
Growing Peanuts in Containers might sound like a whimsical dream, something reserved for sprawling farms, but I’m here to tell you it’s absolutely achievable, even if you only have a balcony or a small patio! Forget the image of endless fields; we’re bringing the peanut patch to your personal space.
For centuries, peanuts have been a staple food in cultures around the globe, from South America where they originated, to Asia and Africa. They’re not just delicious; they’re packed with nutrients and represent a symbol of resourcefulness and sustenance in many communities. But who says you need a vast plot of land to partake in this rich agricultural tradition?
In today’s world, where space is often a premium, and the desire for fresh, homegrown food is on the rise, growing peanuts in containers offers a fantastic solution. Imagine the satisfaction of harvesting your own crunchy, earthy peanuts, knowing exactly where they came from and how they were grown. Plus, it’s a super fun and educational project for kids (and adults!).
This DIY guide will walk you through every step, from choosing the right container and soil to nurturing your peanut plants and harvesting your bounty. So, ditch the store-bought peanuts and get ready to experience the joy of growing your own. Let’s get started!
Growing Peanuts in Containers: A Beginner’s Guide
Okay, so you want to grow peanuts in containers? Awesome! It’s totally doable, even if you don’t have a sprawling garden. I’ve done it myself, and let me tell you, there’s nothing quite like harvesting your own homegrown peanuts. It’s a fun and rewarding experience. This guide will walk you through everything you need to know, from choosing the right container to harvesting your delicious bounty.
Choosing the Right Container and Soil
Before we even think about planting, we need to get our setup right. This is crucial for peanut success!
* Container Size: This is probably the most important factor. Peanuts need room to spread their roots and for the “pegs” (where the peanuts actually form) to bury themselves in the soil. I recommend a container that’s at least 18 inches in diameter and 18 inches deep. Bigger is generally better! A half-barrel planter or a large, sturdy plastic container works perfectly.
* Drainage: Excellent drainage is a must. Peanuts don’t like soggy feet. Make sure your container has plenty of drainage holes. If it doesn’t, drill some!
* Soil: Forget heavy clay soil. Peanuts thrive in loose, well-draining soil. A sandy loam is ideal. I like to use a mix of:
* Potting mix (about 50%)
* Compost (about 25%) – This adds nutrients and improves drainage.
* Sand (about 25%) – This helps with drainage and aeration.
* You can also add a little bit of perlite or vermiculite to further improve drainage.
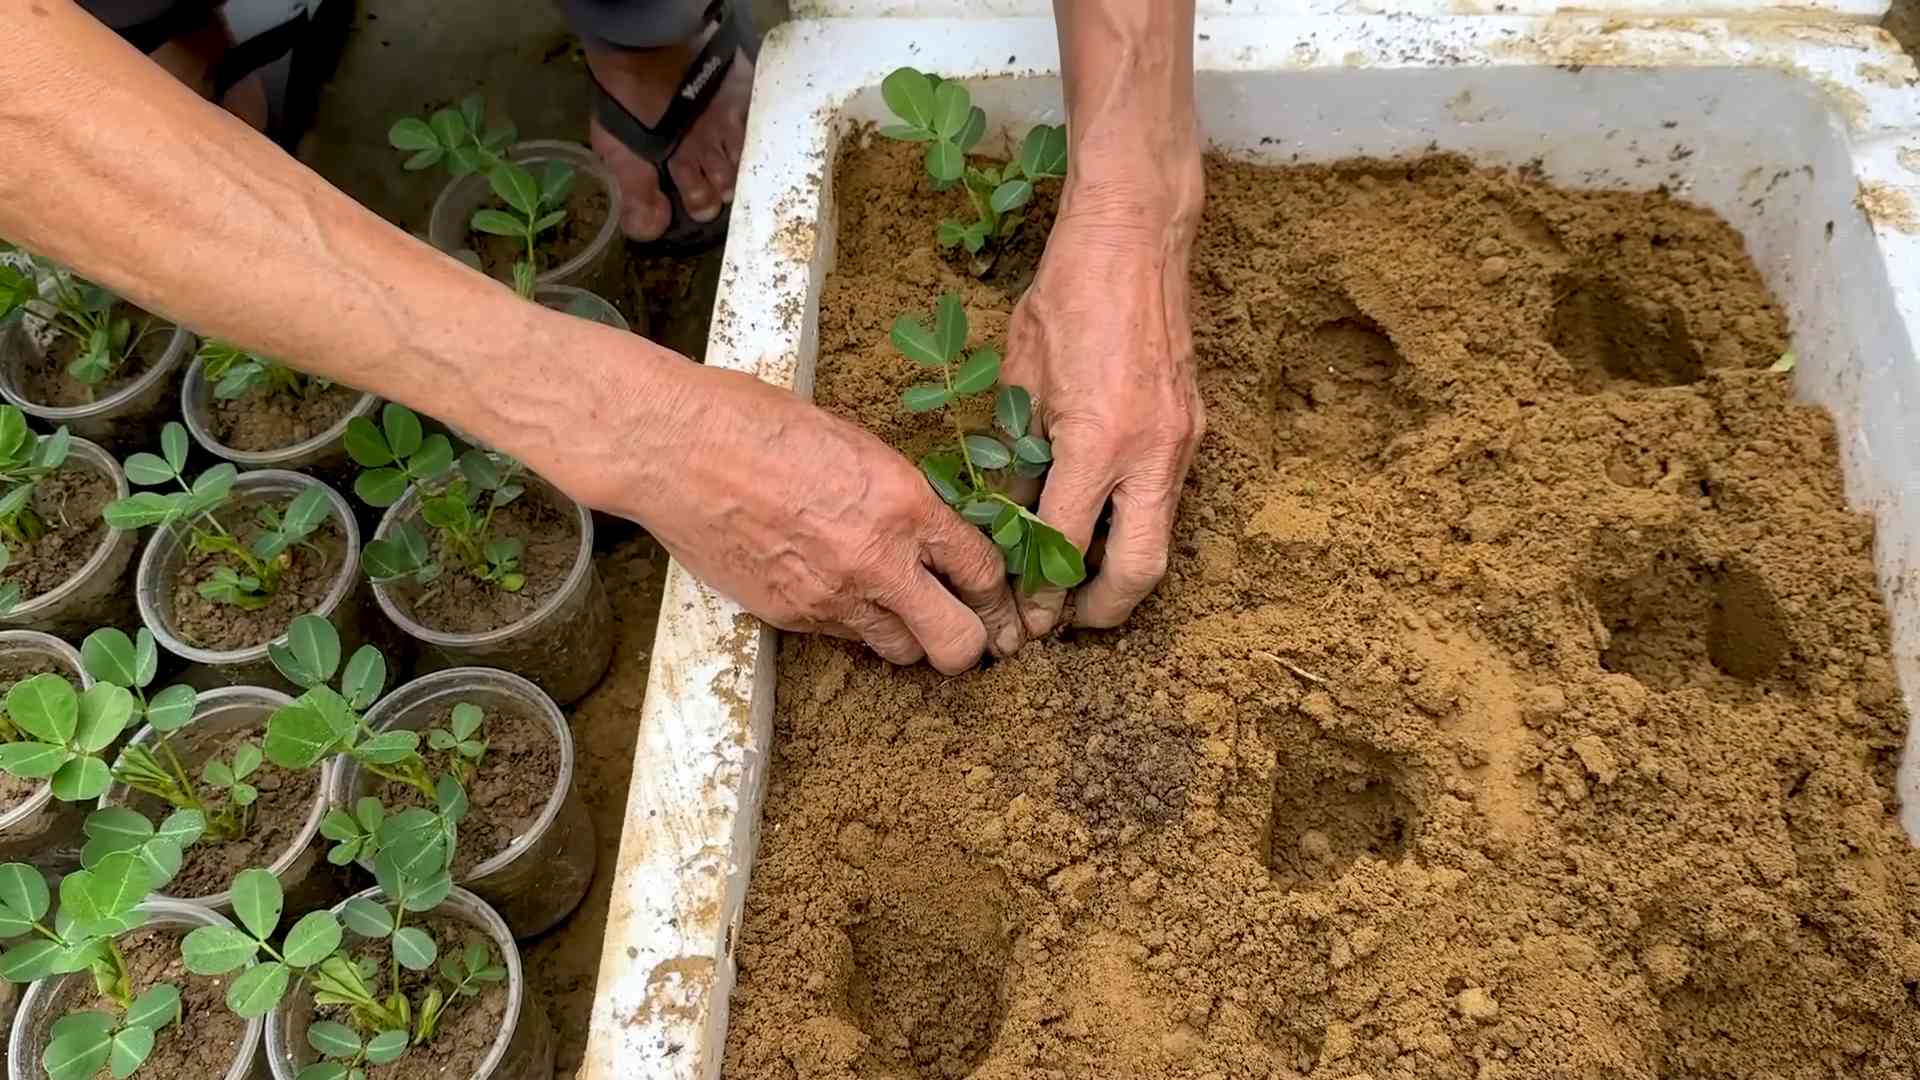
Planting Your Peanut Seeds
Now for the fun part! Getting those seeds in the ground (or, in this case, the container).
* Seed Selection: You can’t just use any old peanuts from the grocery store. You need raw, unroasted peanuts. Look for them at garden centers or online. Virginia peanuts are a popular choice, but Spanish or Valencia varieties also work well.
* Soaking the Seeds (Optional): Some people swear by soaking their peanut seeds in water for a few hours (up to overnight) before planting. This can help speed up germination. I’ve had success both with and without soaking, so it’s really up to you. If you do soak them, don’t let them sit for too long, or they might rot.
* Planting Depth: Plant the peanut seeds about 1-2 inches deep.
* Spacing: If you’re planting multiple seeds in the same container (which you probably will be, to increase your chances of success), space them about 6-8 inches apart.
* Watering: After planting, water the soil thoroughly but gently. You want to make sure the soil is moist but not waterlogged.
Step-by-Step Planting Instructions:
1. Fill your chosen container with your well-draining soil mix, leaving a few inches of space at the top.
2. If you’re soaking your seeds, do that now.
3. Make small holes in the soil, about 1-2 inches deep, spaced 6-8 inches apart.
4. Place one peanut seed in each hole.
5. Cover the seeds with soil and gently pat it down.
6. Water the soil thoroughly.
7. Place the container in a sunny location.
Caring for Your Peanut Plants
This is where the real work begins! Peanuts need consistent care to thrive.
* Sunlight: Peanuts need at least 6-8 hours of direct sunlight per day. Choose a sunny spot for your container.
* Watering: Water regularly, especially during hot, dry weather. The soil should be consistently moist but not soggy. Check the soil moisture by sticking your finger in it. If the top inch or two feels dry, it’s time to water.
* Fertilizing: Peanuts are legumes, which means they can fix nitrogen from the air. However, they still benefit from some fertilization. I like to use a balanced fertilizer (like 10-10-10) every few weeks. You can also use a fertilizer specifically formulated for legumes. Follow the instructions on the fertilizer package. Avoid over-fertilizing, as this can lead to excessive foliage growth at the expense of peanut production.
* Weeding: Keep the container free of weeds. Weeds compete with the peanut plants for nutrients and water.
* Hilling: As the peanut plants grow, you’ll notice small, stem-like structures called “pegs” emerging from the base of the plant. These pegs are what will eventually form the peanuts. It’s important to hill the soil around the base of the plants as the pegs emerge. This helps the pegs penetrate the soil and form peanuts. Just gently mound soil around the base of the plants every few weeks.
* Pest Control: Keep an eye out for pests like aphids, spider mites, and caterpillars. If you spot any pests, you can try spraying them with insecticidal soap or neem oil. I prefer to use organic pest control methods whenever possible.
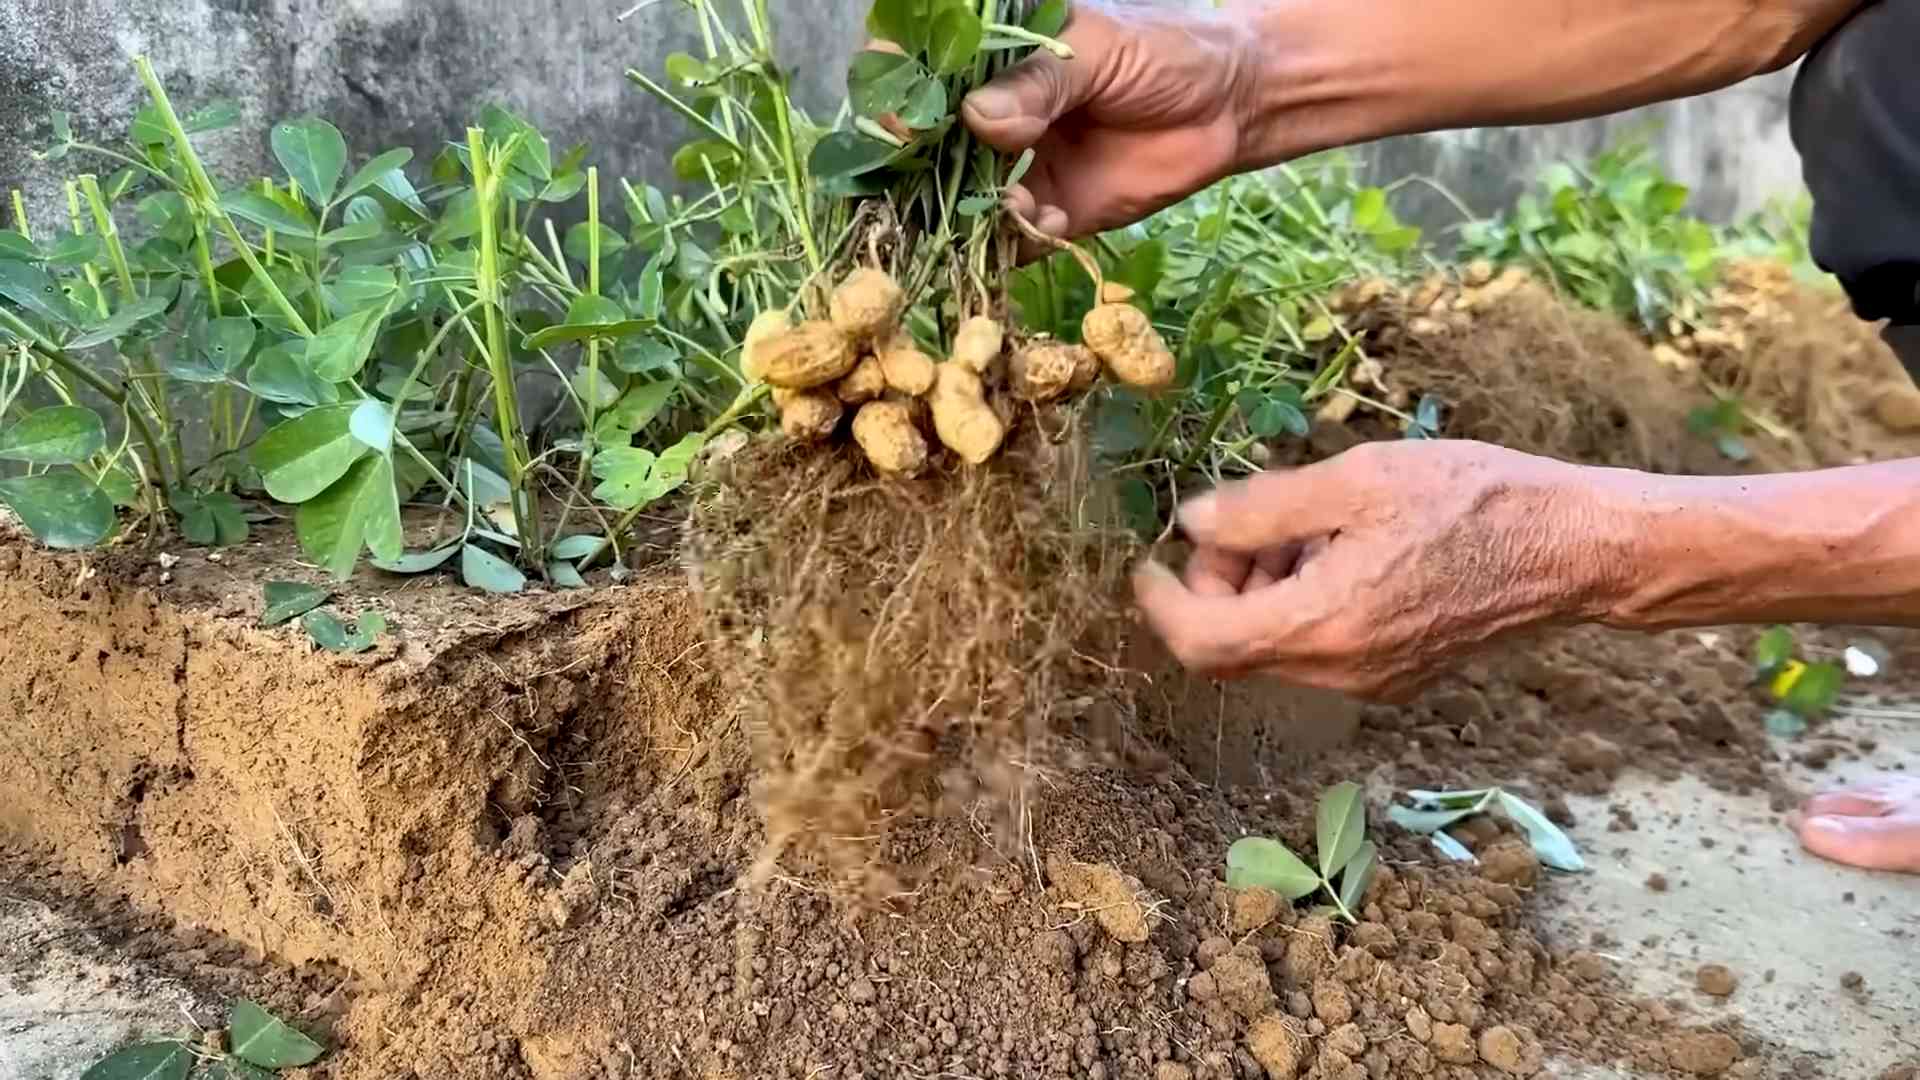
Harvesting Your Peanuts
This is the moment you’ve been waiting for! Harvesting your homegrown peanuts is incredibly satisfying.
* Timing: Peanuts typically take about 120-150 days to mature. The exact timing will depend on the variety you’re growing and the weather conditions. A good indicator that your peanuts are ready to harvest is when the foliage starts to turn yellow and brown.
* Harvesting Method: The easiest way to harvest peanuts from a container is to simply dump the entire container out onto a tarp or other surface. Then, gently pull the peanut plants out of the soil. You should see peanuts clinging to the roots.
* Cleaning: Shake off as much soil as possible from the peanuts. Then, rinse them with water to remove any remaining dirt.
* Curing: Curing is essential for developing the flavor of the peanuts and preventing them from molding. To cure your peanuts, spread them out in a single layer on a screen or wire rack in a well-ventilated area. Allow them to dry for several weeks, or until the shells are completely dry and brittle. Turn them occasionally to ensure even drying.
* Storage: Once the peanuts are cured, you can store them in an airtight container in a cool, dry place. They should keep for several months.
Step-by-Step Harvesting Instructions:
1. Wait until the foliage of your peanut plants starts to turn yellow and brown.
2. Gently dump the contents of your container onto a tarp or other surface.
3. Carefully pull the peanut plants out of the soil.
4. Shake off as much soil as possible from the peanuts.
5. Rinse the peanuts with water to remove any remaining dirt.
6. Spread the peanuts out in a single layer on a screen or wire rack.
7. Allow them to dry in a well-ventilated area for several weeks, turning them occasionally.
8. Store the cured peanuts in an airtight container in a cool, dry place.
Troubleshooting
Even with the best care, you might encounter some problems along the way. Here are a few common issues and how to deal with them:
* Poor Germination: If your peanut seeds don’t germinate, it could be due to several factors:
* Old seeds: Make sure you’re using fresh seeds.
* Cold soil: Peanuts need warm soil to germinate. Wait until the soil temperature is consistently above 65°F (18°C) before planting.
* Overwatering: Soggy soil can cause the seeds to rot. Make sure the soil is well-draining.
* Yellowing Leaves: Yellowing leaves can be a sign of nutrient deficiency. Try fertilizing with a balanced fertilizer. It could also be a sign of overwatering or poor drainage.
* Lack of Peanuts: If your peanut plants are growing well but not producing peanuts, it could be due to:
* Insufficient sunlight: Make sure your plants are getting at least 6-8 hours of direct sunlight per day.
* Poor pollination: While peanuts are self-pollinating, you can help them along by gently shaking the plants occasionally.
* Soil that is too compacted: Make sure your soil is loose and well-draining.
* Pests and Diseases: Keep an eye out for pests and diseases. Treat them promptly with appropriate organic or chemical controls.
Enjoying Your Homegrown Peanuts
Now that you’ve harvested and cured your peanuts, it’s time to enjoy them! You can roast them, boil them, or eat them raw. Here are a few ideas:
* Roasted Peanuts: Spread the peanuts out in a single layer on a baking sheet and roast them in a preheated oven at 350°F (175°C) for 15-
Conclusion
So, there you have it! Growing peanuts in containers is not only possible, but it’s also a surprisingly rewarding experience. Forget the sprawling peanut farms of Georgia; with a little planning and some readily available materials, you can cultivate your own miniature peanut patch right on your balcony, patio, or even indoors with sufficient light.
Why is this DIY trick a must-try? Because it brings the joy of gardening to even the smallest spaces. It’s a fantastic educational project for kids, teaching them about plant life cycles and where their food comes from. Plus, there’s nothing quite like the satisfaction of harvesting your own homegrown peanuts, knowing you nurtured them from seed to snack. The taste of freshly dug, roasted peanuts is simply unparalleled – a flavor you won’t find in any store-bought bag.
But the benefits extend beyond just the delicious harvest. Growing peanuts in containers is also a relatively low-maintenance activity. Once you’ve established your plants, they require minimal watering and fertilization. The container environment also helps to control pests and diseases, making it easier to achieve a successful yield.
Looking for variations? Consider experimenting with different peanut varieties. Valencia peanuts, known for their sweet flavor and multiple kernels per shell, are a popular choice for container growing. Spanish peanuts, with their smaller size and reddish skins, are another excellent option. You can also try adding companion plants to your containers, such as marigolds or basil, to deter pests and attract beneficial insects.
Another variation is to experiment with different container sizes and materials. While a 5-gallon bucket is a good starting point, you might find that a larger container allows for better root development and a more abundant harvest. Terracotta pots, plastic containers, and even repurposed containers like old tires can all be used to grow peanuts, as long as they provide adequate drainage.
Don’t be afraid to get creative with your peanut-growing setup. You can even create a vertical peanut garden using stacked containers or hanging baskets. This is a great way to maximize space and add a unique visual element to your garden.
The key to successful container peanut growing is patience and observation. Pay close attention to your plants’ needs and adjust your watering and fertilization schedule accordingly. Be sure to provide them with plenty of sunlight and protect them from extreme temperatures.
We wholeheartedly encourage you to give this DIY trick a try. It’s a fun, educational, and ultimately delicious way to connect with nature and enjoy the fruits (or rather, nuts) of your labor. Once you’ve harvested your first batch of homegrown peanuts, we’d love to hear about your experience! Share your photos, tips, and stories with us in the comments below. Let’s build a community of container peanut growers and inspire others to discover the joys of this unique gardening adventure. Remember, growing your own food, even something as small as a container of peanuts, is a powerful way to connect with the earth and nourish yourself and your loved ones. So, grab some seeds, a container, and get ready to experience the magic of growing your own peanuts in containers!
FAQ
What kind of soil is best for growing peanuts in containers?
Peanuts thrive in well-draining, sandy loam soil. Avoid heavy clay soils that can become waterlogged. A good mix would be equal parts potting soil, sand, and compost. The compost provides essential nutrients, while the sand ensures proper drainage. You can also purchase a pre-made potting mix specifically formulated for vegetables. Ensure the soil pH is between 6.0 and 6.5 for optimal growth.
How much sunlight do peanuts need when grown in containers?
Peanuts are sun-loving plants and require at least 6-8 hours of direct sunlight per day. Choose a location for your container that receives ample sunlight throughout the day. If you’re growing peanuts indoors, supplement with grow lights to ensure they get enough light. Insufficient sunlight can lead to stunted growth and reduced yields.
How often should I water my peanut plants in containers?
Water your peanut plants regularly, especially during hot and dry weather. The soil should be consistently moist but not waterlogged. Check the soil moisture by sticking your finger about an inch deep. If the soil feels dry, it’s time to water. Avoid overwatering, as this can lead to root rot. During cooler weather, you may need to water less frequently.
When is the best time to plant peanuts in containers?
The best time to plant peanuts is after the last frost, when the soil has warmed up to at least 65°F (18°C). In most regions, this is typically in late spring or early summer. You can start peanut seeds indoors 4-6 weeks before the last frost to get a head start. Transplant the seedlings into containers once the weather has warmed up.
How long does it take for peanuts to mature in containers?
Peanuts typically take 120-150 days to mature, depending on the variety and growing conditions. You’ll know your peanuts are ready to harvest when the foliage starts to turn yellow and the pods feel plump and full. You can also dig up a few plants to check the maturity of the pods.
What are some common pests and diseases that affect peanuts in containers?
Common pests that can affect peanuts include aphids, spider mites, and leafhoppers. These pests can be controlled with insecticidal soap or neem oil. Diseases that can affect peanuts include leaf spot and root rot. Prevent these diseases by providing good air circulation, avoiding overwatering, and using disease-resistant varieties.
Do I need to fertilize my peanut plants in containers?
Yes, peanuts benefit from regular fertilization. Use a balanced fertilizer with a ratio of 10-10-10 or 5-10-10. Apply the fertilizer according to the package instructions. Avoid over-fertilizing, as this can lead to excessive foliage growth and reduced pod production. You can also supplement with compost tea or other organic fertilizers.
How do I harvest peanuts from containers?
To harvest peanuts, carefully dig up the entire plant, being careful not to damage the pods. Gently shake off the excess soil and hang the plants upside down in a warm, dry place for 2-3 weeks to cure. Once the peanuts are cured, you can remove them from the plants and store them in a cool, dry place.
Can I grow peanuts indoors in containers?
Yes, you can grow peanuts indoors in containers, but you’ll need to provide them with adequate light. Place the container near a sunny window or supplement with grow lights. Ensure the plants receive at least 6-8 hours of light per day. You’ll also need to provide good air circulation and maintain a consistent temperature.
What are some tips for increasing peanut yield in containers?
To increase peanut yield in containers, choose a large container (at least 5 gallons), provide plenty of sunlight, water regularly, fertilize properly, and control pests and diseases. You can also try pinching off the tips of the stems to encourage branching and more pod production. Additionally, ensure the soil is well-draining to prevent root rot.

Leave a Comment