
Sage Gardening in Pots: Unlock the Flavor and Beauty Right on Your Patio!
Have you ever dreamed of stepping outside your kitchen and snipping fresh, fragrant sage to elevate your culinary creations? I know I have! For centuries, sage has been revered not only for its distinct flavor but also for its medicinal properties and even its symbolic significance in various cultures. From ancient Romans using it as a preservative to Native Americans employing it in spiritual ceremonies, sage boasts a rich and fascinating history.
But let’s be honest, not everyone has a sprawling garden to dedicate to this wonderful herb. That’s where the magic of container gardening comes in! Sage gardening in pots is the perfect solution for apartment dwellers, balcony enthusiasts, or anyone with limited space who craves the taste and aroma of homegrown herbs.
This DIY guide is your passport to a thriving sage garden, no matter how small your space. I’ll walk you through everything you need to know, from selecting the right pot and soil to providing the perfect amount of sunlight and water. Imagine the satisfaction of harvesting your own fresh sage for stuffing, sauces, teas, and more. Plus, the beautiful silvery-green foliage will add a touch of elegance to your outdoor (or even indoor!) space. Let’s get started and transform your space into a fragrant and flavorful oasis!
Growing Sage in Pots: A DIY Guide for Beginners
Hey there, fellow plant enthusiasts! I’m so excited to share my experience with growing sage in pots. It’s surprisingly easy, even if you don’t have a green thumb (yet!). Sage is a fantastic herb to have on hand – it adds a wonderful earthy flavor to your cooking, and it smells amazing. Plus, it’s a beautiful plant to look at. So, let’s dive into how you can successfully grow sage in pots, right in your own home or garden.
Choosing the Right Sage Variety
First things first, let’s talk about sage varieties. While common sage (Salvia officinalis) is the most popular and readily available, there are actually quite a few different types you can grow. Each has its own unique characteristics and uses.
* **Common Sage (Salvia officinalis):** This is your classic culinary sage. It has grayish-green leaves and a strong, earthy flavor. It’s also known for its medicinal properties.
* **Purple Sage (Salvia officinalis ‘Purpurascens’):** As the name suggests, this variety has beautiful purple-tinged leaves. It’s just as flavorful as common sage and adds a lovely visual element to your garden.
* **Golden Sage (Salvia officinalis ‘Aurea’):** This variety boasts golden-yellow variegated leaves. It’s slightly milder in flavor than common sage and adds a bright pop of color.
* **Tricolor Sage (Salvia officinalis ‘Tricolor’):** This variety has leaves that are a mix of green, white, and pink. It’s a stunning plant and has a similar flavor to common sage.
I personally love growing common sage and purple sage. They’re both relatively easy to find and add a lot of flavor to my dishes.
Materials You’ll Need
Before we get started, let’s gather all the materials you’ll need. This will make the whole process much smoother.
* **Sage Seeds or a Sage Plant:** You can start from seeds or buy a small sage plant from your local nursery. I usually opt for a plant because it’s faster and easier.
* A Pot with Drainage Holes: This is crucial! Sage needs well-draining soil to thrive. Choose a pot that’s at least 12 inches in diameter.
* **Potting Mix:** Use a high-quality potting mix that’s specifically formulated for herbs or vegetables. Avoid using garden soil, as it can be too heavy and doesn’t drain well.
* **Gravel or Pebbles (Optional):** Adding a layer of gravel or pebbles at the bottom of the pot can improve drainage.
* **Watering Can or Hose:** For watering your sage plant.
* **Gardening Gloves (Optional):** To keep your hands clean.
* **Trowel or Small Shovel:** For planting.
* **Fertilizer (Optional):** A balanced, slow-release fertilizer can help your sage plant thrive.
Step-by-Step Planting Guide
Okay, let’s get our hands dirty! Here’s a step-by-step guide to planting sage in a pot:
1. **Prepare the Pot:** If you’re using gravel or pebbles, add a layer to the bottom of the pot. This will help with drainage.
2. **Fill the Pot with Potting Mix:** Fill the pot with potting mix, leaving about an inch or two of space at the top.
3. **Plant the Sage:**
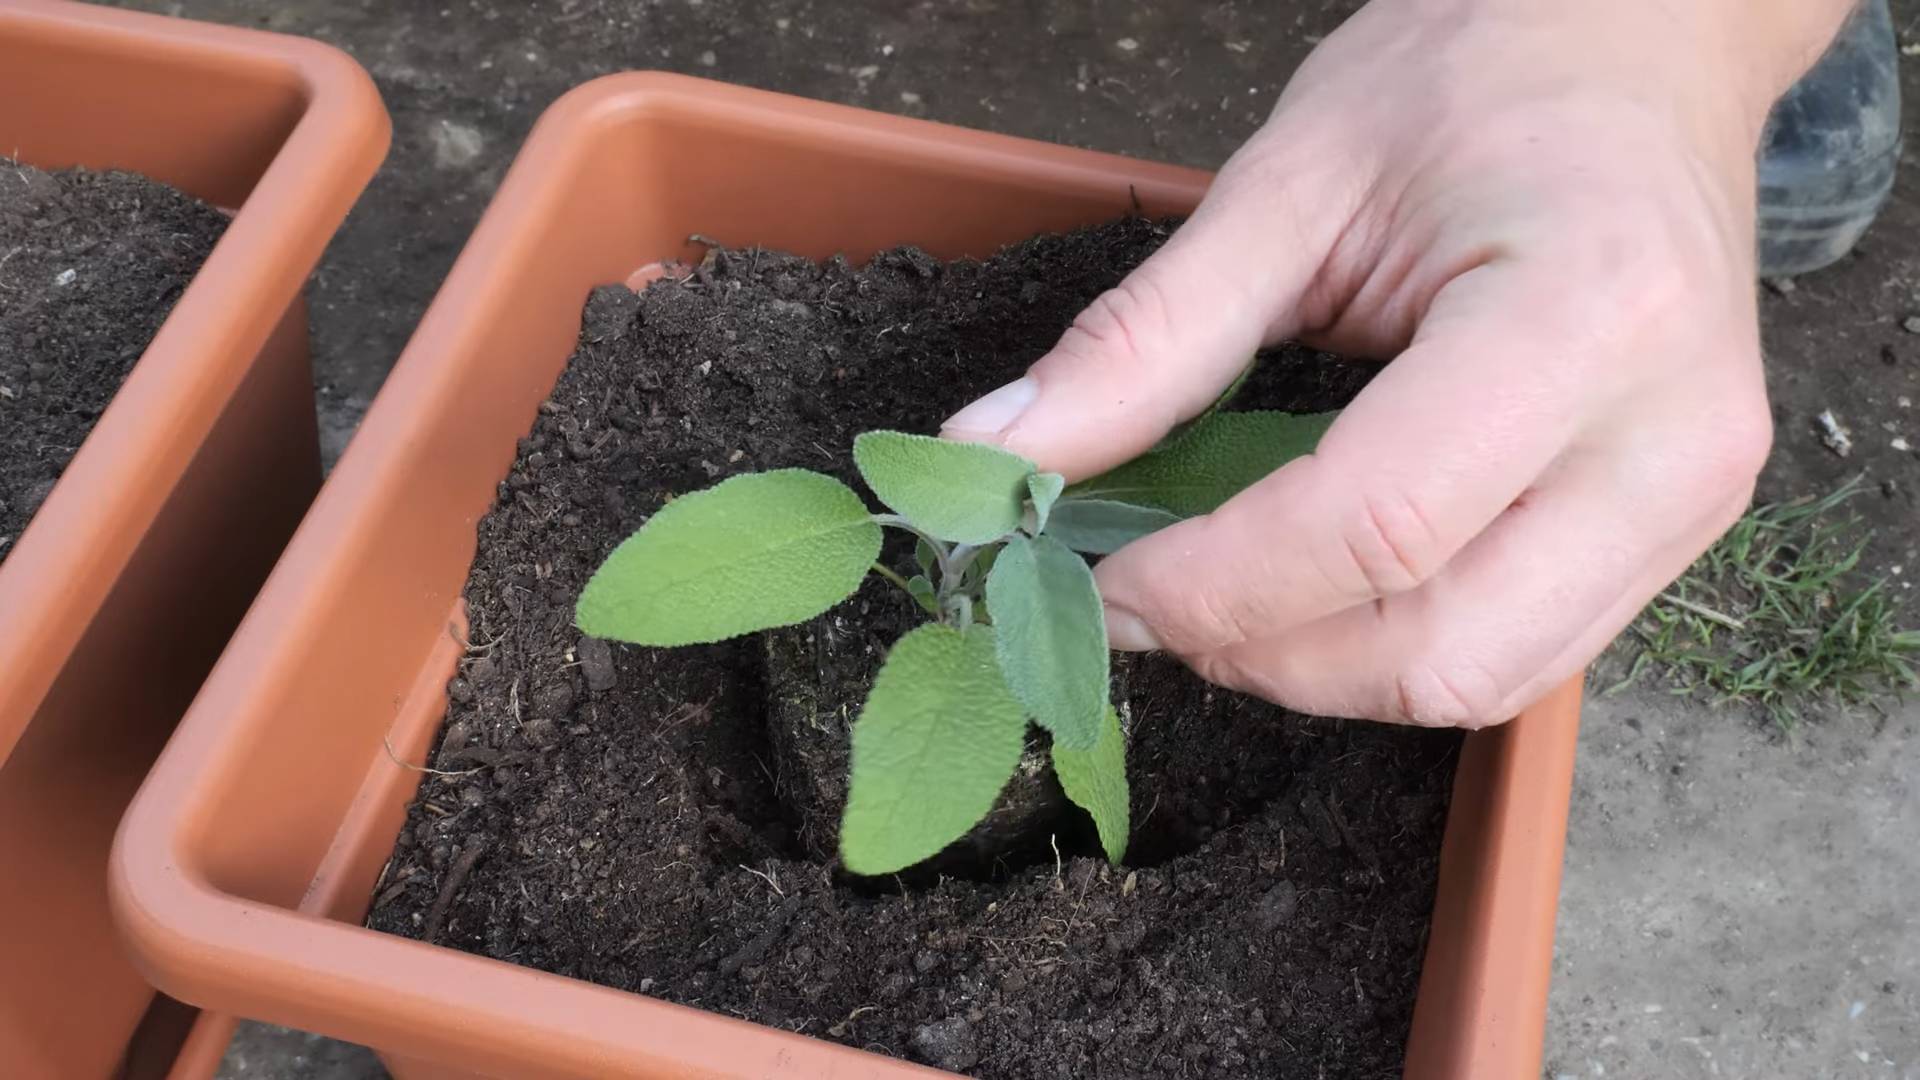
* **From a Plant:** Gently remove the sage plant from its nursery container. Loosen the roots slightly with your fingers. Dig a hole in the potting mix that’s large enough to accommodate the root ball. Place the plant in the hole and backfill with potting mix. Gently press down the soil around the plant.
* **From Seeds:** Sow the seeds about ¼ inch deep in the potting mix. Gently water the soil. Keep the soil moist but not soggy until the seeds germinate, which usually takes about 10-21 days. Once the seedlings emerge, thin them out so that only the strongest plants remain.
4. **Water Thoroughly:** Water the sage plant thoroughly after planting. Make sure the water drains out of the drainage holes.
5. **Place in a Sunny Location:** Sage needs at least 6-8 hours of sunlight per day. Place the pot in a sunny location, such as a windowsill, balcony, or patio.
Caring for Your Sage Plant
Now that your sage is planted, it’s important to provide it with the proper care to ensure it thrives.
* **Watering:** Water your sage plant when the top inch of soil feels dry to the touch. Avoid overwatering, as this can lead to root rot. Sage prefers slightly dry conditions.
* **Fertilizing:** If you choose to fertilize your sage plant, use a balanced, slow-release fertilizer. Apply the fertilizer according to the package instructions. I usually fertilize my sage plants every few months during the growing season.
* **Pruning:** Pruning is essential for keeping your sage plant healthy and productive. Prune your sage plant regularly to remove dead or damaged leaves and to encourage bushier growth. You can also prune your sage plant to harvest leaves for cooking.
* **Overwintering:** Sage is a perennial herb, which means it can live for several years. However, in colder climates, you may need to overwinter your sage plant indoors. Before the first frost, bring your sage plant indoors and place it in a sunny location. Water it sparingly during the winter months.
* **Pest and Disease Control:** Sage is generally resistant to pests and diseases. However, it can occasionally be affected by aphids, spider mites, or powdery mildew. If you notice any signs of pests or diseases, treat your sage plant with an appropriate insecticide or fungicide. I prefer using organic solutions whenever possible.
Harvesting Sage
One of the best parts of growing sage is being able to harvest fresh leaves for cooking!
* **When to Harvest:** You can start harvesting sage leaves as soon as the plant is established, usually a few weeks after planting.
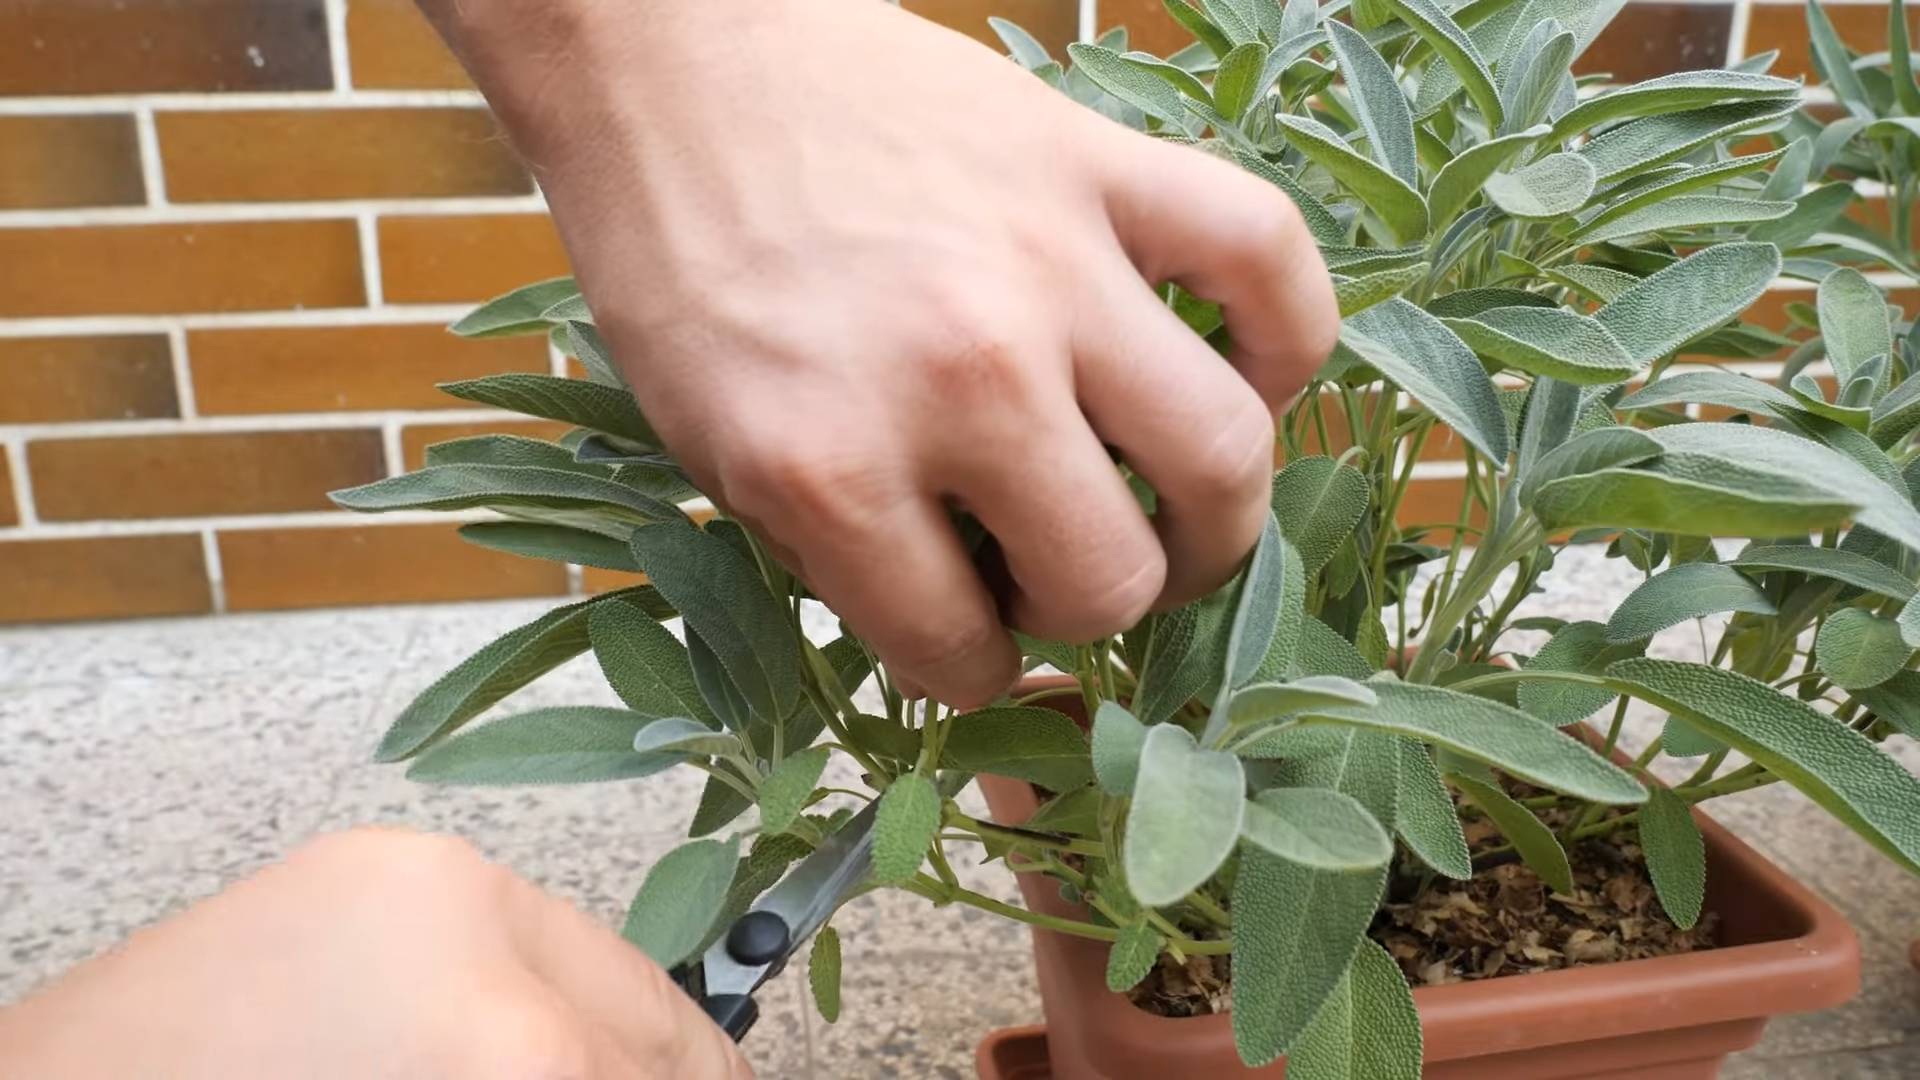
* **How to Harvest:** Use scissors or pruning shears to cut off the leaves. Avoid cutting off more than one-third of the plant at a time.
* **Drying Sage:** If you want to dry your sage leaves for later use, you can hang them upside down in a cool, dry place. Once the leaves are completely dry, store them in an airtight container. You can also dry sage leaves in a dehydrator or oven.
Troubleshooting Common Problems
Even with the best care, you might encounter some problems while growing sage. Here are a few common issues and how to address them:
* **Yellowing Leaves:** This can be caused by overwatering, underwatering, or nutrient deficiencies. Check the soil moisture and adjust your watering accordingly. If the soil is dry, water thoroughly. If the soil is soggy, allow it to dry out before watering again. You can also try fertilizing your sage plant with a balanced fertilizer.
* **Leggy Growth:** This is usually caused by insufficient sunlight. Move your sage plant to a sunnier location. You can also prune your sage plant to encourage bushier growth.
* **Powdery Mildew:** This is a fungal disease that can cause a white, powdery coating on the leaves. Improve air circulation around your sage plant and treat it with a fungicide.
* **Aphids:** These small, sap-sucking insects can cause stunted growth and distorted leaves. Wash the aphids off your sage plant with a strong stream of water or treat it with an insecticidal soap.
Using Your Homegrown Sage
Now for the fun part – using your homegrown sage! Sage is a versatile herb that can be used in a variety of dishes.
* **Cooking:** Sage pairs well with poultry, pork, and vegetables. It’s also a great addition to soups, stews, and sauces. I love using sage in my Thanksgiving stuffing and in brown butter sauce for pasta.
* **Tea:** You can also make sage tea by steeping fresh or dried sage leaves in hot water. Sage tea is said to have medicinal properties and can help with sore throats and digestive issues.
* **Aromatherapy:** The scent of sage is known to be calming and relaxing. You can use sage essential oil in a diffuser or add fresh sage leaves to a bath.
Propagating Sage
Want more sage plants? Propagating sage is surprisingly easy! You can propagate sage from cuttings.
1. **Take a Cutting:** In the spring or summer, take a 4-6 inch cutting from a healthy sage plant. Remove the lower leaves from the cutting.
2. **Root the Cutting:** Place the cutting in a glass of water or plant it in a small pot filled with potting mix. Keep the soil moist but not soggy.
3. **Wait for Roots to Develop:** In a few weeks, the cutting should develop roots.
4. **Plant the New Sage Plant:** Once the roots are well-established, you can plant the new sage plant in a pot or in the garden.
Enjoy Your Homegrown Sage!
Growing sage in pots is a rewarding experience. Not only will you have fresh herbs on
Conclusion
So, there you have it! Cultivating your own sage in pots is not only achievable, but it’s also incredibly rewarding. From the fresh, aromatic leaves ready to enhance your culinary creations to the sheer joy of nurturing a living plant, growing sage in pots offers a multitude of benefits. We’ve walked through the essential steps, from selecting the right pot and soil to providing optimal sunlight and watering.
Why is this DIY trick a must-try? Because it empowers you to have fresh, organic sage readily available, regardless of your garden space. No sprawling acres required! A sunny windowsill, a balcony, or even a small patio can become your personal herb garden. Plus, store-bought sage can sometimes be expensive and lack the vibrant flavor of homegrown. With this method, you control the quality and freshness, ensuring that your dishes are infused with the most potent and delicious sage possible.
Beyond the basic method, there’s room for experimentation and personalization. Consider trying different varieties of sage, such as purple sage for its ornamental value or golden sage for its milder flavor. You can also companion plant your sage with other herbs like rosemary or thyme in larger pots, creating a miniature herb garden ecosystem. Another variation is to use self-watering pots, especially if you tend to forget to water your plants regularly. These pots help maintain consistent moisture levels, reducing the risk of underwatering or overwatering.
Don’t be afraid to experiment with different soil mixes to find what works best for your specific environment. Some gardeners prefer a slightly more acidic soil, while others find that a neutral pH is ideal. The key is to observe your plant and adjust your care accordingly.
We wholeheartedly encourage you to give this DIY trick a try. It’s a simple, cost-effective, and incredibly satisfying way to bring the flavors and aromas of fresh sage into your home. Imagine the possibilities: sage butter for pasta, sage-infused olive oil, or even a soothing sage tea. The culinary applications are endless!
But the benefits extend beyond the kitchen. Sage is also known for its medicinal properties, and having a fresh supply readily available allows you to explore its potential health benefits. From soothing sore throats to aiding digestion, sage has been used for centuries as a natural remedy.
Growing sage in pots is more than just a gardening project; it’s an investment in your well-being and culinary creativity.
So, grab a pot, some soil, and a sage plant, and get started today! We’re confident that you’ll be amazed at how easy and rewarding it is to grow your own sage. And most importantly, we want to hear about your experience! Share your tips, successes, and even your challenges in the comments below. Let’s create a community of sage-loving gardeners and learn from each other. What are you waiting for? Start your sage gardening journey today! Let us know how your **sage gardening in pots** goes!
Frequently Asked Questions (FAQ)
What kind of pot is best for growing sage?
The ideal pot for growing sage should be at least 12 inches in diameter to allow for adequate root growth. Terracotta pots are a good choice because they allow for good drainage and airflow, which helps prevent root rot. However, plastic pots are also suitable, especially if you live in a hot climate, as they retain moisture better. Regardless of the material, ensure the pot has drainage holes to prevent waterlogging.
What type of soil should I use for sage?
Sage thrives in well-draining soil that is slightly sandy. A good potting mix for sage would be a blend of potting soil, perlite, and compost. The perlite improves drainage, while the compost provides essential nutrients. Avoid using heavy clay soil, as it can retain too much moisture and lead to root rot. You can also amend your potting mix with a small amount of lime to raise the pH slightly, as sage prefers a slightly alkaline soil.
How much sunlight does sage need?
Sage requires at least 6-8 hours of direct sunlight per day to thrive. If you’re growing sage indoors, place it near a sunny window that receives plenty of light. If you don’t have enough natural light, you can supplement with a grow light. Insufficient sunlight can lead to leggy growth and reduced flavor in the leaves.
How often should I water my sage plant?
Water your sage plant when the top inch of soil feels dry to the touch. Avoid overwatering, as this can lead to root rot. During the growing season (spring and summer), you may need to water more frequently than during the dormant season (fall and winter). When watering, water deeply until water drains out of the drainage holes.
How do I fertilize my sage plant?
Sage doesn’t require heavy fertilization. You can fertilize it once or twice during the growing season with a balanced liquid fertilizer diluted to half strength. Avoid over-fertilizing, as this can lead to excessive foliage growth at the expense of flavor. Alternatively, you can amend the soil with compost or aged manure to provide slow-release nutrients.
How do I prune my sage plant?
Pruning is essential for maintaining the shape and health of your sage plant. Prune regularly to remove dead or damaged leaves and to encourage bushier growth. You can also prune to harvest leaves for culinary use. In the spring, you can prune more heavily to remove any woody growth and to rejuvenate the plant. Avoid pruning too late in the fall, as this can make the plant more susceptible to winter damage.
Can I grow sage indoors?
Yes, you can successfully grow sage indoors, provided you meet its basic needs. Ensure that your sage plant receives at least 6-8 hours of direct sunlight per day, or supplement with a grow light. Use a well-draining potting mix and water when the top inch of soil feels dry. Also, ensure good air circulation to prevent fungal diseases.
How do I harvest sage leaves?
You can harvest sage leaves at any time during the growing season. Simply snip off the leaves with scissors or pruning shears. For the best flavor, harvest leaves in the morning after the dew has dried. Avoid harvesting more than one-third of the plant at a time, as this can stress the plant.
What are some common problems with growing sage?
Some common problems with growing sage include root rot, powdery mildew, and spider mites. Root rot is caused by overwatering, so ensure that your sage plant is planted in well-draining soil and that you don’t overwater it. Powdery mildew is a fungal disease that can occur in humid conditions. To prevent powdery mildew, ensure good air circulation and avoid overhead watering. Spider mites are tiny pests that can suck the sap from sage leaves. To control spider mites, you can spray your plant with insecticidal soap or neem oil.
Can I propagate sage from cuttings?
Yes, sage can be easily propagated from cuttings. Take a 4-6 inch cutting from a healthy stem, remove the lower leaves, and dip the cut end in rooting hormone. Plant the cutting in a pot filled with well-draining potting mix and keep it moist. In a few weeks, the cutting should develop roots. Once the roots are established, you can transplant the cutting into a larger pot or into the garden.
Leave a Comment