
Grow Cauliflower Backyard: Imagine harvesting your own creamy, delicious cauliflower right from your backyard! It’s easier than you think, and this guide is packed with DIY tricks and hacks to help you succeed, even if you’re a beginner gardener. For centuries, cauliflower has been a staple in diets around the world, prized for its versatility and nutritional benefits. From ancient Roman banquets to modern-day veggie platters, this humble vegetable has a rich history.
But let’s be honest, store-bought cauliflower can sometimes be disappointing – bland, expensive, and lacking that fresh, vibrant flavor. That’s where this DIY guide comes in! I’m going to share my favorite tips and tricks to help you grow cauliflower backyard like a pro. We’ll cover everything from choosing the right varieties to protecting your plants from pests and diseases.
Why do you need these DIY tricks? Because growing cauliflower can be a bit tricky! It requires specific conditions and a little know-how to get those perfect, tightly packed heads. But with the right information and a little effort, you can enjoy a bountiful harvest of fresh, flavorful cauliflower all season long. So, grab your gardening gloves, and let’s get started!
Growing Cauliflower in Your Backyard: A Comprehensive DIY Guide
Hey there, fellow gardening enthusiasts! I’m so excited to share my tried-and-true method for growing beautiful, delicious cauliflower right in your own backyard. It might seem intimidating at first, but trust me, with a little patience and these simple steps, you’ll be harvesting your own homegrown cauliflower in no time. Let’s get started!
Choosing the Right Cauliflower Variety
Before we even think about planting, it’s crucial to pick the right cauliflower variety for your climate and growing season. Different varieties mature at different rates and have varying levels of heat tolerance.
* Consider your climate: If you live in a warmer climate, opt for heat-tolerant varieties like ‘Snow Crown’ or ‘Cheddar’. For cooler climates, ‘Snowball Y Improved’ or ‘Early White Vienna’ are excellent choices.
* Think about maturity time: Cauliflower varieties range from early-maturing (around 50-60 days) to late-maturing (over 80 days). Choose a variety that fits within your growing season.
* Explore different colors: While white cauliflower is the most common, you can also find purple, orange, and green varieties. These add a fun splash of color to your garden and offer slightly different flavor profiles. ‘Graffiti’ (purple) and ‘Cheddar’ (orange) are popular choices.
Preparing the Soil
Cauliflower is a heavy feeder, meaning it needs nutrient-rich soil to thrive. Proper soil preparation is key to a successful harvest.
* Soil Testing: Before you do anything, test your soil’s pH. Cauliflower prefers a slightly acidic to neutral pH of 6.0 to 7.0. You can purchase a soil testing kit at most garden centers.
* Amending the Soil: Based on your soil test results, amend the soil accordingly.
* For acidic soil (pH below 6.0): Add lime to raise the pH.
* For alkaline soil (pH above 7.0): Add sulfur to lower the pH.
* Adding Organic Matter: Incorporate plenty of organic matter, such as compost, well-rotted manure, or leaf mold, into the soil. This will improve drainage, aeration, and nutrient content. I usually add a 2-3 inch layer of compost and work it into the top 6-8 inches of soil.
* Fertilizing: Apply a balanced fertilizer, such as 10-10-10, according to the package instructions. This will provide the necessary nutrients for healthy growth.
Starting Cauliflower Seeds (Optional)
While you can purchase cauliflower transplants from a nursery, starting your own seeds gives you more control over the process and allows you to choose from a wider variety of options.
* Timing: Start seeds indoors 4-6 weeks before the last expected frost in your area.
* Materials: You’ll need seed starting trays or pots, seed starting mix, and a grow light.
* Sowing the Seeds: Fill the trays or pots with seed starting mix and sow the seeds about 1/4 inch deep. Gently water the soil and keep it moist but not soggy.
* Providing Light and Warmth: Place the trays or pots under a grow light or in a sunny window. Maintain a temperature of 65-75°F (18-24°C).
* Hardening Off: Once the seedlings have developed a few sets of true leaves, gradually acclimate them to outdoor conditions by exposing them to increasing amounts of sunlight and fresh air over a period of 1-2 weeks. This process is called “hardening off.”
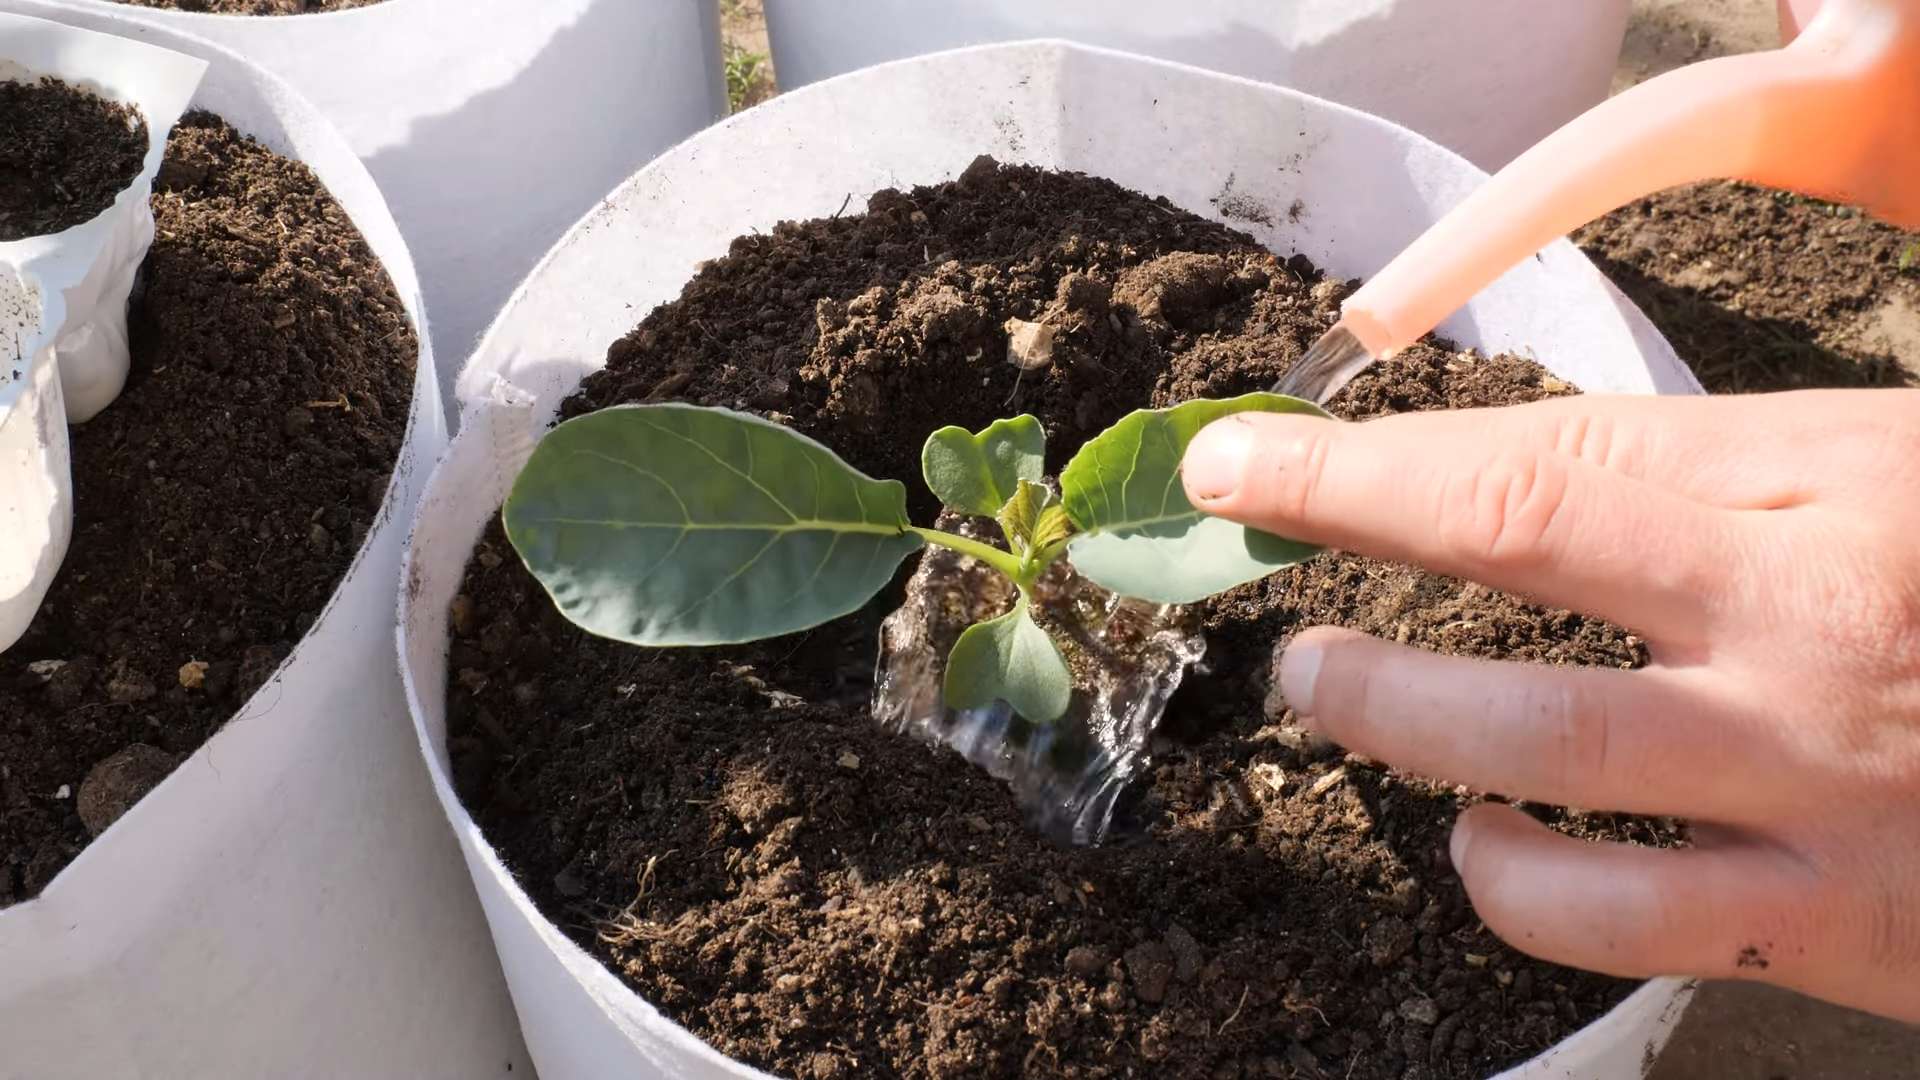
Transplanting Cauliflower Seedlings
Whether you started your own seeds or purchased transplants, transplanting them into the garden is a crucial step.
* Timing: Transplant seedlings outdoors 2-3 weeks after the last expected frost, when the soil has warmed up to at least 60°F (15°C).
* Spacing: Space the plants 18-24 inches apart in rows that are 24-36 inches apart. This will give them enough room to grow and mature.
* Planting Depth: Dig a hole that is slightly larger than the root ball of the seedling. Gently remove the seedling from its container and place it in the hole. Make sure the top of the root ball is level with the surrounding soil.
* Watering: Water the seedlings thoroughly after transplanting.
* Mulching: Apply a layer of mulch, such as straw or wood chips, around the plants to help retain moisture, suppress weeds, and regulate soil temperature.
Caring for Your Cauliflower Plants
Once your cauliflower plants are in the ground, it’s important to provide them with the care they need to thrive.
* Watering: Cauliflower needs consistent moisture, especially during head formation. Water deeply and regularly, aiming for about 1-2 inches of water per week. Avoid overhead watering, as this can lead to fungal diseases.
* Fertilizing: Side-dress the plants with a nitrogen-rich fertilizer, such as fish emulsion or blood meal, every 2-3 weeks. This will promote healthy leaf growth and head development.
* Weeding: Keep the area around the plants free of weeds, as they can compete for nutrients and water. Hand-pull weeds or use a hoe to cultivate the soil.
* Pest Control: Cauliflower is susceptible to several pests, including cabbage worms, aphids, and flea beetles.
* Cabbage Worms: These green caterpillars can devour the leaves of your cauliflower plants. Handpick them off the plants or use Bacillus thuringiensis (Bt), a natural insecticide.
* Aphids: These small, sap-sucking insects can weaken the plants and transmit diseases. Spray them with a strong stream of water or use insecticidal soap.
* Flea Beetles: These tiny beetles can create small holes in the leaves. Cover the plants with row covers to prevent them from reaching the plants.
* Disease Prevention: Cauliflower can also be affected by several diseases, such as black rot and clubroot.
* Black Rot: This bacterial disease can cause yellowing and wilting of the leaves. Plant disease-resistant varieties and practice crop rotation.
* Clubroot: This fungal disease can cause swollen and distorted roots. Amend the soil with lime to raise the pH and plant disease-resistant varieties.
Blanching Cauliflower Heads
Blanching is the process of covering the developing cauliflower head to prevent it from turning yellow or brown. This results in a whiter, more tender head.
* Timing: When the head is about 2-3 inches in diameter, it’s time to blanch it.
* Method: Gently pull the large outer leaves over the head and secure them with twine, rubber bands, or clothespins. Be careful not to damage the head.
* Monitoring: Check the head regularly to make sure it’s not rotting or becoming infested with pests.
* Duration: Blanching typically takes 4-7 days, depending on the variety and weather conditions.
Harvesting Cauliflower
Harvesting cauliflower at the right time is crucial for optimal flavor and texture.
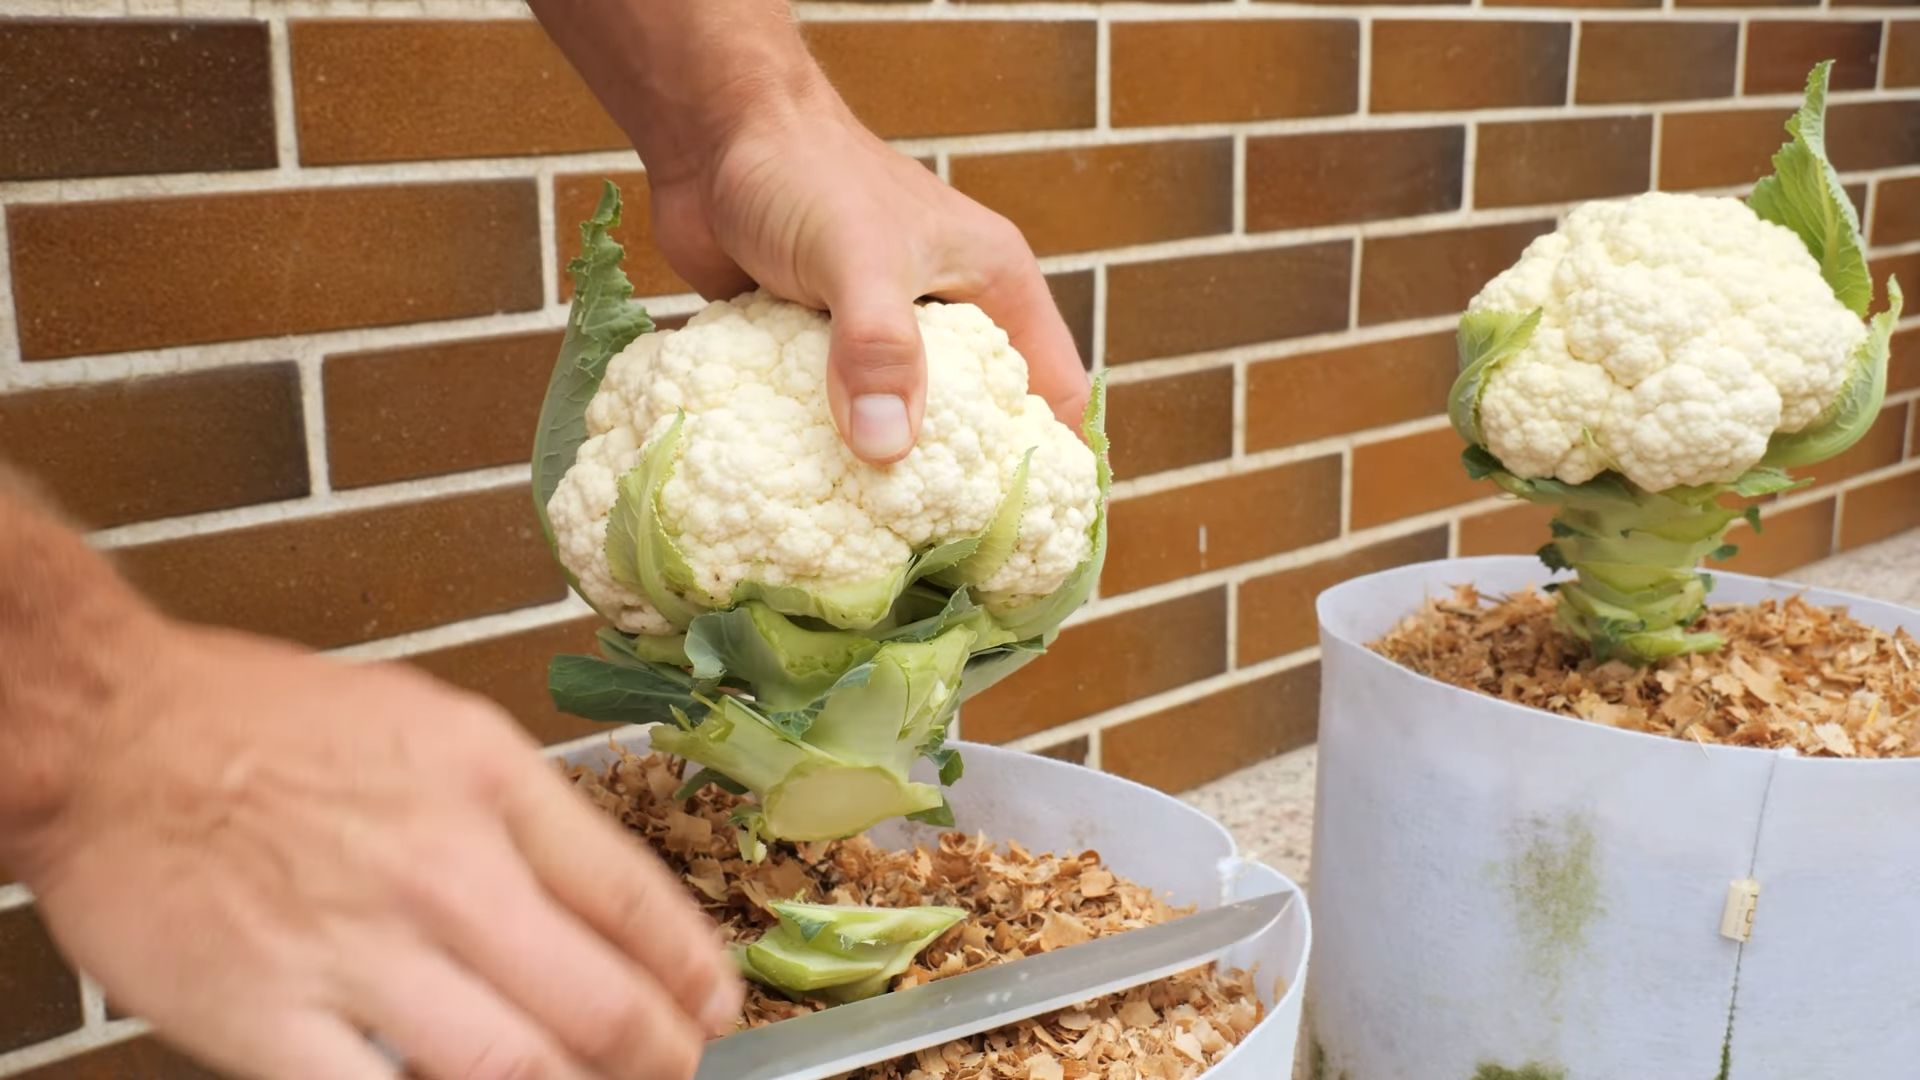
* Timing: Harvest the head when it is firm, compact, and about 6-8 inches in diameter. The florets should be tightly closed and not starting to separate.
* Method: Use a sharp knife to cut the head from the plant, leaving a few inches of stem attached.
* Storage: Store the harvested cauliflower in the refrigerator for up to a week.
Troubleshooting Common Problems
Even with the best care, you may encounter some problems while growing cauliflower. Here are some common issues and how to address them:
* Buttoning: This occurs when the plant forms small, premature heads. It can be caused by stress, such as lack of water or nutrients. Ensure consistent watering and fertilization.
* Ricey Heads: This is when the florets become loose and grainy. It can be caused by hot weather or over-maturity. Harvest the head before it becomes too mature.
* Yellowing Heads: This can be caused by lack of blanching or exposure to sunlight. Blanch the head as soon as it starts to form.
* Pest Infestations: Regularly inspect your plants for pests and take action as soon as you notice them.
* Disease Problems: Plant disease-resistant varieties and practice good sanitation to prevent disease problems.
Enjoying Your Homegrown Cauliflower
Congratulations! You’ve successfully grown your own cauliflower. Now it’s time to enjoy the fruits (or rather, vegetables) of your labor.
* Raw: Cauliflower can be eaten raw in salads or as a snack with dip.
* Steamed: Steaming is a healthy way to cook cauliflower. It retains its nutrients and delicate flavor.
*
Conclusion
So, there you have it! Growing cauliflower in your backyard isn’t just a gardening project; it’s a rewarding journey that culminates in crisp, delicious, and homegrown goodness. We’ve demystified the process, broken down the steps, and armed you with the knowledge to cultivate your own thriving cauliflower patch. Why settle for store-bought when you can experience the unparalleled flavor and satisfaction of harvesting your own?
This DIY trick, this journey from seed to table, is a must-try for several compelling reasons. First and foremost, you gain complete control over the growing process. No more wondering about pesticides or questionable farming practices. You know exactly what goes into your cauliflower, ensuring a healthy and wholesome addition to your meals. Secondly, the taste difference is undeniable. Freshly harvested cauliflower boasts a sweetness and vibrancy that simply can’t be matched by produce that’s traveled miles and sat on shelves. Finally, and perhaps most importantly, growing your own cauliflower is incredibly empowering. It connects you to the earth, fosters a sense of accomplishment, and provides a sustainable source of food for you and your family.
But the fun doesn’t stop there! Feel free to experiment with different cauliflower varieties. Purple cauliflower adds a splash of color to your plate, while Romanesco cauliflower offers a unique and visually stunning twist. You can also try companion planting to deter pests and improve soil health. Marigolds, for example, are known to repel many common garden pests. Consider interplanting your cauliflower with herbs like rosemary or thyme to enhance its flavor and create a more diverse and resilient garden ecosystem.
Don’t be afraid to get your hands dirty and embrace the learning process. Gardening is all about experimentation and adaptation. If you encounter challenges along the way, don’t get discouraged. Research, troubleshoot, and learn from your mistakes. Every season is a new opportunity to refine your techniques and improve your yields.
We wholeheartedly encourage you to give this DIY trick a try. Transform your backyard into a cauliflower haven and experience the joy of harvesting your own fresh, flavorful produce. And once you’ve reaped the rewards of your labor, we’d love to hear about your experience! Share your tips, tricks, and triumphs in the comments below. Let’s build a community of backyard cauliflower growers and inspire others to embark on this rewarding journey. Show us your cauliflower creations! Post pictures of your harvest, your favorite cauliflower recipes, and any innovative techniques you’ve discovered. Together, we can cultivate a greener, healthier, and more delicious world, one cauliflower at a time. Growing cauliflower is easier than you think, and the rewards are well worth the effort.
Frequently Asked Questions (FAQ)
Q: What is the best time of year to plant cauliflower?
A: The best time to plant cauliflower depends on your climate. Cauliflower thrives in cool weather, so it’s typically planted in the spring or fall. For a spring crop, start seeds indoors 6-8 weeks before the last expected frost. Transplant seedlings outdoors 2-3 weeks before the last frost. For a fall crop, start seeds indoors in mid-summer and transplant seedlings outdoors in late summer or early fall. In warmer climates, you may be able to grow cauliflower throughout the winter. Pay attention to your local weather patterns and adjust your planting schedule accordingly.
Q: How much sunlight does cauliflower need?
A: Cauliflower requires at least 6 hours of direct sunlight per day to thrive. Choose a planting location that receives ample sunlight throughout the day. If you live in a particularly hot climate, some afternoon shade may be beneficial to prevent the cauliflower from bolting (going to seed prematurely).
Q: What type of soil is best for growing cauliflower?
A: Cauliflower prefers well-drained, fertile soil that is rich in organic matter. The ideal soil pH is between 6.0 and 7.0. Before planting, amend your soil with compost or other organic matter to improve its fertility and drainage. You can also add a slow-release fertilizer to provide essential nutrients to your cauliflower plants.
Q: How often should I water my cauliflower plants?
A: Cauliflower needs consistent moisture to thrive. Water your plants deeply and regularly, especially during dry periods. Aim to keep the soil consistently moist but not waterlogged. A good rule of thumb is to water when the top inch of soil feels dry to the touch. Mulching around your plants can help to retain moisture and suppress weeds.
Q: What are some common pests and diseases that affect cauliflower?
A: Cauliflower is susceptible to a variety of pests and diseases, including cabbage worms, aphids, flea beetles, clubroot, and black rot. To prevent pest and disease problems, practice good garden hygiene, such as removing plant debris and rotating crops. You can also use organic pest control methods, such as insecticidal soap or neem oil, to control pests. If you suspect your plants have a disease, consult a local gardening expert or extension service for advice on treatment options.
Q: How do I know when my cauliflower is ready to harvest?
A: Cauliflower is typically ready to harvest when the head is firm, compact, and about 6-8 inches in diameter. The exact timing will depend on the variety of cauliflower you are growing and the growing conditions. Check the seed packet or plant tag for specific information on harvest time. To harvest, cut the head from the plant with a sharp knife, leaving a few leaves attached to protect the head.
Q: Can I grow cauliflower in containers?
A: Yes, you can grow cauliflower in containers, but you’ll need to choose a large container (at least 12 inches in diameter) and use a high-quality potting mix. Be sure to provide your container-grown cauliflower with plenty of sunlight, water, and fertilizer. Container-grown cauliflower may require more frequent watering and fertilization than cauliflower grown in the ground.
Q: What are some good companion plants for cauliflower?
A: Companion planting can help to deter pests, improve soil health, and enhance the flavor of your cauliflower. Some good companion plants for cauliflower include:
* Marigolds: Repel many common garden pests.
* Rosemary and Thyme: Enhance the flavor of cauliflower and deter pests.
* Nasturtiums: Attract aphids away from cauliflower.
* Beans and Peas: Fix nitrogen in the soil, which benefits cauliflower.
* Garlic and Onions: Repel pests and improve soil health.
Q: My cauliflower head is starting to separate. What should I do?
A: If your cauliflower head is starting to separate, it may be due to stress from heat, drought, or nutrient deficiencies. Try to provide your plants with consistent moisture and fertilizer. You can also try shading the head with leaves or a cloth to protect it from the sun. If the head is already starting to separate, you can still harvest it, but it may not be as firm or compact as a fully mature head.

Leave a Comment