
Growing sweet potatoes might seem like a challenge reserved for seasoned farmers, but I’m here to tell you it’s totally achievable – and incredibly rewarding – right in your own backyard! Imagine harvesting your own vibrant, nutrient-packed sweet potatoes, ready to roast, mash, or bake into delicious pies. Forget those bland, store-bought spuds; homegrown sweet potatoes offer an unparalleled sweetness and freshness that will elevate your meals.
The history of sweet potatoes is fascinating, dating back thousands of years in Central and South America. They’ve been a staple food in many cultures, prized for their versatility and nutritional value. Today, with a growing interest in sustainable living and knowing exactly where our food comes from, growing sweet potatoes at home is experiencing a major resurgence.
But why should *you* try it? Well, for starters, it’s a fantastic way to reduce your grocery bill and minimize your environmental impact. Plus, it’s a deeply satisfying experience to nurture a plant from slip to harvest. Many people are intimidated by the process, thinking it requires acres of land or specialized equipment. That’s where this DIY guide comes in! I’m going to share simple, effective tricks and hacks that will empower you to grow a bountiful sweet potato crop, even if you’re a complete beginner with limited space. Get ready to dig in – literally!
DIY: Growing Sweet Potatoes – A Beginner’s Guide
Okay, so you want to grow sweet potatoes? Awesome! They’re delicious, nutritious, and surprisingly rewarding to cultivate. I’m going to walk you through everything you need to know to get started, from preparing your slips to harvesting your bounty. Let’s get our hands dirty!
What You’ll Need
Before we dive in, let’s gather our supplies. This will make the whole process smoother and less stressful.
* Sweet Potato Slips: These are baby sweet potato plants. You can buy them online, from a local nursery, or even grow your own (more on that later!).
* Well-Draining Soil: Sweet potatoes thrive in loose, sandy loam. If your soil is heavy clay, you’ll need to amend it.
* Compost or Aged Manure: This will enrich the soil and provide essential nutrients.
* Raised Beds or Garden Space: Sweet potatoes need plenty of room to spread out.
* Gardening Gloves: Protect your hands!
* Trowel or Shovel: For planting.
* Watering Can or Hose: To keep your plants hydrated.
* Mulch (Optional): Straw, hay, or wood chips to help retain moisture and suppress weeds.
* Fertilizer (Optional): A balanced fertilizer can give your plants a boost. Look for one with a lower nitrogen content.
Growing Your Own Sweet Potato Slips (Optional but Recommended!)
If you’re feeling adventurous, you can grow your own slips from a sweet potato you bought at the grocery store (organic is best to avoid any growth inhibitors). It’s a fun project and saves you money!
Here’s how:
1. Choose a Healthy Sweet Potato: Select a firm, unblemished sweet potato.
2. Prepare the Potato: There are two main methods:
* Water Method: Suspend the sweet potato in a jar or glass of water, with the bottom half submerged. You can use toothpicks to hold it in place.
* Soil Method: Bury the sweet potato horizontally in a container filled with moist potting mix, leaving the top exposed.
3. Provide Warmth and Light: Place the jar or container in a warm, sunny location.
4. Wait Patiently: In a few weeks, you should see sprouts (slips) emerging from the potato. Keep the water level consistent or the soil moist.
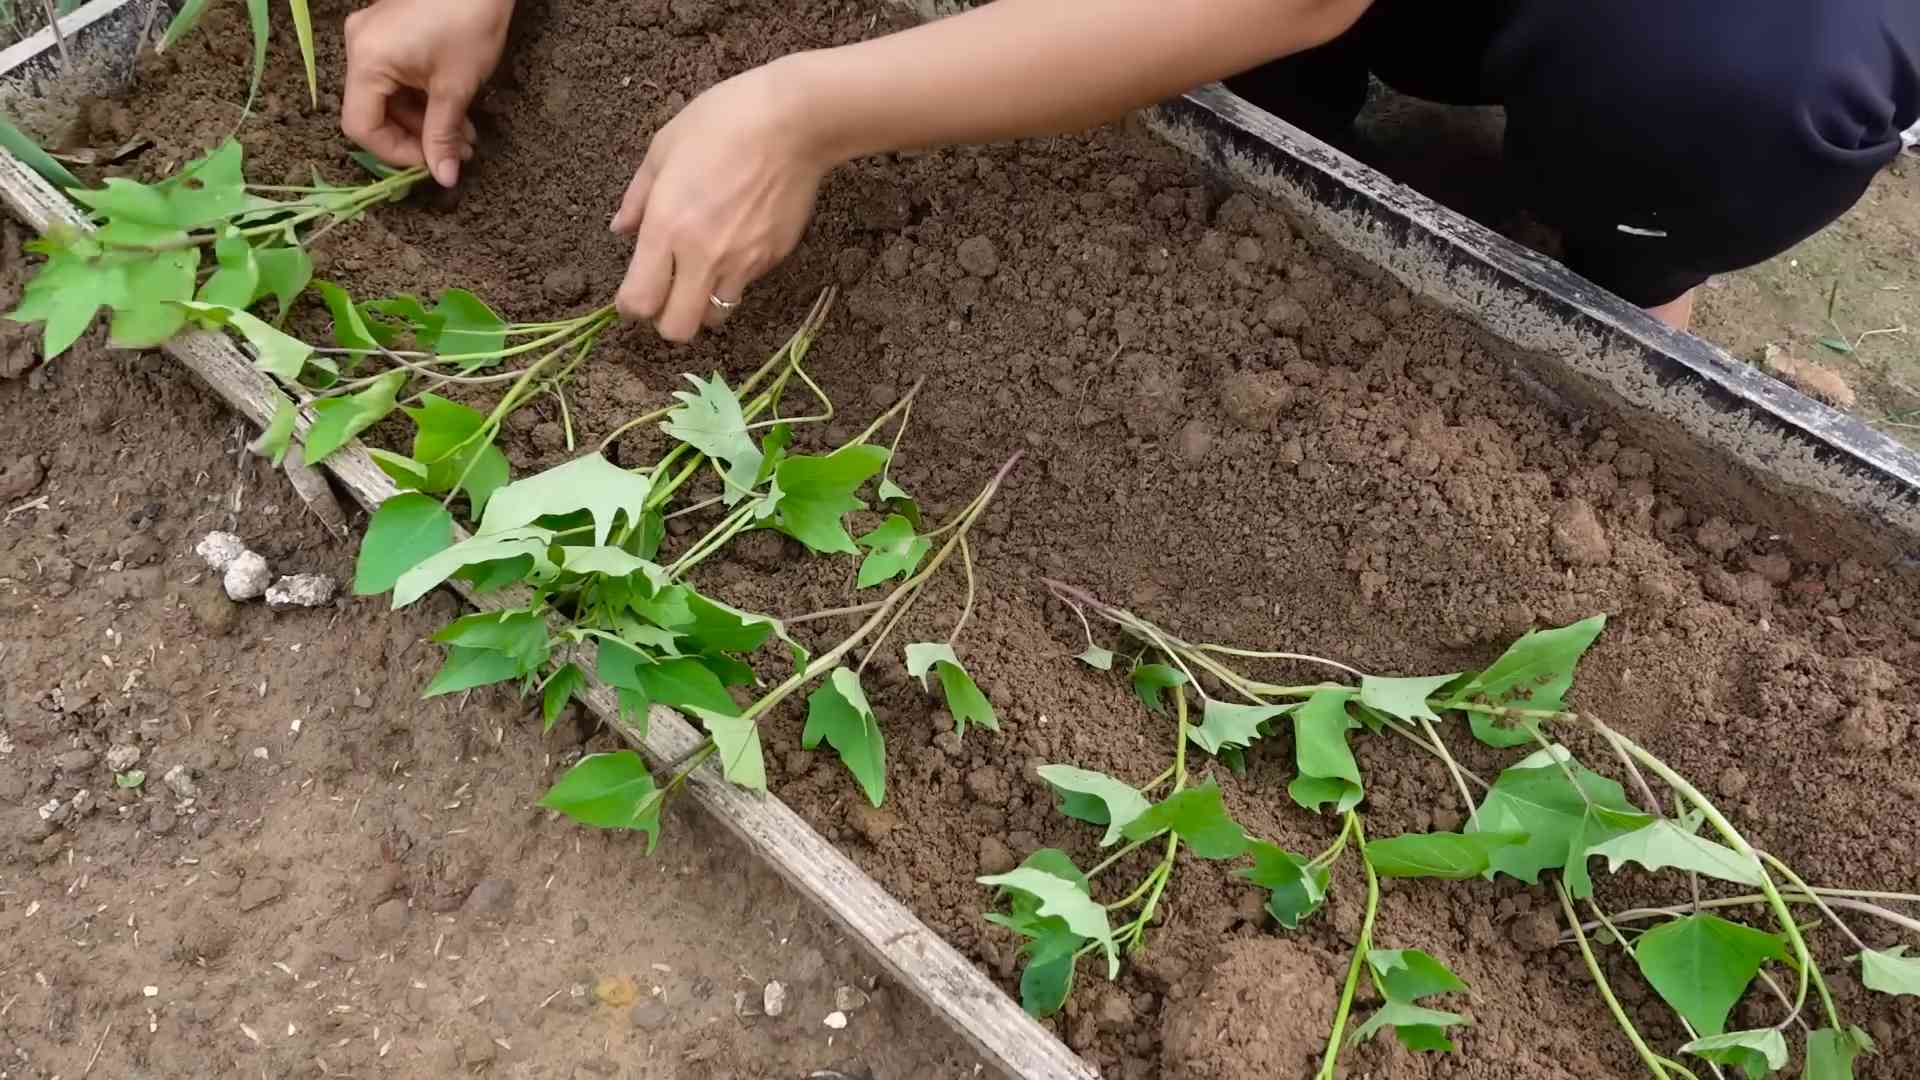
5. Harvest the Slips: Once the slips are 6-8 inches long, gently twist or cut them off the potato.
6. Root the Slips: Place the slips in a glass of water, allowing roots to develop. This usually takes about a week. Change the water every couple of days.
Preparing the Garden Bed
Sweet potatoes need loose, well-draining soil to thrive. If your soil is heavy clay, you’ll need to amend it with organic matter.
1. Choose a Sunny Location: Sweet potatoes need at least 6-8 hours of sunlight per day.
2. Clear the Area: Remove any weeds, rocks, or debris from the planting area.
3. Amend the Soil: Dig in plenty of compost or aged manure to improve drainage and fertility. Aim for a soil pH between 5.5 and 6.5.
4. Create Ridges or Hills (Optional): Sweet potatoes grow best in raised ridges or hills, which improve drainage and allow the tubers to expand. Create ridges about 8-12 inches high and 3-4 feet apart.
Planting Your Sweet Potato Slips
Now for the fun part – planting!
1. Harden Off the Slips: If you grew your own slips, gradually acclimate them to outdoor conditions by placing them outside for a few hours each day for a week before planting.
2. Choose the Right Time: Plant your slips after the last frost, when the soil has warmed to at least 60°F (15°C).
3. Dig Holes: Space the slips about 12-18 inches apart in rows that are 3-4 feet apart.
4. Plant the Slips: Gently place each slip in a hole, burying the roots and about half of the stem.
5. Water Thoroughly: Water the newly planted slips well to help them establish.
Caring for Your Sweet Potato Plants
Sweet potatoes are relatively low-maintenance, but they do need some attention to thrive.
1. Water Regularly: Keep the soil consistently moist, especially during dry periods. Water deeply but infrequently, allowing the soil to dry out slightly between waterings.
2. Weed Control: Keep the garden bed free of weeds, which can compete with your sweet potato plants for nutrients and water. Mulching can help suppress weeds.
3. Fertilize (Optional): If your soil is poor, you can fertilize your sweet potato plants with a balanced fertilizer. Avoid fertilizers that are high in nitrogen, as this can promote leafy growth at the expense of tuber development.
4. Vine Training (Optional): Sweet potato vines can spread quite a bit. You can train them to grow in a specific direction or prune them back if they become too unruly.
5. Pest and Disease Control: Sweet potatoes are generally resistant to pests and diseases, but keep an eye out for common problems like sweet potato weevils and fungal diseases. If you notice any problems, take action promptly to prevent them from spreading.
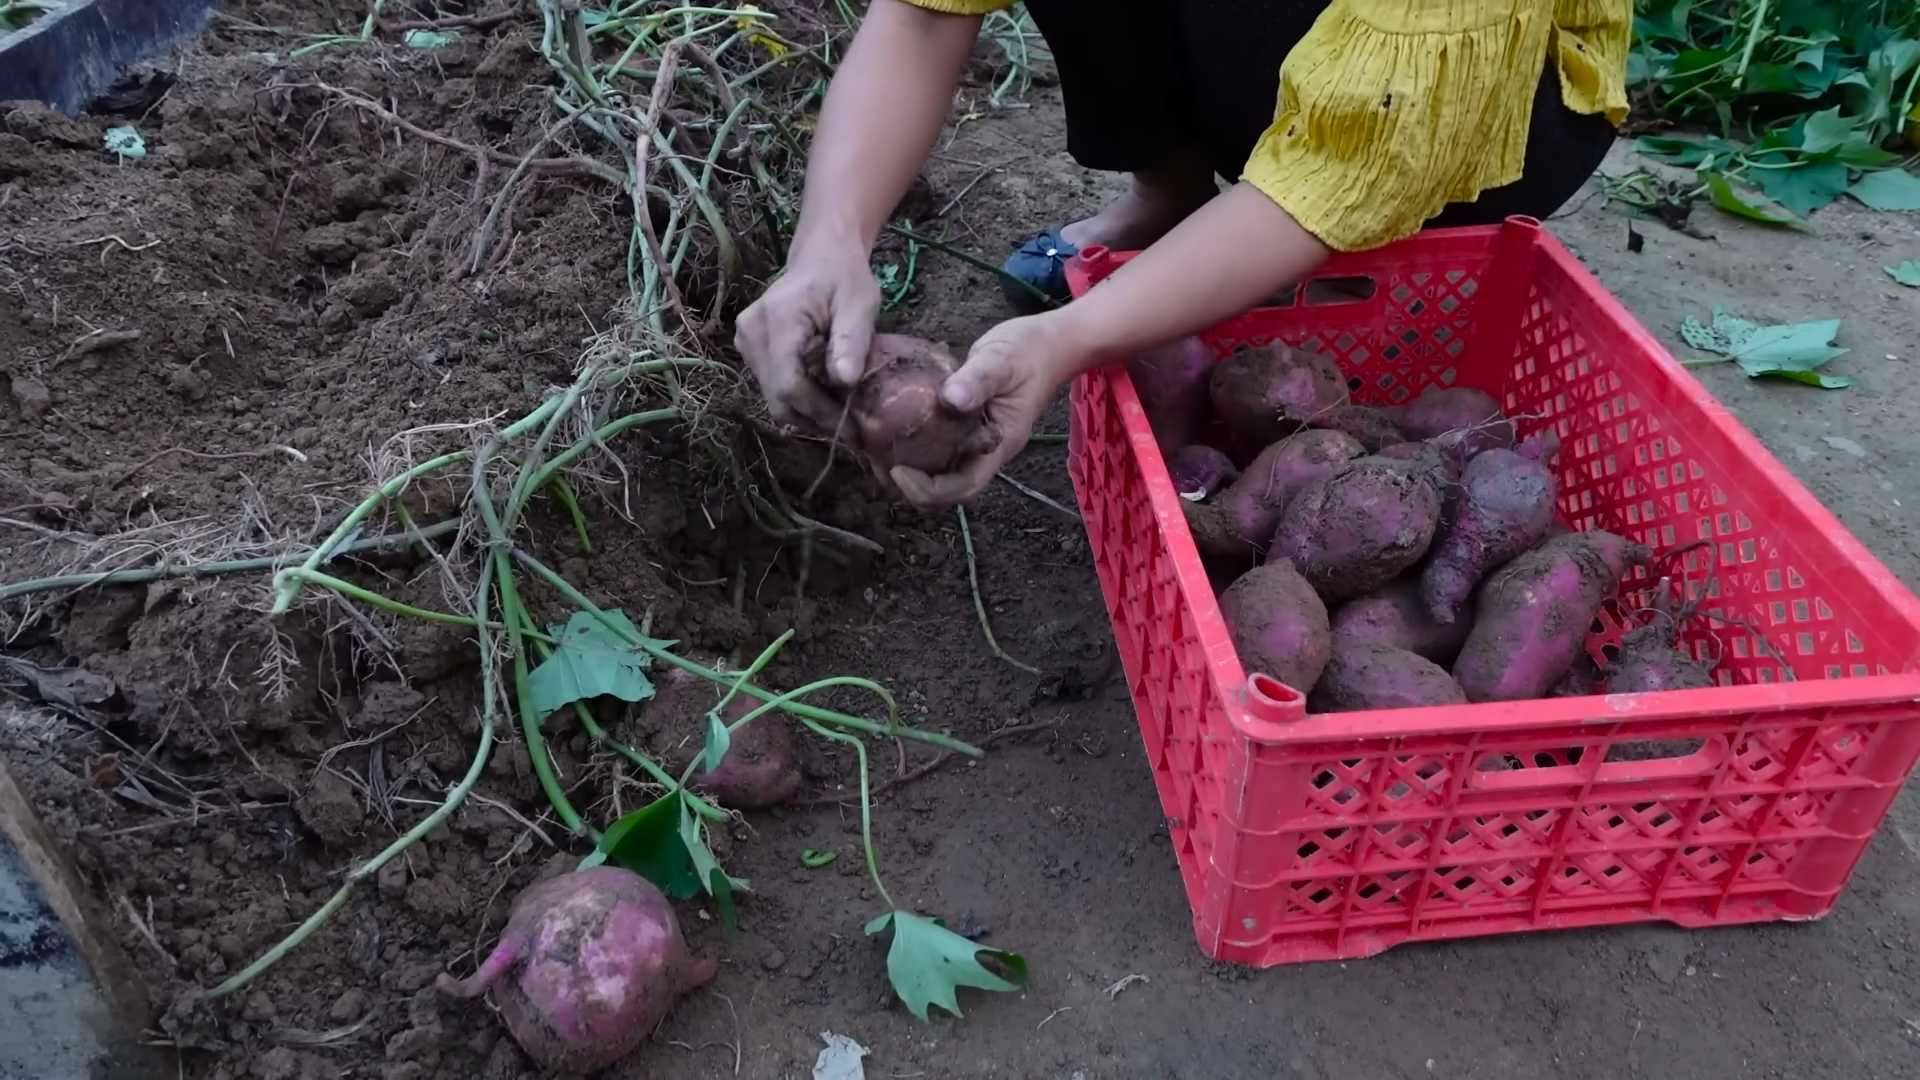
Harvesting Your Sweet Potatoes
The moment you’ve been waiting for! Harvesting sweet potatoes is a rewarding experience.
1. Know When to Harvest: Sweet potatoes are typically ready to harvest about 90-120 days after planting, or before the first frost. The leaves will start to turn yellow and the vines will begin to die back.
2. Choose a Dry Day: Harvest your sweet potatoes on a dry day to prevent them from rotting.
3. Dig Carefully: Use a garden fork or shovel to carefully dig around the plants, being careful not to damage the tubers.
4. Lift the Tubers: Gently lift the tubers from the soil.
5. Cure the Sweet Potatoes: Curing is essential for developing the sweet flavor and improving storage life. Place the sweet potatoes in a warm, humid place (80-85°F or 27-29°C and 85-90% humidity) for 7-10 days. You can use a greenhouse, a shed, or even a spare room with a humidifier.
6. Store the Sweet Potatoes: After curing, store the sweet potatoes in a cool, dry, and dark place (55-60°F or 13-16°C). They should keep for several months.
Troubleshooting
Even with the best planning, things can sometimes go wrong. Here are a few common problems and how to address them:
* Yellowing Leaves: This could be a sign of nutrient deficiency, overwatering, or underwatering. Check the soil moisture and consider fertilizing with a balanced fertilizer.
* Small Tubers: This could be due to poor soil, lack of sunlight, or too much nitrogen fertilizer. Amend the soil with compost, ensure the plants are getting enough sunlight, and avoid high-nitrogen fertilizers.
* Rotting Tubers: This could be caused by damage during harvesting, poor curing, or improper storage. Handle the tubers carefully during harvesting, cure them properly, and store them in a cool, dry place.
* Pest Infestation: Inspect your plants regularly for pests and take action promptly if you notice any problems. Use organic pest control methods whenever possible.
Tips for Success
Here are a few extra tips to help you grow the best sweet potatoes possible:
* Choose the Right Variety: Different sweet potato varieties have different characteristics. Choose a variety that is well-suited to your climate and growing conditions.
* Rotate Your Crops: Avoid planting sweet potatoes in the same location year after year, as this can deplete the soil and increase the risk of pests and diseases.
* Don’t Overwater: Sweet potatoes are drought-tolerant and don’t need a lot of water. Overwatering can lead to root rot.
* Be Patient: Sweet potatoes take time to mature. Don’t get discouraged if you don’t see results right away.
Growing sweet potatoes is a rewarding experience that anyone can enjoy. With a little planning and effort, you can harvest a delicious and nutritious crop that you can be proud of. Happy gardening!
Conclusion
So, there you have it! Growing sweet potatoes at home, while it might seem daunting at first, is surprisingly achievable and incredibly rewarding. We’ve walked you through the process, from sprouting slips to harvesting your own homegrown bounty. But why should you bother with this DIY adventure?
Simply put, the taste of a freshly harvested, homegrown sweet potato is unparalleled. The sweetness is more pronounced, the texture is creamier, and you have the satisfaction of knowing exactly where your food came from. Beyond the superior flavor, growing your own sweet potatoes allows you to choose varieties that you might not find in your local grocery store. Imagine enjoying the vibrant purple flesh of a ‘Stokes Purple’ or the nutty flavor of a ‘Japanese’ sweet potato, all grown in your own backyard!
This DIY trick isn’t just about the taste; it’s about control. You control the soil, the water, and the inputs, ensuring that your sweet potatoes are grown organically and sustainably. You avoid the pesticides and herbicides that are often used in commercial farming, providing your family with healthier, more nutritious food.
But the benefits don’t stop there. Growing sweet potatoes is a fantastic learning experience, especially for children. It teaches them about the life cycle of plants, the importance of healthy soil, and the rewards of hard work. It’s a hands-on way to connect with nature and appreciate the food we eat.
Ready to take your sweet potato game to the next level? Consider experimenting with different growing methods. Try growing them in raised beds for better drainage, or in containers if you have limited space. You can also explore different varieties to find your personal favorite. Don’t be afraid to get creative with your soil amendments – adding compost, aged manure, or even coffee grounds can boost your sweet potato yield.
Variations to consider:
* Vertical Growing: If you’re short on space, try growing sweet potatoes in large grow bags or containers and train the vines to grow upwards on a trellis.
* Hydroponics: For the adventurous gardener, hydroponic sweet potato growing can be a fun and efficient way to produce a crop.
* Companion Planting: Plant sweet potatoes alongside beneficial companions like beans, peas, or thyme to deter pests and improve soil health.
Growing sweet potatoes is more than just a gardening project; it’s an investment in your health, your knowledge, and your connection to the natural world. It’s a chance to experience the joy of harvesting your own food and sharing it with loved ones.
So, what are you waiting for? Grab some sweet potatoes, start sprouting those slips, and get ready to enjoy the delicious rewards of your own homegrown harvest. We encourage you to try this DIY trick and share your experiences with us! Let us know what varieties you’re growing, what challenges you’ve faced, and what successes you’ve celebrated. Share your photos, your tips, and your stories – we can’t wait to hear from you! Happy growing!
Frequently Asked Questions (FAQ)
Q: How long does it take to grow sweet potatoes?
A: Sweet potatoes typically take 90-120 days to mature from transplanting the slips. The exact time will depend on the variety, climate, and growing conditions. Keep an eye on the foliage – when it starts to yellow and die back, it’s a good indication that your sweet potatoes are ready to harvest.
Q: What kind of soil is best for growing sweet potatoes?
A: Sweet potatoes prefer well-drained, sandy loam soil. Heavy clay soil can lead to misshapen tubers. Amend your soil with compost and other organic matter to improve drainage and fertility. A slightly acidic soil pH (around 6.0-6.5) is ideal.
Q: How often should I water my sweet potatoes?
A: Water deeply and regularly, especially during the first few weeks after transplanting. Once established, sweet potatoes are relatively drought-tolerant, but consistent moisture is still important for optimal growth. Avoid overwatering, as this can lead to root rot. Aim for about 1 inch of water per week.
Q: Do sweet potatoes need full sun?
A: Yes, sweet potatoes need at least 6-8 hours of direct sunlight per day to thrive. Choose a sunny location in your garden for best results.
Q: What are slips, and how do I get them?
A: Slips are the sprouts that grow from a sweet potato. You can easily grow your own slips by suspending a sweet potato in a jar of water, with the bottom half submerged. Place the jar in a warm, sunny location, and wait for the slips to sprout. Once the slips are 6-8 inches long, gently twist them off the sweet potato and root them in water before transplanting them into your garden. You can also purchase slips from nurseries or online retailers.
Q: What are some common pests and diseases that affect sweet potatoes?
A: Common pests include sweet potato weevils, flea beetles, and wireworms. Diseases include stem rot, scurf, and black rot. Practice crop rotation, use disease-resistant varieties, and control pests with organic methods like neem oil or insecticidal soap.
Q: How do I harvest sweet potatoes?
A: Harvest sweet potatoes before the first frost. Use a garden fork or shovel to carefully dig around the plants, being careful not to damage the tubers. Gently lift the sweet potatoes from the soil and brush off any excess dirt.
Q: How do I cure sweet potatoes after harvesting?
A: Curing is essential for improving the flavor and storage life of sweet potatoes. After harvesting, allow the sweet potatoes to dry in a warm, humid place (80-85°F and 85-90% humidity) for 7-10 days. This process allows the skins to harden and any minor cuts or bruises to heal.
Q: How do I store sweet potatoes?
A: Store cured sweet potatoes in a cool, dark, and dry place (55-60°F) with good ventilation. Avoid storing them in the refrigerator, as this can cause them to develop a hard core. Properly cured and stored sweet potatoes can last for several months.
Q: Can I grow sweet potatoes in containers?
A: Yes, you can grow sweet potatoes in containers, but you’ll need a large container (at least 20 gallons) with good drainage. Choose a bush-type variety for best results.
Q: What are some good companion plants for sweet potatoes?
A: Good companion plants for sweet potatoes include beans, peas, thyme, oregano, and marigolds. These plants can help deter pests, improve soil health, and attract beneficial insects.
Q: Can I eat the sweet potato leaves?
A: Yes, sweet potato leaves are edible and nutritious. They can be cooked like spinach or other leafy greens. Choose young, tender leaves for the best flavor.
Q: My sweet potato plants are producing lots of vines but few potatoes. What could be the problem?
A: Several factors can contribute to this. Over-fertilizing with nitrogen can encourage vine growth at the expense of tuber development. Also, ensure your soil is well-drained, as overly wet soil can hinder tuber formation. Finally, make sure your plants are getting enough sunlight.
Q: Is growing sweet potatoes organically difficult?
A: While it requires more attention to detail, growing sweet potatoes organically is definitely achievable. Focus on building healthy soil with compost and other organic amendments, choose disease-resistant varieties, and use organic pest control methods.

Leave a Comment