
Harvesting Swiss Chard from your own garden is one of the most rewarding experiences for any home gardener, and I’m here to show you how to do it right! Imagine stepping outside your back door and snipping fresh, vibrant leaves for a delicious salad or a hearty side dish. No more wilted greens from the grocery store – just pure, homegrown goodness.
Swiss chard, with its colorful stalks and crinkled leaves, has a rich history, dating back to ancient Greece and Rome. It wasn’t just a food source; it was also valued for its medicinal properties. Today, it’s a staple in many cuisines around the world, and for good reason! It’s packed with vitamins, minerals, and antioxidants, making it a nutritional powerhouse.
But knowing when and how to harvest your Swiss chard is crucial to ensuring a continuous supply of this leafy green throughout the growing season. Many people struggle with this, either harvesting too early and missing out on the full flavor and nutritional benefits, or waiting too long and ending up with tough, bitter leaves. That’s where this DIY guide comes in! I’m going to share my favorite tricks and techniques for harvesting Swiss Chard like a pro, so you can enjoy a bountiful harvest all season long. Get ready to unlock the secrets to a thriving Swiss chard patch!
Harvesting Swiss Chard Like a Pro: A Step-by-Step Guide
Okay, so you’ve got some beautiful Swiss chard growing in your garden, and you’re probably wondering when and how to harvest it. Don’t worry, it’s super easy! I’m going to walk you through the whole process, ensuring you get the most out of your leafy greens. Harvesting correctly not only gives you delicious chard to eat but also encourages the plant to keep producing. Let’s get started!
When to Harvest Your Swiss Chard
Knowing when to harvest is key. You don’t want to pick it too early and miss out on the flavor, or too late and end up with tough, bitter leaves. Here’s what to look for:
* Leaf Size: Aim for leaves that are at least 6-8 inches long. This is usually when they have a good balance of tenderness and flavor.
* Plant Maturity: Swiss chard is typically ready to harvest about 40-60 days after planting, depending on the variety and growing conditions.
* Continuous Harvest: The beauty of Swiss chard is that you can harvest it continuously throughout the growing season. Just take what you need, and the plant will keep producing more.
* Avoid Overcrowding: Harvesting regularly also helps prevent overcrowding, which can lead to smaller, less productive plants.
Tools You’ll Need
You don’t need a ton of fancy equipment for this. Just a few basic tools will do the trick:
* Sharp Knife or Scissors: A sharp blade is essential for making clean cuts and preventing damage to the plant. I prefer using a small, sharp kitchen knife.
* Basket or Bag: To collect your harvested chard. A basket is great because it allows air circulation, which helps keep the leaves fresh.
* Gloves (Optional): If you have sensitive skin, gloves can protect your hands from any potential irritation.
The Harvesting Process: Step-by-Step
Alright, let’s get down to the nitty-gritty. Here’s how to harvest your Swiss chard like a pro:
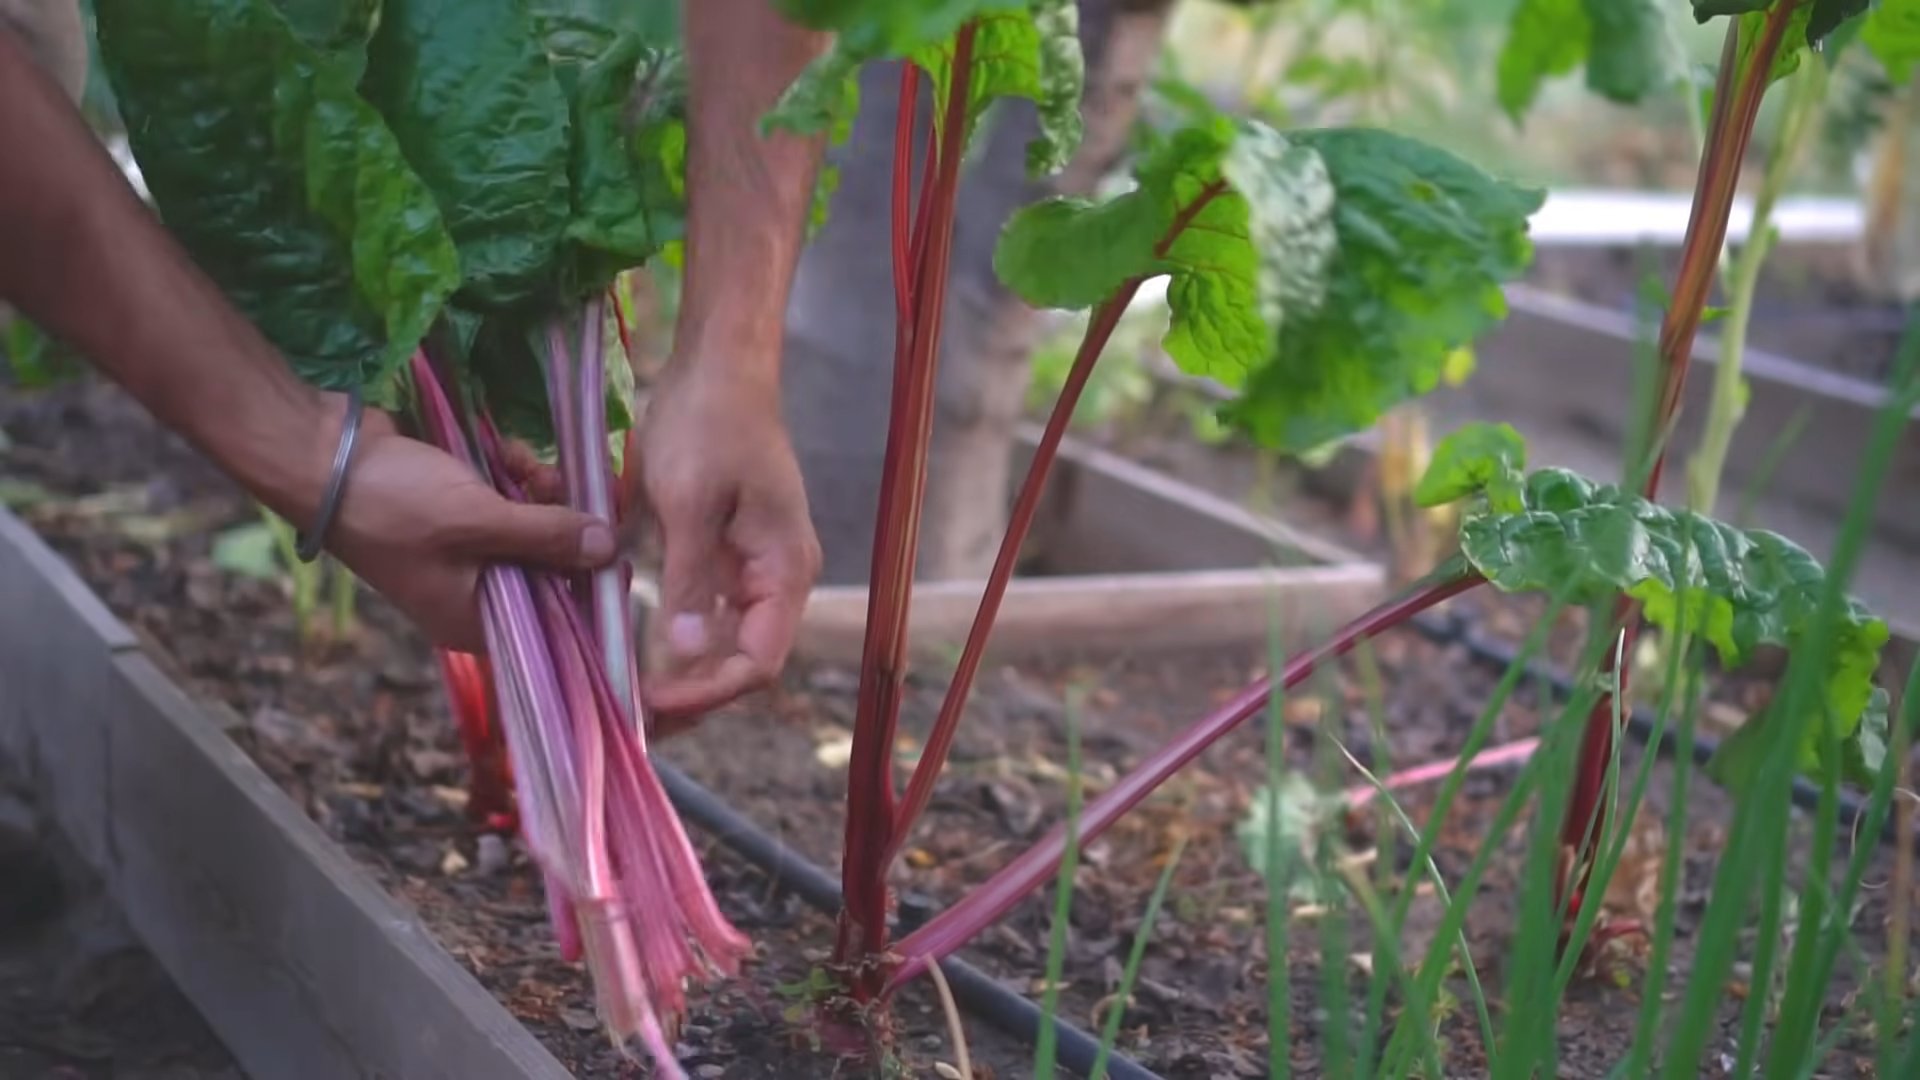
1. Choose Your Leaves: Select the outer, more mature leaves first. These are the ones that are closest to the ground and have had the most time to develop. Leave the inner, younger leaves to continue growing. This ensures a continuous harvest.
2. Make the Cut: Using your sharp knife or scissors, cut the leaf stem about 2 inches above the soil line. Be careful not to damage the central bud of the plant, as this is where new leaves will emerge. A clean, angled cut is best.
3. Handle with Care: Gently remove the harvested leaves and place them in your basket or bag. Avoid piling them on top of each other too tightly, as this can cause bruising and wilting.
4. Repeat as Needed: Continue harvesting the outer leaves until you have the desired amount. Remember to leave the inner leaves to grow, and don’t harvest more than about one-third of the plant at any one time.
5. Water After Harvesting: After harvesting, give your Swiss chard plants a good watering. This will help them recover and encourage new growth.
Tips for Maximizing Your Harvest
Here are a few extra tips to help you get the most out of your Swiss chard:
* Harvest in the Morning: The best time to harvest is in the morning, after the dew has dried but before the sun gets too hot. This is when the leaves are at their freshest and most flavorful.
* Regular Harvesting: Don’t be afraid to harvest regularly, even if you only need a few leaves at a time. The more you harvest, the more the plant will produce.
* Remove Damaged Leaves: If you notice any yellowing, damaged, or diseased leaves, remove them promptly. This will help prevent the problem from spreading to the rest of the plant.
* Succession Planting: To ensure a continuous supply of Swiss chard throughout the growing season, consider succession planting. This involves planting new seeds every few weeks.
* Fertilize Regularly: Swiss chard is a heavy feeder, so it’s important to fertilize it regularly. Use a balanced fertilizer or compost tea to provide the nutrients it needs.
Storing Your Harvested Swiss Chard
Now that you’ve harvested your Swiss chard, you’ll want to store it properly to keep it fresh. Here are a few options:
* Refrigerate: The best way to store Swiss chard is in the refrigerator. Wrap the leaves loosely in a damp paper towel and place them in a plastic bag or container. They should keep for up to a week.
* Blanch and Freeze: If you have a lot of Swiss chard, you can blanch and freeze it for longer storage. To blanch, boil the leaves for 2-3 minutes, then plunge them into ice water. Drain well and freeze in freezer bags or containers.
* Use Immediately: Of course, the best way to enjoy your Swiss chard is to use it immediately after harvesting. It’s delicious in salads, soups, stir-fries, and more.
Troubleshooting Common Issues
Sometimes, things don’t go exactly as planned. Here are a few common issues you might encounter when growing and harvesting Swiss chard, and how to deal with them:
* Pests: Aphids, slugs, and snails can sometimes be a problem. Inspect your plants regularly and remove any pests you find. You can also use organic pest control methods, such as insecticidal soap or diatomaceous earth.
* Diseases: Leaf spot and downy mildew are common diseases that can affect Swiss chard. To prevent these diseases, ensure good air circulation around your plants and avoid overhead watering. If you notice any signs of disease, remove the affected leaves and treat the plant with a fungicide.
* Bolting: Bolting is when the plant starts to produce flowers and seeds prematurely. This can happen if the weather gets too hot or if the plant is stressed. To prevent bolting, provide shade during hot weather and ensure the plant is well-watered and fertilized. If your Swiss chard does bolt, you can still eat the leaves, but they may be a bit more bitter.
Delicious Ways to Use Your Harvested Swiss Chard
Okay, you’ve harvested your beautiful Swiss chard, now what? Here are some of my favorite ways to use it:
* Sautéed Swiss Chard: This is a simple and delicious way to enjoy Swiss chard. Just sauté it with some garlic, olive oil, and a pinch of salt and pepper.
* Swiss Chard Salad: Add chopped Swiss chard to your favorite salad for a boost of nutrients and flavor.
* Swiss Chard Soup: Swiss chard is a great addition to soups and stews. It adds a mild, earthy flavor and lots of vitamins.
* Swiss Chard Stir-Fry: Use Swiss chard in stir-fries with other vegetables and protein.
* Swiss Chard Quiche: Add chopped Swiss chard to quiches and frittatas for a healthy and flavorful meal.
* Swiss Chard Smoothies: Sneak some Swiss chard into your smoothies for a nutrient boost. You won’t even taste it!
Understanding the Different Varieties
Swiss chard comes in a variety of colors and flavors. Here are a few popular varieties:
* Bright Lights: This variety has colorful stems in shades of red, yellow, orange, and pink. It’s not only beautiful but also delicious.
* Fordhook Giant: This variety has large, dark green leaves and thick, white stems. It’s known for its high yield and excellent flavor.
* Lucullus: This variety has light green leaves and white stems. It’s a good choice for hot climates.
* Ruby Red: This variety has deep red stems and dark green leaves. It’s a beautiful and flavorful addition to any garden.
Why Grow Your Own Swiss Chard?
Growing your own Swiss chard is a rewarding experience for so many reasons:
* Freshness: You can’t beat the taste of freshly harvested Swiss chard. It’s so much more flavorful than store-bought.
* Cost Savings: Growing your own Swiss chard can save you money on groceries.
* Health Benefits: Swiss chard is packed with vitamins, minerals, and antioxidants.
* Sustainability: Growing your own food is a sustainable way to reduce your environmental impact.
* Satisfaction: There’s nothing quite like the feeling of harvesting your own food and knowing that you grew it yourself.
Final Thoughts
Harvesting Swiss chard is a simple and rewarding process. By following these steps, you can enjoy a continuous supply of fresh, delicious greens throughout the growing season. So get out there, harvest your chard, and enjoy all the wonderful things you can make with it! Happy gardening!
Conclusion
So, there you have it! Mastering the art of harvesting Swiss chard is not only incredibly simple, but it’s also a game-changer for your kitchen garden. Forget relying solely on grocery store offerings; with this straightforward DIY trick, you can enjoy a continuous supply of fresh, vibrant, and nutritious Swiss chard right from your own backyard. Think of the possibilities: vibrant salads bursting with color, hearty sautés packed with vitamins, and even creative additions to your favorite soups and stews.
The beauty of this method lies in its sustainability. By harvesting the outer leaves and allowing the inner ones to continue growing, you’re essentially creating a perpetual Swiss chard machine. This ensures a consistent harvest throughout the growing season, minimizing waste and maximizing the yield from your plants. Plus, freshly harvested Swiss chard simply tastes better. The flavor is more intense, the texture is crisper, and you have the satisfaction of knowing exactly where your food came from.
But don’t stop there! Feel free to experiment with different harvesting techniques. Some gardeners prefer to cut the entire plant down to a few inches above the ground, allowing it to regrow for a second harvest. This method can be particularly useful towards the end of the season. You can also try harvesting smaller, younger leaves for a more delicate flavor, perfect for salads. Or, let some of your Swiss chard plants bolt (go to seed) and collect the seeds for planting next year, ensuring a continuous cycle of homegrown goodness.
Beyond the basic harvesting technique, consider the timing of your harvest. Harvesting in the cooler parts of the day, like early morning or late evening, can help prevent wilting and preserve the freshness of your Swiss chard. Also, be sure to wash your harvested leaves thoroughly to remove any dirt or debris before storing or using them.
This DIY trick for harvesting Swiss chard is more than just a gardening tip; it’s an invitation to connect with your food, embrace sustainable practices, and elevate your culinary creations. It’s about taking control of your food source and enjoying the unparalleled flavor of freshly harvested produce.
We wholeheartedly encourage you to give this method a try. You’ll be amazed at how easy it is to maintain a thriving Swiss chard patch and enjoy a continuous supply of this nutritious leafy green. And once you’ve experienced the joy of harvesting your own Swiss chard, we’d love to hear about it! Share your experiences, tips, and favorite Swiss chard recipes in the comments below. Let’s build a community of gardeners who are passionate about growing and enjoying fresh, homegrown food. So, grab your gardening shears, head out to your garden, and start harvesting! You won’t regret it.
Frequently Asked Questions (FAQ)
What is the best time of day to harvest Swiss chard?
The ideal time to harvest Swiss chard is during the cooler parts of the day, such as early morning or late evening. This helps to minimize wilting, as the leaves are less likely to lose moisture in the cooler temperatures. Harvesting during the heat of the day can cause the leaves to become limp and less flavorful. If you must harvest during the day, try to do so in the shade and immediately place the harvested leaves in a cool, damp environment.
How do I know when my Swiss chard is ready to harvest?
Swiss chard is typically ready to harvest when the outer leaves are about 6-8 inches long. However, you can harvest smaller, younger leaves for a more tender and delicate flavor. The size of the leaves will also depend on the variety of Swiss chard you are growing. Look for leaves that are vibrant in color and free from blemishes or damage. Avoid harvesting leaves that are yellowing or showing signs of disease.
Can I harvest all the leaves at once, or should I only harvest a few at a time?
It’s best to harvest Swiss chard by selectively removing the outer leaves, allowing the inner leaves to continue growing. This method, often referred to as “cut and come again,” ensures a continuous harvest throughout the growing season. Avoid harvesting all the leaves at once, as this can shock the plant and reduce its overall yield. By selectively harvesting the outer leaves, you encourage the plant to produce more leaves, providing you with a steady supply of fresh Swiss chard.
How do I properly harvest Swiss chard without damaging the plant?
To harvest Swiss chard properly, use a sharp knife or gardening shears to cut the outer leaves about 2 inches above the ground. Be careful not to damage the central bud of the plant, as this is where new leaves will emerge. Avoid pulling the leaves off, as this can damage the plant’s roots and stems. Make clean cuts to prevent disease from entering the plant.
How should I store harvested Swiss chard to keep it fresh?
After harvesting, wash the Swiss chard leaves thoroughly to remove any dirt or debris. Pat them dry with a clean towel or spin them in a salad spinner. Store the leaves in a plastic bag or container in the refrigerator. To help maintain moisture, you can wrap the leaves in a damp paper towel before placing them in the bag or container. Properly stored Swiss chard can last for up to a week in the refrigerator.
What are some common problems that can affect Swiss chard, and how can I prevent them?
Some common problems that can affect Swiss chard include leaf miners, aphids, and fungal diseases. To prevent leaf miners, cover your plants with row covers to prevent the adult flies from laying eggs on the leaves. Aphids can be controlled with insecticidal soap or by introducing beneficial insects like ladybugs. Fungal diseases can be prevented by ensuring good air circulation around the plants and avoiding overhead watering. Regularly inspect your plants for signs of pests or diseases and take action promptly to prevent them from spreading.
Can I eat the stems of Swiss chard, or are they only for composting?
Yes, the stems of Swiss chard are perfectly edible and can be quite delicious! They have a slightly different texture and flavor than the leaves, but they are just as nutritious. You can sauté, steam, or roast the stems, or add them to soups and stews. The stems may take a bit longer to cook than the leaves, so it’s best to cook them separately or add them to the dish earlier. Don’t throw away those colorful stems; they are a valuable part of the plant!
What are some creative ways to use harvested Swiss chard in my cooking?
Swiss chard is a versatile ingredient that can be used in a variety of dishes. You can use it in salads, sautés, soups, stews, frittatas, and even smoothies. It can also be used as a substitute for spinach in many recipes. Try adding it to pasta dishes, quiches, or wraps. The possibilities are endless! Experiment with different flavors and textures to find your favorite ways to enjoy this nutritious leafy green.
Is Swiss chard a good source of nutrients?
Absolutely! Swiss chard is packed with vitamins, minerals, and antioxidants. It’s an excellent source of vitamins A, C, and K, as well as magnesium, potassium, and iron. It’s also a good source of dietary fiber. Incorporating Swiss chard into your diet can help boost your immune system, improve bone health, and protect against chronic diseases. It’s a nutritional powerhouse that deserves a place on your plate.
What if my Swiss chard bolts (goes to seed)? Can I still eat it?
When Swiss chard bolts, it means the plant is focusing its energy on producing seeds rather than leaves. The leaves may become more bitter and less tender. While you can still eat the leaves, they may not be as palatable as before. You can try removing the flower stalks to encourage the plant to produce more leaves, but it may not be as productive as it was before bolting. However, bolting also means you can collect the seeds for planting next year, ensuring a continuous supply of Swiss chard in your garden.
Leave a Comment