
Eggplant bottle garden harvest – sounds intriguing, right? Imagine plucking plump, juicy eggplants straight from a recycled plastic bottle hanging on your balcony! It’s not just a whimsical dream; it’s a surprisingly achievable reality with a few clever DIY tricks. For centuries, humans have sought innovative ways to cultivate food, from ancient terraced gardens to modern hydroponics. But the beauty of container gardening, especially using recycled materials, lies in its accessibility and sustainability.
Why should you embrace this quirky method? Well, space is often a constraint in urban environments, and traditional gardening can seem daunting. But with an eggplant bottle garden harvest, you can bypass the need for a sprawling backyard. Plus, it’s incredibly rewarding to transform discarded plastic into a thriving ecosystem. I’m excited to share some simple yet effective DIY hacks that will guide you through creating your own miniature eggplant paradise. Get ready to witness the magic of urban gardening and enjoy the freshest, most homegrown eggplants imaginable!
DIY Eggplant Bottle Garden: From Seed to Harvest!
Hey there, fellow gardening enthusiasts! Ever dreamt of growing your own eggplants but thought you didn’t have the space? Well, I’m here to tell you that you absolutely can, even in a small apartment! This guide will walk you through creating your very own eggplant bottle garden, a fun, sustainable, and space-saving way to enjoy fresh, homegrown veggies. Let’s get our hands dirty (figuratively, until we actually start planting!).
What You’ll Need
Before we dive in, let’s gather our supplies. This project is all about repurposing, so feel free to get creative with what you have!
* Large Plastic Bottles: Think 2-liter soda bottles, water bottles, or even larger juice containers. You’ll need at least two bottles per eggplant plant. The sturdier, the better!
* Eggplant Seeds: Choose your favorite variety! I personally love Black Beauty for its classic flavor and beautiful dark purple color.
* Potting Soil: A good quality potting mix is crucial for healthy growth.
* Scissors or Utility Knife: Be careful!
* Drill or Nail and Hammer: For drainage holes.
* Twine or Strong String: For hanging your bottle garden (optional).
* Watering Can or Spray Bottle: For keeping your eggplant happy and hydrated.
* Small Pebbles or Gravel: For drainage at the bottom of the bottles.
* Optional: Liquid fertilizer, plant labels, gloves.
Preparing the Bottles
This is where the magic begins! We’re going to transform those ordinary plastic bottles into mini-planters.
1. Clean the Bottles: Thoroughly wash the bottles with soap and water to remove any residue. Rinse them well and let them dry completely. This is important to prevent any unwanted mold or bacteria growth.
2. Cut the Bottles: For each eggplant plant, you’ll need two bottles prepared differently.
* Bottle 1 (Top Section): Cut the top third of the bottle off. This will be the planting container. I usually cut it right below where the bottle starts to narrow towards the neck.
* Bottle 2 (Bottom Section): Cut the bottom third of the bottle off. This will act as a water reservoir.
3. Create Drainage Holes: This is super important to prevent root rot!
* Top Section (Planting Container): Drill or carefully poke several drainage holes in the bottom of the top section. I usually make about 5-6 holes, spaced evenly. If you’re using a nail and hammer, be extra cautious!
* Bottom Section (Water Reservoir): No drainage holes needed here! This section is designed to hold water.
4. Optional: Hanging Holes: If you want to hang your bottle garden, drill or poke two holes on opposite sides of the top section, near the cut edge. These will be used to thread the twine or string.
Planting Your Eggplant Seeds
Now for the fun part – planting!
1. Add Drainage Layer: Place a layer of small pebbles or gravel at the bottom of the top section (planting container). This will help with drainage and prevent the soil from becoming waterlogged. I usually add about an inch or two.
2. Fill with Potting Soil: Fill the top section with potting soil, leaving about an inch of space at the top. Gently pat the soil down to remove any air pockets.
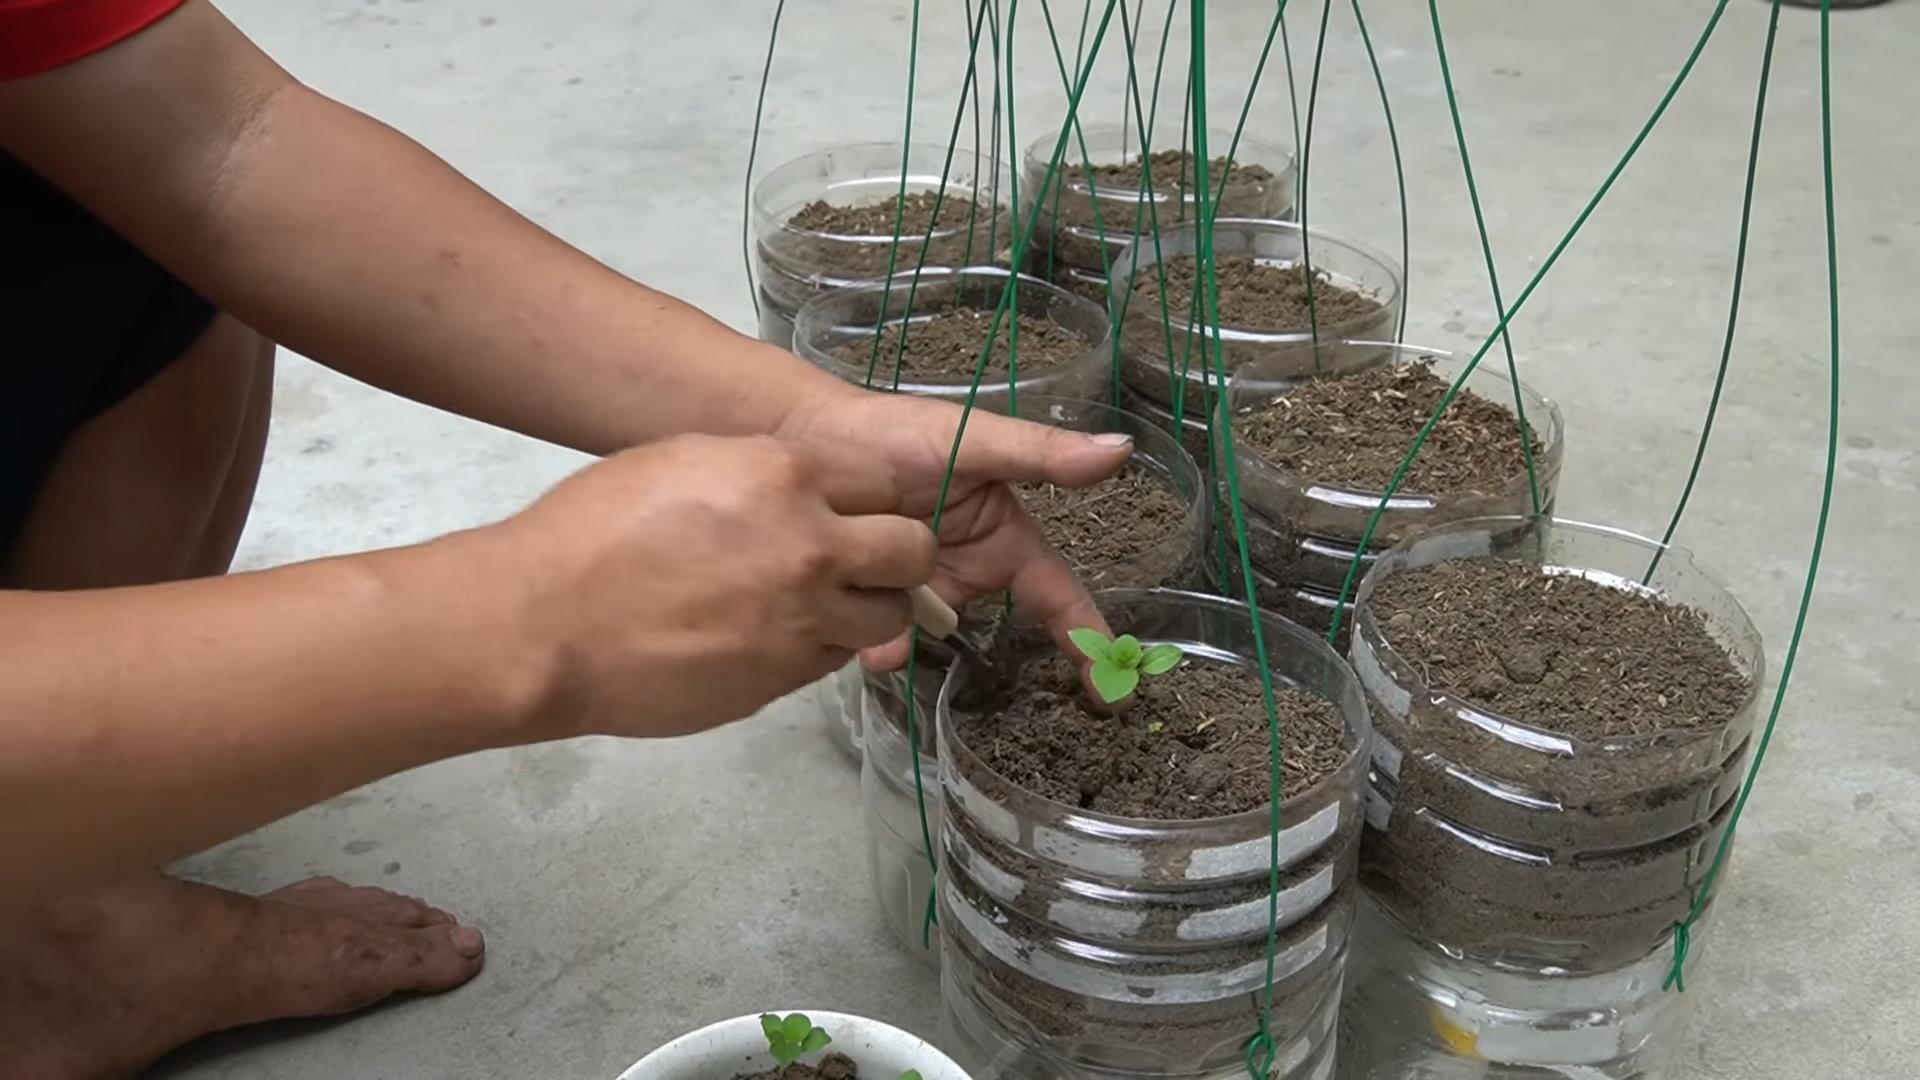
3. Sow the Seeds: Make a small indentation in the soil (about 1/4 inch deep) and place 2-3 eggplant seeds in each container. Cover the seeds with a thin layer of soil. Planting multiple seeds ensures at least one will germinate.
4. Water Gently: Use a watering can or spray bottle to gently water the soil. Be careful not to overwater! The soil should be moist but not soggy.
5. Provide Warmth and Light: Eggplant seeds need warmth and light to germinate. Place your bottle garden in a warm, sunny location, such as a windowsill or under a grow light.
Nurturing Your Seedlings
This is where patience comes in! It can take a week or two for the seeds to germinate.
1. Keep the Soil Moist: Check the soil moisture daily and water as needed. The soil should always be slightly moist, but never waterlogged.
2. Thin the Seedlings: Once the seedlings have sprouted and have a few sets of leaves, thin them out, leaving only the strongest seedling in each container. Snip the weaker seedlings at the base with scissors.
3. Harden Off the Seedlings: If you plan to move your eggplant plants outdoors, you’ll need to “harden them off” first. This means gradually exposing them to outdoor conditions over a period of a week or two. Start by placing them outdoors for a few hours each day, gradually increasing the amount of time they spend outside. This will help them adjust to the sun, wind, and temperature changes.
Transplanting to the Bottle Garden System
Once your seedlings are strong enough (about 4-6 inches tall), it’s time to transplant them into the bottle garden system.
1. Prepare the Water Reservoir: Fill the bottom section (water reservoir) with water.
2. Place the Planting Container: Carefully place the top section (planting container) into the bottom section (water reservoir). The water will wick up through the drainage holes, providing the eggplant plant with a constant source of moisture.
3. Monitor the Water Level: Check the water level in the reservoir regularly and refill as needed.
Caring for Your Eggplant Plants
Now that your eggplant plants are in their new home, it’s time to provide them with the care they need to thrive.
1. Sunlight: Eggplants need at least 6-8 hours of sunlight per day. If you don’t have a sunny spot, consider using a grow light.
2. Watering: The bottle garden system provides a consistent source of moisture, but you may still need to water the plants occasionally, especially during hot weather. Check the soil moisture regularly and water when the top inch of soil feels dry.
3. Fertilizing: Eggplants are heavy feeders, so you’ll need to fertilize them regularly. Use a liquid fertilizer that is specifically formulated for vegetables. Follow the instructions on the fertilizer label. I usually fertilize every 2-3 weeks.
4. Support: As your eggplant plants grow, they may need support to prevent them from falling over. You can use stakes or twine to support the stems.
5. Pest Control: Keep an eye out for pests, such as aphids, spider mites, and whiteflies. If you notice any pests, treat them with an appropriate insecticide or insecticidal soap. I prefer to use organic pest control methods whenever possible.
Pollination
Eggplants are self-pollinating, but they often benefit from a little help.
1. Hand Pollination: You can hand-pollinate your eggplant flowers by gently shaking the plant or using a small paintbrush to transfer pollen from one flower to another. I usually do this in the morning, when the flowers are open.
Harvesting Your Eggplants
The moment we’ve all been waiting for – harvesting!
1. Harvest Time: Eggplants are typically ready to harvest about 60-80 days after planting. The fruits should be firm, glossy, and have a deep, rich color.
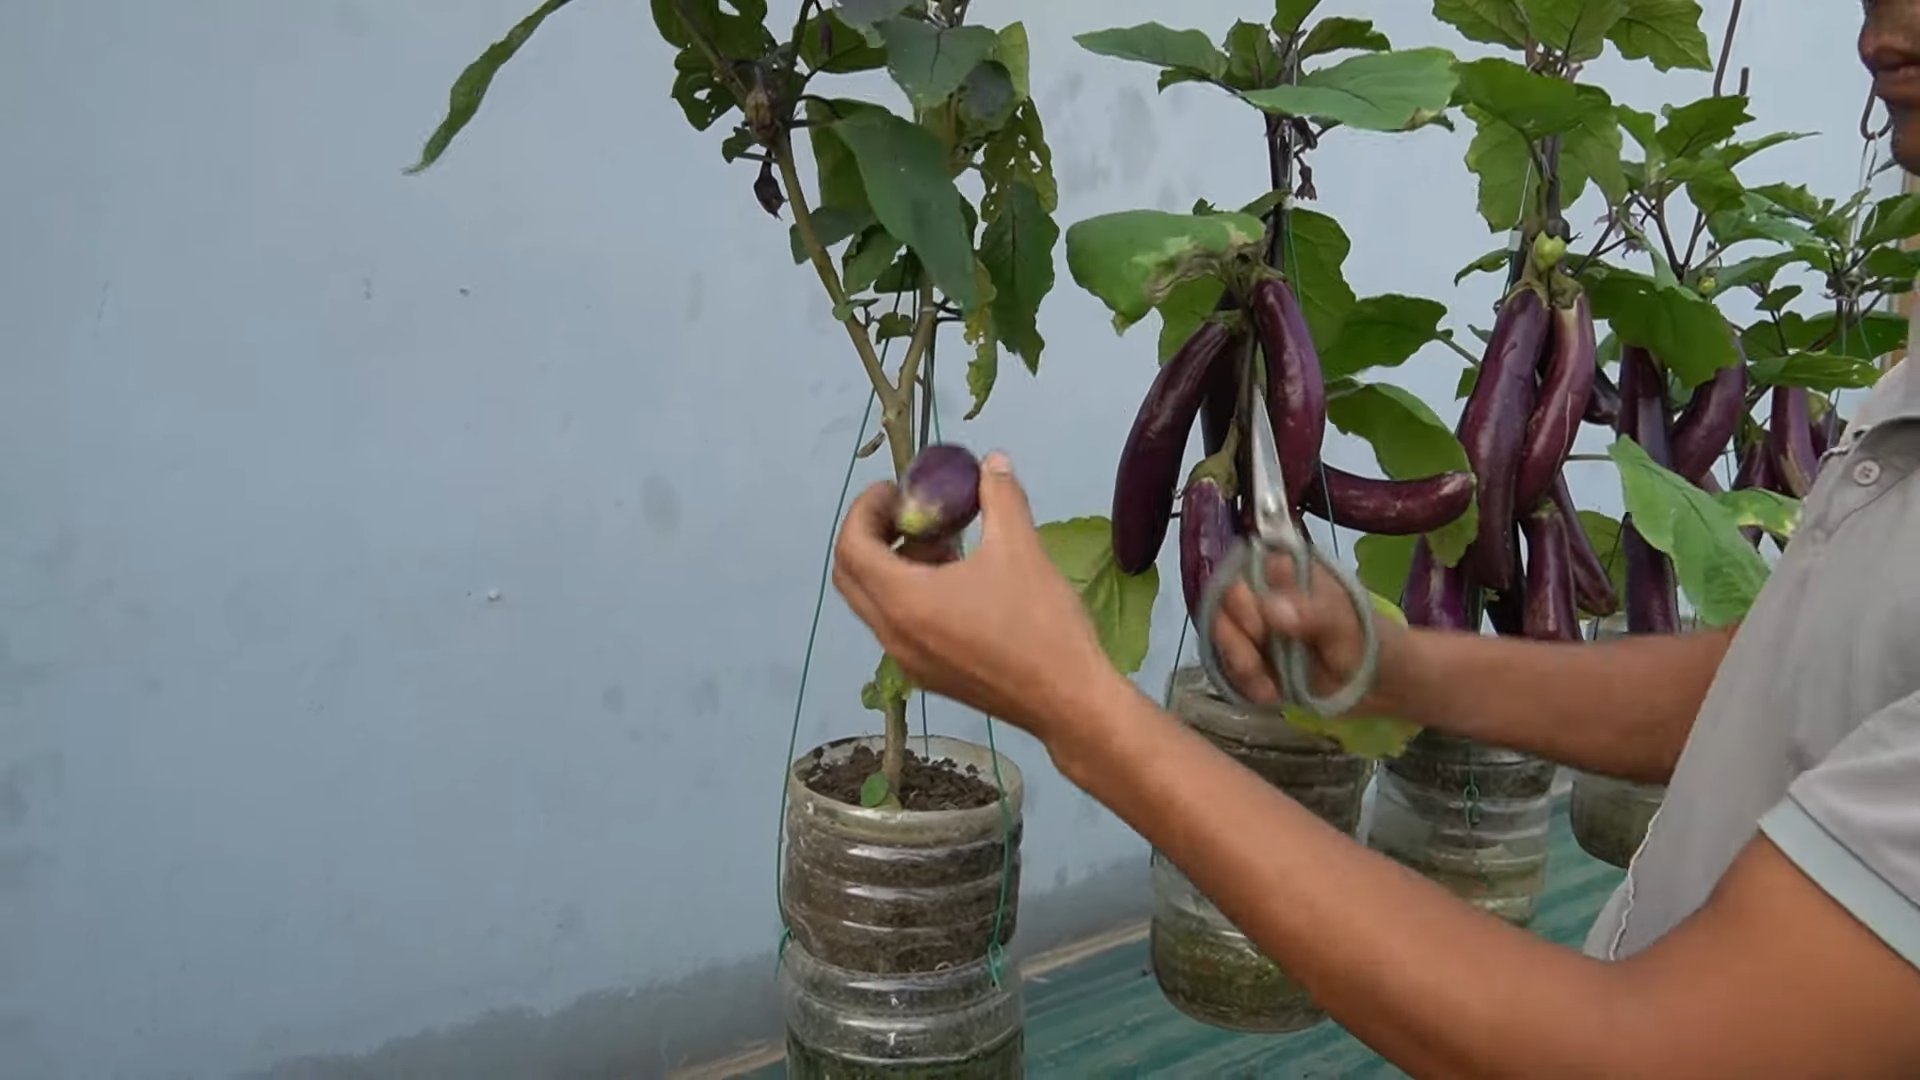
2. Harvesting Technique: Use a sharp knife or scissors to cut the eggplant from the plant, leaving about an inch of stem attached.
3. Enjoy Your Harvest: Enjoy your homegrown eggplants in your favorite recipes! They’re delicious grilled, roasted, or used in eggplant parmesan.
Troubleshooting
Even with the best care, you may encounter some problems along the way. Here are a few common issues and how to address them:
* Yellowing Leaves: This could be a sign of overwatering, underwatering, or nutrient deficiency. Check the soil moisture and adjust your watering accordingly. Fertilize the plants if necessary.
* Drooping Leaves: This could be a sign of underwatering or heat stress. Water the plants thoroughly and provide shade during the hottest part of the day.
* Pests: As mentioned earlier, keep an eye out for pests and treat them promptly.
* Lack of Fruit: This could be due to poor pollination, lack of sunlight, or nutrient deficiency. Hand-pollinate the flowers, provide more sunlight, and fertilize the plants.
Tips for Success
Here are a few extra tips to help you succeed with your eggplant bottle garden:
* Choose the Right Variety: Some eggplant varieties are better suited for container gardening than others. Look for varieties that are compact and produce smaller fruits.
* Use High-Quality Potting Soil: A good quality potting mix is essential for healthy growth.
* Provide Adequate
Conclusion
So, there you have it! Transforming discarded plastic bottles into thriving eggplant havens is not just a clever upcycling project; it’s a sustainable, space-saving, and incredibly rewarding way to grow your own food. We’ve walked you through the simple steps, highlighting the benefits of this innovative gardening technique. From reducing plastic waste to enjoying fresh, homegrown eggplants, this DIY project offers a multitude of advantages.
But why is this eggplant bottle garden harvest method a must-try? Firstly, it’s incredibly accessible. You likely already have the primary ingredient – plastic bottles – readily available. Secondly, it’s a fantastic solution for those with limited gardening space, such as apartment dwellers or individuals with small yards. Vertical gardening maximizes your yield without demanding a large footprint. Thirdly, it’s an environmentally conscious choice, giving new life to discarded materials and reducing your reliance on commercially grown produce, which often involves significant transportation and resource consumption.
Beyond the basic method, there’s ample room for experimentation and personalization. Consider these variations to tailor your eggplant bottle garden to your specific needs and preferences:
* Tiered Systems: Stack multiple bottle gardens on top of each other to create a visually stunning and highly productive vertical garden. Use sturdy supports to ensure stability.
* Hydroponic Adaptation: Explore incorporating a simple hydroponic system into your bottle garden. This involves circulating nutrient-rich water through the bottles, potentially boosting growth and yield.
* Companion Planting: Plant herbs like basil or marigolds alongside your eggplants in the bottles. These companion plants can deter pests and attract beneficial insects, creating a healthier growing environment.
* Bottle Size Variation: Experiment with different bottle sizes to accommodate varying eggplant varieties. Larger bottles may be necessary for larger, more robust eggplant plants.
* Self-Watering Mechanism: Incorporate a wick system to create a self-watering bottle garden. This involves using a cotton rope or strip of fabric to draw water from a reservoir at the bottom of the bottle up to the soil.
We strongly encourage you to give this DIY eggplant bottle garden a try. It’s a fun, educational, and ultimately delicious project that connects you with nature and empowers you to grow your own food. Don’t be afraid to experiment, adapt the method to your specific circumstances, and most importantly, have fun!
Once you’ve harvested your first eggplant from your bottle garden, we’d love to hear about your experience. Share your photos, tips, and challenges in the comments section below. Let’s build a community of bottle garden enthusiasts and inspire others to embrace sustainable gardening practices. Your insights could be invaluable to fellow gardeners embarking on their own eggplant bottle garden journey. Let us know what worked, what didn’t, and any creative modifications you made along the way. Together, we can refine this method and make it even more accessible and effective for everyone. Happy gardening!
Frequently Asked Questions (FAQ)
What type of plastic bottles are best for an eggplant bottle garden?
Ideally, you should use food-grade plastic bottles, such as those used for water, juice, or soda. Look for bottles with the recycling symbols #1 (PET or PETE) or #2 (HDPE), as these are generally considered safer for growing food. Avoid using bottles that have contained harsh chemicals or cleaning products. Thoroughly wash and rinse the bottles before using them for planting. The size of the bottle will depend on the variety of eggplant you are growing. Smaller varieties can thrive in 2-liter bottles, while larger varieties may require larger bottles (3-5 liters).
How often should I water my eggplant bottle garden?
The watering frequency will depend on several factors, including the weather, the size of the bottle, and the type of soil you are using. Generally, you should water your eggplant bottle garden when the top inch of soil feels dry to the touch. During hot, sunny weather, you may need to water daily or even twice a day. In cooler weather, you may only need to water every few days. Ensure that the bottles have adequate drainage holes to prevent waterlogging, which can lead to root rot. A good rule of thumb is to water deeply until you see water draining from the bottom of the bottle.
What type of soil should I use for my eggplant bottle garden?
A well-draining potting mix is essential for a successful eggplant bottle garden. Avoid using garden soil, as it can be too heavy and compact, hindering root growth and drainage. A good potting mix should contain a blend of peat moss, perlite, and vermiculite. You can also add compost to the mix to provide additional nutrients. Consider using a soilless mix for even better drainage and aeration. Ensure the pH level of the soil is between 6.0 and 7.0, which is ideal for eggplant growth.
How much sunlight do eggplants need in a bottle garden?
Eggplants require at least 6-8 hours of direct sunlight per day to thrive. Choose a location for your bottle garden that receives ample sunlight throughout the day. If you live in a particularly hot climate, you may need to provide some afternoon shade to prevent the plants from overheating. If you don’t have access to enough natural sunlight, you can supplement with grow lights. Position the grow lights close to the plants and adjust the height as they grow.
How do I fertilize my eggplant bottle garden?
Eggplants are heavy feeders and require regular fertilization to produce a bountiful harvest. Start fertilizing your plants a few weeks after transplanting them into the bottle garden. Use a balanced fertilizer with an NPK ratio of 10-10-10 or 14-14-14. You can also use organic fertilizers, such as compost tea or fish emulsion. Follow the instructions on the fertilizer package carefully. Avoid over-fertilizing, as this can damage the plants. Fertilize every 2-3 weeks during the growing season.
How do I protect my eggplant bottle garden from pests and diseases?
Regularly inspect your plants for signs of pests or diseases. Common eggplant pests include aphids, flea beetles, and spider mites. You can control these pests with insecticidal soap, neem oil, or by handpicking them off the plants. Common eggplant diseases include fungal infections like early blight and verticillium wilt. Prevent these diseases by providing good air circulation, avoiding overhead watering, and using disease-resistant eggplant varieties. If you notice signs of disease, remove the affected leaves or plants immediately.
Can I grow other vegetables in plastic bottles besides eggplants?
Yes, you can grow a variety of other vegetables in plastic bottles, including tomatoes, peppers, herbs, lettuce, and strawberries. The key is to choose vegetables that are well-suited to container gardening and that have similar growing requirements. Consider the size of the bottle when selecting your vegetables. Smaller bottles are ideal for herbs and lettuce, while larger bottles are better suited for tomatoes and peppers.
How do I harvest eggplants from a bottle garden?
Harvest eggplants when they are firm, glossy, and have reached their mature size. The skin should be smooth and unblemished. Use a sharp knife or pruning shears to cut the eggplant from the plant, leaving a short stem attached. Avoid pulling the eggplant off the plant, as this can damage the plant. Harvest regularly to encourage continued production. Overripe eggplants will become bitter and seedy.
What do I do with the plastic bottles after the growing season?
After the growing season, you can clean and store the plastic bottles for reuse in the following year. Alternatively, you can recycle them or repurpose them for other gardening projects. Consider using them to start seedlings or to create a compost bin. You can also donate them to local schools or community gardens.
Is an eggplant bottle garden harvest as good as a traditional garden harvest?
While the yield from an eggplant bottle garden may not be as high as from a traditional garden, the quality of the eggplants can be just as good, if not better. Bottle gardens allow for better control over soil conditions, watering, and fertilization, which can lead to healthier plants and more flavorful eggplants. Plus, the satisfaction of growing your own food in a sustainable and space-saving way is an added bonus!

Leave a Comment