
Growing Marigolds From Seed is easier than you might think, and I’m here to show you how! Have you ever admired those vibrant, cheerful blooms in someone’s garden and thought, “I wish I could do that?” Well, guess what? You absolutely can! For centuries, marigolds have been cherished not just for their beauty, but also for their practical benefits in the garden. From ancient Aztec rituals where they were used for medicinal purposes to their modern-day role as natural pest repellents, marigolds have a rich and fascinating history.
But beyond their historical significance, why should *you* bother growing marigolds from seed? Simple: they’re incredibly low-maintenance, add a burst of color to any space, and can even help protect your other plants from unwanted critters. Imagine a garden brimming with bright orange and yellow hues, naturally deterring pests and attracting beneficial insects. Plus, starting from seed is a budget-friendly way to fill your garden with these sunny flowers. I’ll guide you through each step, from selecting the right seeds to nurturing your seedlings, so you can enjoy a thriving marigold display all season long. Let’s get started and transform your garden into a vibrant, pest-free paradise!
Growing Marigolds From Seed: A Beginner’s Guide
Hey there, fellow gardening enthusiasts! I’m so excited to share my experience with growing marigolds from seed. It’s a super rewarding process, and trust me, even if you’ve never grown anything before, you can totally do this! Marigolds are not only beautiful and cheerful, but they’re also incredibly easy to grow and fantastic for attracting pollinators and deterring pests in your garden. Let’s dive in!
Choosing Your Marigold Variety
Before we get our hands dirty, let’s talk about choosing the right marigold variety for you. There are two main types: African marigolds (also known as American marigolds) and French marigolds.
* African Marigolds (Tagetes erecta): These are the giants of the marigold world! They can grow up to 3 feet tall and produce large, pom-pom-like flowers. They’re great for adding height and drama to your garden.
* French Marigolds (Tagetes patula): These are smaller and more compact, typically reaching 6-12 inches in height. They have smaller, more delicate flowers and come in a wider range of colors and patterns. I personally love using them as edging plants or in containers.
* Signet Marigolds (Tagetes tenuifolia): These are less common but equally charming. They have a citrusy scent and edible petals! They’re perfect for adding a unique touch to your garden and your salads.
Consider your garden space, desired flower size, and color preferences when making your choice. I usually opt for a mix of French and African marigolds for a diverse and vibrant display.
Materials You’ll Need
Okay, let’s gather our supplies. Here’s what you’ll need to get started:
* Marigold Seeds: Choose your favorite variety! You can find them at most garden centers or online.
* Seed Starting Trays or Small Pots: I prefer using seed starting trays with individual cells, but small pots work just as well.
* Seed Starting Mix: This is a lightweight, sterile soil mix specifically designed for starting seeds. Don’t use regular garden soil, as it can be too heavy and may contain diseases.
* Watering Can or Spray Bottle: Gentle watering is key to avoid disturbing the delicate seedlings.
* Heat Mat (Optional): A heat mat can help speed up germination, especially in cooler climates.
* Grow Lights (Optional): If you’re starting your seeds indoors, grow lights will provide the necessary light for healthy growth. A sunny windowsill can work too, but grow lights offer more consistent results.
* Plant Labels: Trust me, you’ll want to label your seedlings! It’s easy to forget which variety is which.
* Small Trowel or Spoon: For transplanting seedlings.
Starting Your Marigold Seeds Indoors
Starting your marigold seeds indoors gives them a head start, especially if you live in a region with a short growing season. I usually start mine about 6-8 weeks before the last expected frost.
Step-by-Step Instructions:
1. Prepare Your Seed Starting Trays or Pots: Fill your seed starting trays or pots with seed starting mix. Gently tap the trays to settle the mix and remove any air pockets.
2. Sow the Seeds: Make a small indentation (about 1/4 inch deep) in the center of each cell or pot. Place 2-3 marigold seeds in each indentation. This increases the chances of at least one seed germinating.
3. Cover the Seeds: Gently cover the seeds with a thin layer of seed starting mix.
4. Water Thoroughly: Use a watering can or spray bottle to thoroughly moisten the soil. Be careful not to overwater, as this can lead to damping off (a fungal disease that can kill seedlings).
5. Provide Warmth: Place the seed starting trays or pots on a heat mat (if using) and cover them with a clear plastic dome or plastic wrap to create a humid environment. This will help the seeds germinate.
6. Provide Light: Place the trays or pots under grow lights or in a sunny windowsill. If using grow lights, keep them about 2-4 inches above the soil surface.
7. Monitor Moisture Levels: Check the soil moisture daily and water as needed to keep it consistently moist but not soggy.
8. Remove the Cover: Once the seeds germinate (usually within 5-10 days), remove the plastic dome or plastic wrap.
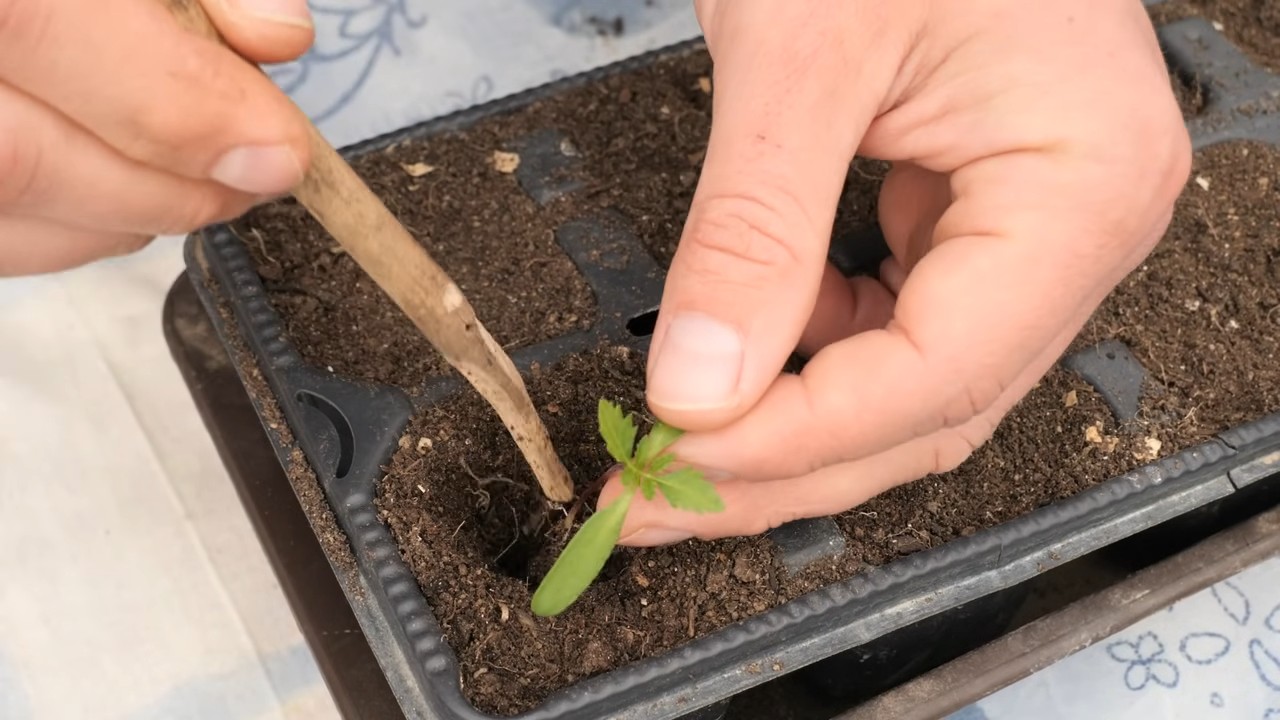
9. Thin the Seedlings: Once the seedlings have their first true leaves (the second set of leaves that appear after the initial seed leaves), thin them to one seedling per cell or pot. Use small scissors to snip off the weaker seedlings at the soil line. This will give the remaining seedling more room to grow.
10. Harden Off the Seedlings: Before transplanting the seedlings outdoors, you’ll need to harden them off. This process gradually acclimates them to outdoor conditions. Start by placing the seedlings outdoors in a sheltered location for a few hours each day, gradually increasing the amount of time they spend outdoors over the course of a week. Protect them from direct sunlight and strong winds.
Direct Sowing Marigold Seeds Outdoors
Hey there, fellow gardening enthusiasts! I’m so excited to share my experience with growing marigolds from seed. It’s a super rewarding process, and trust me, even if you’ve never grown anything before, you can totally do this! Marigolds are not only beautiful and cheerful, but they’re also incredibly easy to grow and fantastic for attracting pollinators and deterring pests in your garden. Let’s dive in!
Choosing Your Marigold Variety
Before we get our hands dirty, let’s talk about choosing the right marigold variety for you. There are two main types: African marigolds (also known as American marigolds) and French marigolds.
* African Marigolds (Tagetes erecta): These are the giants of the marigold world! They can grow up to 3 feet tall and produce large, pom-pom-like flowers. They’re great for adding height and drama to your garden.
* French Marigolds (Tagetes patula): These are smaller and more compact, typically reaching 6-12 inches in height. They have smaller, more delicate flowers and come in a wider range of colors and patterns. I personally love using them as edging plants or in containers.
* Signet Marigolds (Tagetes tenuifolia): These are less common but equally charming. They have a citrusy scent and edible petals! They’re perfect for adding a unique touch to your garden and your salads.
Consider your garden space, desired flower size, and color preferences when making your choice. I usually opt for a mix of French and African marigolds for a diverse and vibrant display.
Materials You’ll Need
Okay, let’s gather our supplies. Here’s what you’ll need to get started:
* Marigold Seeds: Choose your favorite variety! You can find them at most garden centers or online.
* Seed Starting Trays or Small Pots: I prefer using seed starting trays with individual cells, but small pots work just as well.
* Seed Starting Mix: This is a lightweight, sterile soil mix specifically designed for starting seeds. Don’t use regular garden soil, as it can be too heavy and may contain diseases.
* Watering Can or Spray Bottle: Gentle watering is key to avoid disturbing the delicate seedlings.
* Heat Mat (Optional): A heat mat can help speed up germination, especially in cooler climates.
* Grow Lights (Optional): If you’re starting your seeds indoors, grow lights will provide the necessary light for healthy growth. A sunny windowsill can work too, but grow lights offer more consistent results.
* Plant Labels: Trust me, you’ll want to label your seedlings! It’s easy to forget which variety is which.
* Small Trowel or Spoon: For transplanting seedlings.
Starting Your Marigold Seeds Indoors
Starting your marigold seeds indoors gives them a head start, especially if you live in a region with a short growing season. I usually start mine about 6-8 weeks before the last expected frost.
Step-by-Step Instructions:
1. Prepare Your Seed Starting Trays or Pots: Fill your seed starting trays or pots with seed starting mix. Gently tap the trays to settle the mix and remove any air pockets.
2. Sow the Seeds: Make a small indentation (about 1/4 inch deep) in the center of each cell or pot. Place 2-3 marigold seeds in each indentation. This increases the chances of at least one seed germinating.
3. Cover the Seeds: Gently cover the seeds with a thin layer of seed starting mix.
4. Water Thoroughly: Use a watering can or spray bottle to thoroughly moisten the soil. Be careful not to overwater, as this can lead to damping off (a fungal disease that can kill seedlings).
5. Provide Warmth: Place the seed starting trays or pots on a heat mat (if using) and cover them with a clear plastic dome or plastic wrap to create a humid environment. This will help the seeds germinate.
6. Provide Light: Place the trays or pots under grow lights or in a sunny windowsill. If using grow lights, keep them about 2-4 inches above the soil surface.
7. Monitor Moisture Levels: Check the soil moisture daily and water as needed to keep it consistently moist but not soggy.
8. Remove the Cover: Once the seeds germinate (usually within 5-10 days), remove the plastic dome or plastic wrap.
9. Thin the Seedlings: Once the seedlings have their first true leaves (the second set of leaves that appear after the initial seed leaves), thin them to one seedling per cell or pot. Use small scissors to snip off the weaker seedlings at the soil line. This will give the remaining seedling more room to grow.
10. Harden Off the Seedlings: Before transplanting the seedlings outdoors, you’ll need to harden them off. This process gradually acclimates them to outdoor conditions. Start by placing the seedlings outdoors in a sheltered location for a few hours each day, gradually increasing the amount of time they spend outdoors over the course of a week. Protect them from direct sunlight and strong winds.
Direct Sowing Marigold Seeds Outdoors
If you live in a region with a long growing season, you can also direct sow marigold seeds outdoors. This is a simpler method, but it’s important to wait until the soil has warmed up and the risk of frost has passed.
Step-by-Step Instructions:
1. Prepare the Soil: Choose a sunny location with well-drained soil. Amend the soil with compost or other organic matter to improve its fertility and drainage.
2. Sow the Seeds: Sow the seeds directly into the soil, about 1/4 inch deep and 6-12 inches apart, depending on the variety.
3. Water Thoroughly: Gently water the soil to moisten it.
4. Keep the Soil Moist: Keep the soil consistently moist until the seeds germinate.
5. Thin the Seedlings: Once the seedlings emerge, thin them to the desired spacing.
Transplanting Marigold Seedlings Outdoors
Once your marigold seedlings have been hardened off and the risk of frost has passed, it’s time to transplant them into your garden.
Step-by-Step Instructions:
1. Choose a Sunny Location: Marigolds thrive in full sun, so choose a location that receives at least 6 hours of sunlight per day.
2. Prepare the Soil: Amend the soil with compost or other organic matter to improve its fertility and drainage.
3. Dig Holes: Dig holes that are slightly larger than the root balls of the seedlings. Space the holes 6-12 inches apart, depending on the variety.
4. Remove the Seedlings from Their Containers: Gently remove the seedlings from their seed starting trays or pots. Be careful not to damage the roots.
5. Place the Seedlings in the Holes: Place the seedlings in the holes and gently backfill with soil.
6. Water Thoroughly: Water the seedlings thoroughly to help them settle in.
7. Mulch Around the Plants: Apply a layer of mulch around the plants to help retain moisture and suppress weeds.
Caring for Your Marigolds
Once your marigolds are established, they’re relatively low-maintenance. Here are a few tips to keep them thriving:
* Watering: Water regularly, especially during dry spells. Avoid overwatering, as this can lead to root rot.
* Fertilizing: Marigolds don’t require a lot of fertilizer. A light feeding with a balanced fertilizer every few weeks is sufficient.
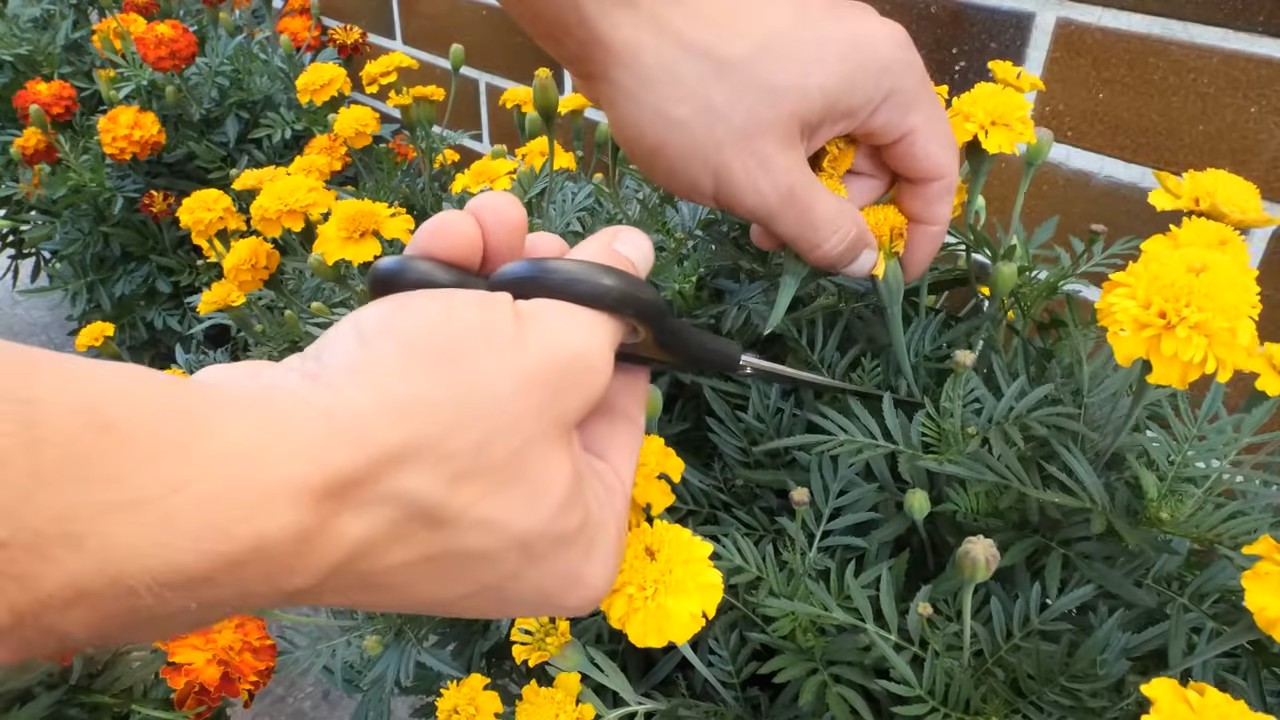
* Deadheading: Deadhead spent flowers regularly to encourage more blooms. Simply pinch or cut off the faded flowers just below the flower head.
* Pest Control: Marigolds are relatively pest-resistant, but they can occasionally be bothered by aphids or spider mites. If you notice any pests, spray the plants with insecticidal soap.
* Disease Control: Avoid overhead watering to prevent fungal diseases. If you notice any signs of disease, such as powdery mildew, treat the plants with a fungicide.
Enjoying Your Marigolds
Now comes the best part: enjoying your beautiful marigolds! They’ll bloom throughout the summer and into the fall, adding a splash of color to your garden. You can also cut the flowers and bring them indoors to enjoy in bouquets.
Marigolds are also edible! The petals have a slightly citrusy flavor and can be used to garnish salads, soups, and other dishes. Just make sure to only eat petals from plants that haven’t been treated with pesticides.
Growing marigolds from seed is a simple and rewarding experience. With a little bit of care and attention, you can enjoy a vibrant display of these cheerful flowers all season long. Happy gardening
Conclusion
So, there you have it! Growing marigolds from seed isn’t just a cost-effective way to fill your garden with vibrant color; it’s a deeply rewarding experience that connects you to the natural world. From the initial anticipation of those tiny sprouts emerging to the triumphant display of cheerful blooms, every step of the process is a testament to the power of nature and your own green thumb.
But why is this DIY trick a must-try? Beyond the obvious financial benefits, starting your marigolds from seed gives you complete control over the varieties you grow. No longer are you limited to the selection at your local garden center. You can explore heirloom varieties, experiment with different colors and sizes, and even cultivate unique cultivars that perfectly suit your garden’s aesthetic and your personal preferences. Imagine a garden bursting with lemon-yellow ‘Lemon Drop’ marigolds alongside the deep orange hues of ‘Crackerjack’ – all grown from seeds you nurtured yourself!
Furthermore, starting from seed allows you to get a head start on the growing season, especially if you live in a region with a shorter summer. By starting your seeds indoors, you can have robust seedlings ready to transplant outdoors as soon as the weather permits, giving you a longer blooming period and a more impressive display.
Don’t be afraid to experiment with variations! Try using different types of seed starting mixes to see which one works best for you. Some gardeners swear by a simple mix of peat moss and perlite, while others prefer a more complex blend with added nutrients. You can also experiment with different lighting conditions. While a sunny windowsill can work, a grow light can provide more consistent and intense light, resulting in stronger, healthier seedlings.
Consider companion planting your marigolds. They are known to deter certain pests, making them excellent companions for tomatoes, peppers, and other vegetables. Plant them strategically throughout your garden to create a natural pest control system and enjoy the added benefit of their vibrant blooms.
And if you’re feeling adventurous, try saving seeds from your favorite marigolds at the end of the season. This is a fantastic way to perpetuate your favorite varieties and create a truly unique collection of marigolds that are perfectly adapted to your local climate. Just be aware that hybrid varieties may not come true from seed, meaning the offspring may not look exactly like the parent plant.
We wholeheartedly encourage you to give this DIY trick a try. It’s easier than you might think, and the rewards are well worth the effort. Embrace the joy of nurturing life from a tiny seed and witness the magic of nature unfold before your eyes.
Once you’ve embarked on your marigold-growing adventure, we’d love to hear about your experience! Share your tips, tricks, and photos in the comments section below. Let’s create a community of marigold enthusiasts and inspire others to discover the joys of growing their own flowers from seed. What varieties did you choose? What challenges did you face, and how did you overcome them? Your insights could be invaluable to other aspiring gardeners. So, grab your seeds, get your hands dirty, and let the marigold magic begin! Remember, successful **growing marigolds from seed** is within everyone’s reach.
Frequently Asked Questions (FAQ)
What is the best time to start marigold seeds indoors?
The ideal time to start marigold seeds indoors is typically 6-8 weeks before the last expected frost in your area. This allows the seedlings to develop a strong root system and be ready for transplanting outdoors once the weather warms up. To determine the last frost date for your region, consult your local weather service or agricultural extension office. Starting too early can result in leggy, weak seedlings, while starting too late may delay flowering.
What type of soil is best for starting marigold seeds?
A light, well-draining seed starting mix is crucial for successful germination and seedling development. Avoid using garden soil, as it can be too heavy and may contain pathogens that can harm young seedlings. A commercially available seed starting mix, typically composed of peat moss, vermiculite, and perlite, provides the ideal balance of moisture retention and drainage. You can also create your own seed starting mix by combining equal parts of these ingredients. Ensure the mix is thoroughly moistened before sowing the seeds.
How deep should I plant marigold seeds?
Marigold seeds should be planted at a depth of about ¼ inch. Planting them too deep can prevent them from germinating, while planting them too shallow can cause them to dry out. Gently press the seeds into the moistened seed starting mix and cover them with a thin layer of the mix. Lightly water the surface to ensure good seed-to-soil contact.
How much light do marigold seedlings need?
Marigold seedlings require plenty of light to grow strong and healthy. A sunny windowsill that receives at least 6 hours of direct sunlight per day is a good option. However, if you don’t have access to a sunny windowsill, or if the light is inconsistent, a grow light is a better choice. Place the grow light a few inches above the seedlings and keep it on for 14-16 hours per day. As the seedlings grow, you may need to adjust the height of the light to maintain the optimal distance.
How often should I water marigold seedlings?
Keep the seed starting mix consistently moist, but not soggy. Water the seedlings when the surface of the mix feels dry to the touch. Use a gentle watering can or spray bottle to avoid disturbing the delicate seedlings. Overwatering can lead to fungal diseases, while underwatering can cause the seedlings to wilt and die.
When can I transplant marigold seedlings outdoors?
Marigold seedlings can be transplanted outdoors once the danger of frost has passed and the soil has warmed up. Harden off the seedlings by gradually exposing them to outdoor conditions for a week or two before transplanting. Start by placing them in a sheltered location for a few hours each day, gradually increasing the amount of time they spend outdoors. This will help them acclimate to the sun, wind, and temperature changes.
What are some common problems when growing marigolds from seed?
Some common problems include damping-off (a fungal disease that causes seedlings to rot), leggy seedlings (caused by insufficient light), and pest infestations (such as aphids or spider mites). To prevent damping-off, use a sterile seed starting mix and avoid overwatering. To prevent leggy seedlings, provide adequate light. To control pests, inspect your seedlings regularly and treat any infestations promptly with insecticidal soap or neem oil.
Can I save seeds from my marigolds to plant next year?
Yes, you can save seeds from your marigolds to plant next year. Allow the flower heads to dry completely on the plant. Once they are dry and brown, carefully remove the seeds from the flower heads. Store the seeds in a cool, dry, and dark place until you are ready to plant them. Keep in mind that hybrid varieties may not come true from seed, meaning the offspring may not look exactly like the parent plant. Open-pollinated varieties are more likely to produce offspring that are similar to the parent plant.
Are marigolds deer resistant?
Marigolds are generally considered to be deer resistant, although deer may still nibble on them if other food sources are scarce. The strong scent of marigolds is thought to deter deer. Planting marigolds around your garden can help protect other plants from deer damage.
What are the benefits of companion planting marigolds?
Marigolds are excellent companion plants for a variety of vegetables and flowers. They are known to deter certain pests, such as nematodes, aphids, and whiteflies. Planting marigolds near tomatoes, peppers, and other vegetables can help protect them from these pests. Marigolds also attract beneficial insects, such as ladybugs and hoverflies, which prey on harmful pests.

Leave a Comment