
Grow Bag Watermelon: Imagine sinking your teeth into a juicy, homegrown watermelon, bursting with flavor, all thanks to your own green thumb! You might think growing watermelons is only for those with sprawling gardens, but I’m here to tell you that’s simply not true. This DIY guide unlocks the secrets to cultivating these summer delights even in limited spaces, using the magic of grow bags.
Watermelons have a rich history, dating back thousands of years to Africa. They were even depicted in ancient Egyptian art! Over time, different varieties have been developed, each with its unique sweetness and size. But one thing remains constant: the joy of enjoying a perfectly ripe watermelon on a hot day.
Why should you try this DIY grow bag watermelon trick? Well, for starters, it’s incredibly rewarding to nurture a plant from seed to fruit. Plus, store-bought watermelons often lack the intense flavor of homegrown ones. And let’s be honest, who doesn’t love a good DIY project? This method is perfect for apartment dwellers, balcony gardeners, or anyone looking to maximize their harvest in a small area. I’ll guide you through every step, from choosing the right grow bag to watering techniques, ensuring you’ll be enjoying your own grow bag watermelon in no time. Get ready to impress your friends and family with your gardening prowess!
Growing Watermelons in Grow Bags: A Sweet Success Story!
Hey there, fellow gardening enthusiasts! I’m so excited to share my experience with growing watermelons in grow bags. I know, it sounds a little unconventional, right? But trust me, it’s totally doable, and the results are incredibly rewarding. If you’re short on space, have poor soil, or just want to try something new, growing watermelons in grow bags might be the perfect solution for you. Let’s dive in!
Why Grow Bags for Watermelons?
Before we get started, let’s talk about why grow bags are actually a great option for watermelons:
* Excellent Drainage: Watermelons need well-draining soil to thrive. Grow bags naturally allow excess water to escape, preventing root rot, which is a common problem with watermelons.
* Improved Aeration: The fabric of grow bags allows air to circulate around the roots, promoting healthy growth and nutrient uptake.
* Portability: You can easily move your watermelon plants around to follow the sun or protect them from unexpected weather.
* Space-Saving: Grow bags are perfect for balconies, patios, or small gardens where you don’t have a lot of in-ground space.
* Soil Control: You have complete control over the soil composition, ensuring your watermelons get the nutrients they need.
Choosing the Right Grow Bag and Variety
Okay, so you’re convinced! Now, let’s get down to the nitty-gritty.
* Grow Bag Size: This is crucial! Watermelons are heavy feeders and need plenty of room for their roots to grow. I recommend using a grow bag that is at least 20 gallons, but 25-30 gallons is even better. The bigger, the better, really!
* Grow Bag Material: Fabric grow bags are the way to go. They’re breathable and allow for excellent drainage. Avoid plastic pots, as they can overheat and retain too much moisture.
* Watermelon Variety: Not all watermelon varieties are created equal when it comes to grow bags. Look for bush or compact varieties that don’t produce overly long vines. Some great options include:
* Bush Sugar Baby
* Golden Midget
* Tiger Baby
* Sugar Baby (can work, but needs more pruning)
* Note: Larger varieties like Charleston Gray can be grown, but they require significant support and more space.
What You’ll Need: The Supply List
Before we start planting, let’s gather all the necessary supplies. This will make the whole process much smoother.
* Grow bag (20-30 gallons)
* High-quality potting mix (specifically for vegetables)
* Water-soluble fertilizer (formulated for fruits and vegetables)
* Watermelon seeds or seedlings
* Trowel or small shovel
* Watering can or hose
* Mulch (straw, wood chips, or plastic mulch)
* Tomato cage or trellis (optional, for support)
* Gardening gloves (optional, but recommended)
Getting Started: Planting Your Watermelon
Alright, let’s get our hands dirty! This is the fun part.
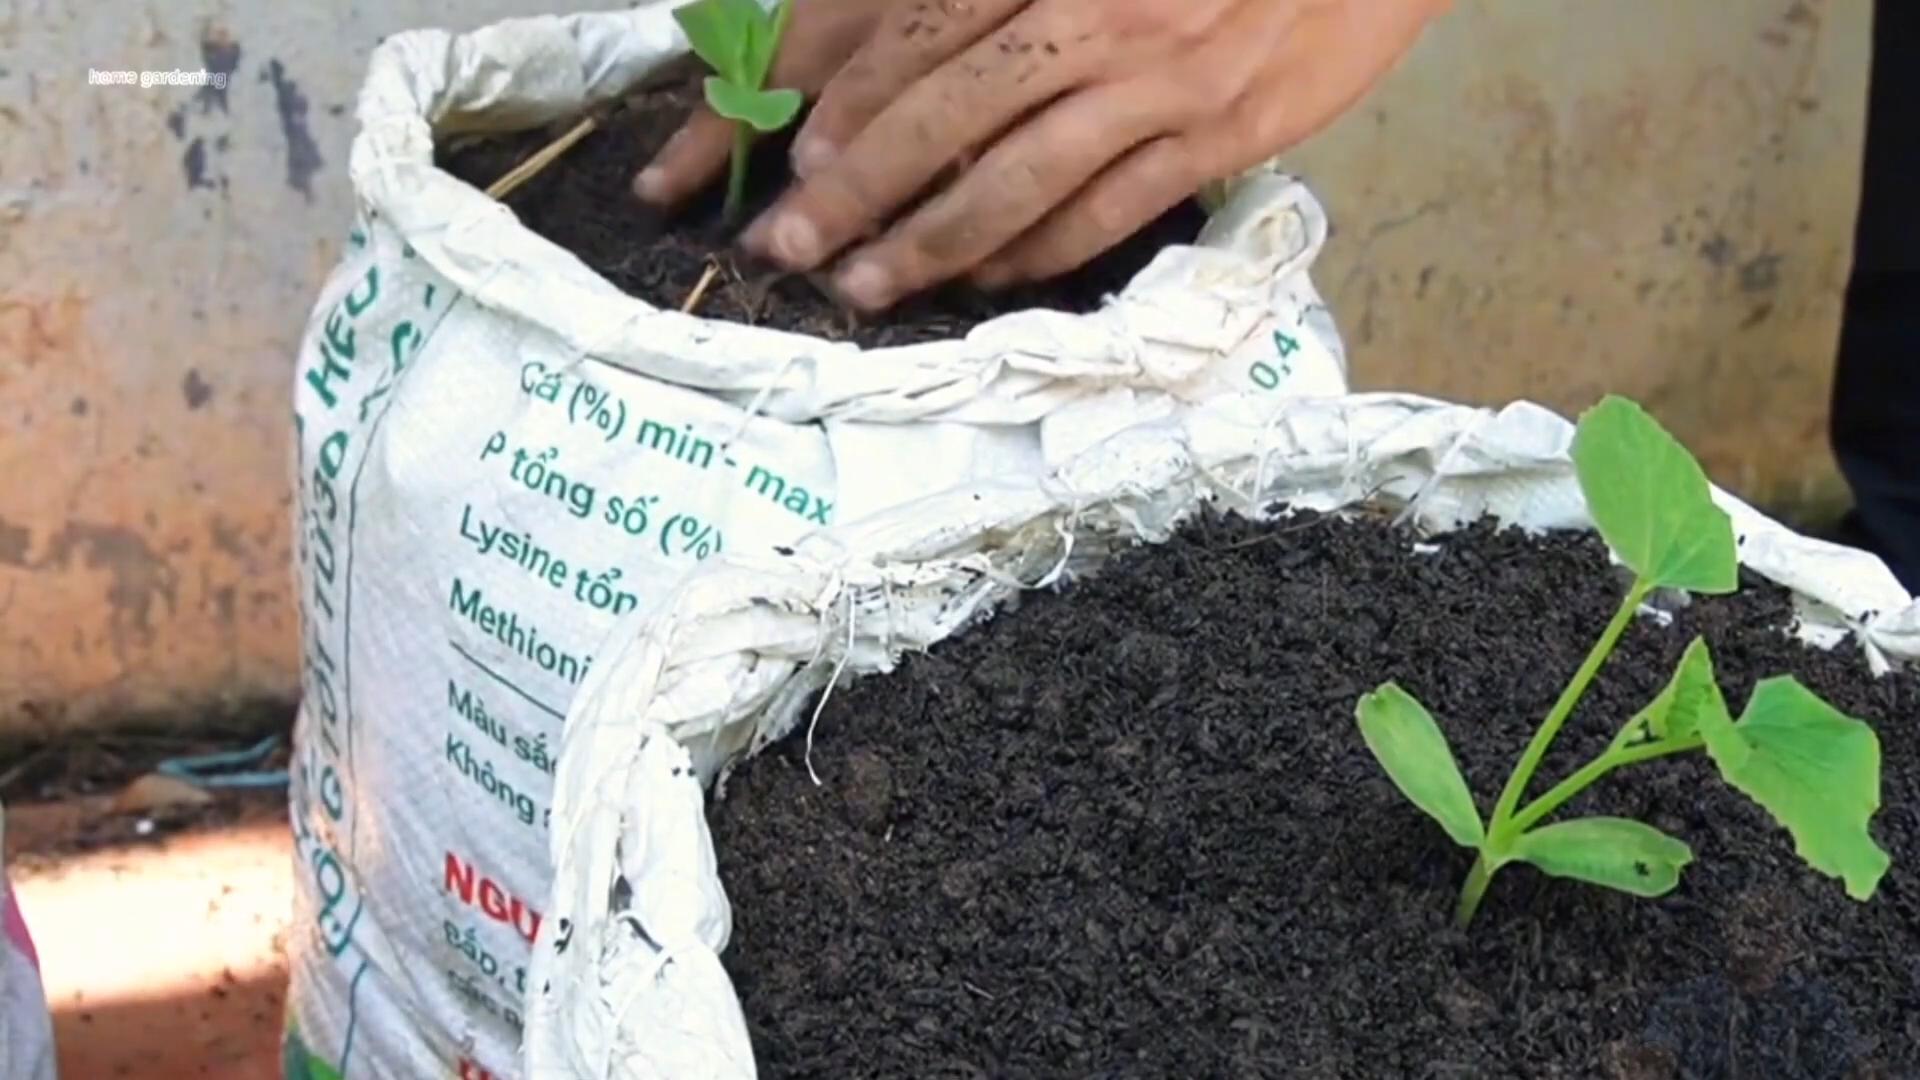
1. Prepare the Grow Bag: Fill your grow bag with the high-quality potting mix, leaving about 2-3 inches of space at the top. Gently pat down the soil to remove any air pockets.
2. Sowing Seeds (if starting from seed): If you’re starting from seed, sow 2-3 seeds in the center of the grow bag, about 1 inch deep. Water gently to moisten the soil.
3. Transplanting Seedlings (if using seedlings): If you’re using seedlings, gently remove the seedling from its container, being careful not to damage the roots. Dig a hole in the center of the grow bag that is large enough to accommodate the root ball. Place the seedling in the hole and backfill with soil. Water thoroughly.
4. Mulch, Mulch, Mulch!: Apply a layer of mulch around the base of the plant. Mulch helps to retain moisture, suppress weeds, and regulate soil temperature. I personally prefer straw mulch, but wood chips or even plastic mulch will work.
5. Support System (Optional): If you’re growing a variety that produces longer vines, consider adding a tomato cage or trellis to provide support. This will help to keep the fruit off the ground and prevent rot. I’ve found that even bush varieties benefit from a little support as the watermelons get heavier.
Watering and Feeding: Keeping Your Watermelons Happy
Watermelons are thirsty plants, especially when they’re fruiting. Proper watering and feeding are essential for a successful harvest.
1. Watering: Water your watermelon plants deeply and regularly, especially during hot, dry weather. Aim to keep the soil consistently moist, but not waterlogged. Check the soil moisture by sticking your finger about an inch into the soil. If it feels dry, it’s time to water. I usually water every day or every other day, depending on the weather.
2. Fertilizing: Watermelons are heavy feeders and need regular fertilization to produce large, sweet fruit. Start fertilizing about two weeks after planting, using a water-soluble fertilizer formulated for fruits and vegetables. Follow the instructions on the fertilizer package for application rates. I typically fertilize every 2-3 weeks throughout the growing season.
3. Foliar Feeding (Optional): In addition to regular fertilization, you can also give your watermelon plants a foliar feeding every few weeks. This involves spraying the leaves with a diluted fertilizer solution. Foliar feeding can help to boost growth and improve fruit quality.
Pruning and Training: Maximizing Your Harvest
Pruning and training can help to improve air circulation, reduce disease, and encourage fruit production.
1. Pruning: Remove any dead, damaged, or yellowing leaves. Also, prune away any suckers (small shoots that grow from the base of the plant). This will help to direct the plant’s energy towards fruit production.
2. Training: If you’re growing a variety with long vines, train the vines to grow up a trellis or along the ground. This will help to keep the fruit off the ground and prevent rot. You can use twine or plant clips to secure the vines to the support structure.
3. Pollination Assistance (If Needed): Watermelons need to be pollinated in order to produce fruit. If you’re not seeing a lot of bees or other pollinators in your garden, you may need to hand-pollinate the flowers. To do this, use a small paintbrush to transfer pollen from the male flowers to the female flowers. Female flowers have a small, immature watermelon at the base of the flower.
Pest and Disease Control: Protecting Your Precious Watermelons
Watermelons can be susceptible to various pests and diseases. Here’s how to protect your plants:
1. Common Pests:
* Aphids: These tiny insects can suck the sap from leaves and stems. Control aphids with insecticidal soap or neem oil.
* Squash Bugs: These pests can damage leaves and stems. Handpick squash bugs or use insecticidal soap.
* Cucumber Beetles: These beetles can spread diseases and damage leaves and fruit. Use row covers to protect young plants or apply neem oil.
2. Common Diseases:
* Powdery Mildew: This fungal disease causes a white, powdery coating on leaves. Improve air circulation and apply a fungicide if necessary.
* Fusarium Wilt: This soilborne disease can cause wilting and death. Use disease-resistant varieties and avoid overwatering.
* Anthracnose: This fungal disease can cause lesions on leaves and fruit. Apply a fungicide if necessary.
3. Prevention is Key: The best way to control pests and diseases is to prevent them from occurring in the first place. Choose disease-resistant varieties, provide good air circulation, avoid overwatering, and keep your garden clean.
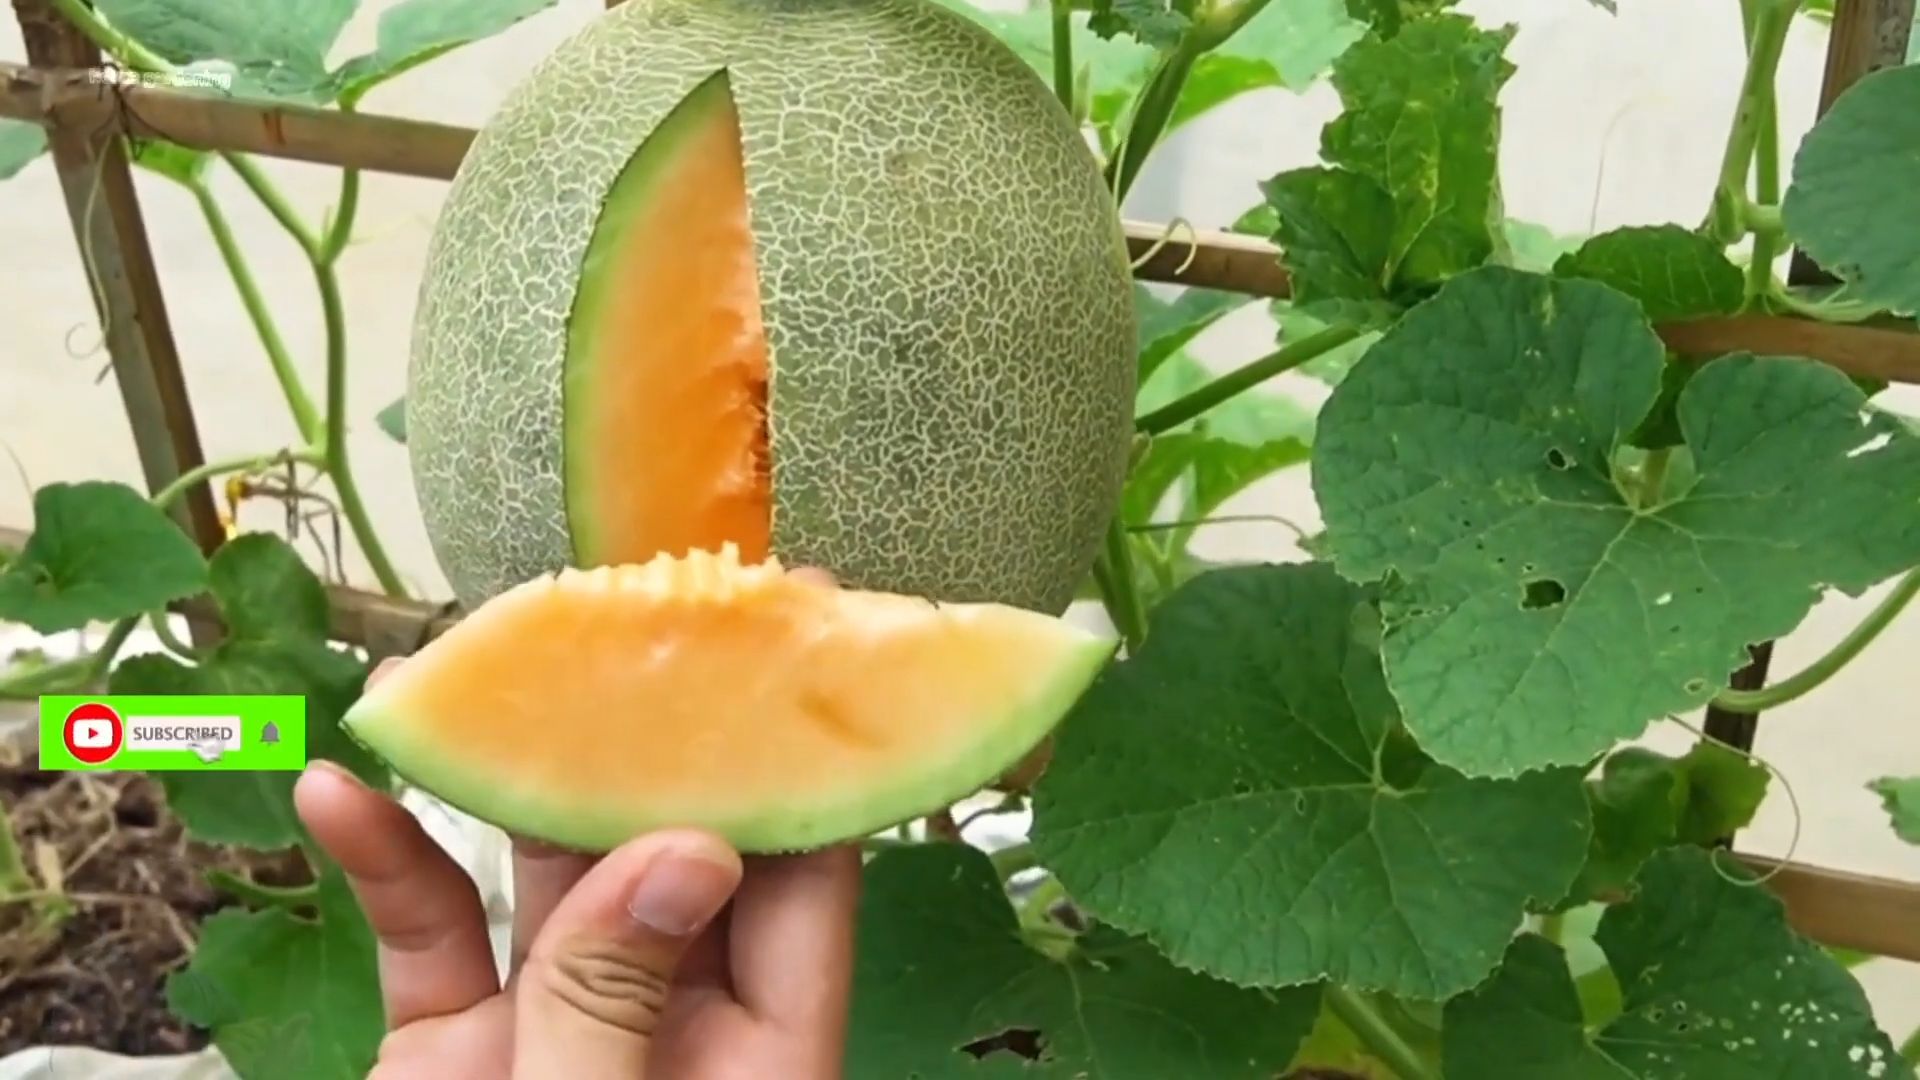
Harvesting Your Watermelons: The Sweet Reward
After all your hard work, it’s finally time to harvest your watermelons! This is the most exciting part.
1. Determining Ripeness: Knowing when a watermelon is ripe can be tricky, but here are a few things to look for:
* The tendril closest to the fruit turns brown and dries up.
* The underside of the watermelon (where it rests on the ground) turns from white to yellow.
* The watermelon sounds hollow when you thump it.
2. Harvesting: Once you’ve determined that your watermelon is ripe, use a sharp knife to cut it from the vine, leaving a few inches of stem attached.
3. Enjoy!: Now, it’s time to enjoy the fruits (or rather, watermelons) of your labor! Slice it open and savor the sweet
Conclusion
So, there you have it! Growing watermelons in grow bags isn’t just a quirky gardening experiment; it’s a game-changer for anyone with limited space, challenging soil, or simply a desire for a more controlled growing environment. We’ve walked through the steps, highlighted the benefits, and armed you with the knowledge to cultivate your own juicy, homegrown watermelons, even if you thought it was impossible.
The beauty of this method lies in its adaptability. You’re not confined to a traditional garden plot. Balconies, patios, rooftops – all become potential watermelon havens. And the improved drainage and soil control offered by grow bags translate to healthier plants and, ultimately, more delicious fruit. Think about it: no more battling compacted clay or nutrient-poor soil. You’re in charge of creating the perfect watermelon paradise.
But the advantages extend beyond convenience. Grow bags warm up faster than the ground, giving your watermelon seedlings a head start in the spring. This is particularly crucial in cooler climates where the growing season is shorter. Plus, the portability of grow bags means you can easily move your plants to chase the sun or shelter them from unexpected frosts.
Don’t be afraid to experiment! While we’ve focused on standard-sized watermelons, you can absolutely adapt this method for smaller, bush-type varieties. Consider trying ‘Sugar Baby’ or ‘Bush Sugar Baby’ for a more compact option. You can also explore different soil amendments to tailor the nutrient profile to your specific watermelon variety. Adding bone meal for phosphorus or Epsom salts for magnesium can further enhance fruit production.
And speaking of variations, why not try companion planting within your grow bag? Marigolds can deter pests, while basil can improve the flavor of your watermelons. A little creativity can go a long way in maximizing your harvest.
The key takeaway here is that growing watermelons in grow bags opens up a world of possibilities for gardeners of all levels. It’s a rewarding and surprisingly simple way to enjoy the taste of summer, fresh from your own “garden,” no matter how small.
We wholeheartedly encourage you to give this DIY trick a try. It’s an investment in fresh, healthy food, a connection to nature, and a whole lot of fun. And once you’ve tasted your first homegrown watermelon, you’ll be hooked!
But don’t keep your success (or your challenges!) to yourself. We want to hear about your experiences! Share your photos, tips, and questions in the comments below. Let’s build a community of grow bag watermelon enthusiasts and learn from each other. What watermelon variety did you choose? What challenges did you face, and how did you overcome them? Your insights can help others achieve their watermelon-growing dreams. So, grab your grow bags, your seeds, and your gardening gloves, and let’s get growing! Remember, the sweetest rewards come from the fruits (and vegetables!) of our labor. This **grow bag watermelon** method is your ticket to a summer filled with juicy, refreshing goodness.
Frequently Asked Questions (FAQ)
What size grow bag is best for watermelons?
The ideal size grow bag for watermelons is typically between 20 and 30 gallons. This provides ample space for the roots to develop and allows the plant to access sufficient nutrients and water. Smaller varieties like ‘Sugar Baby’ might do well in a 20-gallon bag, while larger varieties will thrive in a 30-gallon bag. Ensure the bag is sturdy and well-draining to prevent waterlogging.
What type of soil should I use in my grow bag?
A well-draining, nutrient-rich potting mix is essential for growing watermelons in grow bags. Avoid using garden soil, as it can become compacted and hinder root growth. A good mix consists of equal parts compost, peat moss (or coconut coir), and perlite or vermiculite. The compost provides essential nutrients, the peat moss or coir retains moisture, and the perlite or vermiculite improves drainage. You can also add slow-release fertilizer to the mix to provide a steady supply of nutrients throughout the growing season.
How often should I water my watermelon plants in grow bags?
Watermelon plants in grow bags require consistent moisture, especially during hot weather. Check the soil moisture daily, and water deeply whenever the top inch feels dry to the touch. Avoid overwatering, as this can lead to root rot. A good rule of thumb is to water until you see water draining from the bottom of the bag. During peak growing season, you may need to water daily or even twice a day. Consider using a soaker hose or drip irrigation system to provide a slow, steady supply of water directly to the roots.
How much sunlight do watermelons need in grow bags?
Watermelons are sun-loving plants and require at least 6-8 hours of direct sunlight per day to thrive. Choose a location for your grow bag that receives ample sunlight throughout the day. If you live in a particularly hot climate, you may need to provide some afternoon shade to prevent the plants from overheating. You can also rotate the grow bag periodically to ensure that all sides of the plant receive equal sunlight.
Do I need to fertilize my watermelon plants in grow bags?
Yes, watermelons are heavy feeders and require regular fertilization to produce large, juicy fruits. Start fertilizing your plants about two weeks after transplanting them into the grow bag. Use a balanced fertilizer (e.g., 10-10-10) every two to three weeks. Once the fruits begin to develop, switch to a fertilizer that is higher in phosphorus and potassium to promote fruit growth and sweetness. You can also supplement with liquid seaweed or fish emulsion for added nutrients.
How do I support the watermelon fruit as it grows in a grow bag?
As watermelons grow larger, they can become quite heavy and may need support to prevent them from breaking off the vine. You can use slings made from netting, fabric, or even old pantyhose to support the fruit. Tie the slings to a sturdy trellis or stake. Alternatively, you can place the fruit on a bed of straw or mulch to protect it from direct contact with the soil.
How do I know when my watermelon is ripe?
There are several indicators that a watermelon is ripe. Look for the following signs:
* The tendril closest to the fruit should be brown and dry.
* The spot where the watermelon rests on the ground (the “ground spot”) should be yellow or cream-colored.
* The watermelon should sound hollow when you thump it.
* The skin should be dull rather than shiny.
Can I grow multiple watermelon plants in one grow bag?
While it’s technically possible to grow multiple watermelon plants in a large grow bag, it’s generally not recommended. Watermelon plants require a lot of space and nutrients, and overcrowding can lead to stunted growth and reduced fruit production. It’s best to grow one watermelon plant per grow bag to ensure that it has enough room to thrive.
What are some common pests and diseases that affect watermelons in grow bags?
Common pests that can affect watermelons include aphids, squash bugs, and vine borers. Diseases include powdery mildew, fusarium wilt, and anthracnose. Regularly inspect your plants for signs of pests or diseases, and take action promptly to prevent them from spreading. Use organic pest control methods such as insecticidal soap or neem oil. Ensure good air circulation around the plants to prevent fungal diseases.
Can I reuse the soil in my grow bag for next year’s watermelon crop?
It’s generally not recommended to reuse the soil in your grow bag for watermelons the following year. Watermelons are heavy feeders and can deplete the soil of nutrients. Additionally, the soil may harbor pests or diseases that can affect future crops. It’s best to replace the soil with fresh potting mix each year. You can, however, use the old soil in other parts of your garden or compost it.

Leave a Comment