
Soil-Free Wheatgrass Growing: Ever dreamt of having a vibrant, green patch of wheatgrass right in your kitchen, ready to be juiced or added to your favorite smoothie? I know I have! But the thought of dealing with soil, potential messes, and the hassle of traditional gardening can be a real deterrent. That’s where the magic of soil-free wheatgrass growing comes in!
For centuries, wheatgrass has been celebrated for its incredible health benefits. From ancient civilizations using it for medicinal purposes to modern-day health enthusiasts touting its detoxifying properties, this little green powerhouse has a rich history. But let’s be honest, not everyone has a green thumb or the space for a full-blown garden. That’s why I’m so excited to share this simple, effective, and mess-free method with you.
This DIY guide will walk you through the entire process of soil-free wheatgrass growing, from sourcing your seeds to harvesting your vibrant green crop. Imagine enjoying fresh, nutrient-packed wheatgrass without the dirt, the weeds, or the complicated gardening techniques. It’s easier than you think, and I’m here to show you how! Ready to ditch the soil and embrace a cleaner, greener way to grow your own wheatgrass? Let’s get started!
Growing Wheatgrass Without Soil: A Fun and Easy DIY Project!
Hey there, fellow plant enthusiasts! I’m super excited to share a really cool and surprisingly simple DIY project with you: growing wheatgrass without any soil! Yep, you heard that right. No dirt, no mess, just pure, green goodness. I’ve been experimenting with this method for a while now, and I’m absolutely hooked. It’s cleaner, faster, and honestly, just a bit more magical than traditional soil-based growing. So, grab your supplies, and let’s get started!
What You’ll Need
Before we dive in, let’s gather everything we need. Don’t worry, the list is pretty short and sweet:
* Wheatgrass Seeds: Obviously! Make sure you get seeds specifically for sprouting or growing wheatgrass. You can find these at most health food stores or online. I usually buy organic.
* Growing Trays: You’ll need at least two trays – one with drainage holes and one without. The one without holes will act as a reservoir for water. I like using shallow plastic trays, but you can also repurpose things like takeout containers (just make sure they’re clean!).
* Sprouting Jar or Container: A wide-mouth jar or container is perfect for the initial sprouting phase. A mason jar works great!
* Burlap or Hemp Mat (Optional): This isn’t strictly necessary, but it helps to keep the seeds evenly moist and provides a good surface for the roots to grip onto. I find it makes a big difference in the overall success rate.
* Spray Bottle: For misting the seeds and seedlings.
* Water: Filtered water is best, but tap water that’s been left out overnight to dechlorinate will also work.
* Hydrogen Peroxide (Optional): A little bit of hydrogen peroxide (3%) can help prevent mold and mildew.
Phase 1: Sprouting the Seeds
This is where the magic begins! We need to wake up those little seeds and get them ready to grow.
1. Rinse the Seeds: Start by giving your wheatgrass seeds a good rinse under cool water. This removes any debris and helps to hydrate them. I usually use a fine-mesh sieve for this.
2. Soak the Seeds: Place the rinsed seeds in your sprouting jar or container. Add enough water to completely cover them, plus an extra inch or two. They’ll expand as they soak. I usually add a teaspoon of hydrogen peroxide to the water at this stage to help prevent mold.
3. Soak Time: Let the seeds soak for 8-12 hours, or even overnight. I usually do this before I go to bed so they’re ready to go in the morning.
4. Drain and Rinse Again: After soaking, drain the water and rinse the seeds thoroughly. Make sure to get rid of all the old soaking water.
5. Sprouting Rinse and Repeat: Now, we need to keep the seeds moist and aerated. Rinse the seeds 2-3 times a day for the next 1-2 days. After each rinse, drain as much water as possible. The seeds should be damp, not soaking wet. I usually tilt the jar upside down and let it drain for a few minutes.
6. Observe the Sprouts: You should start to see tiny little sprouts emerging from the seeds within a day or two. This is a good sign! Keep rinsing and draining until the sprouts are about ¼ to ½ inch long.
Phase 2: Planting the Sprouts in the Tray
Now that our seeds have sprouted, it’s time to move them to the growing tray.
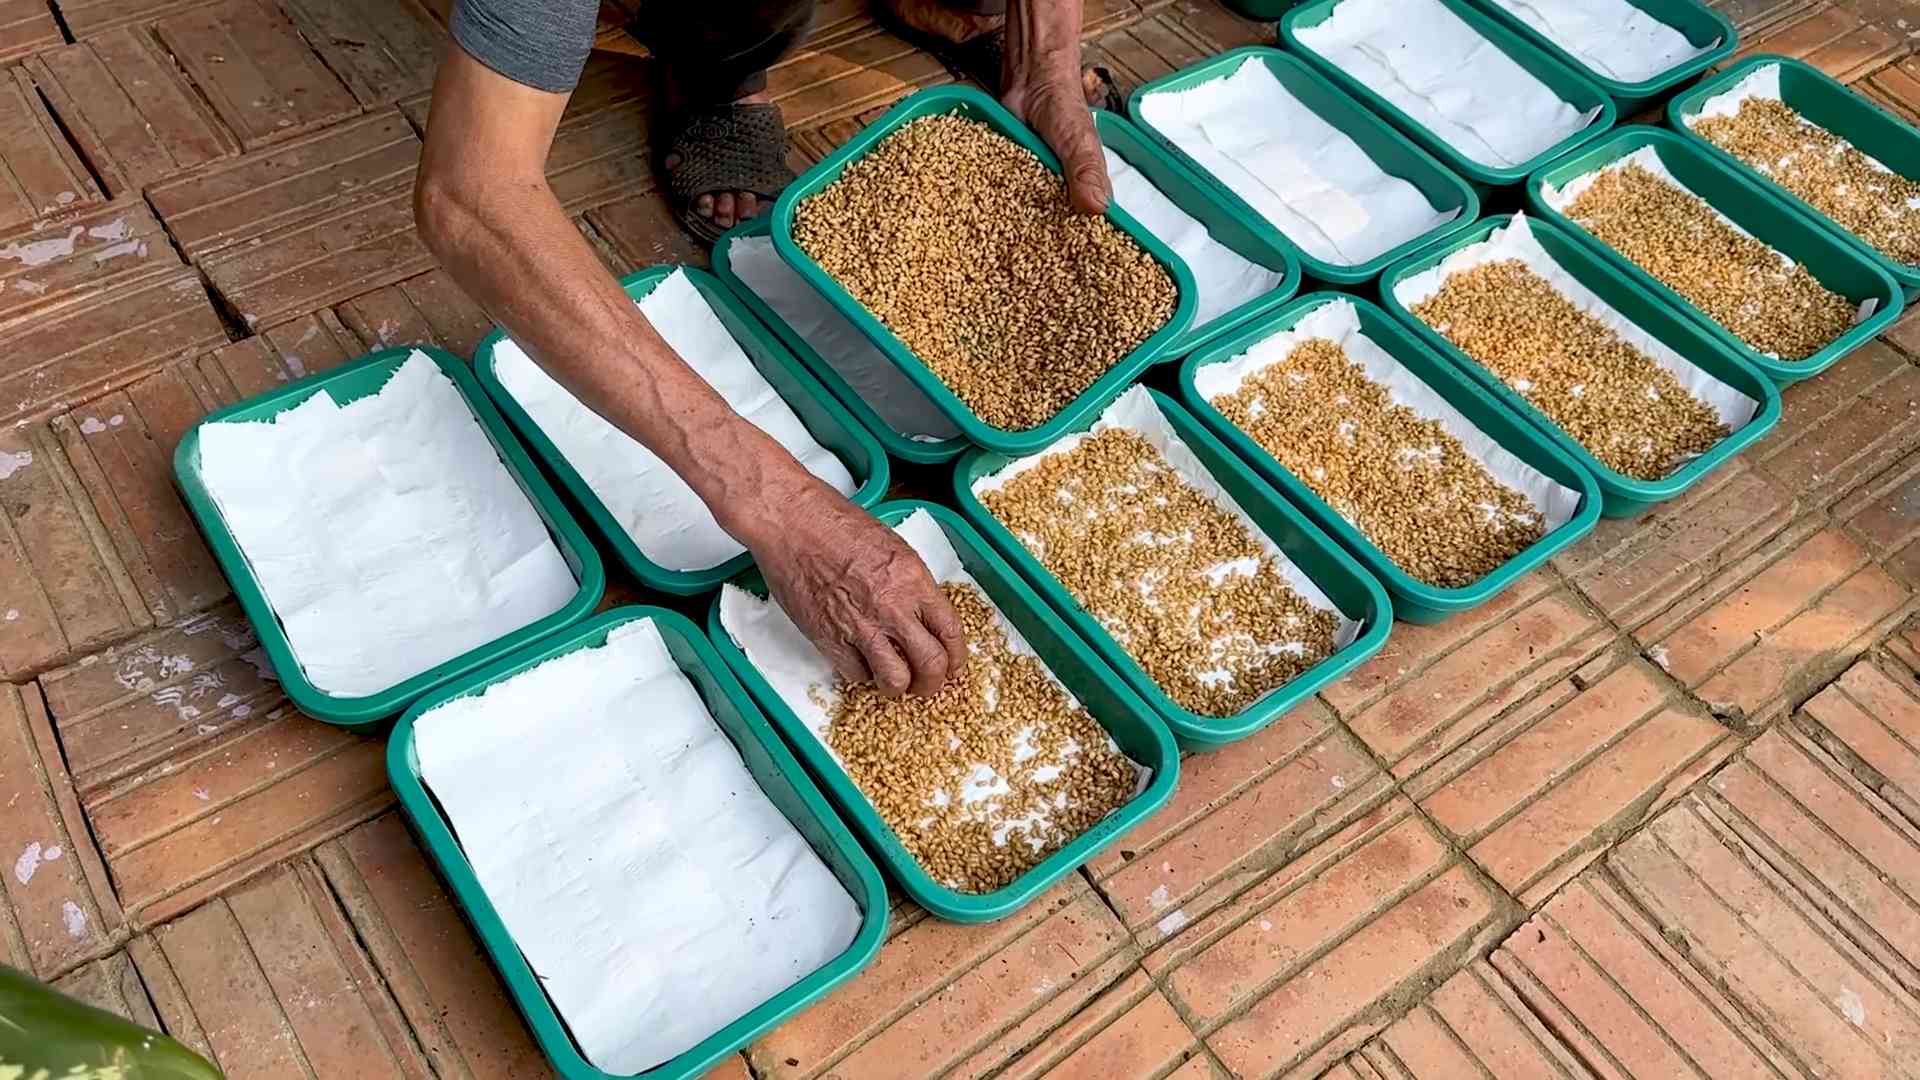
1. Prepare the Tray: If you’re using a burlap or hemp mat, place it in the tray with drainage holes. Make sure it fits snugly and covers the entire bottom of the tray.
2. Spread the Sprouts: Gently spread the sprouted seeds evenly over the mat (or directly onto the bottom of the tray if you’re not using a mat). Try to avoid overcrowding them, but don’t worry if they’re a little close together.
3. Water the Sprouts: Lightly mist the sprouts with water using your spray bottle. You want to moisten them without soaking them.
4. Stack the Trays: Place the tray with the sprouts inside the tray without drainage holes. This will create a reservoir for water.
5. Cover the Sprouts: Cover the top tray with a lid or another tray to create a dark, humid environment. This helps the sprouts to establish their roots. I often use a piece of cardboard or even a damp towel.
Phase 3: Growing the Wheatgrass
This is where the real growth happens! We need to provide the right conditions for our wheatgrass to thrive.
1. Darkness is Key (Initially): Keep the sprouts covered for the first 2-3 days. This encourages the roots to grow downwards. Mist the sprouts with water 1-2 times a day, making sure the mat (or bottom of the tray) stays moist.
2. Introduce Light: After 2-3 days, remove the cover and expose the wheatgrass to light. Indirect sunlight is best. Avoid direct sunlight, which can scorch the delicate seedlings. I usually keep mine near a window that gets morning sun.
3. Watering Schedule: Now, we need to water the wheatgrass regularly. Instead of misting, we’ll start bottom-watering. Pour water into the bottom tray (the one without drainage holes) until it’s about ½ inch deep. The wheatgrass will absorb the water through the mat (or directly from the bottom of the tray). Refill the bottom tray as needed, usually every 1-2 days.
4. Monitor for Mold: Keep an eye out for mold or mildew. If you see any, remove the affected areas and increase ventilation. You can also add a little hydrogen peroxide to the water to help prevent mold growth.
5. Rotate the Tray: Rotate the tray every day or two to ensure even growth. This will prevent the wheatgrass from leaning towards the light.
Phase 4: Harvesting and Enjoying Your Wheatgrass
The moment we’ve been waiting for! Our wheatgrass is ready to harvest.
1. Harvest Time: Your wheatgrass is ready to harvest when it’s about 6-8 inches tall and has a vibrant green color. This usually takes about 7-10 days from the time you planted the sprouts in the tray.
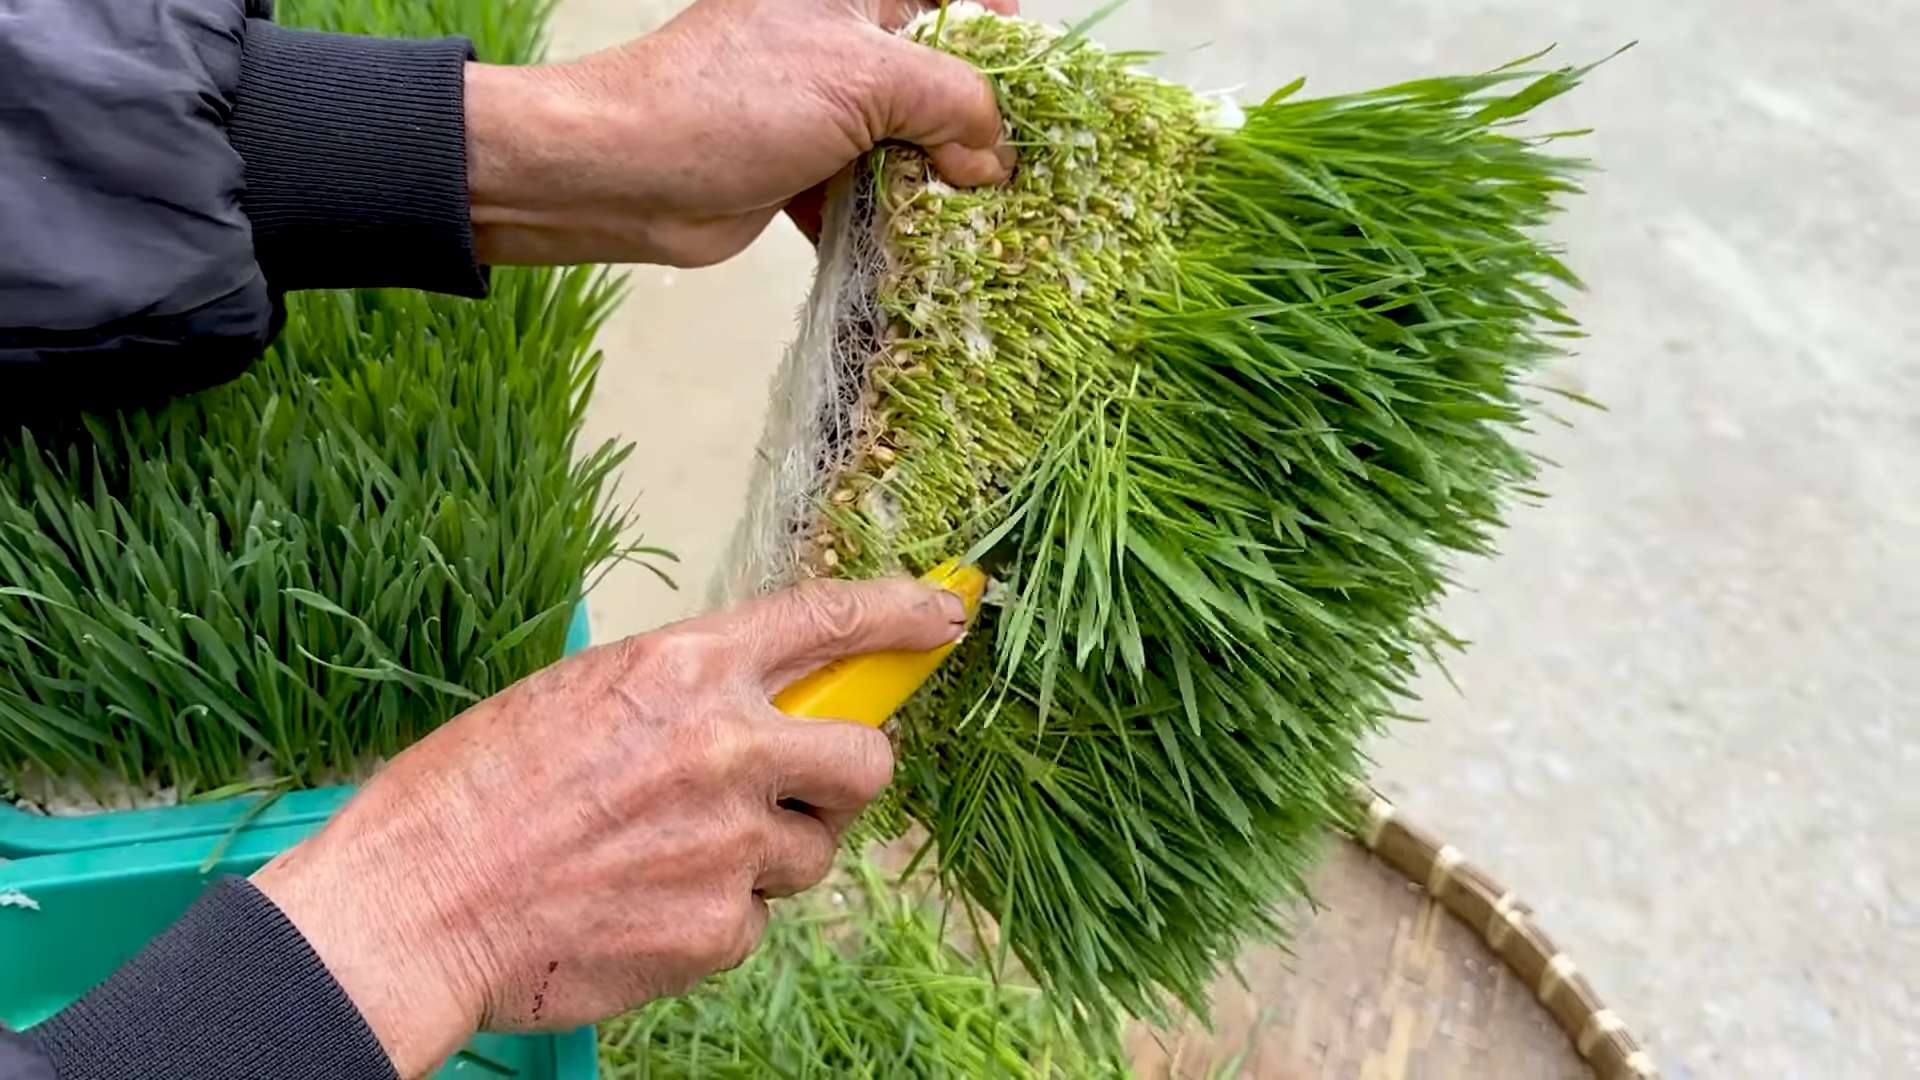
2. Harvesting Technique: Use scissors or a sharp knife to cut the wheatgrass about an inch above the roots.
3. Enjoy Your Harvest: You can juice your wheatgrass, add it to smoothies, or even feed it to your pets (if they like it!). I personally love juicing it for a quick and healthy energy boost.
4. Second Harvest (Optional): You can often get a second harvest from the same roots. Just continue to water and care for the wheatgrass as before. The second harvest may not be as lush as the first, but it’s still worth a try!
Tips and Tricks for Success
Here are a few extra tips to help you grow the best soil-free wheatgrass ever:
* Seed Quality Matters: Invest in high-quality wheatgrass seeds. Cheap seeds may not germinate well or may be more prone to mold.
* Proper Ventilation: Good ventilation is crucial to prevent mold and mildew. Make sure the growing area is well-ventilated.
* Don’t Overwater: Overwatering is a common mistake. The wheatgrass should be moist, not soaking wet.
* Cleanliness is Key: Keep your trays and equipment clean to prevent the growth of bacteria and mold.
* Experiment and Learn: Don’t be afraid to experiment with different techniques and find what works best for you.
Growing wheatgrass without soil is a rewarding and fun project. It’s a great way to add fresh, healthy greens to your diet and enjoy the satisfaction of growing your own food. So, give it a try, and let me know how it goes! Happy growing!
Conclusion
So, there you have it! Growing wheatgrass without soil isn’t just a quirky experiment; it’s a game-changer for anyone seeking fresh, nutrient-packed greens without the mess and hassle of traditional gardening. This method unlocks a world of possibilities, allowing you to enjoy the vibrant benefits of wheatgrass juice, smoothies, or even as a nutritious addition to your pet’s diet, all from the comfort of your own home.
The beauty of this soil-free approach lies in its simplicity and adaptability. You’re no longer constrained by the need for garden space, specialized soil mixtures, or the constant worry of pests and diseases that plague conventional wheatgrass cultivation. Instead, you have a clean, efficient, and highly controllable system that puts you in charge of your wheatgrass production.
But why is this DIY trick a must-try? Firstly, it’s incredibly cost-effective. You’re bypassing the expense of buying soil, fertilizers, and potentially even specialized containers. Secondly, it’s remarkably clean. Say goodbye to muddy messes and hello to a tidy, organized growing space. Thirdly, it’s fast! You’ll be harvesting your first batch of vibrant green wheatgrass much sooner than you would with traditional soil-based methods. And finally, it’s incredibly rewarding to witness the miracle of life unfolding before your eyes, knowing that you played a direct role in nurturing these powerful little plants.
Beyond the Basics: Exploring Variations
Don’t be afraid to experiment! Once you’ve mastered the basic soil-free wheatgrass growing technique, you can explore a range of exciting variations. Consider trying different types of sprouting trays or containers to find what works best for your space and needs. You could even experiment with different light sources, such as LED grow lights, to optimize growth and nutrient content.
Another interesting variation is to explore different types of seeds. While wheatgrass is the star of the show, you could also try growing other sprouts and microgreens using the same soil-free method. Think about radish sprouts, broccoli sprouts, or even sunflower sprouts. Each offers its unique flavor profile and nutritional benefits, adding variety to your homegrown greens.
For those seeking an even more automated approach, consider incorporating a simple hydroponic system. This involves circulating nutrient-rich water over the wheatgrass roots, providing a constant supply of nourishment and further accelerating growth. While this requires a bit more initial investment, it can significantly streamline the growing process and yield even more impressive results.
The Call to Action: Grow Your Own and Share Your Success!
We wholeheartedly encourage you to give this soil-free wheatgrass growing method a try. It’s a simple, rewarding, and incredibly beneficial way to incorporate fresh, nutrient-rich greens into your daily life. And remember, the best way to learn is by doing! Don’t be afraid to experiment, make mistakes, and learn from your experiences.
Once you’ve harvested your first batch of vibrant green wheatgrass, we’d love to hear about your experience! Share your photos, tips, and tricks in the comments section below. Let’s build a community of soil-free wheatgrass enthusiasts and inspire others to embrace this innovative and sustainable growing method. Together, we can unlock the power of homegrown greens and enjoy the countless benefits of fresh, healthy wheatgrass. So, grab your seeds, your sprouting tray, and get ready to embark on a rewarding journey of soil-free wheatgrass cultivation! This method of growing soil-free wheatgrass is a game changer.
Frequently Asked Questions (FAQ)
Q1: What exactly is wheatgrass, and why should I grow it?
Wheatgrass is the young grass of the common wheat plant, *Triticum aestivum*. It’s a nutritional powerhouse, packed with vitamins, minerals, antioxidants, and enzymes. Many people consume wheatgrass juice or powder for its potential health benefits, including boosting immunity, detoxifying the body, and improving energy levels. Growing your own wheatgrass ensures you have access to fresh, high-quality greens whenever you need them, without the added cost and preservatives of store-bought products.
Q2: What materials do I need to grow wheatgrass without soil?
The beauty of this method is its simplicity! You’ll need:
* Wheatgrass seeds (hard red winter wheat is a popular choice)
* A sprouting tray or container with drainage holes
* A dark container or cover for the initial sprouting phase
* Water (filtered water is ideal)
* A spray bottle or watering can
* A well-lit area (natural sunlight or grow lights)
That’s it! No soil, no fertilizers, just the basics.
Q3: How long does it take to grow wheatgrass without soil?
From seed to harvest, you can expect the process to take approximately 7-10 days. The initial sprouting phase, where the seeds germinate and develop roots, typically takes 2-3 days. After that, the wheatgrass will rapidly grow towards the light, reaching a harvestable height of 4-6 inches within a few days.
Q4: How often should I water the wheatgrass?
Maintaining consistent moisture is crucial for successful soil-free wheatgrass growing. During the initial sprouting phase, keep the seeds consistently moist by spraying them with water 2-3 times per day. Once the wheatgrass starts to grow, water it once or twice daily, ensuring the roots are adequately hydrated but not waterlogged. The goal is to keep the growing medium moist but not soggy.
Q5: What kind of light does wheatgrass need?
Wheatgrass thrives in bright, indirect light. Direct sunlight can scorch the delicate leaves, so avoid placing your sprouting tray in direct sun exposure, especially during the hottest part of the day. If you don’t have access to sufficient natural light, consider using LED grow lights to supplement the light and promote healthy growth.
Q6: How do I harvest wheatgrass?
Harvesting wheatgrass is simple. Once the grass reaches a height of 4-6 inches, use scissors or a sharp knife to cut it just above the seed level. It’s best to harvest the wheatgrass just before you plan to use it to maximize its freshness and nutrient content.
Q7: How do I store harvested wheatgrass?
Freshly harvested wheatgrass is best used immediately. However, if you need to store it, wrap it in a damp paper towel and place it in a sealed plastic bag in the refrigerator. It will typically stay fresh for 2-3 days.
Q8: Can I regrow wheatgrass after harvesting?
While it’s possible to get a second harvest from wheatgrass, the yield and nutrient content will be significantly lower. For optimal results, it’s best to start with fresh seeds for each batch.
Q9: What are some common problems I might encounter, and how can I fix them?
* **Mold growth:** This is usually caused by excessive moisture and poor air circulation. Ensure proper drainage, avoid overwatering, and provide adequate ventilation.
* **Slow growth:** This could be due to insufficient light, inadequate watering, or poor seed quality. Ensure your wheatgrass receives enough light, maintain consistent moisture, and use high-quality seeds.
* **Yellowing leaves:** This can be a sign of nutrient deficiency or overwatering. Ensure proper drainage and consider adding a diluted nutrient solution to the water.
Q10: Can I use any type of seeds for soil-free growing?
While you can experiment with other types of seeds, wheatgrass seeds are specifically chosen for their high germination rate, rapid growth, and nutritional value. Other suitable options include radish seeds, broccoli seeds, and sunflower seeds. However, be sure to research the specific growing requirements for each type of seed to ensure optimal results.
Q11: Is it safe to consume wheatgrass grown without soil?
Yes, it is generally safe to consume wheatgrass grown without soil, provided you follow proper hygiene practices. Be sure to use clean water, sanitize your sprouting tray regularly, and thoroughly rinse the wheatgrass before consuming it. This will help prevent the growth of harmful bacteria or mold.
Q12: Can I compost the leftover roots and seeds after harvesting?
Absolutely! The leftover roots and seeds are a valuable addition to your compost pile. They are rich in organic matter and nutrients, which will help enrich your compost and improve its overall quality.
Q13: What are the benefits of drinking wheatgrass juice?
Many people believe that wheatgrass juice offers a range of health benefits, including boosting immunity, detoxifying the body, improving digestion, increasing energy levels, and promoting healthy skin. While more research is needed to confirm these claims, wheatgrass is undoubtedly a nutrient-rich food that can be a valuable addition to a healthy diet.
Q14: Can I grow wheatgrass without soil indoors all year round?
Yes, absolutely! One of the biggest advantages of soil-free wheatgrass growing is that you can do it indoors, regardless of the weather conditions. This means you can enjoy fresh, homegrown wheatgrass all year round, providing a consistent source of nutrients and health benefits.
Q15: Where can I buy wheatgrass seeds?
Wheatgrass seeds are widely available online and at many garden centers and health food stores. Look for high-quality, organic seeds to ensure optimal germination and growth.
Leave a Comment