
Mushroom Growing From Food Waste: Imagine transforming your kitchen scraps into a delicious and sustainable food source! For centuries, mushrooms have been prized for their unique flavor and nutritional benefits, playing a significant role in various cultures’ cuisines and traditional medicine. From ancient Roman feasts to modern-day gourmet dishes, mushrooms have always held a special place.
But what if I told you that you could cultivate these culinary treasures right in your own home, using something you usually throw away? That’s right, this DIY guide is all about mushroom growing from food waste, a fantastic way to reduce your environmental impact and enjoy fresh, homegrown mushrooms.
In today’s world, where sustainability is more important than ever, finding innovative ways to minimize waste is crucial. This DIY project not only addresses the issue of food waste but also provides you with a rewarding and educational experience. Plus, who wouldn’t want a constant supply of fresh mushrooms for their favorite recipes? So, let’s dive in and discover the secrets to successful mushroom cultivation using the resources you already have!
Turning Kitchen Scraps into a Mushroom Farm: A DIY Guide
Hey there, fellow eco-enthusiasts! Ever thought about turning your kitchen waste into something delicious and nutritious? Well, get ready to be amazed because I’m going to walk you through how to grow your own mushrooms using nothing but your food scraps and a little bit of patience. It’s a fantastic way to reduce waste, learn something new, and enjoy fresh, homegrown mushrooms!
What You’ll Need
Before we dive in, let’s gather our supplies. This is a relatively low-cost project, and you probably have many of these items already.
* Mushroom Spawn: This is the most crucial ingredient! You can purchase mushroom spawn online or from a local gardening supply store. Oyster mushrooms are a great choice for beginners because they’re relatively easy to grow and thrive on a variety of substrates. I recommend starting with oyster mushroom spawn.
* Substrate: This is the food source for your mushrooms. We’ll be using a mix of kitchen scraps, but you can also supplement with other materials like:
* Coffee grounds (a fantastic nitrogen source!)
* Cardboard (shredded into small pieces)
* Straw (chopped into short lengths)
* Sawdust (untreated wood only)
* Containers: You’ll need something to grow your mushrooms in. Here are a few options:
* Buckets (5-gallon buckets work well)
* Plastic bags (oven bags or heavy-duty garbage bags)
* Laundry baskets (with holes for drainage)
* I personally prefer buckets because they are sturdy and reusable.
* Spray Bottle: For misting your mushrooms to keep them hydrated.
* Gloves: To maintain a clean environment and protect your hands.
* Drill (optional): If you’re using buckets, you’ll need to drill holes for ventilation and drainage.
* Micropore Tape (optional): To cover the ventilation holes and prevent contamination while still allowing airflow.
* Hydrogen Peroxide (3% solution): For sanitizing your substrate and containers.
* Large Pot or Container: For pasteurizing your substrate.
Preparing Your Substrate
This is a crucial step to eliminate competing organisms and give your mushroom spawn a head start.
1. Collect Your Kitchen Scraps: Start saving your vegetable scraps, fruit peels, coffee grounds, and eggshells. Avoid meat, dairy, and oily foods, as these can attract unwanted pests and bacteria. I usually keep a container in my freezer to store scraps until I have enough.
2. Chop and Mix: Chop your kitchen scraps into smaller pieces (about 1-2 inches). This will help the mushrooms colonize the substrate more easily. Mix the scraps with your other substrate materials (cardboard, straw, sawdust) in a large container. Aim for a ratio of about 50% kitchen scraps and 50% other materials.
3. Pasteurize the Substrate: Pasteurization kills off harmful bacteria and fungi that could compete with your mushroom spawn. There are a few ways to do this:
* Hot Water Pasteurization: This is my preferred method. Fill a large pot or container with water and heat it to around 160-180°F (71-82°C). Submerge your substrate in the hot water for 60-90 minutes. Use a weight to keep the substrate submerged.
* Steam Pasteurization: Place your substrate in a heat-resistant container and steam it for 2-3 hours. You can use a steamer pot or a makeshift steamer with a pot and a rack.
* Cold Water Lime Bath: This method involves soaking the substrate in a lime solution for 12-24 hours. It’s less effective than heat pasteurization but can be used if you don’t have access to a heat source. Use hydrated lime (calcium hydroxide) and follow safety precautions when handling lime.
4. Cool and Drain: After pasteurization, allow the substrate to cool completely. This is important because the heat can kill your mushroom spawn. Drain off any excess water. The substrate should be moist but not soaking wet. Squeeze a handful of the substrate; it should feel damp, and only a few drops of water should come out.
5. Sanitize Your Container: While the substrate is cooling, sanitize your growing container with a diluted hydrogen peroxide solution (3% concentration). This will help prevent contamination.
Inoculating Your Substrate
Now comes the fun part – introducing the mushroom spawn to the substrate!
1. Layering Technique: This is the most common method. Place a layer of substrate in your container, followed by a layer of mushroom spawn. Repeat this process until your container is full, ending with a layer of substrate on top. Aim for a spawn rate of about 5-10% of the substrate volume. For example, if you have 10 pounds of substrate, use 0.5-1 pound of spawn.
2. Mixing Technique: Alternatively, you can thoroughly mix the mushroom spawn with the substrate in a large container before transferring it to your growing container. This method can be faster, but it’s important to ensure the spawn is evenly distributed.
3. Pack Lightly: Don’t pack the substrate too tightly, as this can restrict airflow. The substrate should be loose and airy.
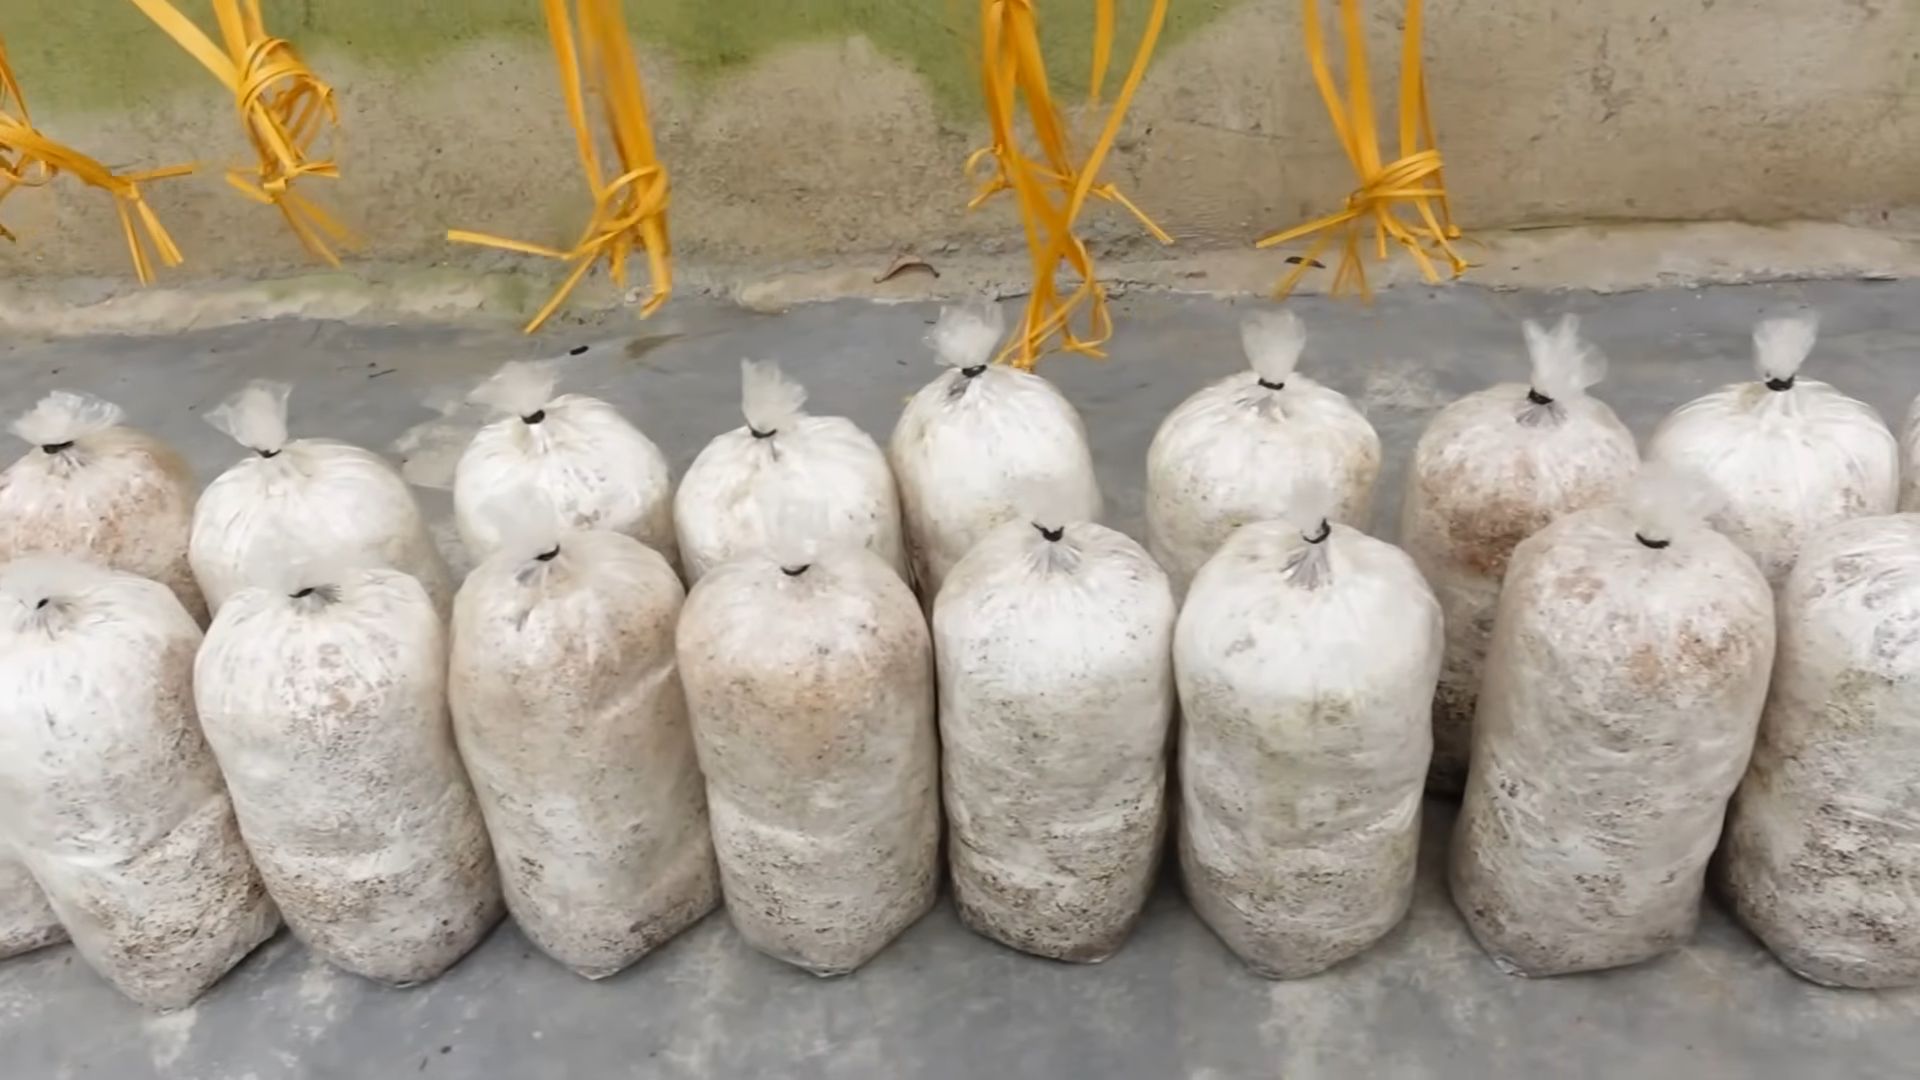
4. Cover and Incubate: Cover your container with a lid or plastic wrap to help retain moisture. If you’re using a bucket, you can cover the ventilation holes with micropore tape to prevent contamination. Place the container in a dark, humid location with a temperature between 65-75°F (18-24°C). A basement, closet, or spare room works well.
Incubation and Colonization
This is where the magic happens! The mushroom spawn will start to colonize the substrate, spreading its mycelium (the vegetative part of the fungus) throughout the mixture.
1. Monitor for Colonization: Check your container regularly for signs of colonization. You should see white, fuzzy growth spreading throughout the substrate. This is the mycelium.
2. Maintain Humidity: Keep the substrate moist by misting it with water as needed. The humidity should be around 80-90%. You can use a humidity gauge to monitor the humidity level.
3. Ventilation: While the substrate needs to be humid, it also needs some ventilation. Open the container briefly every day or two to allow fresh air to circulate. If you’re using micropore tape, you don’t need to worry about this as much.
4. Patience is Key: Colonization can take anywhere from 2-4 weeks, depending on the type of mushroom, the temperature, and the humidity. Be patient and don’t disturb the substrate too much.
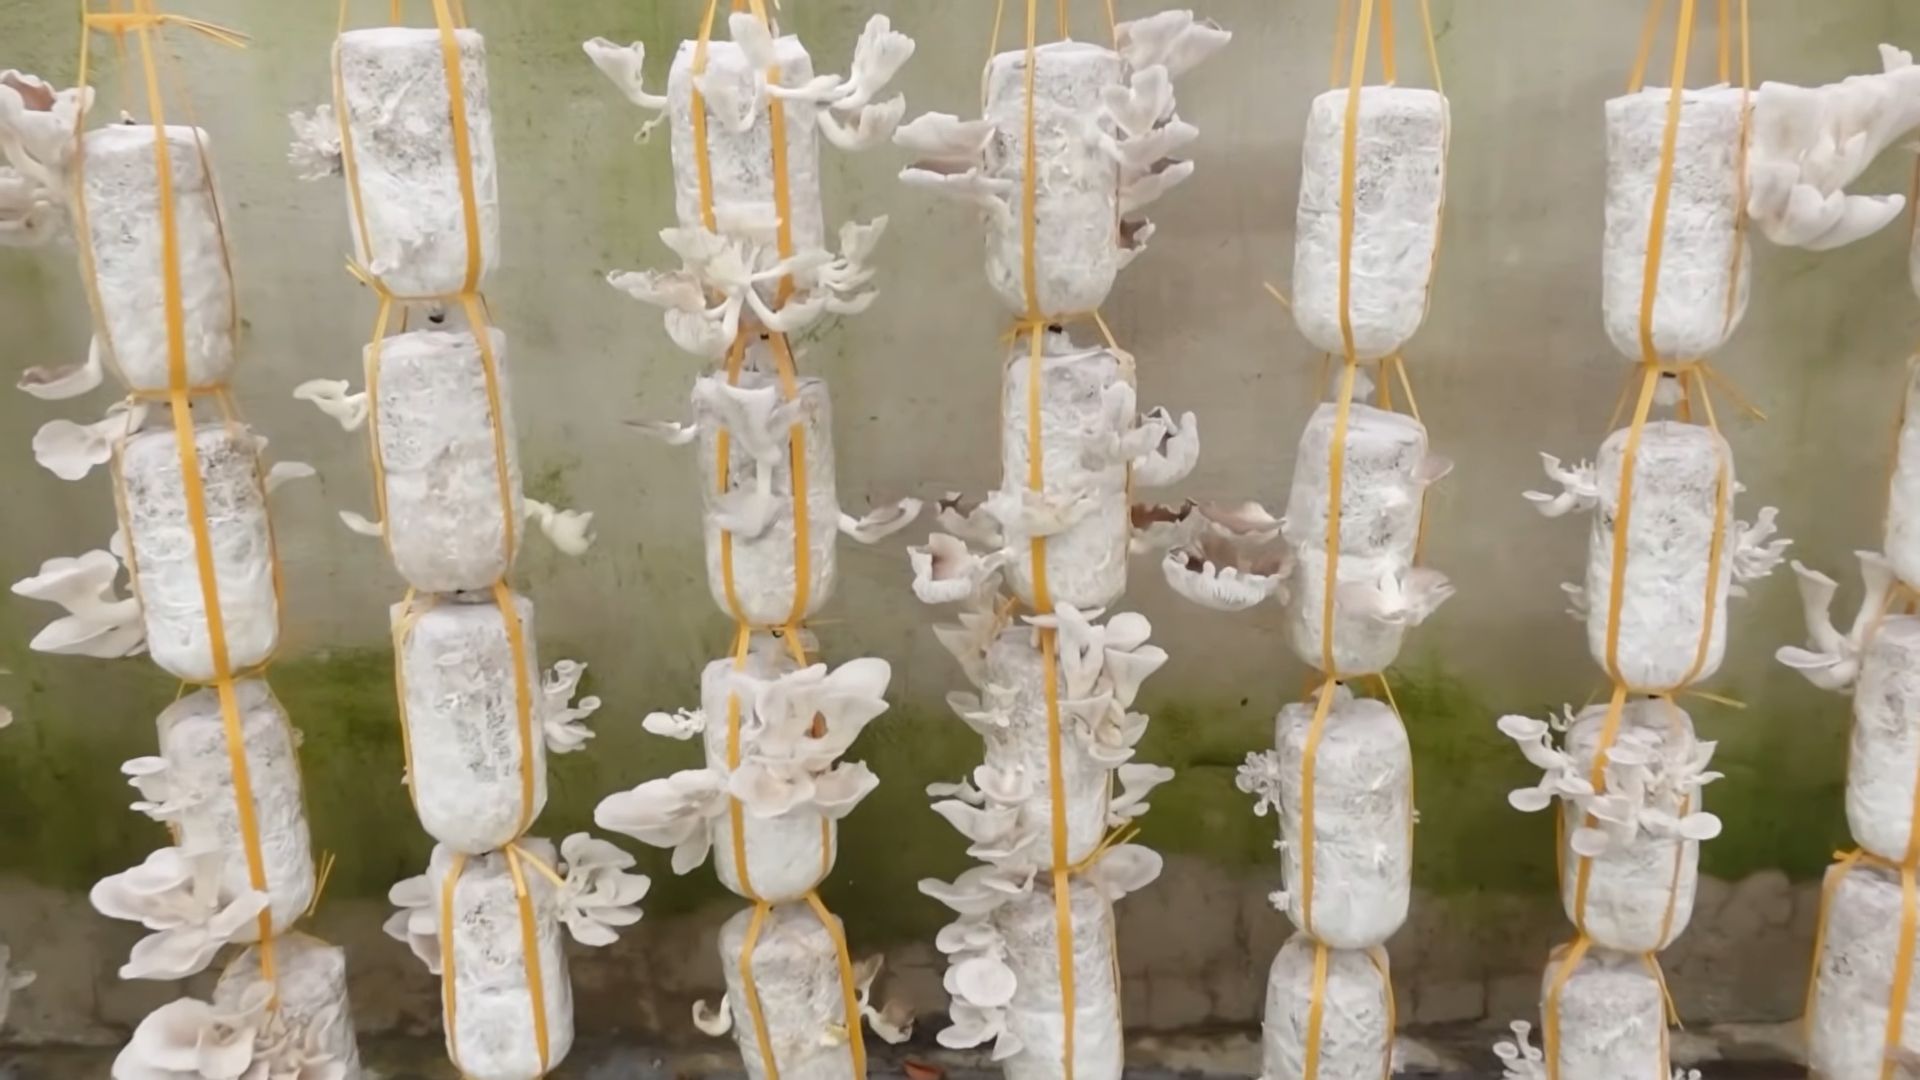
Fruiting
Once the substrate is fully colonized (it will be almost entirely covered in white mycelium), it’s time to initiate fruiting. This is when the mushrooms start to form.
1. Increase Light: Move your container to a location with more light. Indirect sunlight is ideal. Avoid direct sunlight, as this can dry out the substrate.
2. Increase Humidity: Increase the humidity to 90-95%. You can do this by misting the substrate more frequently or by placing a humidity tent over the container. A humidity tent can be made by draping a plastic bag over the container, leaving a small opening for ventilation.
3. Increase Ventilation: Increase ventilation to encourage fruiting. Open the container more frequently or remove the micropore tape from the ventilation holes.
4. Maintain Temperature: Keep the temperature within the optimal range for your mushroom species. Oyster mushrooms typically fruit best at temperatures between 60-70°F (15-21°C).
5. Primordia Formation: After a few days, you should start to see small mushroom “pins” forming on the surface of the substrate. These are called primordia.
6. Mushroom Growth: The primordia will quickly grow into mature mushrooms. Monitor them closely and harvest them when they are fully developed but before they start to drop spores.
Harvesting Your Mushrooms
Harvesting is the most rewarding part of the process!
1. Harvest Time: Harvest your mushrooms when the caps are fully expanded but before they start to flatten out or drop spores.
2. Twist and Pull: Gently twist and pull the mushrooms from the substrate. Avoid cutting them, as this can leave behind a stump that can rot and contaminate the substrate.
3. Clean Up: After harvesting, clean up any debris from the substrate.
4. Second Flush: You can often get multiple flushes of mushrooms from the same substrate. After harvesting the first flush, mist the substrate and maintain the fruiting conditions. A second flush should appear within a few weeks.
5. Repeat: You can continue to get flushes of
Conclusion
So, there you have it! Transforming your kitchen scraps into a thriving mushroom patch is not only incredibly rewarding but also a powerful step towards a more sustainable lifestyle. This DIY mushroom growing from food waste method is a game-changer for anyone looking to reduce their environmental impact, enjoy fresh, homegrown produce, and explore the fascinating world of mycology.
Why is this a must-try? Because it’s accessible, affordable, and surprisingly simple. You’re already generating the waste – coffee grounds, vegetable scraps, even cardboard – that these fungi crave. Instead of sending it to the landfill, you’re giving it a second life, transforming it into a delicious and nutritious food source. Imagine the satisfaction of harvesting your own oyster mushrooms, knowing they were cultivated from materials you would have otherwise discarded.
But the benefits extend beyond just the food on your plate. Growing mushrooms from food waste is an educational experience, a chance to learn about the intricate processes of decomposition and the vital role fungi play in our ecosystem. It’s a hands-on project that can be enjoyed by individuals, families, and even classrooms, fostering a deeper appreciation for the natural world.
Looking for variations? Absolutely! While oyster mushrooms are a great starting point due to their resilience and adaptability, you can experiment with other species as you gain experience. Consider shiitake mushrooms, which thrive on hardwood sawdust, or wine cap mushrooms, which can be grown in outdoor garden beds amended with straw and wood chips. The possibilities are truly endless. You can also adjust the substrate mix to suit the specific needs of the mushroom species you’re cultivating. For example, adding a small amount of gypsum to the substrate can help improve its texture and nutrient content.
Don’t be afraid to experiment with different containers, too. While buckets and plastic tubs are common choices, you can also use repurposed containers like laundry baskets or even old tires (cleaned thoroughly, of course!). Just ensure that your chosen container provides adequate drainage and ventilation.
We wholeheartedly encourage you to embark on this exciting journey of **mushroom growing from food waste**. It’s a project that’s good for you, good for the planet, and incredibly fun. Once you’ve harvested your first flush of mushrooms, we’d love to hear about your experience! Share your photos, tips, and challenges in the comments below. Let’s build a community of urban mushroom farmers, transforming waste into wonder, one mushroom at a time. Your insights could inspire others to take the plunge and discover the magic of homegrown mushrooms. Happy growing!
Frequently Asked Questions (FAQ)
What types of food waste are best for growing mushrooms?
Oyster mushrooms, in particular, are known for their ability to thrive on a wide range of organic materials. Coffee grounds are an excellent choice, as they are rich in nitrogen and already pasteurized during the brewing process. Other suitable options include straw, cardboard (shredded), vegetable scraps (especially non-oily ones), and even spent grain from brewing beer. Avoid using meat scraps, dairy products, or oily foods, as these can attract unwanted pests and bacteria. The key is to use materials that are relatively clean and free from contaminants. Experimenting with different combinations of food waste can also lead to interesting results. For instance, a mix of coffee grounds and shredded cardboard can provide a balanced substrate for oyster mushrooms.
How do I pasteurize the substrate?
Pasteurization is crucial to eliminate competing organisms that could hinder mushroom growth. There are several methods you can use. One common method is to submerge the substrate in hot water (around 160-180°F or 71-82°C) for about an hour. This can be done in a large pot or even a cooler. Alternatively, you can steam the substrate in a pressure cooker or a large pot with a steamer basket. The goal is to heat the substrate sufficiently to kill off unwanted microorganisms without completely sterilizing it, as some beneficial microbes can actually aid in mushroom growth. After pasteurization, allow the substrate to cool completely before inoculating it with mushroom spawn.
Where should I keep my mushroom growing container?
The ideal location for your mushroom growing container depends on the specific mushroom species you’re cultivating. Oyster mushrooms generally prefer a cool, humid environment with indirect light. A basement, garage, or even a shaded area outdoors can be suitable. Avoid placing the container in direct sunlight, as this can dry out the substrate and overheat the mushrooms. Maintaining a consistent temperature and humidity level is essential for successful mushroom growth. You can use a humidifier or mist the mushrooms regularly to keep the humidity high. A temperature range of 60-75°F (15-24°C) is generally ideal for oyster mushrooms.
How long does it take for mushrooms to grow?
The time it takes for mushrooms to grow can vary depending on several factors, including the mushroom species, the substrate, the temperature, and the humidity. Oyster mushrooms are relatively fast-growing, typically fruiting within 2-3 weeks after inoculation. However, it can sometimes take longer, especially if the conditions are not optimal. Be patient and continue to monitor the container for signs of growth. Once the mushrooms start to form, they will grow rapidly, often doubling in size each day. Harvest them when the caps are fully developed but before they start to release spores.
How do I know when the mushrooms are ready to harvest?
Knowing when to harvest your mushrooms is crucial for maximizing their flavor and texture. For oyster mushrooms, the ideal time to harvest is when the caps are fully expanded and the edges are still slightly curled downwards. The gills underneath the caps should be visible but not yet releasing spores. If you wait too long, the mushrooms will become tough and less flavorful. To harvest, simply twist or cut the mushrooms off the substrate at the base of the stem. Be careful not to damage the surrounding mycelium, as this can affect future flushes.
Can I get multiple harvests from the same substrate?
Yes, you can typically get multiple harvests, or “flushes,” from the same substrate. After harvesting the first flush, allow the substrate to rest for a week or two. During this time, continue to maintain the humidity and temperature levels. You may need to mist the substrate more frequently to encourage new growth. After the resting period, you should see new pinheads forming, which will eventually develop into another flush of mushrooms. The subsequent flushes may be smaller than the first, but they can still provide a substantial yield. Eventually, the substrate will become depleted of nutrients, and the mushroom production will decline. At this point, you can compost the spent substrate and start a new batch.
What if my mushrooms don’t grow?
If your mushrooms aren’t growing, don’t despair! There could be several reasons why. First, check the temperature and humidity levels to ensure they are within the optimal range for the mushroom species you’re growing. Make sure the substrate is adequately hydrated but not waterlogged. Also, check for any signs of contamination, such as mold or unusual odors. If you suspect contamination, it’s best to discard the substrate and start over with fresh materials. Finally, be patient! Sometimes it simply takes time for the mushrooms to colonize the substrate and start fruiting.
Is it safe to eat mushrooms grown from food waste?
Yes, it is generally safe to eat mushrooms grown from food waste, as long as you follow proper hygiene and pasteurization procedures. Ensure that the food waste you’re using is free from contaminants and that you pasteurize the substrate thoroughly to eliminate harmful microorganisms. Also, be sure to identify the mushroom species correctly before consuming them. If you’re unsure about the identity of a mushroom, it’s best to err on the side of caution and discard it. When in doubt, consult with a mycologist or experienced mushroom grower.
Leave a Comment