
Bay Leaf Propagation: Unlock the secrets to growing your own aromatic bay leaves at home! Have you ever dreamt of snipping fresh bay leaves straight from your garden to infuse your culinary creations with that distinctive, warm flavor? I know I have! For centuries, bay leaves have been prized not only for their culinary uses but also for their medicinal and symbolic significance, dating back to ancient Greece where they were used to crown victors and symbolize honor.
But let’s be honest, buying bay leaves from the store can sometimes feel like a gamble – are they truly fresh? Have they lost their potency sitting on the shelf? That’s where the magic of DIY comes in! Learning bay leaf propagation empowers you to cultivate a sustainable supply of these fragrant leaves, ensuring you always have the freshest, most flavorful ingredient on hand. Plus, it’s incredibly rewarding to nurture a plant from a small cutting to a thriving bush.
This article is your ultimate guide to mastering bay leaf propagation. I’ll walk you through every step, from selecting the perfect cutting to providing the ideal growing conditions, so you can enjoy the satisfaction of harvesting your own homegrown bay leaves. Get ready to ditch those store-bought leaves and embark on a rewarding gardening adventure!
Propagating Bay Leaf: A DIY Guide to Growing Your Own Culinary Treasure
Hey there, fellow plant enthusiasts! Ever dreamt of having a constant supply of fresh bay leaves right at your fingertips? Well, you’re in luck! Propagating bay leaf (Laurus nobilis) isn’t as daunting as it might seem. I’m going to walk you through two methods: taking cuttings and growing from seed. Let’s get started!
Method 1: Propagating Bay Leaf from Cuttings
This is generally the faster and more reliable method, especially if you want to replicate a specific bay leaf variety you already love.
What You’ll Need:
* A healthy, mature bay leaf plant (your “mother” plant)
* Sharp, clean pruning shears or a knife (sterilize with rubbing alcohol to prevent disease)
* Rooting hormone powder or liquid (optional, but highly recommended)
* Small pots (2-3 inches in diameter)
* Well-draining potting mix (a mix of perlite, peat moss, and vermiculite works well)
* Clear plastic bags or a humidity dome
* Spray bottle with water
Choosing the Right Cuttings:
* Timing is Key: The best time to take cuttings is in late spring or early summer when the plant is actively growing.
* Select Semi-Hardwood Cuttings: Look for stems that are neither too soft and green nor too woody and brown. They should be flexible but firm.
* Length Matters: Aim for cuttings that are 4-6 inches long.
* Healthy Leaves: Choose stems with healthy, undamaged leaves.
Step-by-Step Instructions:
1. Prepare Your Pots: Fill your small pots with the well-draining potting mix. Moisten the mix thoroughly, allowing excess water to drain.
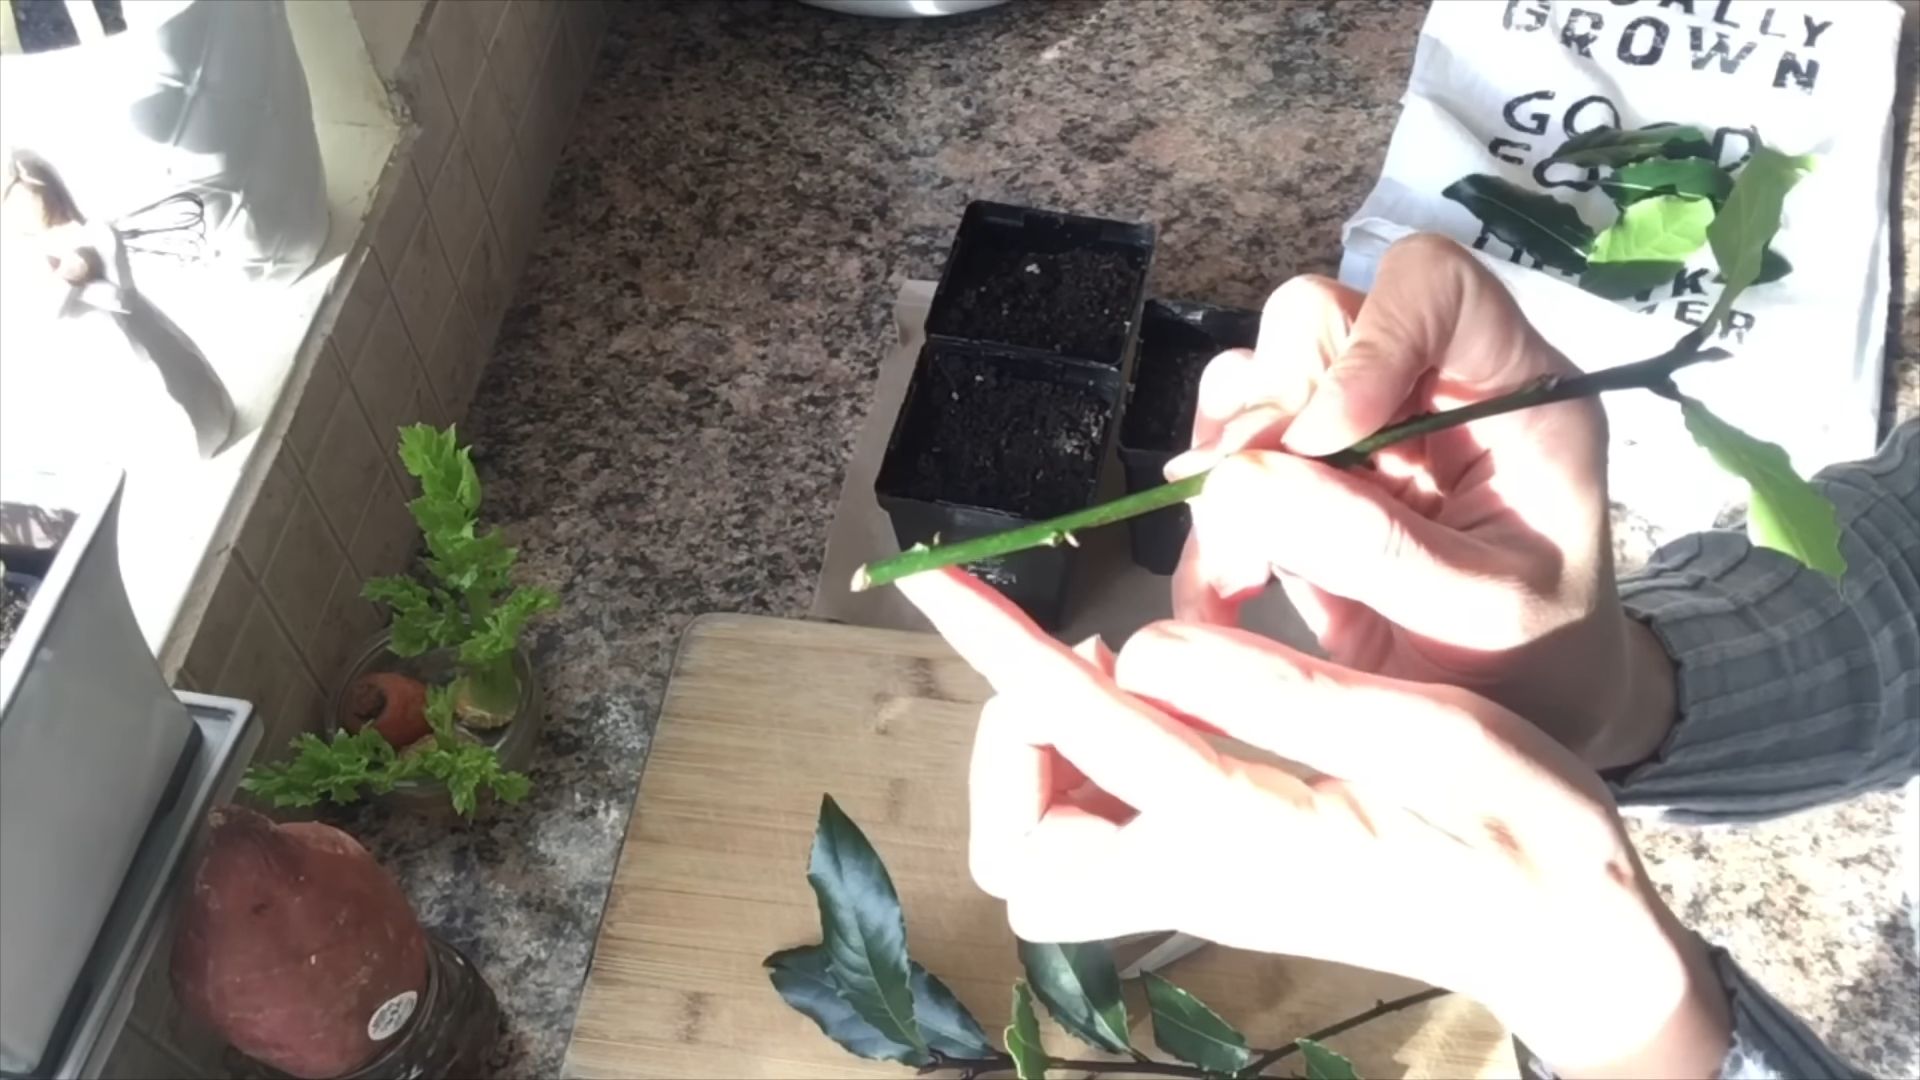
2. Take the Cuttings: Using your sterilized pruning shears or knife, make a clean cut just below a leaf node (the point where a leaf grows from the stem).
3. Prepare the Cuttings: Remove the leaves from the bottom 1-2 inches of the cutting. This will prevent them from rotting when they’re buried in the soil. You can also trim the remaining leaves in half to reduce moisture loss.
4. Apply Rooting Hormone (Optional but Recommended): Dip the cut end of the stem into the rooting hormone powder or liquid. Tap off any excess. Rooting hormone encourages root development and increases your chances of success.
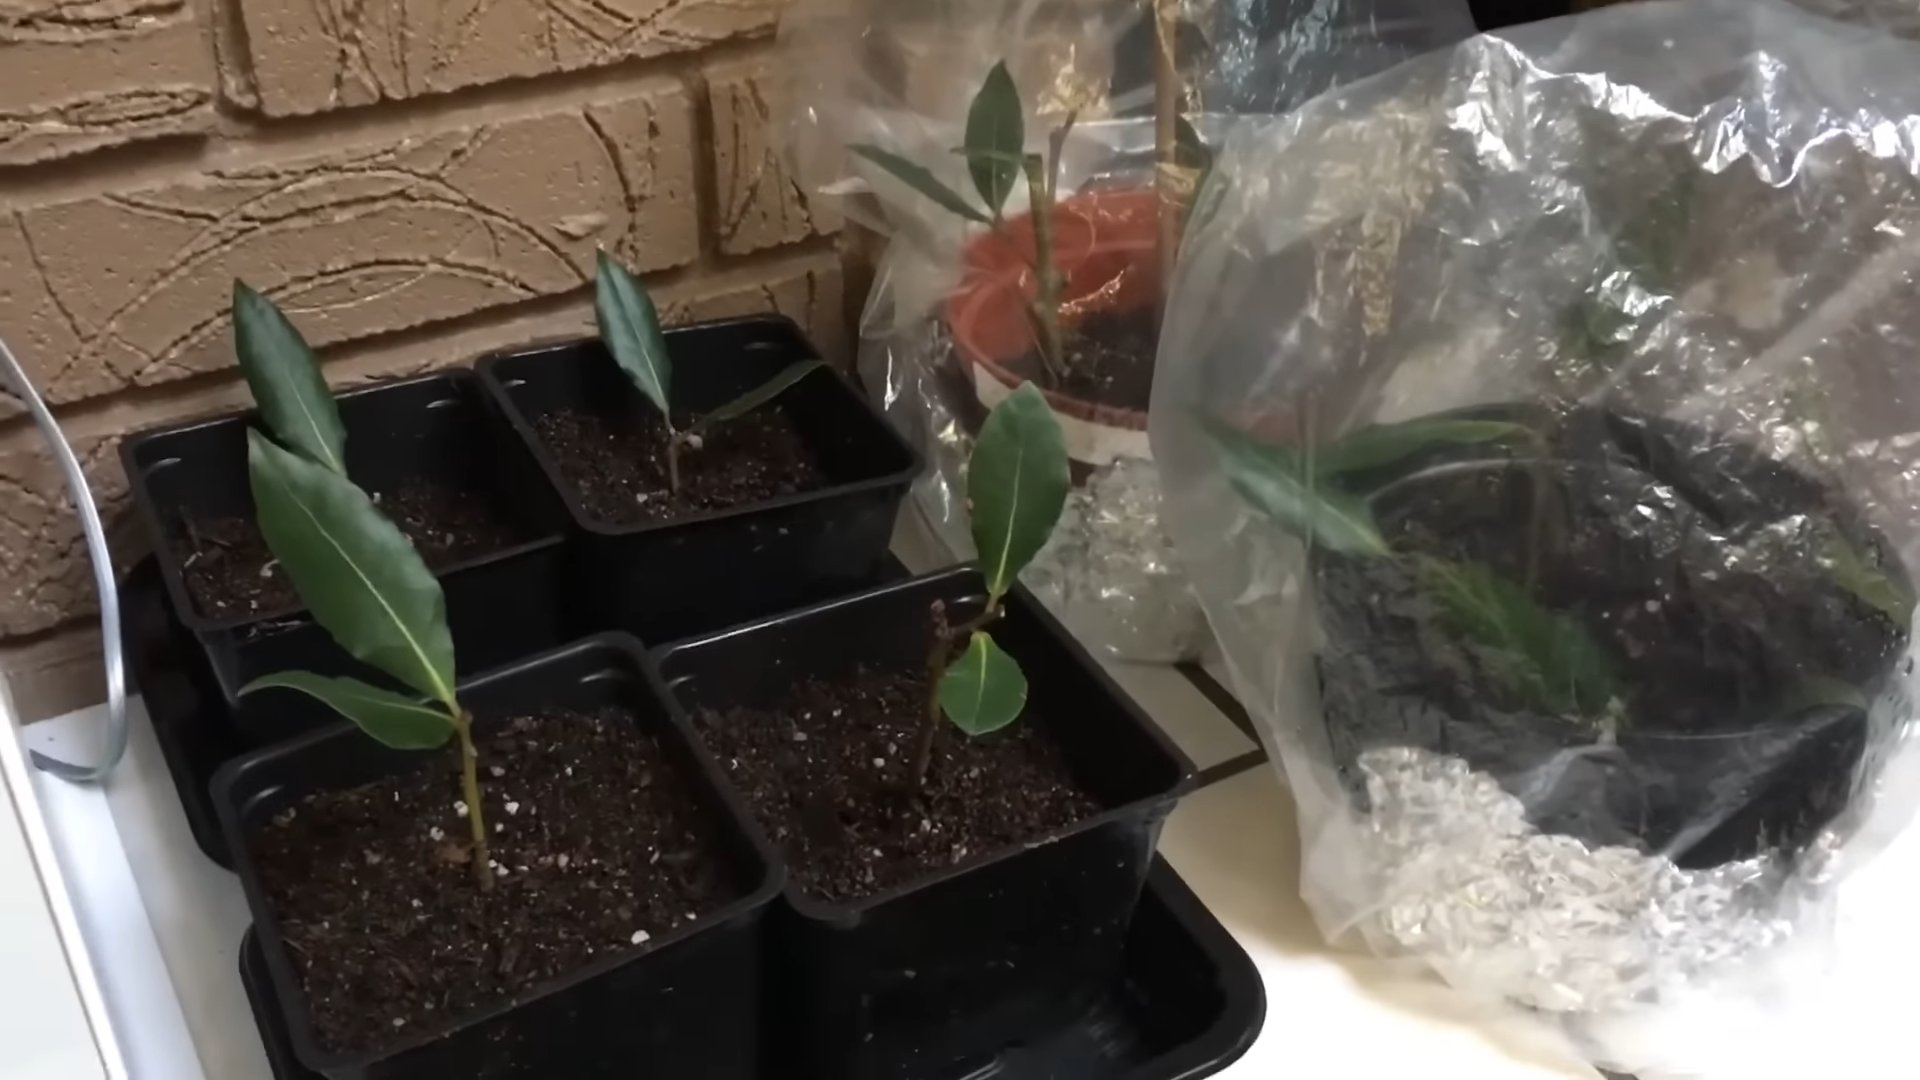
5. Plant the Cuttings: Make a small hole in the potting mix with your finger or a pencil. Gently insert the cutting into the hole, ensuring that the bottom 1-2 inches are buried. Firm the soil around the cutting to provide support.
6. Create a Humid Environment: Place the potted cuttings inside a clear plastic bag or under a humidity dome. This will help to maintain high humidity, which is crucial for root development. If using a plastic bag, make a few small holes for ventilation.
7. Provide Indirect Light: Place the cuttings in a warm location with bright, indirect light. Avoid direct sunlight, which can scorch the leaves.
8. Maintain Moisture: Check the potting mix regularly and mist the cuttings with water whenever the soil feels dry. The goal is to keep the soil consistently moist but not waterlogged.
9. Be Patient: Rooting can take several weeks, so be patient. You can gently tug on the cuttings after a few weeks to check for root development. If you feel resistance, it means roots have formed.
10. Gradually Acclimate: Once the cuttings have rooted, gradually acclimate them to lower humidity by opening the plastic bag or humidity dome for increasing periods of time each day.
11. Transplant: After a few weeks of acclimation, you can transplant the rooted cuttings into larger pots or directly into the garden, depending on your climate.
Method 2: Growing Bay Leaf from Seed
Growing bay leaf from seed is a bit more challenging and time-consuming than propagating from cuttings, but it can be a rewarding experience. Keep in mind that plants grown from seed may not be identical to the parent plant.
What You’ll Need:
* Fresh bay leaf seeds (difficult to find, but you can sometimes find them online or from specialty nurseries)
* Small pots or seed trays
* Seed-starting mix (a fine-textured mix specifically designed for seed germination)
* Heat mat (optional, but helpful for germination)
* Grow light (optional, but helpful for seedlings)
* Spray bottle with water
Preparing the Seeds:
* Freshness is Crucial: Bay leaf seeds have a short viability period, so it’s important to use fresh seeds.
* Soak the Seeds: Soak the seeds in warm water for 24 hours before planting. This will help to soften the seed coat and improve germination rates.
Step-by-Step Instructions:
1. Prepare Your Seed-Starting Mix: Moisten the seed-starting mix thoroughly, allowing excess water to drain.
2. Sow the Seeds: Fill your small pots or seed trays with the moistened seed-starting mix. Sow the seeds about 1/2 inch deep.
3. Cover the Seeds: Gently cover the seeds with a thin layer of seed-starting mix.
4. Maintain Moisture: Mist the soil with water to keep it consistently moist.
5. Provide Warmth: Place the pots or seed trays on a heat mat to maintain a soil temperature of around 70-75°F (21-24°C). This will help to speed up germination.
6. Provide Light: Place the pots or seed trays under a grow light or in a location with bright, indirect light.
7. Be Patient (Again!): Germination can take several weeks or even months, so be patient. Keep the soil consistently moist and maintain the appropriate temperature.
8. Thin the Seedlings: Once the seedlings emerge, thin them out so that only the strongest seedlings remain in each pot or cell.
9. Care for the Seedlings: Continue to provide the seedlings with bright, indirect light and consistent moisture. Fertilize them with a diluted liquid fertilizer every few weeks.
10. Transplant: Once the seedlings have developed several sets of true leaves, you can transplant them into larger pots or directly into the garden, depending on your climate.
General Bay Leaf Care Tips:
* Sunlight: Bay leaf plants prefer full sun to partial shade. In hotter climates, provide some afternoon shade to prevent leaf scorch.
* Soil: Bay leaf plants prefer well-draining soil that is slightly acidic.
* Watering: Water regularly, especially during dry periods. Allow the soil to dry out slightly between waterings.
* Fertilizing: Fertilize in the spring with a balanced fertilizer.
* Pruning: Prune regularly to maintain the desired shape and size. You can also harvest bay leaves as needed.
* Pests and Diseases: Bay leaf plants are generally pest and disease resistant. However, they can be susceptible to scale, aphids, and spider mites. Monitor your plants regularly and treat any infestations promptly.
* Winter Protection: In colder climates, bay leaf plants may need winter protection. You can either bring them indoors or wrap them in burlap to protect them from frost.
Troubleshooting:
* Cuttings Not Rooting: Make sure you’re using fresh cuttings, providing adequate humidity, and using rooting hormone. Also, ensure the potting mix is well-draining.
* Seeds Not Germinating: Ensure you’re using fresh seeds, providing adequate warmth and moisture, and that the seeds are not planted too deep.
* Yellowing Leaves: Yellowing leaves can be a sign of overwatering, underwatering, or nutrient deficiency. Adjust your watering schedule and fertilize as needed.
* Brown Leaf Tips: Brown leaf tips can be a sign of dry air or salt buildup in the soil. Increase humidity and flush the soil with water periodically.
Final Thoughts:
Propagating bay leaf can be a rewarding experience, allowing you to expand your herb garden and enjoy fresh bay leaves whenever you need them. Whether you choose to propagate from cuttings or seeds, remember to be patient and provide the right conditions for success. Happy gardening!
Conclusion
So, there you have it! Propagating bay leaf plants from cuttings might seem a little daunting at first, but with a little patience and the right approach, you can easily expand your herb garden and enjoy a continuous supply of fresh bay leaves. This DIY trick is a must-try for several compelling reasons. Firstly, it’s incredibly cost-effective. Instead of repeatedly buying bay leaves from the store, you can cultivate your own supply, saving money in the long run. Secondly, it’s a sustainable practice. By propagating your own plants, you’re reducing your reliance on commercially grown herbs, which often involve transportation and packaging. Finally, and perhaps most importantly, it’s incredibly rewarding to nurture a plant from a simple cutting and watch it flourish. There’s a unique satisfaction in knowing you’ve played an active role in bringing new life into your garden.
But the fun doesn’t stop there! Feel free to experiment with different variations of this propagation method. For instance, you could try using different rooting hormones to see which one yields the best results for you. Some gardeners swear by honey as a natural rooting agent, while others prefer commercial hormone powders or gels. You could also experiment with different types of potting mixes. A well-draining mix is crucial, but you might find that adding a bit of perlite or vermiculite improves drainage even further. Consider the humidity levels in your environment. If you live in a dry climate, you might need to mist your cuttings more frequently or use a humidity dome to create a more favorable environment.
Another variation to consider is the timing of your cuttings. While late spring or early summer is generally considered the best time to propagate bay leaf plants, you might find that you have success at other times of the year as well. Keep a journal of your experiments and note the dates, conditions, and results. This will help you fine-tune your propagation technique and achieve even better results in the future.
Don’t be discouraged if your first attempt isn’t successful. Propagation can be a bit of a trial-and-error process, and it’s important to learn from your mistakes. Keep trying, and you’ll eventually get the hang of it. Remember to provide your cuttings with consistent moisture, warmth, and indirect sunlight. Avoid overwatering, as this can lead to root rot. And be patient! It can take several weeks or even months for roots to develop.
We are confident that you’ll find this DIY bay leaf propagation trick to be a valuable addition to your gardening skills. It’s a simple, affordable, and sustainable way to expand your herb garden and enjoy a continuous supply of fresh bay leaves. So, what are you waiting for? Grab your pruning shears, find a healthy bay leaf plant, and get started! We encourage you to try this method and share your experiences with us. Let us know what worked for you, what challenges you faced, and any tips or tricks you discovered along the way. Your feedback will help other gardeners succeed in propagating their own bay leaf plants. Happy gardening!
Frequently Asked Questions (FAQ)
What is the best time of year to take bay leaf cuttings?
The ideal time to take bay leaf cuttings is in late spring or early summer. During this period, the plant is actively growing, and the cuttings are more likely to root successfully. However, you can attempt propagation at other times of the year, but the success rate might be lower. Avoid taking cuttings during the dormant season (winter) when the plant’s growth is significantly slowed down.
What type of bay leaf plant is best for propagation?
You can propagate from most varieties of bay leaf plants (Laurus nobilis). Ensure the parent plant is healthy and free from diseases or pests. Choose a plant that is at least a few years old, as younger plants may not have the necessary energy reserves for successful propagation.
How long does it take for bay leaf cuttings to root?
Rooting time can vary depending on several factors, including the time of year, the temperature, humidity, and the specific propagation method used. Generally, it takes anywhere from 4 to 8 weeks for bay leaf cuttings to develop roots. Be patient and continue to provide the cuttings with consistent moisture and warmth.
What kind of rooting hormone should I use?
While rooting hormone isn’t strictly necessary, it can significantly increase the success rate of bay leaf propagation. You can use either a powdered or liquid rooting hormone. Follow the instructions on the product label for proper application. Some gardeners also use natural rooting agents like honey or willow water, although their effectiveness may vary.
What type of potting mix is best for rooting bay leaf cuttings?
A well-draining potting mix is essential for rooting bay leaf cuttings. A mix of perlite, vermiculite, and peat moss or coco coir works well. Avoid using heavy garden soil, as it can retain too much moisture and lead to root rot. You can also purchase a commercially available seed-starting mix.
How much light do bay leaf cuttings need?
Bay leaf cuttings need bright, indirect sunlight. Avoid placing them in direct sunlight, as this can scorch the leaves. A location near an east-facing window is ideal. If you don’t have access to natural light, you can use a grow light.
How often should I water bay leaf cuttings?
Keep the potting mix consistently moist, but not waterlogged. Water the cuttings when the top inch of soil feels dry to the touch. Avoid overwatering, as this can lead to root rot. Misting the leaves regularly can also help to maintain humidity.
How can I increase the humidity around my bay leaf cuttings?
High humidity is beneficial for rooting bay leaf cuttings. You can increase humidity by placing a clear plastic bag or humidity dome over the cuttings. Make sure to vent the bag or dome regularly to prevent the buildup of excessive moisture, which can lead to fungal diseases. You can also use a humidifier to increase the humidity in the surrounding area.
What are some common problems when propagating bay leaf plants and how can I fix them?
Some common problems include:
* **Root rot:** Caused by overwatering. Ensure the potting mix is well-draining and avoid overwatering.
* **Leaf drop:** Can be caused by low humidity, insufficient light, or temperature fluctuations. Provide adequate humidity, light, and a stable temperature.
* **Failure to root:** Can be caused by using unhealthy cuttings, improper rooting hormone application, or unfavorable environmental conditions. Ensure you’re using healthy cuttings, applying rooting hormone correctly, and providing the cuttings with consistent moisture, warmth, and indirect sunlight.
Can I propagate bay leaf plants from seeds?
While it is possible to propagate bay leaf plants from seeds, it is a much slower and less reliable method than propagating from cuttings. Bay leaf seeds can be difficult to germinate, and the resulting plants may not be true to type. Propagation from cuttings is generally the preferred method.
How do I know when my bay leaf cuttings have rooted?
You’ll know your bay leaf cuttings have rooted when you see new growth emerging from the top of the plant. You can also gently tug on the cutting to see if it resists. If it feels firmly anchored in the soil, it has likely rooted. Avoid pulling too hard, as this can damage the delicate roots.
What do I do after my bay leaf cuttings have rooted?
Once your bay leaf cuttings have rooted, you can transplant them into individual pots filled with a well-draining potting mix. Gradually acclimate the plants to outdoor conditions before planting them in the garden. Choose a location with well-drained soil and partial shade. Water regularly, especially during dry periods.
Can I grow bay leaf plants indoors?
Yes, bay leaf plants can be grown indoors. Choose a pot that is large enough to accommodate the plant’s root system. Use a well-draining potting mix and place the plant in a location with bright, indirect sunlight. Water regularly and fertilize every few weeks during the growing season. Prune the plant regularly to maintain its shape and size.

Leave a Comment