
Growing radishes doesn’t have to be a daunting task! Have you ever dreamt of plucking crisp, peppery radishes straight from your own backyard, adding a vibrant crunch to your salads and a satisfying zing to your snacks? I know I have! This seemingly simple root vegetable holds a surprising history, dating back to pre-Roman times. Cultivated for centuries across Asia and Europe, radishes were even used as currency in ancient Egypt – talk about a valuable crop!
But let’s be honest, sometimes getting those perfect, plump radishes feels more like a gamble than a sure thing. That’s where this easy guide comes in. I’m going to share my tried-and-true secrets and DIY tricks to ensure you’re growing radishes successfully, even if you’re a complete beginner. Forget about those tiny, cracked, or overly spicy radishes you might have encountered before. With a few simple hacks, you can enjoy a bountiful harvest of delicious, homegrown radishes in just a few weeks. Ready to get started? Let’s dive in!
Growing Radishes: A Beginner-Friendly Guide to Crunchy Success
Hey there, fellow gardening enthusiasts! I’m so excited to share my secrets to growing radishes – those peppery, crunchy little gems that add a zing to any salad or snack. Radishes are seriously one of the easiest and fastest vegetables to grow, making them perfect for beginners and impatient gardeners (like me!). So, grab your gardening gloves, and let’s get started!
Choosing the Right Radish Variety
First things first, let’s talk about radish varieties. There’s more to radishes than just the classic red globe! Choosing the right variety for your climate and taste is key to a successful harvest. Here are a few of my favorites:
* Cherry Belle: This is your classic, round, bright red radish. It’s quick to mature (about 22 days) and has a mild, slightly peppery flavor. Perfect for beginners!
* French Breakfast: These are elongated, red radishes with a white tip. They have a milder, sweeter flavor than Cherry Belle and are ready in about 25 days. I love them sliced on buttered bread with a sprinkle of sea salt.
* Easter Egg: This variety is a mix of radishes in different colors – red, pink, purple, and white. It’s a fun and colorful addition to any garden and matures in about 25 days.
* Black Spanish: If you’re looking for something with a bit more kick, try Black Spanish radishes. They have a black skin and white flesh and a very pungent flavor. They take longer to mature (around 55 days) and are best grown in the fall.
* Daikon: While technically a radish, Daikon radishes are much larger and milder than other varieties. They’re often used in Asian cuisine and can be pickled, grated, or added to soups. They take about 60 days to mature.
Preparing Your Radish Bed
Radishes aren’t fussy, but they do appreciate well-drained soil and plenty of sunlight. Here’s how I prepare my radish bed:
* Sunlight: Radishes need at least 6 hours of sunlight per day. Choose a spot in your garden that gets plenty of sun.
* Soil: Radishes prefer loose, well-drained soil. If your soil is heavy clay, amend it with compost or other organic matter to improve drainage. I like to add a generous amount of compost to my radish bed before planting.
* pH: Radishes grow best in soil with a pH between 6.0 and 7.0. You can test your soil pH with a soil testing kit from your local garden center.
* Weed Removal: Clear the area of any weeds and rocks. Radishes don’t compete well with weeds, so it’s important to start with a clean slate.
Planting Radish Seeds
Now for the fun part – planting! Radishes are direct-sown, meaning you plant the seeds directly into the ground.
1. Timing is Key: Radishes are a cool-season crop, so they’re best planted in early spring or fall. In the spring, plant them as soon as the soil can be worked. In the fall, plant them about 4-6 weeks before the first expected frost. I usually start planting radishes about two weeks before the last expected frost in spring, and then continue planting every two weeks for a continuous harvest.
2. Sowing the Seeds: Sow the seeds about ½ inch deep and 1 inch apart in rows that are 6 inches apart. I like to use a garden trowel to make a shallow trench, then sprinkle the seeds in and cover them with soil.
3. Watering: Gently water the soil after planting. Keep the soil consistently moist until the seeds germinate.
4. Thinning: Once the seedlings emerge (usually in about 3-7 days), thin them to about 2 inches apart. This will give the radishes enough room to grow. Don’t be afraid to pull out the extra seedlings – it’s better to have fewer, larger radishes than a bunch of small, crowded ones. You can even eat the thinnings! They have a mild radish flavor.
Caring for Your Radishes
Radishes are relatively low-maintenance, but here are a few things you can do to ensure a bountiful harvest:
* Watering: Keep the soil consistently moist, especially during dry spells. Radishes need plenty of water to grow quickly and develop a good flavor. Aim for about 1 inch of water per week.
* Weeding: Keep the radish bed free of weeds. Weeds compete with radishes for water and nutrients, so it’s important to remove them regularly. I like to use a hand hoe to gently cultivate the soil around the radishes and remove any weeds.
* Fertilizing: Radishes don’t need a lot of fertilizer, but a light feeding of a balanced fertilizer can help them grow. I usually use a liquid fertilizer diluted to half strength. Be careful not to over-fertilize, as this can cause the radishes to develop a strong, bitter flavor.
* Pest Control: Radishes are generally pest-resistant, but they can be susceptible to flea beetles and root maggots. Flea beetles are small, jumping insects that chew tiny holes in the leaves. Root maggots are the larvae of flies that feed on the roots of radishes. To control flea beetles, you can cover your radishes with row covers. To control root maggots, you can rotate your crops and avoid planting radishes in the same spot year after year. I’ve also found that diatomaceous earth can be effective against both flea beetles and root maggots.
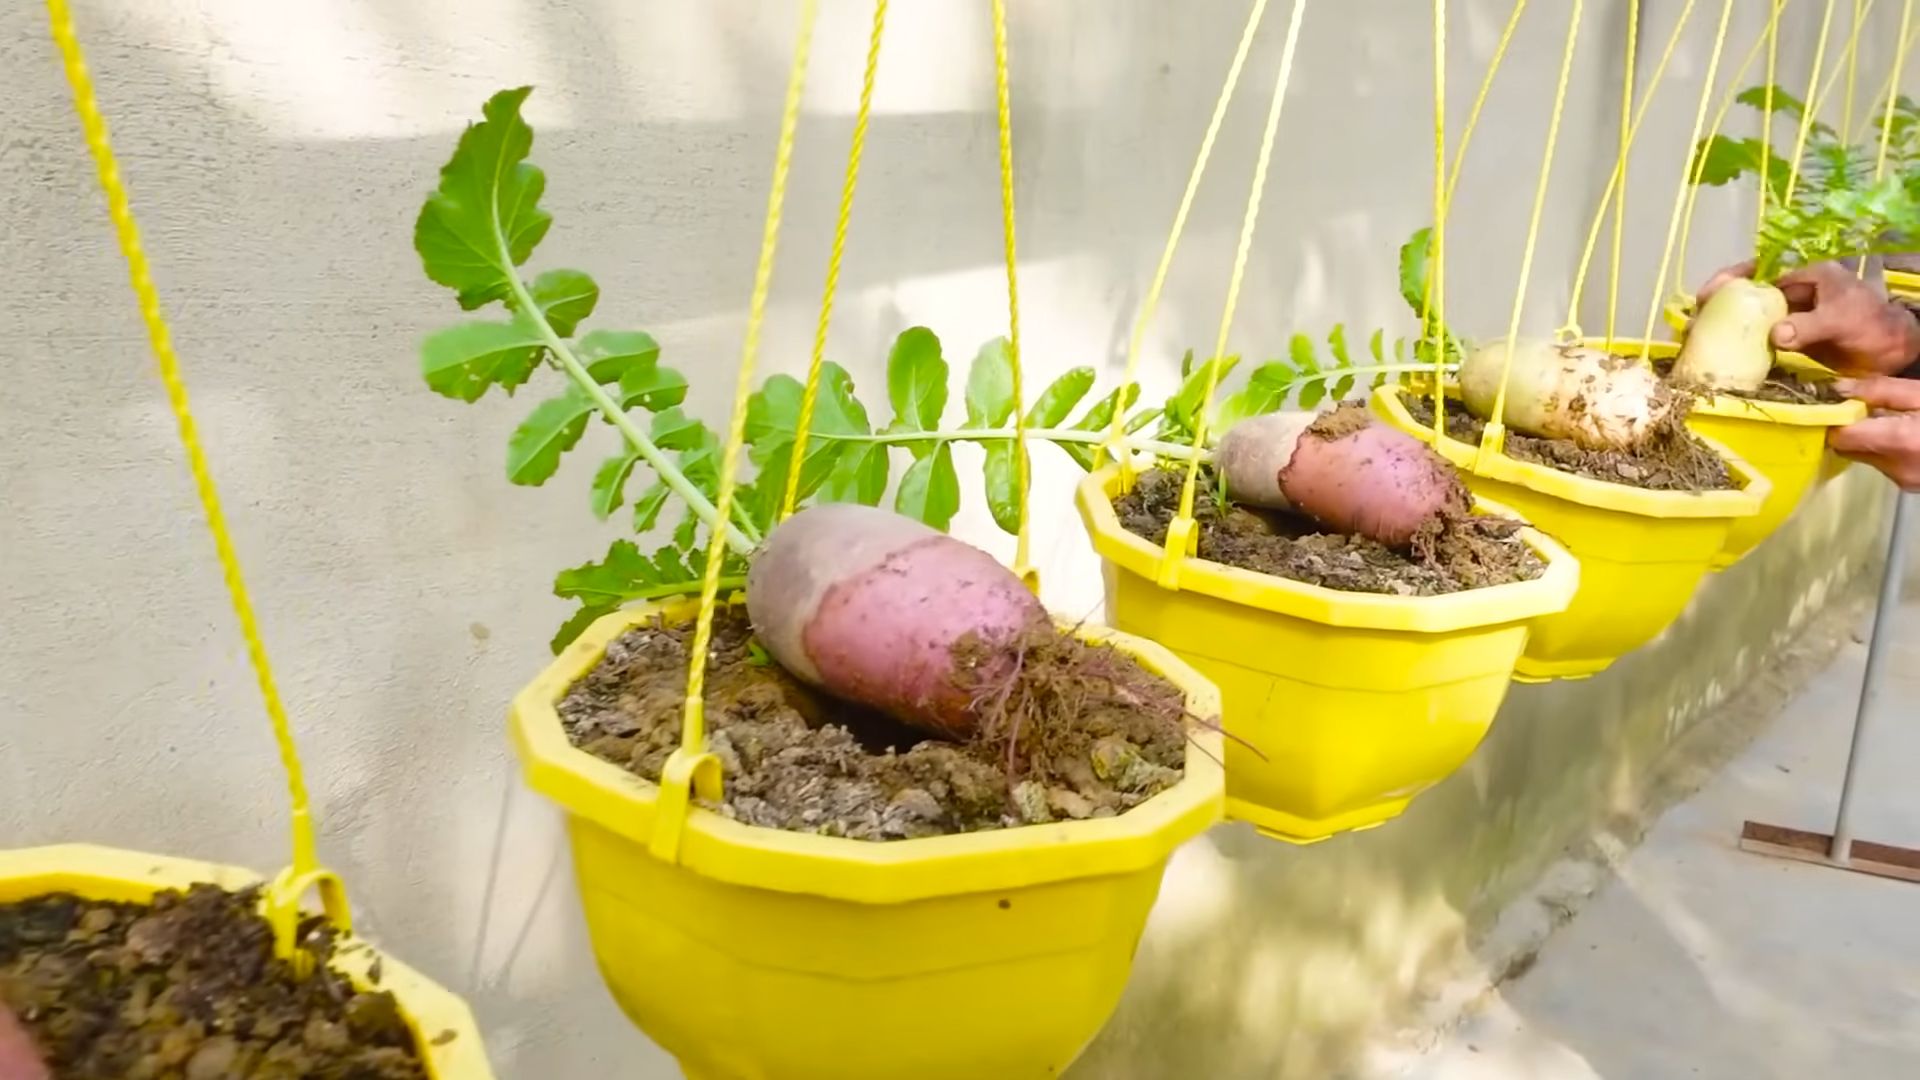
Harvesting Your Radishes
This is the moment you’ve been waiting for! Radishes are ready to harvest when they reach the size of a marble or golf ball, depending on the variety.
1. Check for Size: Gently brush away the soil around the base of the radish to check its size.
2. Pulling: Grasp the radish by the leaves and gently pull it out of the ground. If the soil is dry, you may need to loosen it with a garden fork first.
3. Cleaning: Wash the radishes and trim off the leaves. You can store the radishes in the refrigerator for up to a week. I like to store them in a plastic bag with a damp paper towel to keep them crisp.
4. Succession Planting: To ensure a continuous harvest, plant a new batch of radishes every two weeks. This is called succession planting.
Troubleshooting Common Radish Problems
Even with the best care, you might encounter a few problems when growing radishes. Here are some common issues and how to fix them:
* Radishes are too small: This is usually caused by overcrowding or lack of water. Thin the radishes to give them more room to grow and make sure they’re getting enough water.
* Radishes are cracked: This is usually caused by inconsistent watering. Keep the soil consistently moist, especially during dry spells.
* Radishes are pithy: This means the radishes have become hollow and spongy. This is usually caused by letting the radishes get too old before harvesting. Harvest them when they’re the right size.
* Radishes are too spicy: This can be caused by hot weather or lack of water. Radishes develop a stronger flavor when they’re stressed. Try planting them in a shadier spot or providing them with more water.
* Radishes are all tops and no bottoms: This can be caused by soil that is too rich in nitrogen. Avoid over-fertilizing your radishes.
Creative Ways to Enjoy Your Radish Harvest
Now that you’ve harvested your radishes, it’s time to enjoy them! Here are a few of my favorite ways to eat radishes:
* Raw: Radishes are delicious eaten raw, either on their own or in salads. I love to slice them thinly and add them to a green salad with a vinaigrette dressing.
* Roasted: Roasting radishes mellows out their flavor and makes them surprisingly sweet. Toss them with olive oil, salt, and pepper and roast them at 400°F for about 20 minutes.
* Pickled: Pickled radishes are a tangy and crunchy addition to sandwiches, tacos, and salads. There are tons of recipes online for pickled radishes.
* Radish Greens: Don’t throw away the radish greens! They’re edible and nutritious. You can sauté them, add them to soups, or use them in salads. They have a slightly peppery flavor similar to arugula.
* Radish Butter: This is a classic French appetizer. Simply mash softened butter with finely chopped radishes, salt, and pepper. Spread it on crusty bread and enjoy!
Radish Growing Tips and Tricks
Here are a few extra tips and tricks that I’ve learned over the years:
* Plant radishes between rows of slower
Conclusion
So, there you have it! Growing radishes doesn’t have to be a daunting task reserved for seasoned gardeners. With a little planning, the right conditions, and this simple DIY trick, you can enjoy a bountiful harvest of crisp, peppery radishes right from your own backyard (or even your balcony!).
Why is this DIY trick a must-try? Because it addresses one of the most common challenges faced by radish growers: inconsistent germination and overcrowding. By pre-sprouting your radish seeds, you ensure that only the strongest, most viable seeds make it into the soil. This not only saves you time and resources but also leads to a more uniform and productive crop. Plus, the precision planting method minimizes the need for thinning, which can be a tedious and time-consuming chore.
But don’t stop there! Feel free to experiment with different radish varieties. From the classic Cherry Belle to the spicy French Breakfast or the colorful Easter Egg blend, there’s a radish out there to suit every palate. You can also try interplanting your radishes with other fast-growing crops like lettuce or spinach to maximize your garden space. Another variation is to use different types of growing mediums. While soil is the most common, you can also try using coco coir or a soilless mix for even better drainage and aeration.
Remember, the key to successful radish growing is consistent moisture and well-drained soil. Keep a close eye on your seedlings, and don’t be afraid to adjust your watering schedule as needed. And most importantly, don’t forget to harvest your radishes promptly once they reach maturity. Overripe radishes can become woody and bitter.
We are confident that this DIY trick will revolutionize your radish-growing experience. It’s simple, effective, and yields impressive results. So, grab your seeds, gather your supplies, and get ready to enjoy the satisfaction of harvesting your own homegrown radishes. We encourage you to try this method and share your experiences with us! Let us know what varieties you planted, what challenges you faced, and what successes you celebrated. Your feedback will not only help us improve this guide but also inspire other gardeners to embark on their own radish-growing adventures. Happy gardening, and may your harvest be plentiful! This easy guide to growing radishes will help you get started.
Frequently Asked Questions (FAQs)
What exactly *is* the DIY trick you’re referring to?
The DIY trick we’re emphasizing is pre-sprouting your radish seeds before planting them in the ground. This involves placing the seeds on a damp paper towel inside a sealed plastic bag or container and keeping them in a warm place for a few days until they sprout. Once the seeds have sprouted, you can carefully transfer them to your garden bed or container. This ensures that only viable seeds are planted, leading to a more uniform and successful crop.
Why is pre-sprouting radish seeds beneficial?
Pre-sprouting offers several advantages:
* **Improved Germination Rate:** You only plant seeds that you know will grow.
* **Reduced Thinning:** Because you’re only planting sprouted seeds, you’ll have fewer instances of overcrowding, minimizing the need for thinning later on.
* **Faster Growth:** Sprouted seeds get a head start, leading to quicker harvests.
* **Better Control:** You have more control over the spacing and placement of your radish plants.
* **Resource Conservation:** You avoid wasting seeds on those that won’t germinate.
How long does it take for radish seeds to sprout?
Radish seeds typically sprout within 2-5 days under optimal conditions (warmth and moisture). Check them daily and ensure the paper towel remains damp.
What if my radish seeds don’t sprout after a few days?
If your radish seeds haven’t sprouted after 5 days, it could be due to several factors:
* **Seed Viability:** The seeds might be old or of poor quality. Try using fresh seeds from a reputable source.
* **Insufficient Moisture:** Make sure the paper towel is consistently damp but not soaking wet.
* **Inadequate Warmth:** Radish seeds germinate best in temperatures between 60-70°F (15-21°C).
* **Dormancy:** Some seeds have a dormancy period. While less common in radishes, it’s possible.
What kind of soil is best for growing radishes?
Radishes prefer well-drained, loose soil that is rich in organic matter. Amend your soil with compost or well-rotted manure before planting to improve drainage and fertility. Avoid heavy clay soils, as they can hinder root development. A soil pH of 6.0 to 7.0 is ideal.
How much sunlight do radishes need?
Radishes need at least 6 hours of sunlight per day. However, they can tolerate partial shade, especially in hot climates.
How often should I water my radishes?
Radishes need consistent moisture to grow quickly and develop crisp roots. Water deeply whenever the top inch of soil feels dry to the touch. Avoid overwatering, as this can lead to root rot.
When is the best time to plant radishes?
Radishes are a cool-season crop and are best planted in early spring or late summer/early fall. Avoid planting them during the hottest months of the year, as they tend to bolt (go to seed) in hot weather.
How far apart should I plant my radish seeds (or sprouted seeds)?
When transplanting your pre-sprouted seeds, space them about 1-2 inches apart in rows that are 6-12 inches apart. This will give the radishes enough room to develop without overcrowding.
How long does it take for radishes to mature?
Radishes are one of the fastest-growing vegetables. Most varieties mature in just 20-30 days.
How do I know when my radishes are ready to harvest?
Radishes are ready to harvest when their roots reach the desired size (usually about 1 inch in diameter). Gently loosen the soil around the radish and pull it out of the ground.
What are some common pests and diseases that affect radishes?
Common pests that affect radishes include flea beetles, root maggots, and aphids. Diseases include damping-off and white rust. Use organic pest control methods and ensure good air circulation to prevent these problems.
Can I grow radishes in containers?
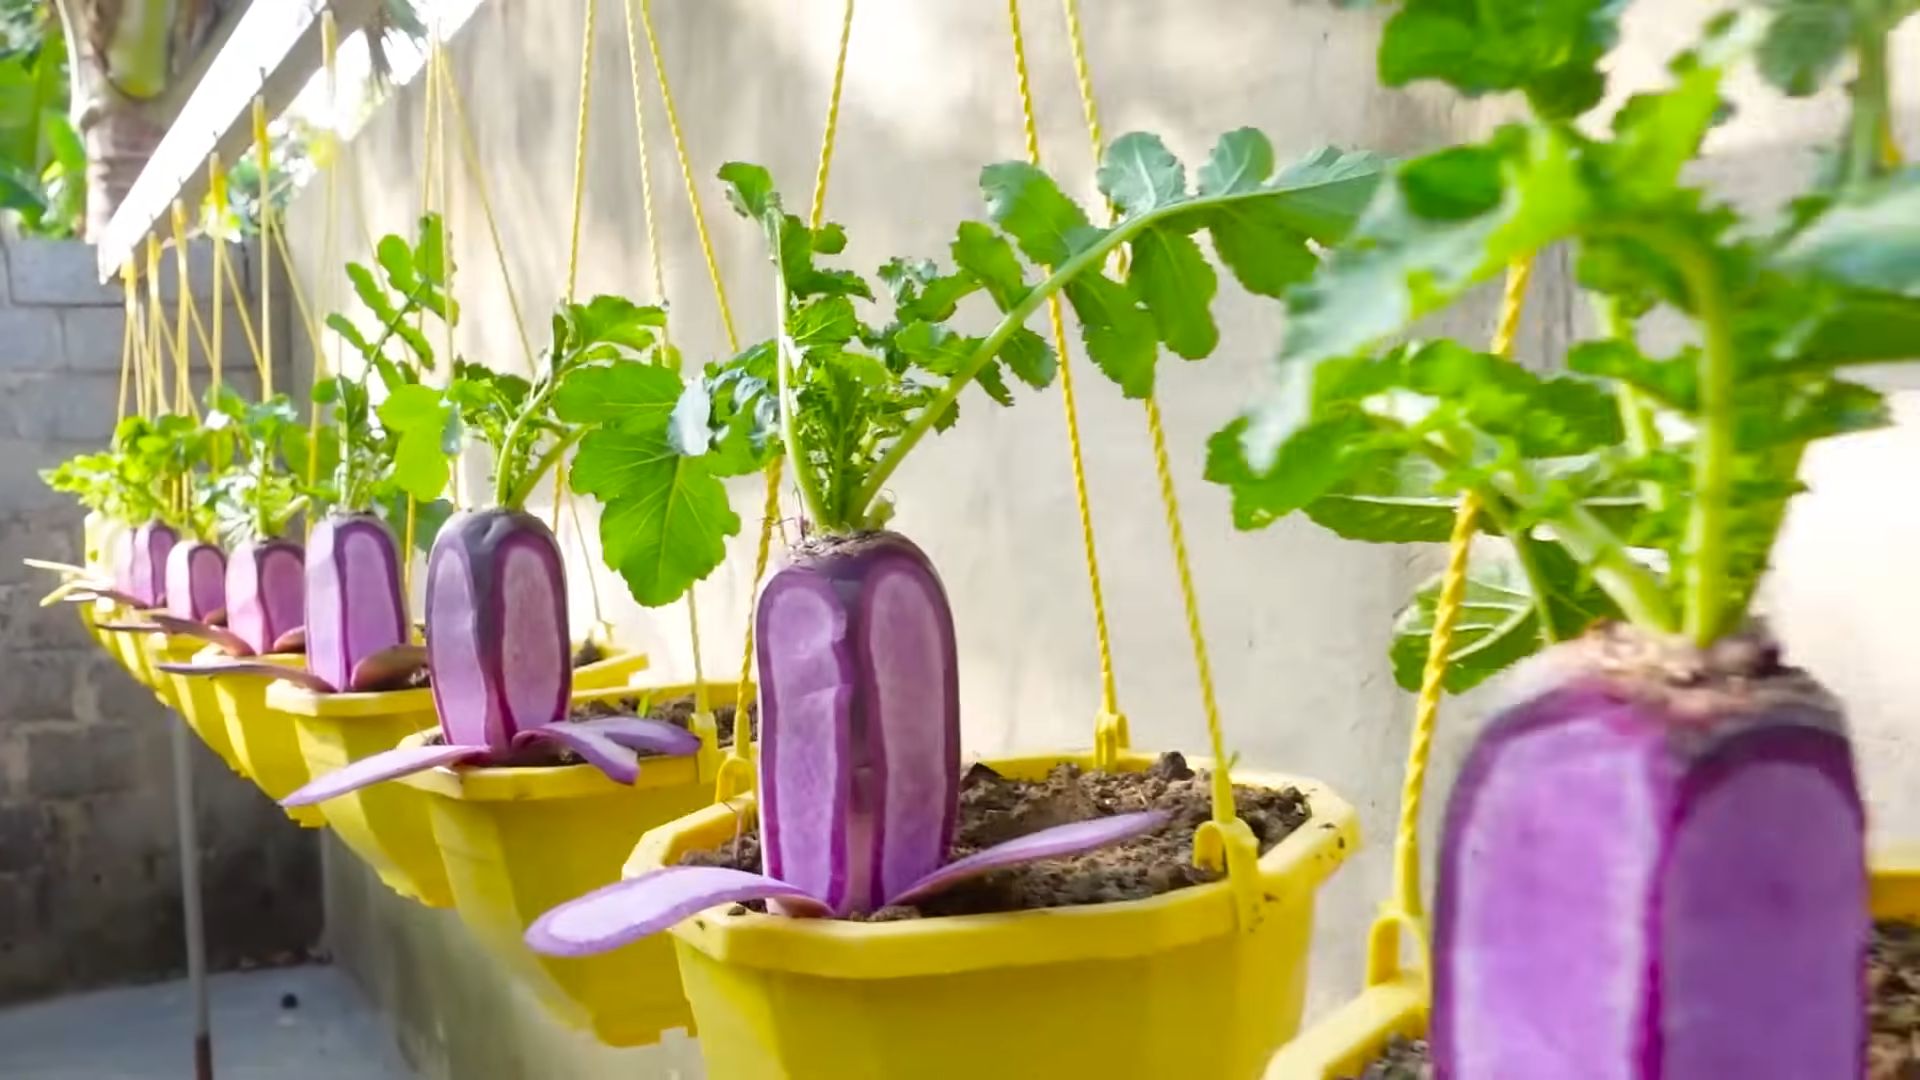
Yes, radishes are well-suited for container gardening. Choose a container that is at least 6 inches deep and has good drainage. Use a high-quality potting mix and follow the same planting and care instructions as for growing radishes in the ground.
Can I eat the radish greens?
Yes, radish greens are edible and nutritious. They have a peppery flavor and can be used in salads, soups, or stir-fries.
How do I store radishes after harvesting?
Remove the greens from the radishes and store them separately in the refrigerator. Place the radishes in a plastic bag or container with a damp paper towel to keep them crisp. They will typically last for about a week in the refrigerator.

Leave a Comment