
Brussel Sprouts Container Gardening: Ever dreamt of harvesting your own delicious, miniature cabbages right from your patio? I know I have! There’s something incredibly satisfying about growing your own food, and Brussel sprouts, despite their sometimes-questionable reputation, are surprisingly easy and rewarding to cultivate in containers.
For centuries, Brussel sprouts have been a staple in European cuisine, with their cultivation tracing back to, you guessed it, Brussels, Belgium! While they might not be everyone’s favorite vegetable on the Thanksgiving table, fresh, homegrown Brussel sprouts offer a flavor profile that’s miles away from the often-bitter, store-bought variety. Plus, they’re packed with vitamins and nutrients, making them a healthy and delicious addition to your diet.
But why Brussel Sprouts Container Gardening, you ask? Well, not everyone has the luxury of a sprawling backyard garden. Container gardening allows even those with limited space – apartment dwellers, balcony enthusiasts, or anyone with poor soil – to enjoy the joys of homegrown produce. This DIY guide will walk you through every step, from choosing the right container and soil to nurturing your sprouts for a bountiful harvest. Say goodbye to bland, store-bought sprouts and hello to fresh, flavorful goodness right at your fingertips! I’m excited to share these simple tricks and hacks that will have you enjoying homegrown Brussel sprouts in no time.
Growing Brussels Sprouts in Containers: A DIY Guide
Hey there, fellow gardeners! I’m so excited to share my experience with growing Brussels sprouts in containers. It’s totally doable, even if you don’t have a huge backyard. I’ve learned a few tricks along the way, and I’m here to guide you through the process, step-by-step. Get ready for some homegrown goodness!
Choosing the Right Container and Soil
Before we even think about seeds, let’s talk about where our Brussels sprouts will call home. This is super important for their success!
* **Container Size:** Brussels sprouts need room to grow, both above and below the soil. I recommend a container that’s at least 12 inches in diameter and 12 inches deep. Bigger is better, honestly! A 5-gallon bucket works great, but a larger pot (10-15 gallons) will give your plants even more space to thrive and potentially produce more sprouts.
* **Drainage:** This is non-negotiable! Make sure your container has drainage holes. Brussels sprouts hate sitting in soggy soil. If your container doesn’t have enough holes, you can drill a few more.
* **Material:** Plastic, terracotta, or even fabric pots will work. I personally like using plastic containers because they retain moisture better, which is helpful in warmer climates. Terracotta pots are beautiful, but they dry out faster. Fabric pots are great for aeration, but they might require more frequent watering.
* **Soil:** Forget using garden soil straight from the ground. It’s usually too heavy and doesn’t drain well enough. Instead, opt for a high-quality potting mix. Look for a mix that’s specifically designed for vegetables. I like to amend my potting mix with compost for added nutrients and drainage. A good mix should be well-draining, but also retain enough moisture to keep the plants happy.
Starting Your Brussels Sprouts
Now for the fun part – getting those seeds started! You have two options here: starting from seed or buying transplants. I’ve done both, and I’ll walk you through each method.
* **Starting from Seed:** This is the more economical option, and it gives you more control over the entire process.
* **Timing:** Brussels sprouts need a long growing season, so you’ll want to start your seeds indoors about 6-8 weeks before the last expected frost. Check your local frost dates to be sure!
* **Seed Starting Mix:** Use a seed starting mix, which is finer and lighter than potting mix. This makes it easier for the delicate seedlings to emerge.
* **Planting:** Sow the seeds about 1/4 inch deep in small pots or seed trays. I usually plant 2-3 seeds per pot and then thin them out later, keeping the strongest seedling.
* **Watering:** Keep the soil consistently moist, but not soggy. I like to use a spray bottle to gently water the seedlings.
* **Light:** Seedlings need plenty of light. If you don’t have a sunny windowsill, you can use grow lights. I keep my grow lights on for about 14-16 hours a day.
* **Hardening Off:** Before transplanting your seedlings outdoors, you’ll need to “harden them off.” This means gradually exposing them to outdoor conditions over a period of about a week. Start by placing them outside for a few hours each day in a sheltered location, and gradually increase the amount of time they spend outdoors.
* **Buying Transplants:** This is a quicker and easier option, especially if you’re short on time or space.
* **Choosing Transplants:** Look for healthy-looking transplants with sturdy stems and green leaves. Avoid plants that are yellowed, wilted, or have signs of pests or diseases.
* **Timing:** Plant your transplants outdoors after the last expected frost.
Planting and Caring for Your Brussels Sprouts
Alright, let’s get those Brussels sprouts into their containers!
1. **Prepare the Container:** Fill your container with your chosen potting mix, leaving a few inches of space at the top.
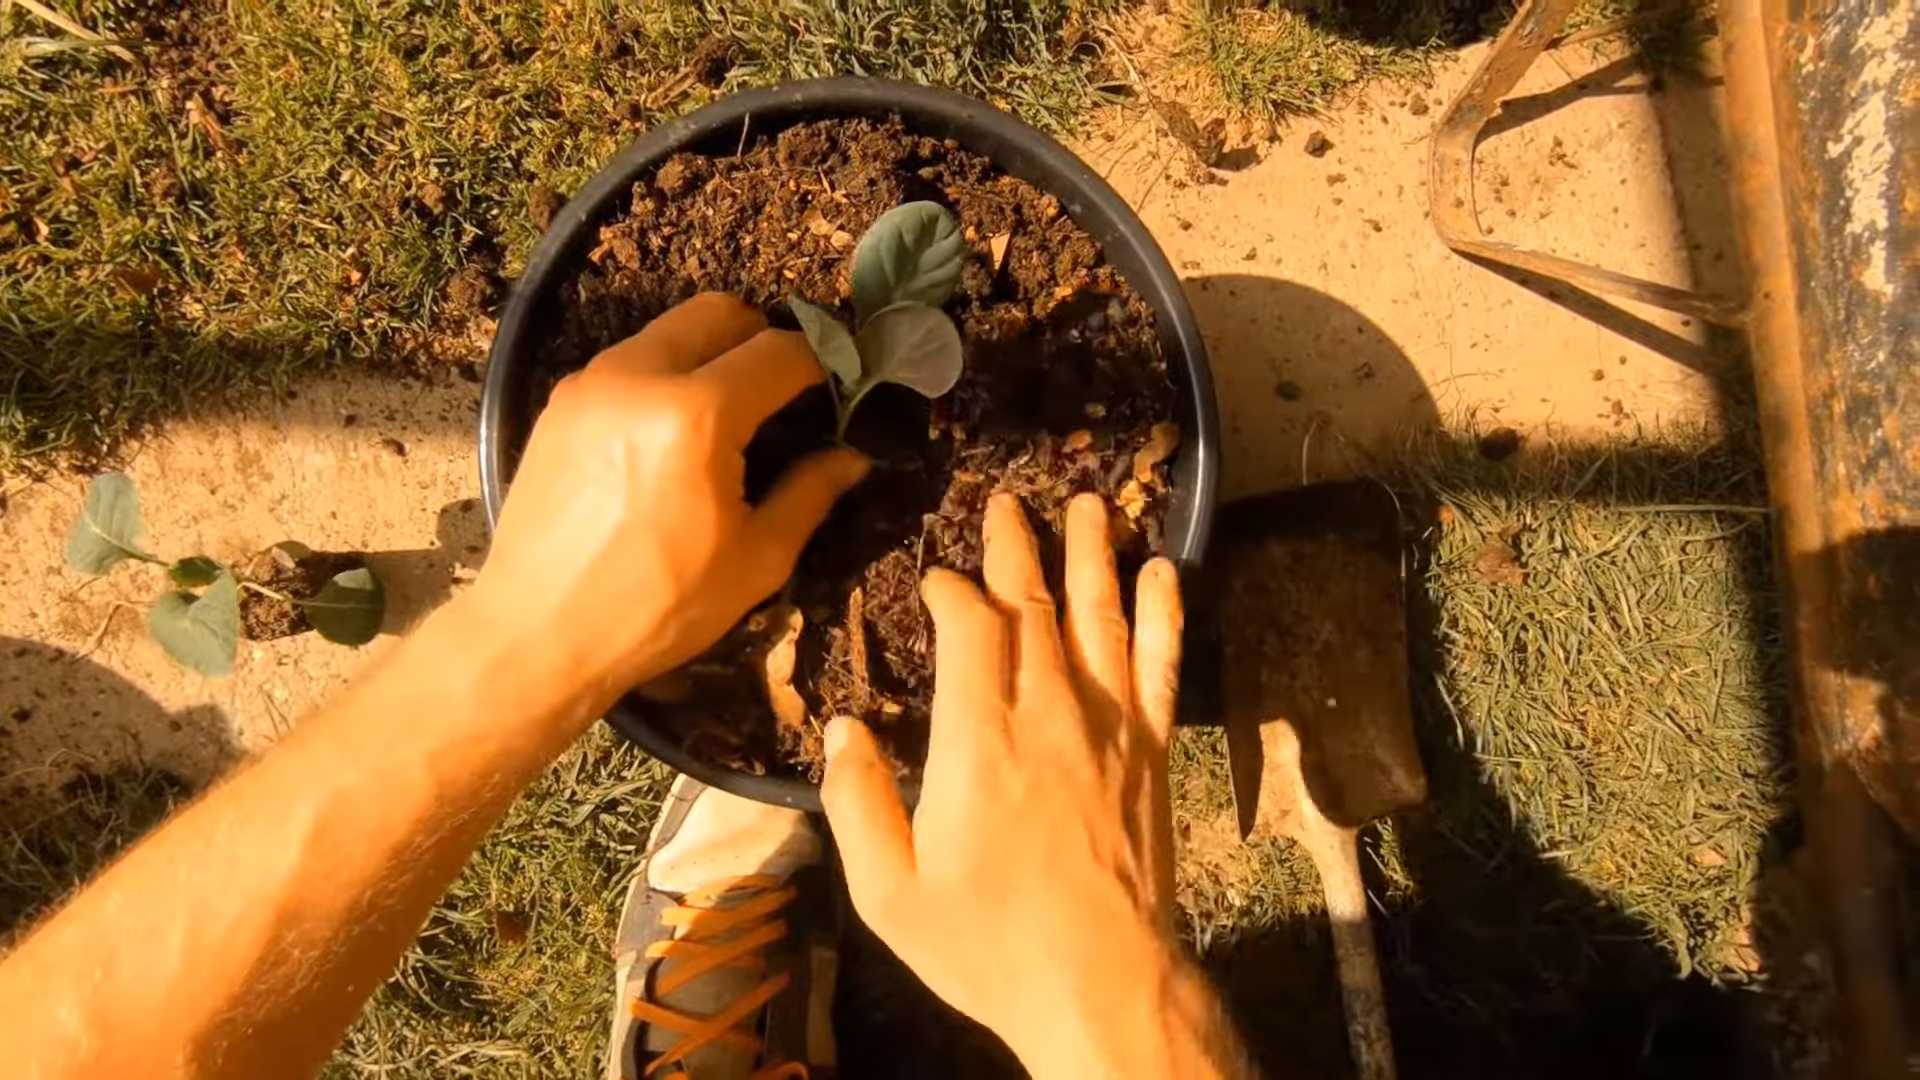
2. **Planting Seedlings/Transplants:**
* **Seedlings:** Gently remove the seedlings from their pots, being careful not to damage the roots. If you planted multiple seeds in one pot, carefully separate the seedlings.
* **Transplants:** Gently remove the transplant from its container.
* **Spacing:** Plant one Brussels sprout plant per container (if using the recommended size). If you’re using a very large container, you might be able to plant two, but make sure they’re spaced at least 18 inches apart.
* **Depth:** Plant the seedlings or transplants at the same depth they were growing in their previous containers.
3. **Watering:** Water thoroughly after planting.
4. **Mulching:** Add a layer of mulch around the base of the plants to help retain moisture and suppress weeds. I like to use straw or wood chips.
5. **Sunlight:** Brussels sprouts need at least 6 hours of sunlight per day. Place your containers in a sunny location.
6. **Watering:** Water regularly, especially during hot, dry weather. The soil should be consistently moist, but not soggy. Check the soil moisture by sticking your finger into the soil. If the top inch feels dry, it’s time to water.
7. **Fertilizing:** Brussels sprouts are heavy feeders, so you’ll need to fertilize them regularly. I like to use a balanced fertilizer (like 10-10-10) every 2-3 weeks. You can also use a liquid fertilizer, following the instructions on the label.
8. **Staking (Optional):** As your Brussels sprouts grow taller, they might need staking to prevent them from falling over. You can use bamboo stakes or tomato cages.
9. **Pest Control:** Keep an eye out for pests like aphids, cabbage worms, and flea beetles. You can control these pests with insecticidal soap, neem oil, or by hand-picking them off the plants. I prefer organic methods whenever possible.
10. **Removing Yellowing Leaves:** As the plant grows, the lower leaves may turn yellow. Remove these leaves to improve air circulation and prevent disease.
Dealing with Common Problems
Even with the best care, you might encounter a few problems along the way. Here are some common issues and how to deal with them:
* **Aphids:** These tiny pests can suck the sap from your plants, causing them to weaken and yellow. Spray them with insecticidal soap or neem oil.
* **Cabbage Worms:** These green caterpillars can devour your Brussels sprouts leaves. Hand-pick them off the plants or use Bacillus thuringiensis (Bt), a natural insecticide.
* **Flea Beetles:** These tiny beetles can create small holes in the leaves. Cover your plants with row covers to prevent them from reaching the plants.
* **Clubroot:** This fungal disease can cause the roots to swell and distort, stunting the plant’s growth. Prevent clubroot by ensuring good drainage and avoiding planting Brussels sprouts in the same spot year after year.
* **Buttoning:** This occurs when the sprouts develop prematurely and remain small. It’s often caused by stress, such as lack of water or nutrients. Make sure your plants are getting enough water and fertilizer.
Harvesting Your Brussels Sprouts
The moment we’ve all been waiting for – harvesting!
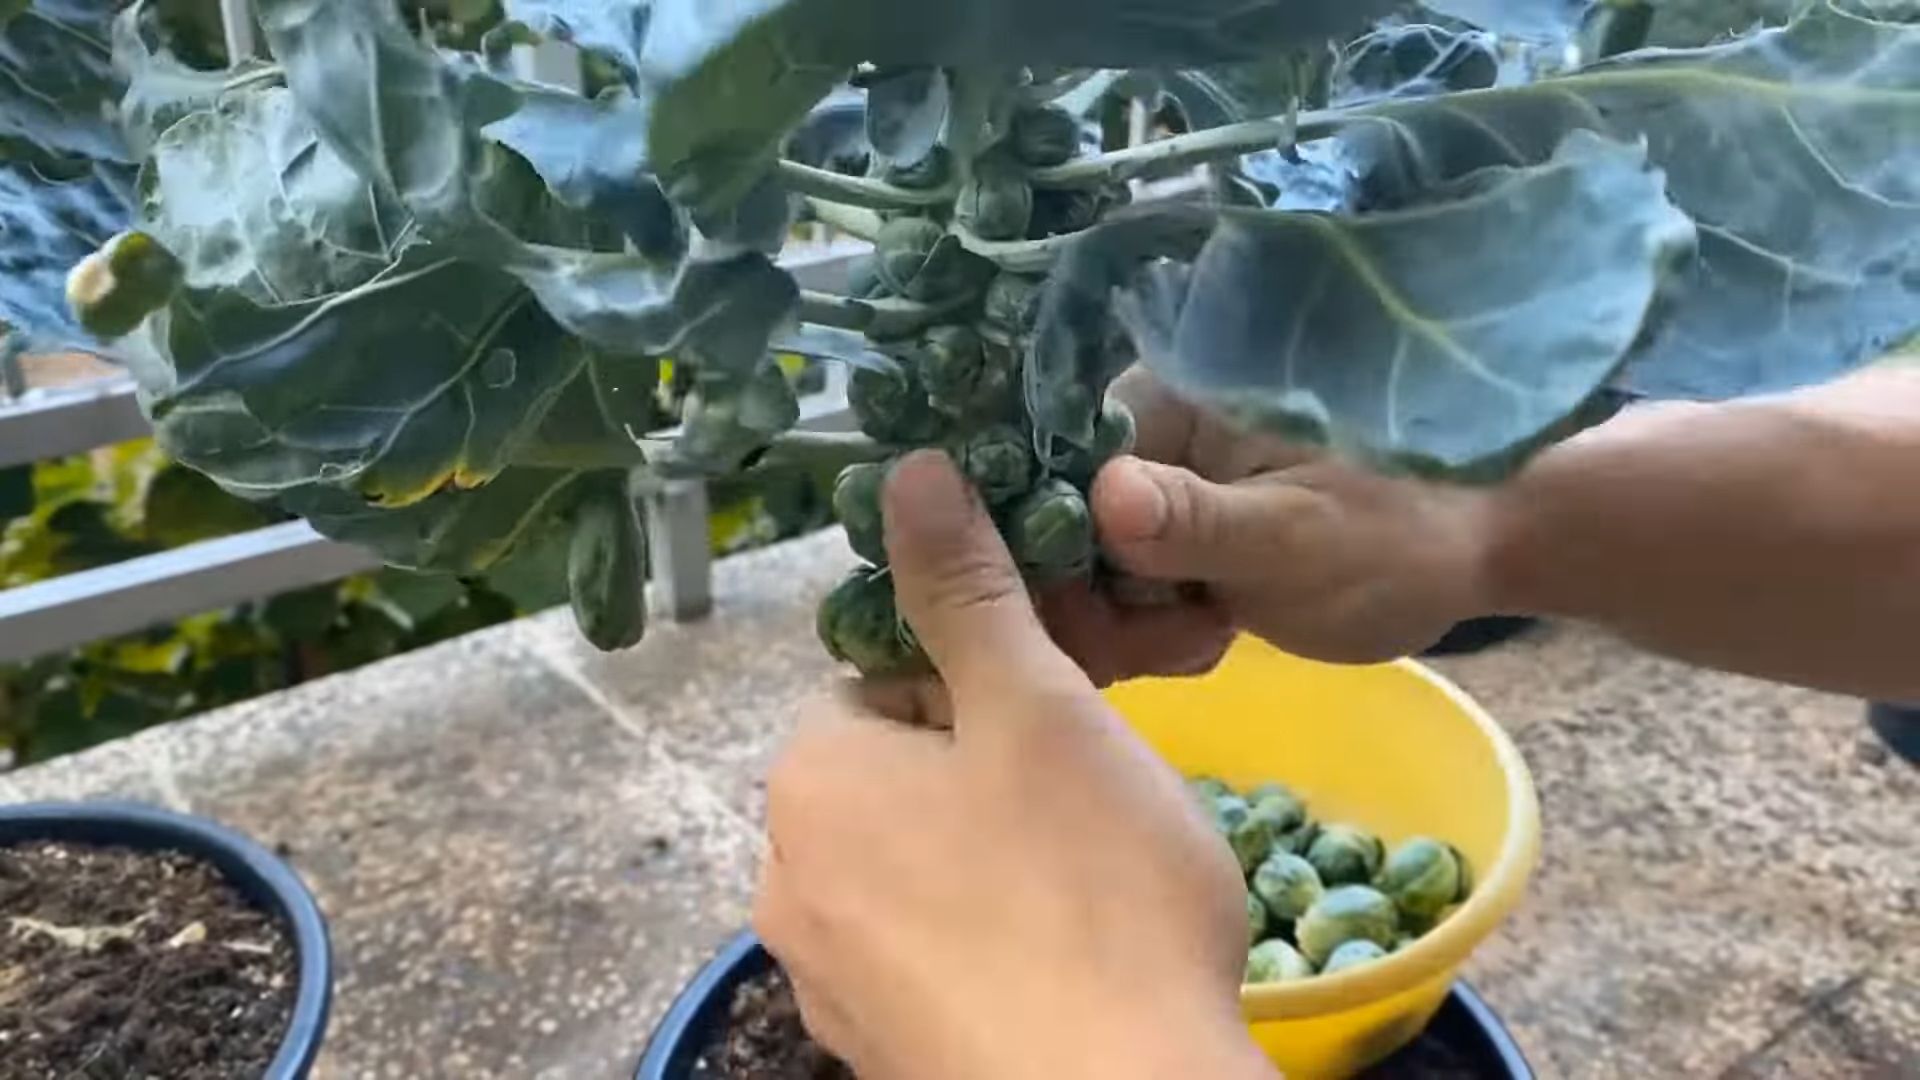
* **Timing:** Brussels sprouts are typically ready to harvest in the fall or early winter, about 90-100 days after planting. The sprouts should be firm and about 1-2 inches in diameter.
* **Harvesting:** Start harvesting from the bottom of the plant, working your way up. Twist the sprouts off the stem.
* **Storage:** Brussels sprouts can be stored in the refrigerator for up to a week.
Extending the Harvest
If you live in a mild climate, you can extend the harvest by protecting your plants from frost. You can cover them with row covers or move the containers to a sheltered location.
Choosing the Right Variety
Selecting the right variety of Brussels sprouts is crucial for success, especially when growing them in containers. Some varieties are more compact and better suited for container gardening than others. Here are a few of my favorites:
* **’Jade Cross E’:** This is a classic hybrid variety known for its high yields and uniform sprouts. It’s relatively compact, making it a good choice for containers.
* **’Long Island Improved’:** This heirloom variety is known for its nutty flavor and good disease resistance. It’s a bit taller than ‘Jade Cross E’, but it can still be grown successfully in containers with proper support.
* **’Redarling’:** If you want to add some color to your garden, try ‘Redarling’. This variety produces beautiful red-purple sprouts with a mild flavor.
* **’Divino F1′:** This variety is known for its early maturity and high yields. It’s a good choice for gardeners in cooler climates with shorter growing seasons.
When choosing a variety, consider your local climate, the size of your containers, and your
Conclusion
So, there you have it! Growing your own Brussels sprouts in containers isn’t just a fun gardening project; it’s a gateway to incredibly fresh, flavorful, and rewarding meals. Forget those bland, overcooked sprouts you might have encountered in the past. When you harvest your own, you’re getting peak-season goodness, bursting with nutrients and a surprisingly sweet, nutty taste.
Why is this DIY trick a must-try? Because it puts you in control. You choose the variety, you control the growing conditions, and you harvest at the perfect moment. Plus, it’s incredibly space-efficient. Even if you only have a small balcony or patio, you can still enjoy the satisfaction of growing your own vegetables. Imagine stepping outside and snipping off a few stalks for a delicious side dish – it’s a game-changer!
But the benefits don’t stop there. Container gardening allows you to move your Brussels sprouts around to optimize sunlight exposure, protect them from harsh weather, and even bring them indoors during unexpected frosts. This level of control is simply not possible with traditional in-ground gardening.
Looking for variations? Absolutely! Experiment with different Brussels sprouts varieties. ‘Long Island Improved’ is a classic choice, but ‘Redarling’ offers beautiful red sprouts, and ‘Jade Cross’ is known for its compact size, perfect for smaller containers. You can also try companion planting. Marigolds can help deter pests, while herbs like rosemary and thyme can add flavor and attract beneficial insects. Consider adding a trellis or support system as your plants grow taller to prevent them from toppling over.
Don’t be intimidated if you’re a beginner gardener. Brussels sprouts container gardening is surprisingly forgiving. Just remember the key elements: well-draining soil, plenty of sunlight, consistent watering, and regular fertilization. With a little bit of care and attention, you’ll be rewarded with a bountiful harvest of delicious, homegrown Brussels sprouts.
We wholeheartedly encourage you to give this DIY trick a try. It’s an investment in your health, your taste buds, and your connection to nature. And most importantly, don’t forget to share your experience! We’d love to hear about your successes, your challenges, and any tips you discover along the way. Post pictures of your thriving Brussels sprouts on social media, tag us, and let’s create a community of container gardening enthusiasts. Let’s all enjoy the delightful taste of homegrown Brussels sprouts!
Frequently Asked Questions
What is the best size container for growing Brussels sprouts?
The ideal container size for Brussels sprouts is at least 12 inches in diameter and 12 inches deep, but larger is generally better. A 5-gallon bucket or a similarly sized pot is a good starting point. Brussels sprouts need ample space for their root systems to develop properly. If you’re planning on growing multiple plants in one container, make sure to increase the size accordingly, allowing at least 12 inches between each plant. Using a container that is too small will restrict root growth, leading to smaller sprouts and a less productive plant.
How much sunlight do Brussels sprouts need when grown in containers?
Brussels sprouts thrive in full sun, requiring at least 6-8 hours of direct sunlight per day. When growing them in containers, this is especially important because you have the flexibility to move the plants to optimize their sun exposure. If you live in a particularly hot climate, providing some afternoon shade can help prevent the plants from overheating. Monitor your plants closely and adjust their location as needed to ensure they are getting enough sunlight. Insufficient sunlight can result in leggy growth and poor sprout development.
What type of soil is best for Brussels sprouts in containers?
The best soil for Brussels sprouts in containers is a well-draining potting mix that is rich in organic matter. Avoid using garden soil, as it can become compacted in containers and doesn’t provide adequate drainage. Look for a potting mix that contains ingredients like peat moss, perlite, and vermiculite. You can also amend the potting mix with compost or aged manure to provide additional nutrients. Good drainage is crucial to prevent root rot, which is a common problem in container gardening.
How often should I water my Brussels sprouts in containers?
Water your Brussels sprouts regularly, keeping the soil consistently moist but not waterlogged. The frequency of watering will depend on factors such as the weather, the size of the container, and the type of potting mix you are using. Check the soil moisture level daily by sticking your finger about an inch into the soil. If it feels dry, it’s time to water. Water deeply, until water drains out of the bottom of the container. Avoid overhead watering, as this can promote fungal diseases.
What kind of fertilizer should I use for Brussels sprouts in containers?
Brussels sprouts are heavy feeders and require regular fertilization to produce a good crop. Use a balanced fertilizer with an NPK ratio of 10-10-10 or 14-14-14. You can also use a fertilizer specifically formulated for vegetables. Start fertilizing your plants about 2-3 weeks after transplanting them into the containers. Follow the instructions on the fertilizer package for application rates. You can also supplement with organic fertilizers like compost tea or fish emulsion. Avoid over-fertilizing, as this can lead to excessive foliage growth and reduced sprout production.
How do I deal with pests and diseases on my container-grown Brussels sprouts?
Monitor your plants regularly for signs of pests and diseases. Common pests that affect Brussels sprouts include aphids, cabbage worms, and flea beetles. You can control these pests with insecticidal soap, neem oil, or Bacillus thuringiensis (Bt). Diseases such as clubroot and blackleg can also affect Brussels sprouts. To prevent these diseases, use disease-resistant varieties, practice crop rotation, and avoid overwatering. If you notice any signs of disease, remove the affected leaves or plants immediately.
When are Brussels sprouts ready to harvest from containers?
Brussels sprouts are typically ready to harvest about 90-100 days after planting. The sprouts should be firm, green, and about 1-2 inches in diameter. Start harvesting from the bottom of the plant, working your way upwards. Twist or cut the sprouts off the stem. You can harvest sprouts over a period of several weeks. The flavor of Brussels sprouts improves after a light frost, so don’t be afraid to leave them on the plant a little longer if the weather permits.
Can I grow Brussels sprouts in containers indoors?
While it is possible to grow Brussels sprouts indoors, it can be challenging. They require a lot of light, so you will need to provide supplemental lighting with grow lights. You will also need to ensure that they have adequate ventilation and humidity. Indoor-grown Brussels sprouts may not produce as many sprouts as those grown outdoors. If you are determined to grow them indoors, choose a compact variety and provide them with the best possible growing conditions.
What are some good companion plants for Brussels sprouts in containers?
Companion planting can help to improve the growth and health of your Brussels sprouts. Good companion plants include marigolds, which deter pests, and herbs like rosemary, thyme, and sage, which attract beneficial insects. Avoid planting Brussels sprouts near other members of the cabbage family, such as broccoli, cauliflower, and kale, as they can attract the same pests and diseases.
How do I store harvested Brussels sprouts?
Store harvested Brussels sprouts in the refrigerator in a plastic bag or container. They will keep for about 1-2 weeks. For longer storage, you can freeze them. To freeze Brussels sprouts, blanch them in boiling water for 3-5 minutes, then plunge them into ice water to stop the cooking process. Drain them well and then freeze them in a single layer on a baking sheet. Once they are frozen solid, transfer them to a freezer bag or container. Frozen Brussels sprouts will keep for up to 12 months.
Leave a Comment