
Cleaning blinds with tongs might sound like a quirky kitchen experiment gone wrong, but trust me, it’s a game-changer for anyone battling dusty blinds! Let’s be honest, who actually enjoys cleaning blinds? It’s a tedious chore that often gets pushed to the bottom of the to-do list. We’ve all been there, staring at those dusty slats, wondering if there’s a faster, easier way. Well, I’m here to tell you there is!
While the history of window blinds stretches back centuries, from ancient Egyptian reeds to the Venetian blinds we know today, the struggle to keep them clean is a timeless one. Dust, pollen, and grime seem to cling to those horizontal surfaces like magnets. But fear not, my friends! This simple DIY trick will transform your blind-cleaning experience from a dreaded task to a surprisingly satisfying one.
Why do you need this cleaning blinds with tongs hack? Because it’s efficient, cost-effective, and uses materials you probably already have at home. No more struggling with awkward cloths or expensive cleaning gadgets. This method allows you to clean multiple slats at once, saving you time and energy. Plus, it’s a great way to repurpose those trusty kitchen tongs! So, grab your tongs, a couple of microfiber cloths, and let’s get those blinds sparkling!
DIY Blind Cleaning Hack: Tongs to the Rescue!
Okay, let’s be honest, cleaning blinds is one of those chores that everyone dreads. It’s fiddly, time-consuming, and never seems to get them truly clean. But fear not, my friends! I’ve discovered a game-changing hack that will make this task so much easier and faster: using tongs! Yes, you read that right. Your kitchen tongs are about to become your new best friend in the fight against dusty blinds.
This method works wonders on horizontal blinds, whether they’re made of vinyl, wood, or aluminum. It’s also a great way to get into those hard-to-reach spots. So, ditch the feather duster and let’s get started!
What You’ll Need
Before we dive in, let’s gather our supplies. Here’s what you’ll need for this brilliant blind-cleaning hack:
* A pair of tongs (preferably with smooth edges to avoid scratching your blinds)
* Two microfiber cloths (or old socks – clean ones, of course!)
* Rubber bands or hair ties
* A spray bottle
* Your cleaning solution of choice (more on that below!)
* A bucket of warm water (optional, for rinsing)
Choosing Your Cleaning Solution
The beauty of this hack is that you can use pretty much any cleaning solution you prefer. Here are a few options, depending on the type of blinds you have and how dirty they are:
* For lightly dusty blinds: A simple solution of warm water and a few drops of dish soap works great.
* For more stubborn dirt and grime: Mix equal parts white vinegar and water. Vinegar is a natural disinfectant and degreaser.
* For wooden blinds: Avoid harsh chemicals and excessive moisture. Use a wood cleaner specifically designed for blinds or a very diluted solution of dish soap and water. Make sure to dry them thoroughly afterward.
* For a natural option: A few drops of lemon essential oil in water can help to freshen up your blinds and leave a pleasant scent.
Important Note: Always test your cleaning solution on a small, inconspicuous area of your blinds first to make sure it doesn’t damage the finish.
Preparing Your Tongs
This is where the magic happens! We’re going to transform your ordinary kitchen tongs into a super-efficient blind-cleaning tool.
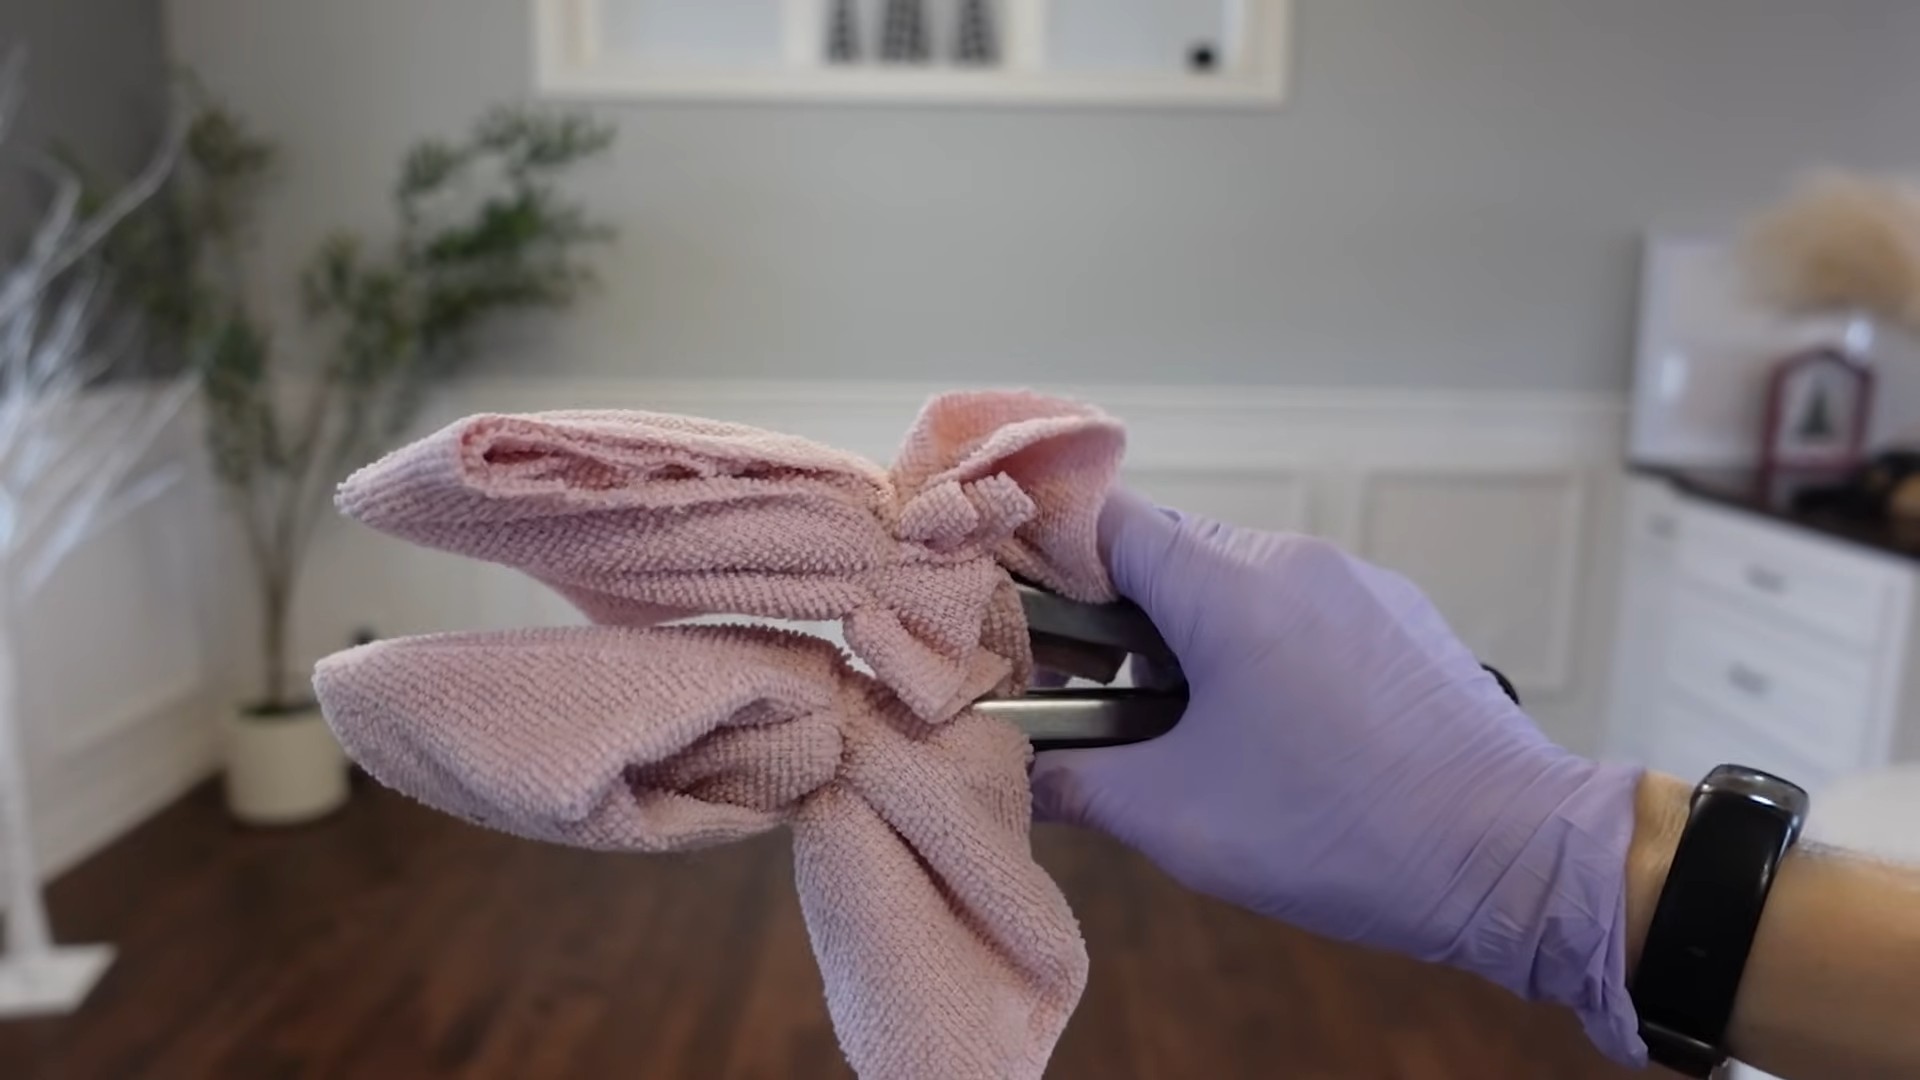
1. Wrap the Tongs: Take one of your microfiber cloths (or socks) and wrap it around one arm of the tongs. Secure it tightly with a rubber band or hair tie.
2. Repeat: Do the same thing with the other microfiber cloth and the other arm of the tongs. Make sure both cloths are securely attached and cover the entire surface of the tongs that will be touching the blinds.
Now you have your custom-made blind-cleaning tool!
Cleaning Your Blinds: Step-by-Step
Alright, let’s get those blinds sparkling clean!
1. Dust First (Optional but Recommended): If your blinds are particularly dusty, it’s a good idea to give them a quick dusting before you start cleaning with a solution. You can use a dry microfiber cloth or a vacuum cleaner with a brush attachment for this step. This will prevent you from just spreading the dust around when you start cleaning with a wet cloth.
2. Prepare Your Cleaning Solution: Fill your spray bottle with your chosen cleaning solution.
3. Spray the Blinds: Lightly spray the blinds with your cleaning solution. Don’t saturate them – a light mist is all you need. If you’re using a solution that’s particularly strong or you’re worried about drips, you can spray the cloths on the tongs instead of spraying the blinds directly.
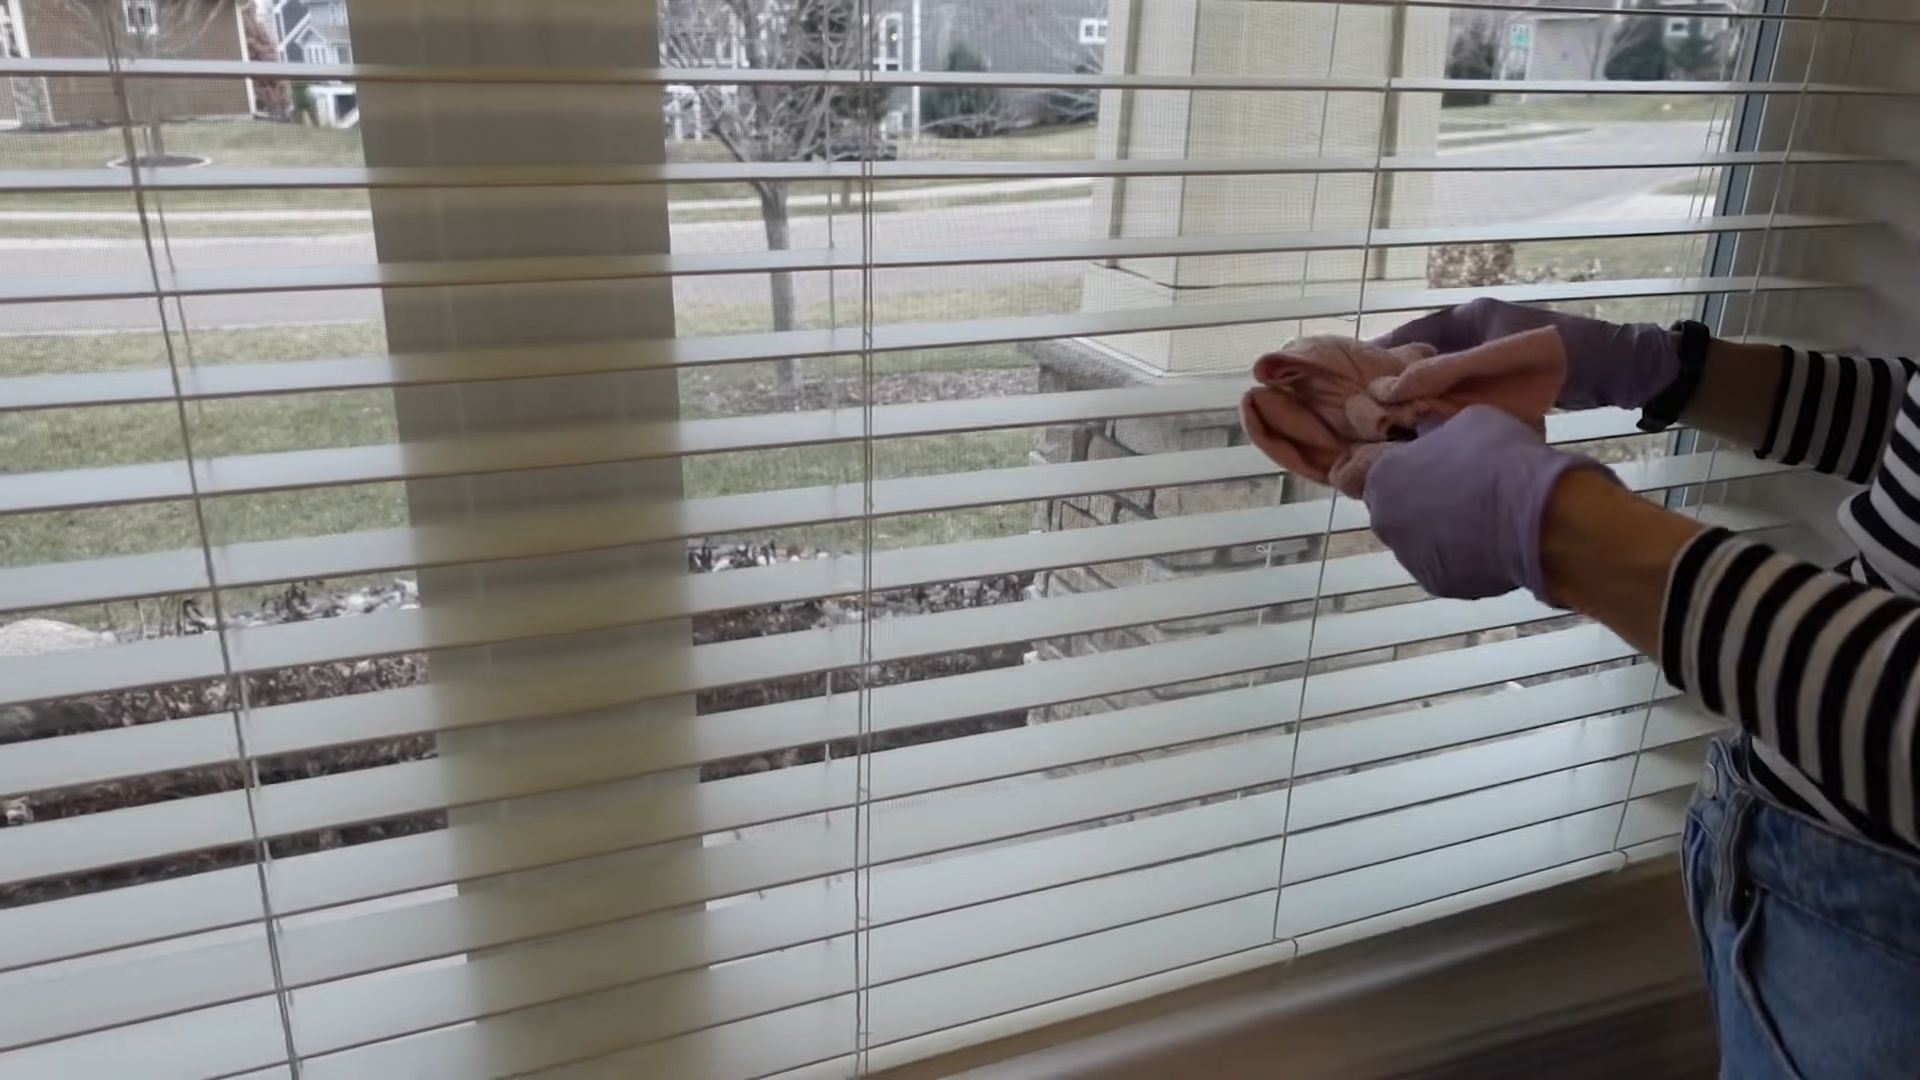
4. Tongs in Action: Now, carefully position the tongs around one slat of the blind. Make sure the microfiber cloths are making contact with both the top and bottom surfaces of the slat.
5. Wipe and Slide: Gently squeeze the tongs together and slide them along the length of the slat. The microfiber cloths will trap the dust and dirt as you go.
6. Repeat for Each Slat: Repeat steps 4 and 5 for each slat of your blinds, working your way from top to bottom.
7. Rinse (Optional): If you’re using a cleaning solution that leaves a residue, you can rinse the blinds with a clean, damp cloth. Simply dip a clean microfiber cloth in a bucket of warm water, wring it out well, and wipe each slat.
8. Dry: Allow the blinds to air dry completely. You can open a window or turn on a fan to speed up the drying process. If you’re using wooden blinds, it’s especially important to dry them thoroughly to prevent water damage.
9. Clean Your Tongs: Once you’re finished cleaning your blinds, remove the microfiber cloths from the tongs and wash them thoroughly. You can also wash the tongs themselves if they’ve gotten dirty.
Tips and Tricks for Sparkling Blinds
Here are a few extra tips to help you get the best results:
* Work in Sections: If you have a lot of blinds to clean, break the task down into smaller sections. This will prevent you from getting overwhelmed and ensure that you do a thorough job.
* Clean Regularly: The more often you clean your blinds, the easier it will be to keep them clean. Aim to clean them at least once a month, or more often if you live in a dusty area.
* Adjust the Angle: For particularly stubborn dirt, try adjusting the angle of the blinds to expose different surfaces to the cleaning cloths.
* Use Different Cloths: If one of your cloths gets too dirty, replace it with a clean one. This will prevent you from just spreading the dirt around.
* Don’t Forget the Cords: While you’re cleaning the slats, don’t forget to wipe down the cords and tassels as well. These can also accumulate dust and dirt.
* Be Gentle: Avoid applying too much pressure when cleaning your blinds, especially if they’re made of a delicate material. You don’t want to damage or break them.
* For Vertical Blinds: While this hack is primarily designed for horizontal blinds, you can adapt it for vertical blinds as well. Simply wrap the cloths around the tongs and use them to wipe down each vane individually.
* Deep Cleaning: For a really deep clean, you can remove your blinds and soak them in a bathtub filled with warm water and detergent. Just make sure to dry them thoroughly before rehanging them.
* Static Cling: To reduce static cling, which can attract dust, you can add a fabric softener sheet to your cleaning solution or wipe the blinds with a dryer sheet after cleaning.
* Consider a Blind Cleaning Brush: While the tongs hack is great, you can also invest in a specialized blind cleaning brush. These brushes are designed to clean multiple slats at once and can be a good option if you have a lot of blinds to clean.
Troubleshooting
Sometimes, even with the best hacks, things don’t go exactly as planned. Here are a few common problems you might encounter and how to solve them:
* Streaks: If you’re seeing streaks on your blinds after cleaning, it could be due to using too much cleaning solution or not drying them properly. Try using less solution and making sure to wipe them down with a clean, dry cloth afterward.
* Sticky Residue: If your blinds feel sticky after cleaning, it could be due to using a cleaning solution that’s too concentrated or not rinsing them properly. Try diluting your cleaning solution or rinsing them with clean water.
* Damaged Blinds: If you accidentally damage your blinds while cleaning, don’t panic! Depending on the type of damage, you may be able to repair them yourself. There are plenty of DIY tutorials online for fixing broken slats or cords.
* Difficult Stains: For particularly stubborn stains, you may need to use a stronger cleaning solution or a specialized stain remover. Always test the solution on a small, inconspicuous area first to make sure it doesn’t damage the blinds.
Alternative Cleaning Methods
While I swear by the tongs method, it’s always good to know other options. Here are a few alternative ways to clean your blinds:
* Vacuum Cleaner: Use a vacuum cleaner with a brush attachment to dust your blinds. This is a quick and easy way to remove loose dust and debris.
* Feather Duster: A feather duster can be used to lightly dust your blinds. However, it’s not as effective as the tongs method for removing stubborn dirt and grime.
* Microfiber Cloth: You can also clean your blinds with a microfiber cloth and a cleaning solution. Simply wipe each slat individually.
* Commercial Blind Cleaners: There are many commercial blind cleaners available on the market. These cleaners are specifically designed to clean blinds and can be a good option if you don’t want to make your own cleaning solution.
So there you have it! With this simple tongs hack, you can say
Conclusion
So, there you have it! Cleaning blinds can often feel like a monumental chore, a task we perpetually postpone. But with this simple, ingenious DIY trick using tongs, a microfiber cloth, and a little bit of your favorite cleaning solution, you can transform this dreaded task into a surprisingly quick and efficient process. Forget struggling with individual slats, awkwardly maneuvering dusters, or spending a fortune on specialized cleaning tools. This method is not only cost-effective, utilizing items you likely already have at home, but it’s also incredibly effective at removing dust, grime, and even stubborn spots from your blinds.
The beauty of this DIY blind cleaning hack lies in its adaptability. Feel free to experiment with different cleaning solutions. For lightly soiled blinds, a simple mixture of warm water and dish soap might suffice. For more stubborn dirt or grease, consider adding a touch of vinegar or lemon juice to your cleaning solution. These natural ingredients not only boost cleaning power but also leave your blinds smelling fresh and clean. You can also use commercial blind cleaning solutions, just be sure to test them on an inconspicuous area first to ensure they don’t damage the material.
Beyond the cleaning solution, you can also customize the microfiber cloths you use. Thicker cloths will absorb more solution and provide a more thorough clean, while thinner cloths might be better for delicate blinds. Consider using different colored cloths for different rooms or types of blinds to avoid cross-contamination.
For those with particularly wide blinds, consider using two sets of tongs simultaneously. This will allow you to clean two slats at once, further speeding up the process. And if you have blinds with intricate designs or hard-to-reach areas, a small brush or cotton swab can be used to get into those nooks and crannies after the initial cleaning with the tongs.
This method is suitable for most types of blinds, including Venetian blinds, mini blinds, and even some types of vertical blinds. However, it’s always a good idea to test the method on a small, hidden area of your blinds before cleaning the entire surface, especially if you’re unsure about the material or finish. This will help you avoid any potential damage or discoloration.
We are confident that once you try this simple yet effective DIY trick, you’ll never look at blind cleaning the same way again. It’s a game-changer that will save you time, money, and frustration. So, ditch the expensive cleaning supplies and complicated methods, and embrace the power of the humble tong!
We encourage you to give this DIY blind cleaning method a try and see the difference it makes in your home. And most importantly, we want to hear about your experience! Share your tips, variations, and before-and-after photos in the comments below. Let’s create a community of clean blind enthusiasts and help each other conquer this common household chore. Your feedback will not only help others but also inspire us to continue sharing innovative and practical cleaning solutions. Happy cleaning!
Frequently Asked Questions (FAQ)
1. What type of blinds is this DIY cleaning method suitable for?
This method is generally safe and effective for most types of blinds, including Venetian blinds, mini blinds, faux wood blinds, and aluminum blinds. However, it’s crucial to exercise caution with delicate materials like fabric blinds or real wood blinds. Always test the cleaning solution and method on a small, inconspicuous area first to ensure it doesn’t cause any damage, discoloration, or warping. For fabric blinds, consider using a dry microfiber cloth or a vacuum cleaner with a brush attachment instead of a wet cleaning solution. For real wood blinds, use a wood-specific cleaner and avoid excessive moisture.
2. What kind of cleaning solution should I use?
The best cleaning solution depends on the type of blinds and the level of dirt and grime. For lightly soiled blinds, a simple mixture of warm water and a few drops of mild dish soap is usually sufficient. For more stubborn dirt or grease, you can add a tablespoon of white vinegar or lemon juice to the water. These natural ingredients have excellent cleaning properties and can help to break down grease and grime. Avoid using harsh chemicals or abrasive cleaners, as they can damage the finish of your blinds. You can also use commercial blind cleaning solutions, but always follow the manufacturer’s instructions and test the solution on a small area first.
3. How often should I clean my blinds using this method?
The frequency of cleaning depends on several factors, including the location of your blinds, the amount of dust and dirt in your home, and your personal preferences. As a general rule, it’s a good idea to clean your blinds at least once a month to prevent dust and grime from building up. If your blinds are located in a high-traffic area or a dusty environment, you may need to clean them more frequently. You can also do a quick dusting with a dry microfiber cloth or a vacuum cleaner with a brush attachment in between deep cleanings.
4. Can I use this method on vertical blinds?
Yes, this method can be adapted for use on vertical blinds. However, instead of using tongs to clean individual slats, you can use them to hold a microfiber cloth and wipe down the entire length of each slat. Start at the top of the slat and work your way down, overlapping each pass slightly. You may need to use a ladder or step stool to reach the top of the blinds. Be sure to support the bottom of the slats as you clean them to prevent them from bending or breaking.
5. What if I don’t have tongs? Can I use something else?
While tongs are the ideal tool for this DIY cleaning method, you can use other items in a pinch. Clothespins, chopsticks, or even two butter knives can be used to hold the microfiber cloth. However, tongs provide a more secure grip and allow you to apply more pressure, resulting in a more thorough clean. If you don’t have any of these items on hand, you can also try wrapping a microfiber cloth around your fingers and using them to clean the slats.
6. How do I prevent streaks when cleaning my blinds?
To prevent streaks, make sure to wring out the microfiber cloth thoroughly before wiping the blinds. Excess water can leave streaks and water spots. Also, avoid using too much cleaning solution. A little goes a long way. After cleaning the blinds, you can use a dry microfiber cloth to buff them and remove any remaining moisture.
7. What if my blinds are heavily soiled or stained?
For heavily soiled or stained blinds, you may need to pre-treat the affected areas before cleaning them with the tongs and microfiber cloth. You can use a paste of baking soda and water to gently scrub away stubborn stains. Alternatively, you can use a commercial stain remover specifically designed for blinds. Always test the stain remover on a small, inconspicuous area first to ensure it doesn’t damage the material.
8. How do I clean the cords and mechanisms of my blinds?
The cords and mechanisms of your blinds can also accumulate dust and grime over time. To clean them, use a dry microfiber cloth or a small brush to remove any loose debris. For more stubborn dirt, you can dampen the cloth with a mild cleaning solution and gently wipe the cords and mechanisms. Be careful not to get the cords too wet, as this can cause them to fray or shrink.
9. Is this method safe for pets and children?
Yes, this method is generally safe for pets and children, as long as you use non-toxic cleaning solutions. Avoid using harsh chemicals or abrasive cleaners, as these can be harmful if ingested or inhaled. Always keep cleaning solutions out of reach of children and pets.
10. How can I prevent my blinds from getting dusty in the first place?
There are several things you can do to prevent your blinds from getting dusty in the first place. Regularly dust your blinds with a dry microfiber cloth or a vacuum cleaner with a brush attachment. You can also use an air purifier to remove dust and allergens from the air. Keep windows closed during dusty conditions, such as windy days or construction work. And finally, consider using a blind cleaner spray that contains anti-static properties to repel dust.

Leave a Comment