
Easy carrot growing method – sounds too good to be true, right? Well, get ready to be amazed because I’m about to share some simple yet incredibly effective DIY tricks that will have you harvesting a bounty of sweet, crunchy carrots from your own backyard (or even balcony!) in no time. Forget those sad, stunted carrots you might have tried to grow before; we’re talking vibrant, healthy, and delicious homegrown goodness.
Carrots have been cultivated for centuries, with their origins tracing back to Central Asia. Initially, they weren’t even orange! Purple, yellow, and white varieties were common before the vibrant orange we know and love became popularized in the Netherlands in the 17th century. But regardless of color, carrots have always been a valuable source of nutrients and a staple in cuisines around the world.
So, why do you need these DIY tricks? Because let’s face it, growing carrots can be tricky! Poor germination, stunted growth, and pest infestations are just a few of the challenges gardeners face. But with these simple hacks, I’m going to show you how to overcome those hurdles and unlock the secrets to a successful easy carrot growing method. I’ll guide you through soil preparation, seed spacing, watering techniques, and even some clever pest control strategies. Get ready to ditch the store-bought carrots and enjoy the unparalleled flavor of your own homegrown harvest!

Growing Malabar Spinach Indoors: A Beginner’s Guide
Hey there, fellow plant enthusiasts! Ever thought about growing your own leafy greens indoors? Let me tell you, it’s incredibly rewarding, and today, I’m going to walk you through how to cultivate Malabar spinach right in your home. This isn’t your typical spinach; it’s a heat-loving vine with thick, succulent leaves that are delicious in salads, stir-fries, and soups. Plus, it’s super easy to grow indoors with a little know-how. So, grab your gardening gloves, and let’s get started!
What You’ll Need
Before we dive into the nitty-gritty, let’s gather all the necessary supplies. Trust me, having everything ready beforehand will make the whole process much smoother.
* **Malabar Spinach Seeds or Cuttings:** You can find seeds online or at your local garden center. Cuttings are another great option if you know someone who already grows Malabar spinach.
* **Potting Mix:** A well-draining potting mix is crucial. I recommend a mix specifically formulated for vegetables or a blend of potting soil, perlite, and compost.
* **Pots:** Choose pots that are at least 6-8 inches in diameter. Remember, Malabar spinach is a vine, so you’ll eventually need a larger pot (12 inches or more) as it grows.
* **Grow Lights (Optional but Recommended):** While Malabar spinach loves sunlight, indoor conditions might not provide enough. Grow lights will ensure your plant gets the light it needs to thrive.
* **Trellis or Support Structure:** Since it’s a vine, Malabar spinach needs something to climb on. A small trellis, bamboo stakes, or even a sturdy tomato cage will work perfectly.
* **Watering Can or Spray Bottle:** For gentle watering.
* **Fertilizer:** A balanced liquid fertilizer (e.g., 10-10-10) will provide essential nutrients.
* **Spray Bottle with Water:** For misting the leaves.
* **Small Gardening Tools:** A trowel for planting and small scissors for harvesting.
Starting from Seeds: A Step-by-Step Guide
Okay, so you’ve got your seeds and you’re ready to go? Awesome! Here’s how to get those little guys germinating:
1. **Soaking the Seeds:** Malabar spinach seeds have a tough outer shell, so soaking them in warm water for 24 hours will significantly improve germination rates. I usually put them in a small bowl and cover them with water, making sure they’re fully submerged.
2. **Preparing the Pot:** Fill your chosen pot with the well-draining potting mix, leaving about an inch of space at the top. Gently pat down the soil to remove any large air pockets.
3. **Sowing the Seeds:** Make small holes (about ½ inch deep) in the soil, spacing them about 2-3 inches apart. Place one or two seeds in each hole and cover them with soil. Lightly water the soil to moisten it.
4. **Creating a Humid Environment:** To encourage germination, you can cover the pot with plastic wrap or a clear plastic bag. This will create a mini-greenhouse effect, trapping moisture and warmth. Make sure to poke a few holes in the plastic for ventilation.
5. **Finding the Right Spot:** Place the pot in a warm location with indirect sunlight. A windowsill facing east or west is ideal. If you’re using grow lights, position them a few inches above the pot.
6. **Maintaining Moisture:** Keep the soil consistently moist but not waterlogged. Check the soil daily and water when the top inch feels dry. Remove the plastic wrap once the seedlings emerge.
7. **Thinning the Seedlings:** Once the seedlings have developed a few sets of true leaves (the leaves that look like miniature versions of the adult leaves), thin them out, leaving only the strongest seedling in each spot. This will give them enough space to grow.
Propagating from Cuttings: A Quick and Easy Method
If you have access to a mature Malabar spinach plant, propagating from cuttings is a faster way to get started. Here’s how:
1. **Selecting a Cutting:** Choose a healthy stem that’s about 4-6 inches long. Make sure it has several leaves and nodes (the points where leaves emerge from the stem).
2. **Preparing the Cutting:** Remove the leaves from the bottom 2 inches of the stem. This will encourage root growth.
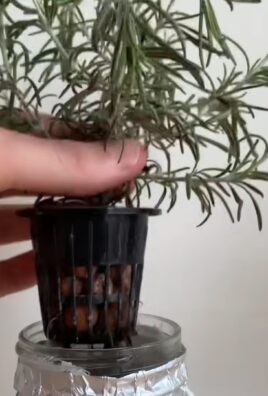
3. **Rooting in Water:** Place the cutting in a glass or jar filled with water, making sure the nodes are submerged. Place the jar in a bright location, but avoid direct sunlight.
4. **Changing the Water:** Change the water every 2-3 days to prevent bacterial growth.
5. **Waiting for Roots:** Within a week or two, you should see roots starting to emerge from the nodes.
6. **Planting the Cutting:** Once the roots are about an inch long, it’s time to plant the cutting in a pot filled with well-draining potting mix.
7. **Watering and Care:** Water the newly planted cutting thoroughly and keep the soil consistently moist. Provide bright, indirect sunlight or use grow lights.
Caring for Your Indoor Malabar Spinach
Now that your Malabar spinach is growing, here’s how to keep it happy and healthy:
1. **Light:** Malabar spinach needs at least 6 hours of sunlight per day. If you’re not getting enough natural light, supplement with grow lights. I use LED grow lights and find they work wonders.
2. **Watering:** Water regularly, keeping the soil consistently moist but not waterlogged. Check the soil moisture by sticking your finger into the soil. If the top inch feels dry, it’s time to water.
3. **Humidity:** Malabar spinach prefers high humidity. You can increase humidity by misting the leaves regularly with a spray bottle, placing a tray of water near the plant, or using a humidifier.
4. **Fertilizing:** Feed your Malabar spinach with a balanced liquid fertilizer every 2-3 weeks during the growing season (spring and summer). Follow the instructions on the fertilizer label.
5. **Pruning and Training:** As your Malabar spinach grows, it will start to vine. Train it to climb up the trellis or support structure by gently guiding the stems. Prune any yellowing or damaged leaves to encourage new growth. You can also prune the tips of the vines to encourage branching and bushier growth.
6. **Pest Control:** Keep an eye out for common pests like aphids, spider mites, and whiteflies. If you spot any pests, treat them with insecticidal soap or neem oil. I prefer using neem oil as it’s a natural and effective solution.
Harvesting Your Malabar Spinach
The best part about growing your own Malabar spinach is, of course, harvesting and enjoying the delicious leaves!
1. **When to Harvest:** You can start harvesting leaves once the plant is about 6-8 inches tall.
2. **How to Harvest:** Use small scissors or your fingers to pinch off the leaves. Focus on harvesting the larger, more mature leaves, leaving the smaller ones to continue growing.
3. **Regular Harvesting:** Regular harvesting will encourage the plant to produce more leaves.
4. **Storage:** Freshly harvested Malabar spinach leaves can be stored in the refrigerator for up to a week. Wrap them in a damp paper towel and place them in a plastic bag.
Troubleshooting Common Problems
Even with the best care, you might encounter some problems while growing Malabar spinach indoors. Here are some common issues and how to address them:
* **Yellowing Leaves:** This could be a sign of overwatering, underwatering, or nutrient deficiency. Check the soil moisture and adjust your watering accordingly. If the soil is consistently moist, reduce watering. If the soil is dry, water more frequently. You can also try fertilizing the plant with a balanced liquid fertilizer.
* **Leggy Growth:** This usually indicates insufficient light. Move the plant to a brighter location or supplement with grow lights.
* **Slow Growth:** This could be due to a variety of factors, including insufficient light, poor soil, or lack of nutrients. Make sure the plant is getting enough light, use a well-draining potting mix, and fertilize regularly.
* **Pest Infestation:** Inspect your plant regularly for pests. If you spot any, treat them with insecticidal soap or neem oil.
Enjoying Your Homegrown Malabar Spinach
Now that you’ve successfully grown and harvested your own Malabar spinach, it’s time to enjoy the fruits (or rather, leaves!) of your labor. Malabar spinach is incredibly versatile and can be used in a variety of dishes. Here are a few ideas:
* **Salads:** Add fresh Malabar spinach leaves to your salads for a slightly tangy and succulent flavor.
* **Stir-fries:** Use Malabar spinach in stir-fries as a substitute for regular spinach. It holds its shape well and doesn’t get mushy.
* **Soups and

Conclusion
So, there you have it! This simple, yet incredibly effective, DIY trick for easy carrot growing is a game-changer for both novice and experienced gardeners alike. Forget struggling with rocky soil, uneven germination, and frustratingly small harvests. This method addresses the core issues that often plague carrot cultivation, providing a nurturing environment for your seeds to thrive and develop into plump, sweet, and delicious carrots.
Why is this a must-try? Because it drastically increases your chances of success. The seed tape ensures even spacing, eliminating the need for thinning and reducing competition for resources. The consistent moisture provided by the paper helps with germination, even in less-than-ideal weather conditions. And the biodegradable nature of the paper means less waste and a healthier garden overall.
But the beauty of this DIY trick lies not only in its simplicity but also in its adaptability. Feel free to experiment with different types of paper. Newspaper works wonderfully, but you can also use paper towels or even toilet paper. Just ensure that the paper is unbleached and biodegradable.
Looking for variations? Consider adding a sprinkle of mycorrhizal fungi to the seed tape before planting. These beneficial fungi form a symbiotic relationship with the carrot roots, enhancing nutrient uptake and promoting stronger, healthier growth. You could also incorporate a slow-release organic fertilizer into the paper pulp for an extra boost of nutrients right from the start.
Another variation involves pre-sprouting the seeds before embedding them in the seed tape. This can further accelerate germination and give your carrots a head start, especially in cooler climates. Simply soak the seeds in water for 24 hours, then place them on a damp paper towel in a warm location until they sprout tiny roots. Carefully transfer the sprouted seeds to the seed tape, ensuring the roots are facing downwards.
Don’t be afraid to get creative and tailor this method to your specific needs and preferences. The key is to provide your carrot seeds with a consistent, nurturing environment that promotes healthy growth from the very beginning.
We are confident that this DIY approach to easy carrot growing will revolutionize your gardening experience. Imagine the satisfaction of harvesting a bountiful crop of perfectly formed carrots, knowing that you achieved it with a simple, sustainable, and cost-effective technique.
So, what are you waiting for? Gather your supplies, get your hands dirty, and give this DIY trick a try. We are eager to hear about your experiences. Share your photos, tips, and variations in the comments below. Let’s build a community of successful carrot growers and spread the word about this amazing method! Happy gardening!
Frequently Asked Questions (FAQ)
What type of paper is best for making carrot seed tape?
Unbleached, biodegradable paper is ideal. Newspaper, paper towels (without dyes or perfumes), and toilet paper are all excellent choices. Avoid glossy or coated papers, as they may not break down easily in the soil. The key is to ensure the paper will decompose naturally, allowing the carrot roots to grow freely.
How far apart should I space the carrot seeds on the tape?
A spacing of 1-2 inches is generally recommended for most carrot varieties. This allows the carrots enough room to develop without overcrowding. However, you may want to adjust the spacing slightly depending on the specific variety you are growing. Check the seed packet for recommended spacing guidelines. Remember, this method eliminates the need for thinning, so accurate spacing is crucial.
How deep should I plant the carrot seed tape?
Plant the seed tape at a depth of about ¼ to ½ inch. Carrots need light to germinate, so planting them too deep can hinder their growth. Gently cover the seed tape with soil and water thoroughly. Avoid compacting the soil, as this can also impede germination.
How often should I water the carrot seed tape after planting?
Keep the soil consistently moist, but not waterlogged, until the seedlings emerge. This is especially important during the first few weeks after planting. Once the seedlings are established, you can reduce the watering frequency, but ensure the soil remains adequately moist, particularly during dry spells. Using mulch around the carrot plants can help retain moisture and suppress weeds.
What if I don’t have time to make seed tape?
While making seed tape is a relatively simple process, it does require some time and effort. If you are short on time, you can purchase pre-made carrot seed tape from many garden centers or online retailers. However, making your own seed tape is a more cost-effective and customizable option.
Can I use this method for other small seeds besides carrots?
Absolutely! This DIY seed tape method is also effective for other small seeds, such as lettuce, radishes, and herbs. Simply adjust the spacing between the seeds according to the specific plant’s requirements. The principle remains the same: providing a consistent and nurturing environment for germination and early growth.
What kind of soil is best for growing carrots using this method?
Carrots thrive in loose, well-drained soil that is rich in organic matter. Avoid heavy clay soils, as they can restrict root growth and result in misshapen carrots. Amend your soil with compost or other organic materials to improve drainage and fertility. Removing rocks and debris from the soil is also crucial for ensuring smooth, straight carrots.
How long does it take for carrots to germinate using this method?
Carrot germination typically takes 7-21 days, depending on the soil temperature and moisture levels. Using seed tape can help improve germination rates and reduce the time it takes for seedlings to emerge. Keeping the soil consistently moist and providing adequate sunlight are essential for successful germination.
What are some common problems I might encounter when growing carrots, and how can I prevent them?
Common problems include carrot rust flies, nematodes, and fungal diseases. To prevent these issues, practice crop rotation, use resistant varieties, and maintain good soil health. Covering your carrot plants with row covers can also help protect them from pests. Ensure proper drainage to prevent fungal diseases.
Can I grow carrots in containers using this method?
Yes, you can grow carrots in containers using this method, but you will need to choose a container that is at least 12 inches deep to accommodate the carrot roots. Use a well-draining potting mix and ensure the container receives plenty of sunlight. Water regularly and fertilize as needed. Dwarf or short-rooted carrot varieties are particularly well-suited for container gardening.
How do I know when my carrots are ready to harvest?
Carrots are typically ready to harvest when they reach the desired size and color. Check the seed packet for specific harvesting guidelines for your chosen variety. You can also gently pull back the soil around the top of the carrot to check its size. Harvest carrots on a dry day to prevent them from rotting.
What are the benefits of using organic fertilizer when growing carrots?
Organic fertilizers provide a slow-release source of nutrients that are essential for healthy carrot growth. They also improve soil health and promote beneficial microbial activity. Avoid using synthetic fertilizers, as they can harm the soil and potentially contaminate your carrots. Compost, aged manure, and bone meal are all excellent organic fertilizer options.
How can I store my harvested carrots to keep them fresh?
Remove the green tops from the carrots, leaving about an inch of stem. Gently brush off any excess soil, but do not wash them. Store the carrots in a cool, dark, and humid place, such as a refrigerator or root cellar. You can also store them in a container filled with moist sand or sawdust. Properly stored carrots can last for several months.
Leave a Comment