
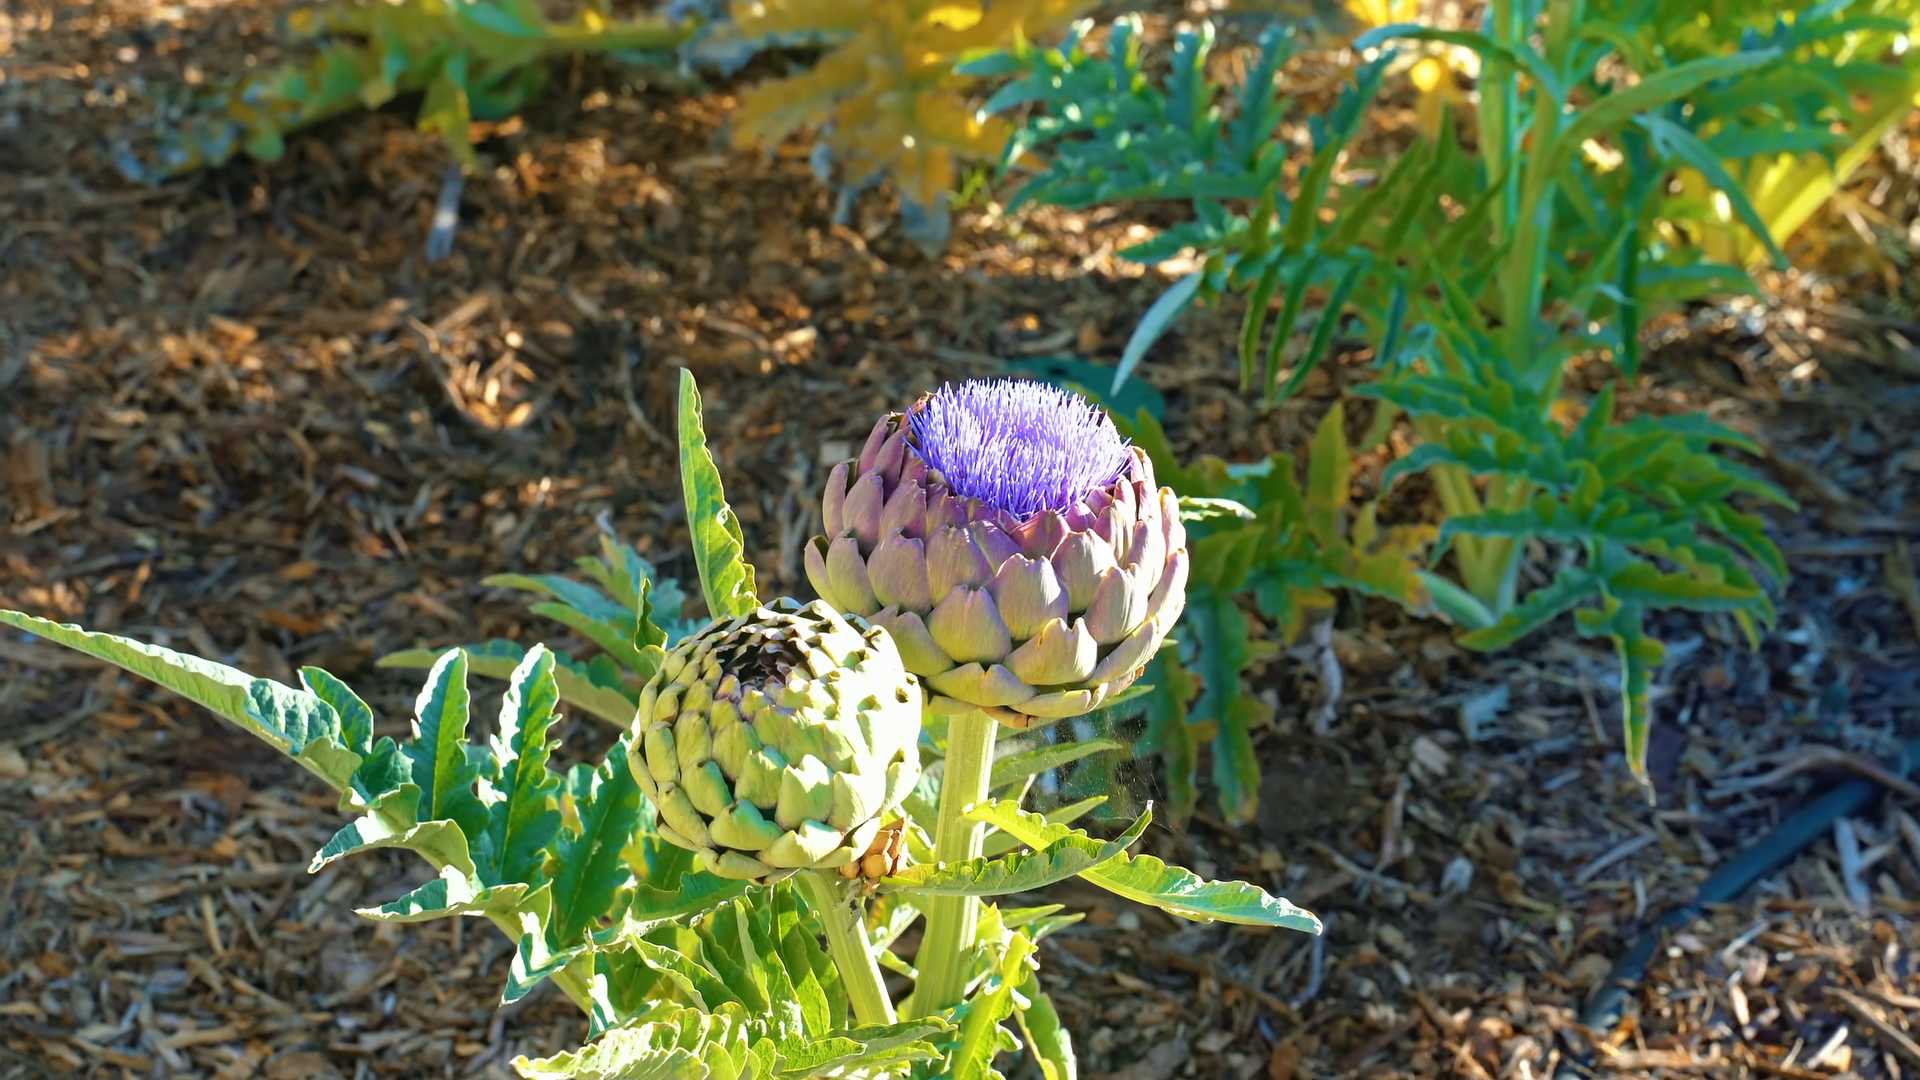
Planting Artichokes at Home might sound intimidating, but trust me, it’s a rewarding experience that brings a touch of Mediterranean charm right to your backyard! For centuries, artichokes have been prized for their unique flavor and nutritional benefits, gracing the tables of royalty and commoners alike. Did you know that the artichoke, a member of the thistle family, was considered a delicacy in ancient Rome?
But why should you bother with planting artichokes at home? Well, imagine stepping outside to harvest your own fresh, plump artichokes, knowing exactly where they came from and how they were grown. No more questionable supermarket produce! Plus, artichoke plants are stunning additions to any garden, boasting architectural foliage and vibrant purple flowers if you let some buds bloom.
This DIY guide is your key to unlocking the secrets of successful artichoke cultivation. I’ll walk you through every step, from choosing the right variety to protecting your plants from pests. Whether you’re a seasoned gardener or a complete beginner, I’m confident that you’ll be enjoying homegrown artichokes in no time. Let’s get our hands dirty and start planting artichokes at home!
Expert Cleaning Hacks: Sparkling Home, Effortless Cleaning!
Hey everyone! I’m so excited to share some of my absolute favorite cleaning hacks that have seriously transformed my cleaning routine. These aren’t your grandma’s cleaning tips (though, no offense to grandmas!). These are tried-and-true methods I’ve discovered and perfected over the years to make cleaning faster, easier, and dare I say, even a little bit fun! Get ready to say goodbye to endless scrubbing and hello to a sparkling clean home!
Cleaning Hacks Overview
Before we dive into the nitty-gritty, here’s a quick overview of the hacks we’ll be covering:
- Microwave Magic: Steam cleaning your microwave with just lemon and water.
- Grime-Busting Grout: A simple paste to brighten dingy grout lines.
- Streak-Free Shower Doors: The secret to sparkling shower doors without harsh chemicals.
- Blender Blitz: Cleaning your blender in seconds.
- Mattress Refresh: Deodorizing and sanitizing your mattress for a better night’s sleep.
- Stovetop Sparkle: Removing burnt-on food from your stovetop with ease.
- Toilet Bowl Bombs: DIY fizzing toilet bowl cleaners.
- Dust-Free Fan Blades: A clever trick to clean ceiling fan blades without making a mess.
- Silverware Shine: Polishing silverware with baking soda and aluminum foil.
- Garbage Disposal Refresh: Cleaning and deodorizing your garbage disposal.
Microwave Magic: Steam Cleaning Your Microwave
Is your microwave looking a little… exploded? Don’t worry, mine gets that way too! This steam cleaning method is a game-changer.
What You’ll Need:
- 1 lemon
- 1/2 cup water
- Microwave-safe bowl
Instructions:
- Prepare the Lemon Water: Cut the lemon in half and squeeze the juice into the microwave-safe bowl. Drop the lemon halves into the bowl as well. Add the water.
- Microwave the Mixture: Place the bowl in the microwave and heat on high for 3 minutes. The water should boil and create steam.
- Let it Sit: Leave the microwave door closed for another 5 minutes. This allows the steam to loosen all the grime and splatters.
- Wipe Clean: Carefully remove the bowl (it will be hot!). Use a damp cloth or sponge to easily wipe away all the loosened food particles. The lemon scent will leave your microwave smelling fresh and clean!
Grime-Busting Grout: Brightening Dingy Grout Lines
Grout can be a real pain to clean, but this simple paste works wonders!
What You’ll Need:
- Baking soda
- Hydrogen peroxide
- Old toothbrush or grout brush
Instructions:
- Make the Paste: In a small bowl, mix baking soda and hydrogen peroxide until you form a thick paste. The consistency should be similar to toothpaste.
- Apply the Paste: Apply the paste generously to the grout lines.
- Let it Sit: Allow the paste to sit for 5-10 minutes. This gives the baking soda and hydrogen peroxide time to work their magic.
- Scrub the Grout: Use an old toothbrush or grout brush to scrub the grout lines. You’ll see the grime start to lift away.
- Rinse Clean: Rinse the area thoroughly with water. You can use a damp cloth or sponge to wipe away any remaining paste.
Streak-Free Shower Doors: The Secret to Sparkling Shower Doors
Say goodbye to water spots and soap scum! This hack will leave your shower doors sparkling.
What You’ll Need:
- White vinegar
- Spray bottle
- Microfiber cloth or squeegee
Instructions:
- Heat the Vinegar: Pour white vinegar into a microwave-safe container and heat it for about 30 seconds. Heating the vinegar helps it to dissolve soap scum more effectively.
- Pour into Spray Bottle: Carefully pour the heated vinegar into a spray bottle.
- Spray the Shower Doors: Spray the shower doors thoroughly with the vinegar.
- Let it Sit: Allow the vinegar to sit for 10-15 minutes.
- Wipe Clean: Wipe the shower doors clean with a microfiber cloth or use a squeegee to remove the vinegar. For stubborn spots, you may need to scrub lightly with a non-abrasive sponge.
- Rinse (Optional): If you prefer, you can rinse the shower doors with water after wiping them clean.
Blender Blitz: Cleaning Your Blender in Seconds
Cleaning a blender can be a hassle, but this hack makes it incredibly easy!
What You’ll Need:
- Dish soap
- Water
Instructions:
- Fill with Water: Fill the blender halfway with warm water.
- Add Dish Soap: Add a drop or two of dish soap.
- Blend: Secure the lid and blend on high speed for about 30 seconds.
- Rinse: Pour out the soapy water and rinse the blender thoroughly. That’s it!
Mattress Refresh: Deodorizing and Sanitizing Your Mattress
We often forget about cleaning our mattresses, but they can harbor dust mites and odors. This simple refresh will leave your mattress feeling clean and fresh.
What You’ll Need:
- Baking soda
- Essential oil (optional, such as lavender or eucalyptus)
- Sieve or strainer
- Vacuum cleaner with upholstery attachment
Instructions:
- Prepare the Baking Soda: In a bowl, mix baking soda with a few drops of your favorite essential oil (optional). This will add a pleasant scent to your mattress.
- Sprinkle the Baking Soda: Using a sieve or strainer, sprinkle the baking soda evenly over the entire surface of your mattress.
- Let it Sit: Allow the baking soda to sit for at least 30 minutes, or even better, a few hours. This will allow it to absorb odors and moisture.
- Vacuum Thoroughly: Use a vacuum cleaner with an upholstery attachment to thoroughly vacuum the entire surface of the mattress, removing all the baking soda.
Stovetop Sparkle: Removing Burnt-On Food from Your Stovetop
Burnt-on food on the stovetop is a common problem, but this hack makes it easy to remove.
What You’ll Need:
- Baking soda
- White vinegar
- Dish soap
- Scrubbing sponge or cloth
Instructions:
- Sprinkle with Baking Soda: Generously sprinkle baking soda over the burnt-on food on your stovetop.
- Spray with Vinegar: Spray white vinegar over the baking soda. The mixture will fizz.
- Let it Sit: Allow the mixture to sit for 10-15 minutes.
- Scrub: Add a few drops of dish soap to a scrubbing sponge or cloth and scrub the stovetop. The burnt-on food should start to loosen.
- Wipe Clean: Wipe the stovetop clean with a damp cloth. For stubborn spots, you may need to repeat the process.
Toilet Bowl Bombs: DIY Fizzing Toilet Bowl Cleaners
These DIY toilet bowl bombs are a fun and effective way to clean and freshen your toilet.
What You’ll Need:
- 1 cup baking soda
- 1/2 cup citric acid
- 1/2 cup cornstarch
- A few tablespoons of water
- Essential oils (optional, such as tea tree or lemon)
- Silicone molds (ice cube trays or small muffin tins work well)
Instructions:
- Mix Dry Ingredients: In a large bowl, combine the baking soda, citric acid, and cornstarch.
- Add Essential Oils (Optional): Add a few drops of your favorite essential oils to the dry mixture.
- Add Water Gradually: Slowly add water, a tablespoon at a time, to the dry mixture. Mix well after each addition. The mixture should be slightly damp and hold its shape when squeezed. Be careful not to add too much
Conclusion
So, there you have it! Planting artichokes at home might seem daunting at first, but with a little planning and the right approach, you can cultivate these architectural beauties and enjoy their delicious hearts right from your own backyard. This DIY project isn’t just about growing food; it’s about connecting with nature, understanding the growing process, and reaping the rewards of your labor. Imagine the satisfaction of serving a homegrown artichoke dish to your family and friends, knowing you nurtured it from seedling to plate.
Why is this a must-try? Because it offers a unique blend of gardening challenge and culinary delight. Artichokes are relatively expensive to buy in stores, so growing your own can save you money. More importantly, the flavor of a freshly harvested, homegrown artichoke is simply unparalleled. You’ll experience a sweetness and tenderness that you just can’t find in commercially grown varieties. Plus, the artichoke plant itself is a stunning addition to any garden, providing visual interest with its silvery-green foliage and dramatic flower buds.
Don’t be afraid to experiment! There are several variations you can try to tailor this project to your specific needs and preferences. For example, if you live in a colder climate, consider growing your artichokes in large containers that can be moved indoors during the winter months. This will allow you to enjoy these Mediterranean treasures even if you don’t have a long growing season. You can also explore different artichoke varieties, such as ‘Green Globe,’ ‘Violetta,’ or ‘Romanesco,’ each offering a slightly different flavor profile and appearance. Another variation is to focus on companion planting. Artichokes thrive alongside certain plants like sunflowers, marigolds, and legumes, which can help deter pests and improve soil health.
We strongly encourage you to give this DIY artichoke planting trick a try. It’s a rewarding experience that will not only enhance your garden but also elevate your culinary creations. Remember to start with good quality seedlings or seeds, provide well-drained soil, and give your plants plenty of sunlight. With a little patience and care, you’ll be harvesting delicious artichokes in no time.
And most importantly, we want to hear about your experience! Share your tips, tricks, and photos with us in the comments below. Let us know what challenges you faced, what successes you celebrated, and what you learned along the way. Your feedback will help other gardeners embark on their own artichoke-growing adventures. Let’s build a community of artichoke enthusiasts and share the joy of growing these amazing plants together! So, get your hands dirty and start planting those artichokes today! You won’t regret it.
Frequently Asked Questions (FAQ)
What is the best time of year to plant artichokes?
The ideal time to plant artichokes depends on your climate. In regions with mild winters (zones 7-10), you can plant artichokes in the fall for a spring harvest. In colder climates (zones 6 and below), it’s best to start artichokes indoors 8-10 weeks before the last expected frost and transplant them outdoors in the spring after the danger of frost has passed. This gives them a head start and allows them to establish themselves before the colder months arrive. Remember to harden off your seedlings gradually before transplanting them to the garden.
How much space do artichoke plants need?
Artichoke plants are large and require ample space to grow. Each plant needs at least 3-4 feet of space in all directions. This allows for proper air circulation and prevents overcrowding, which can lead to disease. When planting in rows, space the rows 4-6 feet apart. Consider the mature size of the plant when planning your garden layout. They can grow to be quite substantial, so give them plenty of room to flourish.
What kind of soil is best for growing artichokes?
Artichokes thrive in well-drained, fertile soil that is rich in organic matter. The ideal soil pH is between 6.0 and 7.0. Before planting, amend the soil with compost or well-rotted manure to improve drainage and fertility. Artichokes are heavy feeders, so regular fertilization is essential. You can use a balanced fertilizer or a fertilizer specifically formulated for vegetables. Avoid soils that are heavy clay, as they can retain too much moisture and lead to root rot.
How often should I water artichoke plants?
Artichokes need consistent moisture, especially during the growing season. Water deeply and regularly, especially during dry spells. Avoid overwatering, as this can lead to root rot. A good rule of thumb is to water when the top inch of soil feels dry to the touch. Mulching around the plants can help retain moisture and suppress weeds. During the winter months, reduce watering frequency, but don’t allow the soil to dry out completely.
How do I protect artichoke plants from pests and diseases?
Artichokes can be susceptible to certain pests and diseases, such as aphids, snails, slugs, and powdery mildew. Regularly inspect your plants for signs of infestation or disease. Handpick pests or use organic pest control methods, such as insecticidal soap or neem oil. To prevent powdery mildew, ensure good air circulation and avoid overhead watering. Remove any infected leaves promptly. Companion planting with herbs like rosemary and sage can also help deter pests.
When are artichokes ready to harvest?
Artichokes are typically ready to harvest in the spring or early summer, depending on your climate and the variety you are growing. The buds are ready to harvest when they are plump and firm, and the bracts (the outer leaves) are still tightly closed. Use a sharp knife to cut the artichoke stem about 2-3 inches below the bud. Harvest the main bud first, followed by the smaller side buds. Don’t wait too long to harvest, as the bracts will start to open, and the artichoke will become tough and less flavorful.
Can I grow artichokes in containers?
Yes, you can grow artichokes in containers, especially if you live in a colder climate. Choose a large container that is at least 24 inches in diameter and depth. Use a well-draining potting mix and provide regular watering and fertilization. Container-grown artichokes may need to be moved indoors during the winter months to protect them from frost. Select a sunny location for your container artichokes, and rotate the container regularly to ensure even growth.
How do I overwinter artichoke plants in cold climates?
In cold climates, artichokes need protection during the winter months. After the first frost, cut back the foliage to about 6 inches above the ground. Cover the plants with a thick layer of mulch, such as straw or leaves, to insulate the roots. You can also use a cold frame or row covers to provide additional protection. In very cold climates, you may need to dig up the plants and store them in a cool, dark place until spring. Replant them outdoors after the danger of frost has passed.
Are artichokes perennial or annual plants?
Artichokes are technically perennial plants, meaning they can live for more than two years. However, in colder climates, they are often grown as annuals because they may not survive the winter. With proper care and protection, you can overwinter artichokes and enjoy them for several years. In warmer climates, artichokes can thrive as perennials for many years, producing a bountiful harvest each spring.
What are some delicious ways to cook and eat artichokes?
There are countless ways to enjoy artichokes! They can be steamed, boiled, grilled, or baked. Steaming is a popular method that preserves the artichoke’s delicate flavor. To eat a steamed artichoke, pull off the bracts one by one and dip them in melted butter, aioli, or your favorite sauce. Scrape the tender flesh from the base of the bracts with your teeth. Once you’ve removed all the bracts, you’ll reach the heart, which is the most prized part of the artichoke. Remove the fuzzy choke with a spoon and enjoy the tender, flavorful heart. Artichokes can also be added to salads, pasta dishes, and dips.


Leave a Comment