
Grow angled luffa easily? Absolutely! Imagine harvesting your own organic, naturally exfoliating sponges right from your backyard. It’s not just a dream; it’s a surprisingly achievable reality with a few clever tricks. For generations, luffa, also known as angled gourd or Chinese okra, has been a staple in Asian and African cultures, used not only for bathing but also as a nutritious vegetable in its young, tender stage.
But let’s be honest, growing luffa can sometimes feel like a challenge. They need a long growing season, plenty of sunshine, and a sturdy support system. That’s where these DIY hacks come in! I’m going to share some simple yet effective techniques that will help you grow angled luffa easily, even if you’re a beginner gardener or live in a cooler climate.
Why do you need these tricks? Because store-bought sponges can be expensive and often contain synthetic materials. Growing your own luffa is not only eco-friendly and cost-effective, but it’s also incredibly rewarding. Plus, imagine the satisfaction of gifting a homegrown luffa sponge to your friends and family! So, let’s dive in and unlock the secrets to a bountiful luffa harvest.
Growing Angled Luffa on a Trellis: A DIY Guide
Hey there, fellow gardening enthusiasts! I’m so excited to share my experience with growing angled luffa (also known as Chinese okra or ridged gourd) vertically on a trellis. It’s a fantastic way to maximize space, get cleaner, straighter luffas, and add a beautiful, edible element to your garden. Trust me, once you try it, you’ll be hooked!
Why Grow Luffa on a Trellis?
Before we dive into the how-to, let’s quickly cover why growing luffa on a trellis is such a great idea:
* Space Saving: Luffa vines can get HUGE! Growing them vertically saves precious garden real estate.
* Better Air Circulation: Trellising allows for better airflow around the leaves, reducing the risk of fungal diseases.
* Straighter Fruits: When the luffas hang freely, they tend to grow straighter and more uniformly. No more oddly shaped gourds!
* Easier Harvesting: Reaching for luffas hanging on a trellis is much easier than crawling through a sprawling vine on the ground.
* Aesthetic Appeal: A luffa-covered trellis is a stunning addition to any garden. It adds vertical interest and a touch of the exotic.
Materials You’ll Need
Alright, let’s gather our supplies. Here’s what you’ll need to get started:
* Luffa Seeds: You can find these online or at your local garden center. Make sure you choose a variety that’s well-suited to your climate.
* Seed Starting Trays or Pots: For starting your seeds indoors.
* Seed Starting Mix: A light, well-draining mix is essential for successful germination.
* Trellis: This is the backbone of our project! You can build your own (more on that later) or purchase a pre-made one. Make sure it’s sturdy enough to support the weight of the mature vines and luffas.
* Garden Soil: Rich, well-draining soil is crucial for healthy luffa growth. Amend your soil with compost or aged manure if needed.
* Compost or Aged Manure: To enrich the soil and provide essential nutrients.
* Gardening Gloves: To protect your hands.
* Watering Can or Hose: For watering your plants.
* Twine or Plant Ties: To help train the vines to the trellis.
* Fertilizer: A balanced fertilizer to feed your luffa plants throughout the growing season.
* Pruning Shears: For trimming the vines as needed.
Building Your Trellis (Optional)
If you’re feeling ambitious, you can build your own trellis. Here are a few ideas:
* Wooden Trellis: Use lumber to build a simple A-frame or rectangular trellis.
* Cattle Panel Trellis: These are sturdy and readily available at farm supply stores. Simply bend the panel into an arch and secure it to the ground.
* Bamboo Trellis: Create a rustic trellis using bamboo poles tied together with twine.
* Repurposed Materials: Get creative! Use old ladders, gates, or even metal fencing to build your trellis.
No matter what type of trellis you choose, make sure it’s at least 6-8 feet tall and wide enough to accommodate the sprawling vines.
Starting Your Luffa Seeds
Luffa seeds have a hard outer shell, so they benefit from a little pre-treatment to improve germination rates.
1. Scarification: Gently nick the seed coat with a knife or sandpaper. Be careful not to damage the inner seed.
2. Soaking: Soak the seeds in warm water for 24-48 hours. This will help soften the seed coat and encourage germination.
3. Planting: Fill your seed starting trays or pots with seed starting mix. Plant the seeds about 1 inch deep.
4. Watering: Water gently to moisten the soil.
5. Warmth: Luffa seeds need warmth to germinate. Place the trays or pots in a warm location, such as on top of a refrigerator or on a heat mat.
6. Germination: Germination typically takes 7-14 days. Keep the soil moist but not soggy.
Transplanting Your Luffa Seedlings
Once your seedlings have developed a few sets of true leaves (usually after 4-6 weeks), it’s time to transplant them into the garden.
1. Harden Off: Before transplanting, gradually acclimate your seedlings to outdoor conditions by placing them outside for a few hours each day, increasing the time each day. This will help them adjust to the sun, wind, and temperature changes.
2. Prepare the Soil: Choose a sunny location with well-draining soil. Amend the soil with compost or aged manure to improve fertility.
3. Planting: Dig a hole that’s slightly larger than the root ball of the seedling. Gently remove the seedling from the tray or pot and place it in the hole. Backfill with soil and water thoroughly.
4. Spacing: Space your luffa plants about 2-3 feet apart.
5. Trellis Placement: Plant your seedlings close to the base of the trellis so they can easily climb.
Training Your Luffa Vines
Luffa vines are naturally climbers, but they may need a little help getting started.
1. Guiding the Vines: As the vines grow, gently guide them towards the trellis and use twine or plant ties to secure them.
2. Encouraging Vertical Growth: Encourage the vines to grow upwards by pruning any side shoots that are growing away from the trellis.
3. Regular Monitoring: Check the vines regularly and adjust the ties as needed.
Caring for Your Luffa Plants
Luffa plants are relatively easy to care for, but here are a few tips to keep them happy and healthy:
* Watering: Water deeply and regularly, especially during hot, dry weather. Luffa plants need plenty of water to produce large fruits.
* Fertilizing: Feed your luffa plants with a balanced fertilizer every 2-3 weeks.
* Pruning: Prune the vines as needed to control their growth and improve air circulation. Remove any yellowing or diseased leaves.
* Pest Control: Keep an eye out for pests such as aphids, squash bugs, and cucumber beetles. Treat infestations promptly with insecticidal soap or neem oil.
* Pollination: Luffa plants produce separate male and female flowers. The female flowers need to be pollinated in order to produce fruit. If you’re not seeing any fruit set, you may need to hand-pollinate the flowers. To do this, simply transfer pollen from the male flower to the female flower using a small brush or cotton swab.
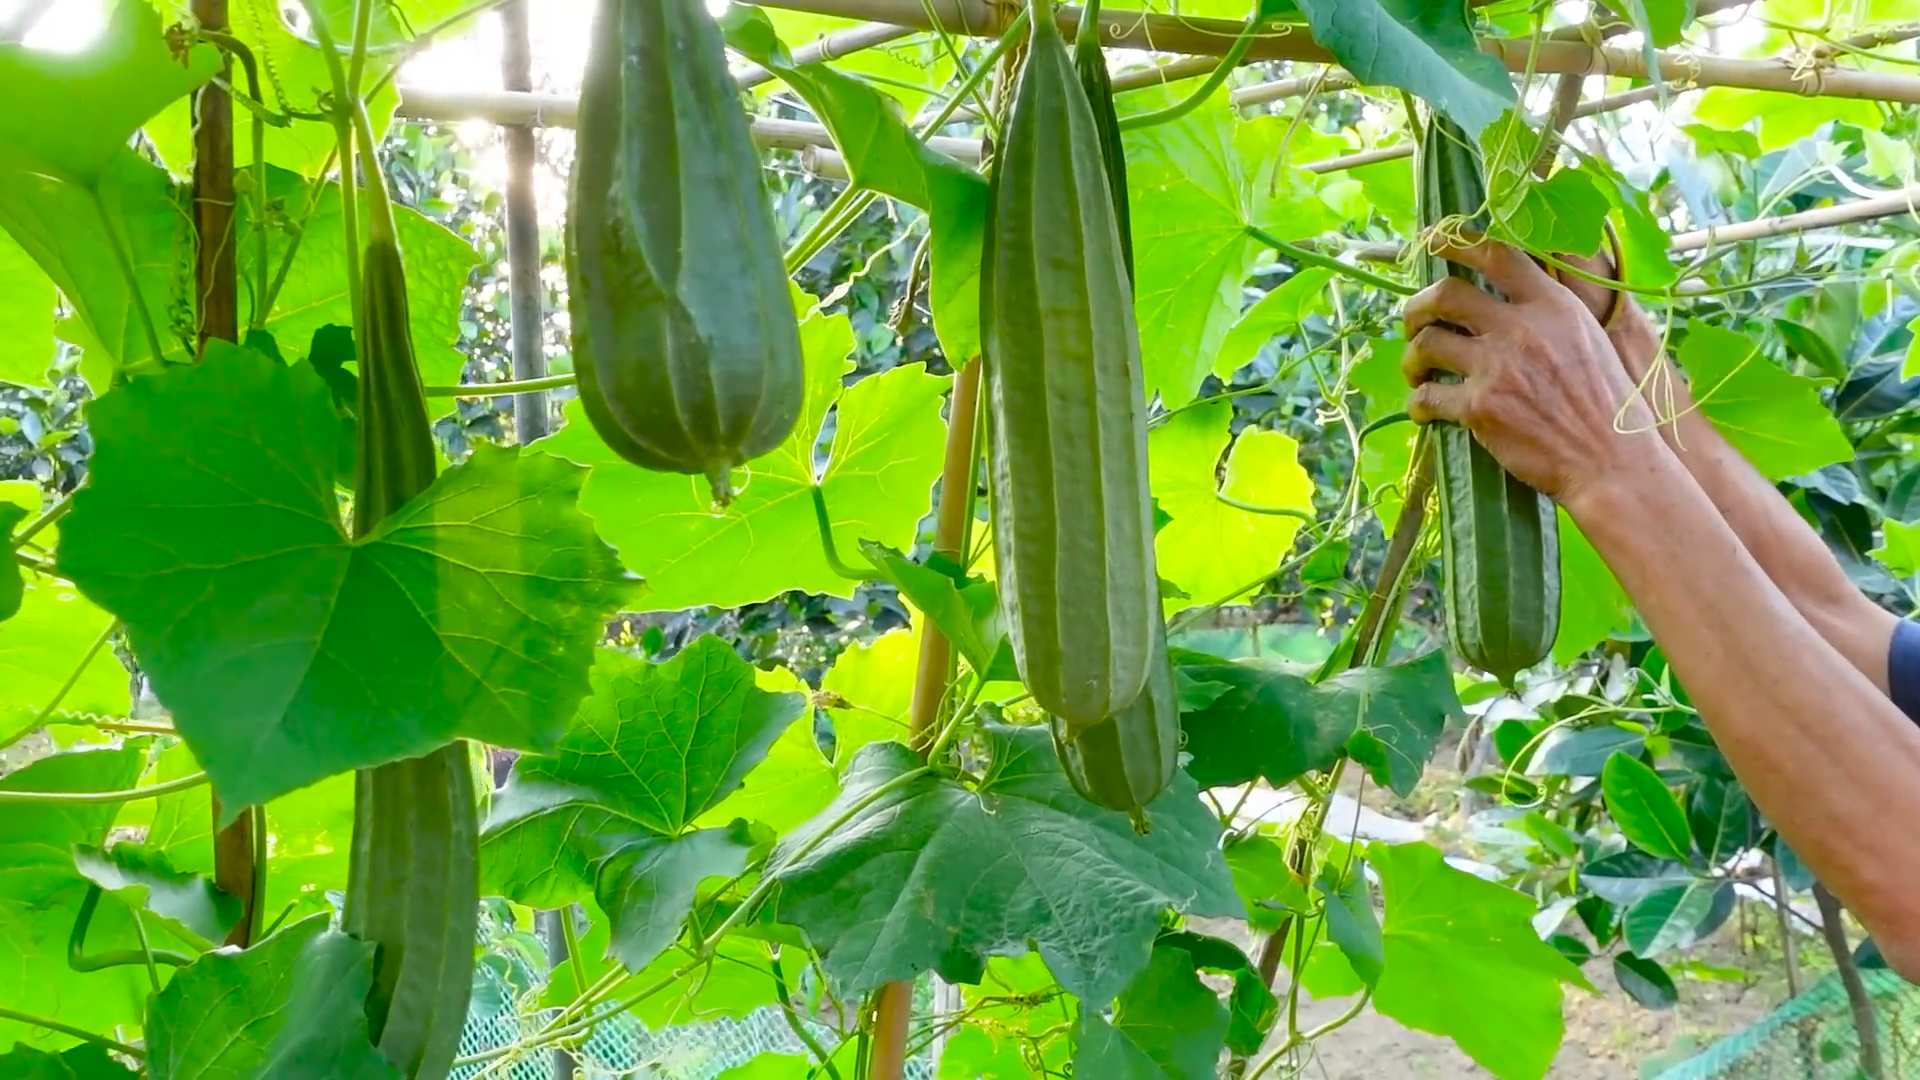
Harvesting Your Luffa Sponges
The moment we’ve all been waiting for! Harvesting your luffa sponges is the most rewarding part of the process.
1. Maturity: Luffas are ready to harvest when the skin turns brown and dry and the gourd feels lightweight. You should be able to easily press your fingernail into the skin.
2. Cutting: Use pruning shears to cut the luffa from the vine, leaving a few inches of stem attached.
3. Peeling: Soak the luffa in water for a few days to soften the skin. Then, peel off the skin to reveal the sponge inside.
4. Seed Removal: Remove the seeds by shaking them out of the luffa. You can save these seeds for planting next year.
5. Cleaning: Rinse the luffa thoroughly with water to remove any remaining pulp or debris.
6. Drying: Dry the luffa in a well-ventilated area. You can hang it up or lay it flat on a screen.
7. Bleaching (Optional): If you want a whiter sponge, you can soak it in a diluted bleach solution for a few minutes. Rinse thoroughly and dry.
Using Your Luffa Sponges
Now that you have your own homegrown luffa sponges, you can use them for a variety of purposes:
* Exfoliating: Use your luffa sponge in the shower or bath to exfoliate your skin.
* Dishwashing: Luffa sponges are great for scrubbing dishes and pots.
* Cleaning: Use your luffa sponge to clean countertops, sinks, and other surfaces.
* Crafting: Get creative and use your luffa sponges in craft projects.
Troubleshooting
Even with the best planning, sometimes things don’t go as expected. Here are a few common problems you might

Conclusion
So, there you have it! Growing angled luffa vertically isn’t just a gardening trend; it’s a game-changer for maximizing your harvest, minimizing space, and producing beautifully straight, usable luffa sponges. We’ve explored the simple yet effective techniques that will transform your luffa growing experience. From building the right support structure to training the vines and ensuring proper pollination, each step contributes to a more successful and rewarding harvest.
Why is this DIY trick a must-try? Because it addresses the common challenges faced by luffa growers. No more misshapen gourds due to ground contact, no more wasted space with sprawling vines, and no more struggling to find enough sunlight for your plants. By embracing vertical growing, you’re optimizing every aspect of the luffa’s development, leading to healthier plants and a more abundant yield.
But the beauty of gardening lies in its adaptability. Feel free to experiment with variations on this method. If you live in a particularly windy area, consider using a sturdier trellis or even a repurposed chain-link fence for added support. For those with limited space, container gardening with a smaller trellis is a viable option. You can also try different training techniques, such as weaving the vines through the trellis in a specific pattern to maximize sunlight exposure. Consider companion planting with beneficial herbs and flowers to attract pollinators and deter pests. Marigolds, basil, and nasturtiums are excellent choices for luffa companions.
Don’t be afraid to get creative with your support structure. Bamboo poles lashed together, repurposed metal pipes, or even sturdy branches can all be used to create a functional and aesthetically pleasing trellis. The key is to ensure that the structure is strong enough to support the weight of the mature luffa gourds.
Remember, successful luffa cultivation hinges on consistent care. Regular watering, especially during dry spells, is crucial. Fertilize your plants every few weeks with a balanced fertilizer to promote healthy growth and abundant flowering. Keep an eye out for pests and diseases, and take action promptly to prevent them from spreading.
Ultimately, the best way to learn is by doing. So, grab your seeds, build your trellis, and get ready to embark on a luffa-growing adventure! We are confident that you will be amazed by the results. The satisfaction of harvesting your own homegrown luffa sponges is truly unparalleled.
We encourage you to try this DIY trick and share your experience with us. Post pictures of your luffa trellises, share your tips and tricks, and let us know what worked best for you. Together, we can create a community of luffa enthusiasts and help each other grow the best luffa possible. Your insights and experiences are invaluable, and we can’t wait to hear from you! Mastering the art of growing angled luffa vertically is within your reach, and the rewards are well worth the effort. Happy gardening!
Frequently Asked Questions (FAQ)
What is the best type of trellis to use for growing angled luffa vertically?
The best type of trellis depends on your available space, budget, and aesthetic preferences. Sturdy options include wooden trellises, metal trellises, chain-link fences, and even repurposed materials like bamboo poles or sturdy branches. The key is to ensure the trellis is strong enough to support the weight of mature luffa gourds, which can become quite heavy. A trellis that is at least 6-8 feet tall is recommended to allow ample space for the vines to climb. Consider the spacing of the trellis as well; a mesh-like structure with openings of 6-12 inches will provide adequate support for the tendrils to grip.
How do I train the luffa vines to grow up the trellis?
Luffa vines naturally climb using tendrils, but they may need some guidance, especially when they are young. Gently guide the vines towards the trellis and encourage the tendrils to wrap around the supports. You can use soft twine or plant ties to secure the vines to the trellis if needed. Regularly check the vines and redirect them as necessary to ensure they are growing in the desired direction. Avoid overcrowding the vines on the trellis; space them out to allow for adequate sunlight and airflow.
How much sunlight do angled luffa plants need?
Angled luffa plants require at least 6-8 hours of direct sunlight per day to thrive. Choose a location for your trellis that receives ample sunlight throughout the day. If you live in a particularly hot climate, some afternoon shade may be beneficial to prevent the plants from overheating. Insufficient sunlight can lead to stunted growth, reduced flowering, and smaller luffa gourds.
How often should I water my angled luffa plants?
Water your angled luffa plants regularly, especially during dry spells. The soil should be consistently moist but not waterlogged. Water deeply at the base of the plants, avoiding wetting the foliage, which can increase the risk of fungal diseases. The frequency of watering will depend on the weather conditions and the type of soil you have. Check the soil moisture regularly and adjust your watering schedule accordingly.
When is the best time to plant angled luffa seeds?
The best time to plant angled luffa seeds is after the last frost, when the soil has warmed up to at least 70°F (21°C). Luffa plants are sensitive to cold temperatures and will not germinate or grow well in cool soil. You can start the seeds indoors 4-6 weeks before the last frost to get a head start on the growing season. Transplant the seedlings outdoors once the weather is warm and settled.
How do I know when my angled luffa gourds are ready to harvest?
Angled luffa gourds are ready to harvest when they are fully mature and the skin has turned brown and dry. The gourds should feel lightweight and the seeds should rattle inside when shaken. If you are unsure, you can allow the gourds to dry on the vine for as long as possible, but be sure to harvest them before the first frost.
How do I process the luffa gourds to make sponges?
To process the luffa gourds, first soak them in water for several days to soften the skin. Then, peel off the skin and remove the seeds. Rinse the luffa sponge thoroughly and allow it to dry completely in the sun. Once dry, you can cut the luffa sponge into smaller pieces if desired.
What are some common pests and diseases that affect angled luffa plants?
Common pests that affect angled luffa plants include aphids, squash bugs, and vine borers. Diseases that can affect luffa plants include powdery mildew, downy mildew, and fungal leaf spots. Regularly inspect your plants for signs of pests and diseases and take action promptly to prevent them from spreading. Organic pest control methods, such as insecticidal soap and neem oil, can be effective in controlling pests. Fungicides can be used to treat fungal diseases.
Can I grow angled luffa in containers?
Yes, you can grow angled luffa in containers, but you will need a large container with good drainage. Choose a container that is at least 20 gallons in size. Use a well-draining potting mix and provide a sturdy trellis for the vines to climb. Container-grown luffa plants may require more frequent watering and fertilization than those grown in the ground.
What are some companion plants for angled luffa?
Good companion plants for angled luffa include marigolds, basil, nasturtiums, and other herbs and flowers that attract pollinators and deter pests. Avoid planting luffa near members of the cucurbit family, such as cucumbers, squash, and melons, as they can compete for resources and attract similar pests and diseases.
Leave a Comment