
Grow Bell Peppers Easily, even if you think you don’t have a green thumb! Have you ever dreamed of biting into a crisp, juicy bell pepper, fresh from your own garden? Imagine the vibrant colors adding a touch of sunshine to your meals, knowing you nurtured them from tiny seedlings. It’s a rewarding experience, and trust me, it’s more achievable than you might think!
Bell peppers have a fascinating history, originating in South America and spreading throughout the world thanks to explorers. They’ve been a staple in cuisines for centuries, adding flavor and vital nutrients. But let’s be honest, sometimes growing them can feel like a challenge. That’s where these DIY tricks and hacks come in!
I know firsthand how frustrating it can be to put in the effort and not see the results you want. Maybe your peppers are small, or the plant isn’t producing much fruit. Perhaps pests are wreaking havoc. That’s why I’ve compiled these simple, yet effective, techniques to help you grow bell peppers easily and abundantly. These aren’t complicated methods requiring specialized equipment; they’re practical tips you can implement right away to boost your pepper production and enjoy a bountiful harvest. Get ready to unlock the secrets to thriving bell peppers in your own backyard!
Grow Bell Peppers Like a Pro: My Foolproof DIY Guide
Hey there, fellow gardening enthusiasts! I’m so excited to share my tried-and-true method for growing bell peppers that are bursting with flavor and color. Forget those tiny, sad peppers you sometimes find at the grocery store – we’re talking about plump, juicy, and vibrant peppers straight from your own backyard (or balcony!). This guide is packed with all the tips and tricks I’ve learned over the years, so even if you’re a complete beginner, you’ll be harvesting a bumper crop in no time.
Choosing the Right Bell Pepper Variety
First things first, let’s talk about choosing the right bell pepper variety. There are so many options out there, and it can be a little overwhelming. Here’s a quick rundown of some popular choices:
* California Wonder: This is a classic, reliable variety that produces large, blocky green peppers that turn red when ripe. It’s a great all-around choice for beginners.
* Yolo Wonder: Similar to California Wonder, but with slightly thicker walls and better disease resistance.
* Golden Bell: A beautiful golden-yellow pepper with a sweet, mild flavor.
* Purple Beauty: A stunning purple pepper that adds a pop of color to your garden and your plate.
* Chocolate Beauty: A unique chocolate-brown pepper with a rich, slightly smoky flavor.
* Sweet Banana: While technically not a bell pepper, these long, yellow peppers are often grouped with them and offer a sweet, mild flavor.
When choosing a variety, consider your climate, the amount of space you have, and your personal preferences. If you live in a cooler climate, look for varieties that are known for their early maturity. If you have limited space, consider growing peppers in containers.
Starting Your Bell Pepper Seeds (or Buying Seedlings)
You have two main options here: starting your own seeds indoors or buying seedlings from a local nursery. Starting your own seeds gives you more control over the process and allows you to choose from a wider variety of peppers, but it requires a little more time and effort. Buying seedlings is a quicker and easier option, but you’ll be limited to the varieties that are available at the nursery.
Starting Seeds Indoors:
I personally prefer to start my seeds indoors about 8-10 weeks before the last expected frost. This gives the seedlings a head start and ensures that they’re strong and healthy when it’s time to transplant them outdoors.
1. Gather your supplies: You’ll need seed starting trays or small pots, seed starting mix, bell pepper seeds, a spray bottle, and a heat mat (optional, but recommended).
2. Fill the trays or pots with seed starting mix: Make sure the mix is moist but not soggy.
3. Sow the seeds: Plant the seeds about ¼ inch deep and gently cover them with soil. I usually plant 2-3 seeds per cell or pot to increase my chances of germination.
4. Water gently: Use a spray bottle to mist the soil. Avoid overwatering, as this can lead to damping off, a fungal disease that can kill seedlings.
5. Provide warmth and light: Place the trays or pots on a heat mat and under grow lights. Bell pepper seeds need warmth to germinate, and grow lights will provide the seedlings with the light they need to grow strong and healthy. Aim for 14-16 hours of light per day.
6. Keep the soil moist: Check the soil regularly and water as needed to keep it moist but not soggy.
7. Thin the seedlings: Once the seedlings have their first true leaves (the second set of leaves that appear after the cotyledons), thin them to one seedling per cell or pot. Choose the strongest, healthiest seedling and snip off the others at the soil line.
8. Harden off the seedlings: About a week before you plan to transplant the seedlings outdoors, start hardening them off. This means gradually exposing them to outdoor conditions to help them acclimate. Start by placing them in a sheltered spot outdoors for an hour or two each day, gradually increasing the amount of time they spend outdoors.
Buying Seedlings:
If you’re buying seedlings from a nursery, choose plants that are healthy and vigorous, with dark green leaves and sturdy stems. Avoid plants that are leggy, yellowed, or have signs of pests or diseases.
Preparing Your Garden Bed or Containers
Bell peppers need plenty of sunshine and well-drained soil to thrive. Choose a location that gets at least 6-8 hours of direct sunlight per day.
1. Prepare the soil: Amend the soil with compost or other organic matter to improve drainage and fertility. Bell peppers prefer slightly acidic soil with a pH of 6.0-6.8. You can test your soil pH with a soil testing kit.
2. Space the plants: Space the plants 18-24 inches apart in rows that are 24-36 inches apart. This will give them enough room to grow and allow for good air circulation.
3. For containers: Use a pot that is at least 12 inches in diameter and 12 inches deep. Make sure the pot has drainage holes to prevent waterlogging. Use a high-quality potting mix that is specifically formulated for vegetables.
Transplanting Your Bell Pepper Plants
Once the danger of frost has passed and the soil has warmed up, it’s time to transplant your bell pepper plants outdoors.
1. Water the seedlings: Water the seedlings thoroughly a few hours before transplanting.
2. Dig holes: Dig holes that are slightly larger than the root balls of the seedlings.
3. Remove the seedlings from their containers: Gently remove the seedlings from their containers, being careful not to damage the roots.
4. Place the seedlings in the holes: Place the seedlings in the holes and backfill with soil. Make sure the top of the root ball is level with the surrounding soil.
5. Water thoroughly: Water the plants thoroughly after transplanting.
6. Mulch: Apply a layer of mulch around the plants to help retain moisture, suppress weeds, and regulate soil temperature. I like to use straw or shredded leaves.
Caring for Your Bell Pepper Plants
Now that your bell pepper plants are in the ground, it’s time to give them the care they need to thrive.
1. Watering: Water the plants regularly, especially during hot, dry weather. Bell peppers need about 1 inch of water per week. Water deeply and infrequently, rather than shallowly and frequently. Avoid getting the leaves wet, as this can promote fungal diseases.
2. Fertilizing: Fertilize the plants every 2-3 weeks with a balanced fertilizer. Look for a fertilizer that is specifically formulated for vegetables. Follow the instructions on the fertilizer label.
3. Support: As the plants grow, they may need support to prevent them from falling over. You can use stakes, cages, or trellises to support the plants.
4. Pruning: Pruning bell pepper plants is optional, but it can help to improve air circulation and encourage fruit production. Remove any suckers (small shoots that grow from the base of the plant) and any yellowed or diseased leaves.
5. Pest and disease control: Keep an eye out for pests and diseases. Common pests of bell peppers include aphids, flea beetles, and tomato hornworms. Common diseases include blossom end rot, powdery mildew, and bacterial leaf spot. If you notice any pests or diseases, take action immediately to control them. You can use organic pesticides or fungicides, or you can try hand-picking the pests or removing the infected leaves.
Harvesting Your Bell Peppers
Bell peppers are typically ready to harvest 60-90 days after transplanting, depending on the variety.
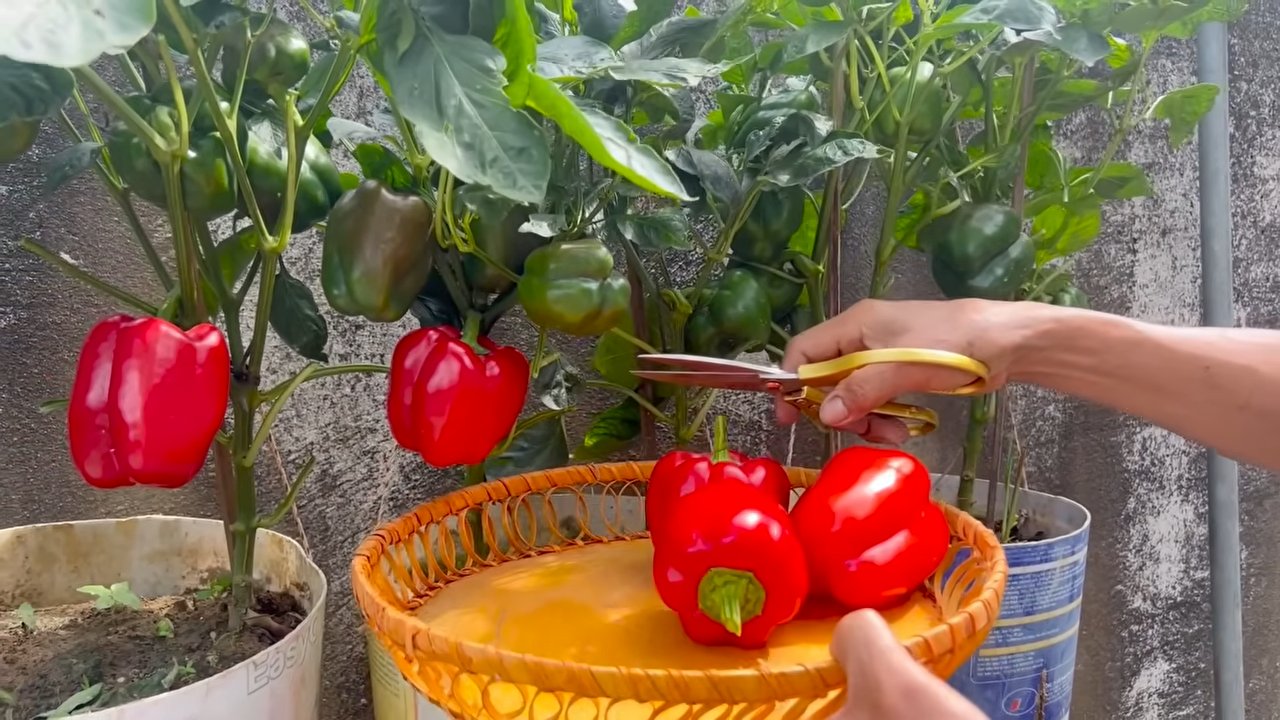
1. Check for ripeness: The peppers should be firm, glossy, and fully colored. Green bell peppers are ready to harvest when they are full size, but they will continue to ripen and turn red, yellow, or orange if left on the plant.
2. Harvest carefully: Use a sharp knife or pruning shears to cut the peppers from the plant. Leave a short stem attached to the pepper.
3. Store properly: Store the peppers in the refrigerator for up to a week.
Troubleshooting Common Problems
Even with the best care, you may encounter some problems when growing bell peppers. Here are some common problems and how to fix them:
* Blossom end rot: This is a condition that causes the bottom of the pepper to rot. It is caused by a calcium deficiency. To prevent blossom end rot, make sure the soil is well-drained and that the plants are getting enough calcium. You can add calcium to the soil by adding lime or bone meal.
* Powdery mildew: This is a fungal disease that causes a white, powdery coating on the leaves. To prevent powdery mildew, provide good air circulation and avoid getting the leaves wet. You can treat powdery mildew with a fungicide.
*

Conclusion
So, there you have it! Growing bell peppers doesn’t have to be a daunting task reserved for seasoned gardeners. With this simple, yet effective DIY trick, you can unlock a bountiful harvest of crisp, colorful bell peppers right in your own backyard, patio, or even on a sunny windowsill. This method, focusing on optimizing soil conditions and providing consistent support, truly makes a difference in the overall health and productivity of your plants.
Why is this a must-try? Because it addresses two of the most common challenges faced by bell pepper growers: nutrient deficiencies and stem breakage. By enriching the soil with the right amendments, you’re giving your plants the fuel they need to thrive and produce those delicious, vibrant fruits. And by providing support, you’re preventing those heavy peppers from weighing down and potentially damaging the plant, ensuring a longer and more productive growing season.
But don’t stop there! Feel free to experiment with variations to personalize this DIY trick to suit your specific needs and preferences. For example, if you’re growing organic bell peppers, consider using organic fertilizers and compost instead of synthetic options. You can also try different types of support systems, such as tomato cages or individual stakes, depending on the size and growth habit of your plants. If you live in a particularly hot climate, consider providing some afternoon shade to prevent sunscald on the peppers.
Another exciting variation is to experiment with different bell pepper varieties. From the classic green bell pepper to the sweeter red, yellow, and orange varieties, there’s a whole rainbow of flavors and colors to explore. You can even try growing miniature bell peppers, which are perfect for snacking and adding to salads.
The key takeaway is to adapt this DIY trick to your specific environment and growing conditions. Observe your plants closely, pay attention to their needs, and don’t be afraid to experiment. Gardening is a journey of learning and discovery, and the more you engage with your plants, the more successful you’ll be.
We are confident that this DIY trick will significantly improve your success in growing bell peppers. It’s a simple, cost-effective, and rewarding way to enjoy fresh, homegrown produce. So, grab your gardening gloves, gather your supplies, and get ready to embark on a bell pepper growing adventure!
We’re eager to hear about your experiences! Did this DIY trick work for you? What variations did you try? What challenges did you encounter? Share your stories, tips, and photos in the comments below. Let’s create a community of bell pepper enthusiasts and learn from each other’s successes and failures. Together, we can all become better gardeners and enjoy the delicious rewards of our labor. Happy growing!
FAQ
What kind of soil is best for growing bell peppers?
Bell peppers thrive in well-draining, loamy soil that is rich in organic matter. The ideal pH level is between 6.0 and 7.0. Before planting, amend your soil with compost, aged manure, or other organic materials to improve its fertility and drainage. If your soil is heavy clay, consider adding sand or perlite to improve drainage. A soil test can help you determine the specific nutrient needs of your soil and guide your amendment choices.
How often should I water my bell pepper plants?
Bell pepper plants need consistent moisture, especially during hot weather. Water deeply and regularly, aiming to keep the soil consistently moist but not waterlogged. A good rule of thumb is to water when the top inch of soil feels dry to the touch. Avoid overhead watering, as this can increase the risk of fungal diseases. Instead, water at the base of the plant, using a soaker hose or drip irrigation system if possible. Mulching around the plants can also help to retain moisture and suppress weeds.
What kind of fertilizer should I use for bell peppers?
Bell peppers are heavy feeders and benefit from regular fertilization. Use a balanced fertilizer with a ratio of 5-10-10 or 10-10-10, or a fertilizer specifically formulated for vegetables. Apply fertilizer according to the package directions, typically every 2-3 weeks during the growing season. You can also supplement with organic fertilizers such as compost tea or fish emulsion. Avoid over-fertilizing, as this can lead to excessive foliage growth at the expense of fruit production.
How much sunlight do bell pepper plants need?
Bell pepper plants need at least 6-8 hours of direct sunlight per day to thrive. Choose a sunny location in your garden or on your patio where your plants will receive ample sunlight. If you live in a particularly hot climate, consider providing some afternoon shade to prevent sunscald on the peppers.
When should I harvest my bell peppers?
Bell peppers can be harvested at any stage of maturity, depending on your preference. Green bell peppers are typically harvested when they are firm and full-sized, but before they start to turn color. Colored bell peppers (red, yellow, orange) are harvested when they have reached their full color and are slightly soft to the touch. Use a sharp knife or pruning shears to cut the peppers from the plant, leaving a short stem attached.
What are some common pests and diseases that affect bell peppers?
Bell peppers are susceptible to a variety of pests and diseases, including aphids, flea beetles, spider mites, blossom-end rot, and fungal diseases. Regularly inspect your plants for signs of pests or diseases and take action promptly to prevent them from spreading. Use organic pest control methods such as insecticidal soap or neem oil to control pests. To prevent blossom-end rot, ensure that your plants receive consistent watering and that the soil is rich in calcium. To prevent fungal diseases, avoid overhead watering and provide good air circulation around the plants.
How can I support my bell pepper plants?
Bell pepper plants can become quite heavy with fruit, so it’s important to provide them with support to prevent them from falling over or breaking. You can use tomato cages, stakes, or trellises to support your plants. Install the support system early in the growing season, before the plants become too large. Tie the stems of the plants to the support system using soft twine or plant ties.
Can I grow bell peppers in containers?
Yes, bell peppers can be successfully grown in containers. Choose a large container that is at least 12 inches in diameter and has good drainage. Use a high-quality potting mix and amend it with compost or other organic materials. Water and fertilize your container-grown bell peppers regularly, as they will dry out and deplete nutrients more quickly than plants grown in the ground. Place the container in a sunny location where it will receive at least 6-8 hours of direct sunlight per day.
How do I prevent blossom-end rot on my bell peppers?
Blossom-end rot is a common problem that affects bell peppers, causing a dark, sunken spot to appear on the bottom of the fruit. It is caused by a calcium deficiency in the developing fruit. To prevent blossom-end rot, ensure that your plants receive consistent watering and that the soil is rich in calcium. You can add calcium to the soil by amending it with bone meal or crushed eggshells. You can also spray the plants with a calcium chloride solution, following the package directions.
What are some tips for growing bell peppers in a greenhouse?
Growing bell peppers in a greenhouse can extend the growing season and protect your plants from pests and diseases. Provide adequate ventilation to prevent overheating and humidity buildup. Use supplemental lighting if necessary to ensure that your plants receive enough sunlight. Water and fertilize your plants regularly, and monitor them closely for signs of pests or diseases. Consider using a self-pollinating variety of bell pepper, as greenhouse environments may not have enough pollinators.
Leave a Comment