
Grow Habaneros Easily, even if you think you don’t have a green thumb! Have you ever dreamed of adding a fiery kick to your homemade salsa or spicing up your favorite dishes with the intense heat of a habanero? I know I have! But the thought of cultivating these little fireballs can seem daunting. Fear not, fellow spice enthusiasts, because this guide is packed with simple, effective DIY tricks and hacks to help you successfully grow habaneros easily, right in your own backyard (or even on your balcony!).
The habanero pepper, with its vibrant colors and scorching heat, has a rich history rooted in the Yucatan Peninsula of Mexico. For centuries, it’s been a staple ingredient in Mayan cuisine, adding depth and complexity to traditional dishes. Today, its popularity has spread worldwide, captivating chefs and home cooks alike. But why buy habaneros when you can grow your own, bursting with flavor and freshness?
Let’s face it, store-bought habaneros can be expensive and sometimes lack the intense flavor you’re craving. Plus, there’s something incredibly satisfying about nurturing a plant from seed to harvest. This DIY guide will empower you to take control of your spice rack and grow habaneros easily, saving you money and providing you with a constant supply of these delicious peppers. I’ll share my tried-and-true methods, from seed starting to pest control, ensuring you have a bountiful harvest. Get ready to unleash your inner gardener and experience the joy of growing your own fiery habaneros!
Growing Habaneros: My Foolproof Guide to Fiery Success
Okay, so you want to grow habaneros? Awesome! Get ready for some serious heat. I’ve been growing these little fireballs for years, and I’ve learned a thing or two along the way. This guide is all about making the process as easy and rewarding as possible, even if you don’t have a green thumb (yet!).
What You’ll Need
Before we dive in, let’s gather our supplies. Having everything ready beforehand will make the whole process smoother.
* Habanero Seeds: Obviously! Make sure you get them from a reputable source. I’ve had the best luck with seeds from online retailers specializing in peppers.
* Seed Starting Trays or Small Pots: These are essential for getting your seedlings started indoors.
* Seed Starting Mix: Don’t use regular potting soil for starting seeds. Seed starting mix is lighter and provides better drainage.
* Grow Lights (Optional, but Recommended): If you don’t have a sunny windowsill, grow lights will give your seedlings the light they need.
* Potting Soil: Once your seedlings are big enough, you’ll need potting soil for transplanting them into larger containers or your garden.
* Larger Pots (If Growing in Containers): Choose pots that are at least 5 gallons in size. Habaneros need room to grow!
* Fertilizer: A balanced fertilizer is good for general growth, and a fertilizer higher in phosphorus will encourage flowering and fruiting.
* Watering Can or Hose: For, well, watering!
* Gloves: Trust me, you’ll want these when handling habaneros later on. The oils can burn!
* Garden Clippers or Scissors: For pruning and harvesting.
* Optional: Heat mat for seed germination, pH meter for soil testing, insecticidal soap for pest control.
Starting Your Seeds Indoors
This is where the magic begins! Starting your seeds indoors gives them a head start, especially if you live in a cooler climate. I usually start my seeds about 8-10 weeks before the last expected frost.
1. Prepare Your Seed Starting Trays: Fill your seed starting trays or small pots with seed starting mix. Gently pat it down, but don’t compact it too much.
2. Sow the Seeds: Plant 2-3 seeds per cell or pot, about 1/4 inch deep. I like to use a pencil to make a small hole.
3. Water Gently: Water the soil gently so you don’t disturb the seeds. A spray bottle works well for this.
4. Provide Warmth: Habanero seeds need warmth to germinate. The ideal temperature is around 80-85°F (27-29°C). A heat mat can be really helpful, but a warm spot in your house will also work.
5. Maintain Moisture: Keep the soil consistently moist, but not soggy. Cover the trays with a humidity dome or plastic wrap to help retain moisture.
6. Provide Light: Once the seedlings emerge (usually in 7-21 days), remove the humidity dome and provide them with plenty of light. If you’re using grow lights, keep them a few inches above the seedlings. If you’re using a windowsill, make sure it gets at least 6 hours of direct sunlight per day.
7. Thin the Seedlings: Once the seedlings have their first true leaves (the second set of leaves that appear after the initial seed leaves), thin them to one seedling per cell or pot. Choose the strongest-looking seedling and snip off the others at the soil line. Don’t pull them out, as this can disturb the roots of the remaining seedling.
Transplanting Your Seedlings
Once your seedlings are big enough and the weather is warm enough, it’s time to transplant them into larger pots or your garden.
1. Harden Off Your Seedlings: This is a crucial step! Before transplanting, you need to gradually acclimate your seedlings to outdoor conditions. Start by placing them outside in a sheltered spot for an hour or two each day, gradually increasing the amount of time they spend outside over the course of a week. This will help them adjust to the sun, wind, and temperature changes.
2. Choose a Sunny Location: Habaneros need at least 6-8 hours of direct sunlight per day. Choose a location in your garden or on your patio that gets plenty of sun.
3. Prepare the Soil: Habaneros prefer well-drained soil that is rich in organic matter. Amend your soil with compost or other organic matter before planting.
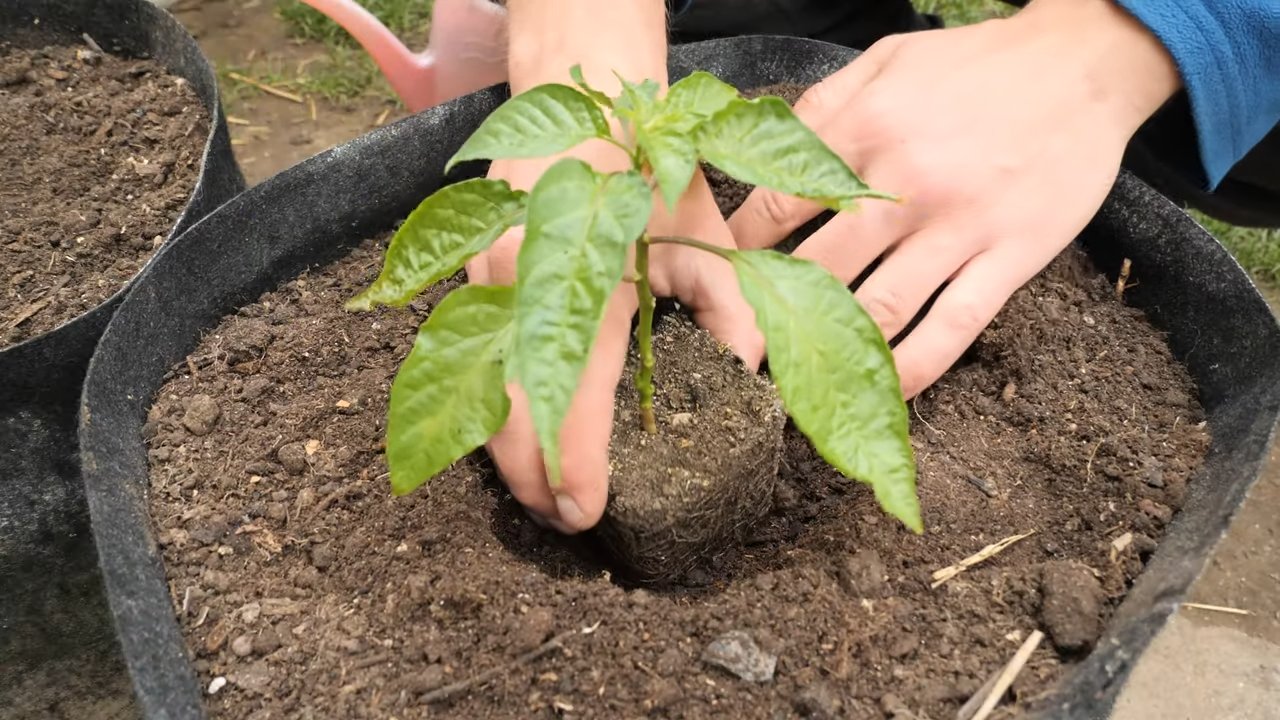
4. Transplant Carefully: Gently remove the seedlings from their pots or trays. Be careful not to damage the roots. Dig a hole that is slightly larger than the root ball and place the seedling in the hole. Backfill with soil and gently pat it down.
5. Water Thoroughly: Water the seedlings thoroughly after transplanting.
6. Mulch: Apply a layer of mulch around the base of the plants to help retain moisture and suppress weeds.
Caring for Your Habanero Plants
Now that your habanero plants are in their final location, it’s time to give them the care they need to thrive.
1. Water Regularly: Habaneros need consistent moisture, especially during hot weather. Water deeply whenever the top inch of soil feels dry. Avoid overwatering, as this can lead to root rot.
2. Fertilize Regularly: Feed your habanero plants with a balanced fertilizer every 2-3 weeks. Once they start flowering, switch to a fertilizer that is higher in phosphorus to encourage fruit production. I like to use a liquid fertilizer diluted to half strength.
3. Prune Your Plants (Optional): Pruning can help to improve air circulation and encourage bushier growth. You can prune your habanero plants by removing any suckers (small shoots that grow from the base of the plant) or by trimming back the tips of the branches.
4. Provide Support (Optional): As your habanero plants grow, they may need support to prevent them from falling over. You can use stakes, cages, or trellises to provide support.
5. Watch Out for Pests and Diseases: Habaneros can be susceptible to pests such as aphids, spider mites, and whiteflies. Check your plants regularly for signs of infestation and treat them with insecticidal soap or other appropriate treatments. They can also be susceptible to fungal diseases such as powdery mildew and blossom end rot. Prevent these diseases by providing good air circulation and avoiding overwatering.
6. Be Patient: Habaneros can take a while to mature. It can take several months from planting to harvest. Don’t get discouraged if you don’t see peppers right away. Just keep providing them with the care they need, and they will eventually reward you with a bountiful harvest.
Harvesting Your Habaneros
The moment you’ve been waiting for! Harvesting your habaneros is the most rewarding part of the process.
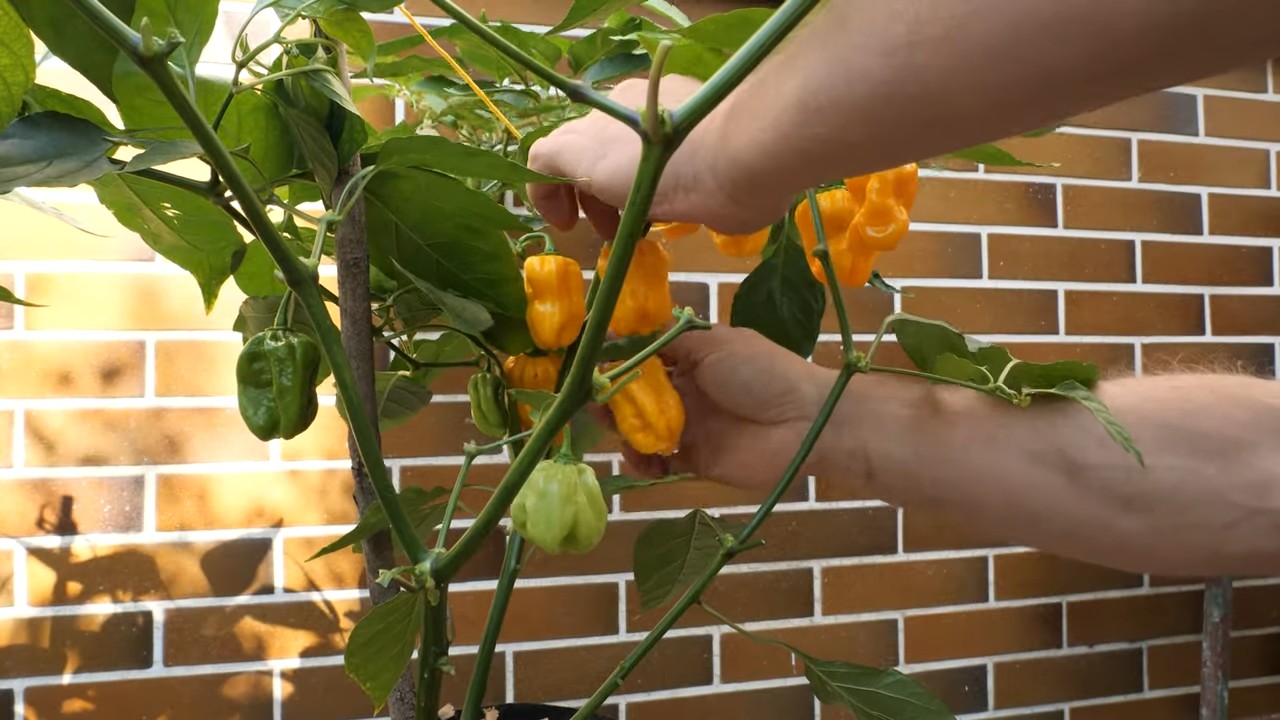
1. Know When to Harvest: Habaneros are typically ready to harvest when they are fully colored (usually orange or red) and slightly soft to the touch. The color will depend on the specific variety you are growing.
2. Use Gloves: I can’t stress this enough! Habaneros are extremely hot, and the oils can burn your skin. Always wear gloves when handling them.
3. Cut the Peppers from the Plant: Use garden clippers or scissors to cut the peppers from the plant. Leave a small piece of stem attached to the pepper.
4. Handle with Care: Be careful not to puncture the peppers, as this can release the oils and make them even hotter to handle.
5. Store Your Habaneros: You can store your habaneros in the refrigerator for several weeks. You can also dry them, freeze them, or pickle them.
Troubleshooting
Even with the best care, you might encounter some problems along the way. Here are a few common issues and how to address them:
* Seedlings Not Germinating: Make sure the soil is warm enough and consistently moist. If you’re using old seeds, they may not be viable.
* Seedlings Leggy: This means they’re not getting enough light. Provide more light or move them closer to your grow lights.
* Leaves Turning Yellow: This could be a sign of overwatering, underwatering, or nutrient deficiency. Check the soil moisture and fertilize if necessary.
* Blossom End Rot: This is caused by a calcium deficiency. Add calcium to the soil or use a calcium-rich fertilizer.
* Pests: Treat infestations with insecticidal soap or other appropriate treatments.
Enjoy Your Fiery Harvest!
Growing habaneros is a rewarding experience. With a little patience and care, you can enjoy a bountiful harvest of these fiery peppers. Use
Conclusion
So, there you have it! Growing habaneros easily doesn’t have to be a daunting task reserved for seasoned gardeners. With a little planning, the right techniques, and a dash of patience, you can cultivate your own fiery peppers right at home. This DIY approach not only saves you money compared to buying them at the store, but it also gives you the satisfaction of knowing exactly where your food comes from and how it was grown.
But why is this DIY trick a must-try? Beyond the cost savings and the control you gain over your food source, growing your own habaneros offers a unique connection to nature. You’ll witness the entire life cycle of the plant, from tiny seedling to vibrant, pepper-laden bush. Plus, the flavor of homegrown habaneros is often superior to store-bought varieties, boasting a richer, more complex heat and aroma.
Don’t be afraid to experiment with variations! Try different soil mixes to see what works best in your climate. Consider using different types of containers, from traditional pots to raised beds, to optimize your growing space. You can even explore hydroponic systems for a more controlled and efficient growing environment. For those in colder climates, bringing your habanero plants indoors during the winter months can extend their growing season and ensure a continuous supply of peppers.
Ready to embark on your habanero-growing adventure? We encourage you to give this DIY trick a try. Start small, learn as you go, and don’t be discouraged by initial setbacks. Gardening is a journey, and every mistake is an opportunity to learn and improve.
And most importantly, we want to hear about your experience! Share your tips, tricks, and triumphs in the comments below. Let us know what worked for you, what challenges you faced, and any creative solutions you discovered along the way. By sharing our collective knowledge, we can all become better habanero growers and enjoy the fruits (or rather, peppers) of our labor. So, get your hands dirty, embrace the heat, and start growing your own habaneros today! You’ll be amazed at how rewarding it can be.
Frequently Asked Questions (FAQ)
What is the best time to start growing habaneros?
The ideal time to start growing habaneros depends on your climate. In warmer regions with long growing seasons, you can start seeds directly outdoors after the last frost. However, in cooler climates, it’s best to start seeds indoors 6-8 weeks before the last expected frost. This gives the seedlings a head start and ensures they have enough time to mature and produce peppers before the end of the growing season.
What kind of soil is best for habaneros?
Habaneros thrive in well-draining, fertile soil with a slightly acidic to neutral pH (around 6.0-7.0). A good soil mix should consist of equal parts potting soil, compost, and perlite or vermiculite. The potting soil provides essential nutrients, the compost adds organic matter and improves drainage, and the perlite or vermiculite enhances aeration and prevents the soil from becoming compacted. Avoid using heavy clay soils, as they can retain too much moisture and lead to root rot.
How much sunlight do habaneros need?
Habaneros require at least 6-8 hours of direct sunlight per day to thrive. Choose a location in your garden that receives ample sunlight throughout the day. If you’re growing habaneros indoors, place them near a sunny window or use grow lights to supplement natural light. Insufficient sunlight can result in stunted growth, reduced pepper production, and less intense flavor.
How often should I water my habanero plants?
Water habanero plants deeply and regularly, especially during hot and dry weather. The soil should be kept consistently moist but not waterlogged. Check the soil moisture level regularly by sticking your finger about an inch into the soil. If the soil feels dry to the touch, it’s time to water. Avoid overwatering, as this can lead to root rot. During cooler weather, you can reduce the frequency of watering.
What kind of fertilizer should I use for habaneros?
Habaneros benefit from regular fertilization throughout the growing season. Use a balanced fertilizer with equal amounts of nitrogen, phosphorus, and potassium (e.g., 10-10-10) during the early stages of growth to promote healthy foliage development. Once the plants start to flower and produce peppers, switch to a fertilizer with a higher phosphorus content (e.g., 5-10-5) to encourage fruit production. Follow the instructions on the fertilizer label for application rates and frequency.
How do I protect my habanero plants from pests and diseases?
Habaneros can be susceptible to various pests and diseases, including aphids, spider mites, whiteflies, and fungal infections. To prevent pest infestations, inspect your plants regularly and remove any pests you find. You can also use insecticidal soap or neem oil to control pests. To prevent fungal diseases, ensure good air circulation around your plants and avoid overwatering. If you notice any signs of disease, such as yellowing leaves or spots on the peppers, treat the plants with a fungicide.
When are habaneros ready to harvest?
Habaneros are typically ready to harvest about 90-100 days after transplanting. The peppers will change color from green to orange or red when they are ripe. The exact color will depend on the specific variety of habanero. The peppers should also feel firm and slightly waxy to the touch. Use pruning shears or scissors to cut the peppers from the plant, leaving a small stem attached.
How hot are habaneros?
Habaneros are known for their intense heat, ranking between 100,000 and 350,000 Scoville heat units (SHU) on the Scoville scale. This makes them significantly hotter than jalapeños, which typically range from 2,500 to 8,000 SHU. When handling habaneros, it’s important to wear gloves to protect your skin from the capsaicin, the compound that gives peppers their heat. Avoid touching your eyes or face after handling habaneros.
Can I grow habaneros in containers?
Yes, habaneros can be successfully grown in containers. Choose a container that is at least 5 gallons in size to provide enough room for the roots to grow. Make sure the container has drainage holes to prevent waterlogging. Use a well-draining potting mix and fertilize regularly. Container-grown habaneros may require more frequent watering than plants grown in the ground.
What can I do with my harvested habaneros?
There are many ways to use your harvested habaneros. You can use them fresh in salsas, sauces, and other dishes. You can also dry them, pickle them, or make hot sauce. Habaneros can also be frozen for later use. When using habaneros, remember that a little goes a long way due to their intense heat. Start with a small amount and add more to taste.
Leave a Comment