
Grow Long Beans at Home? Absolutely! Imagine stepping into your backyard and harvesting fresh, vibrant long beans, ready to be stir-fried, steamed, or added to your favorite dishes. It’s not just a dream; it’s an achievable reality with a few simple tricks and a little DIY spirit. For centuries, cultivating your own food has been a cornerstone of self-sufficiency and a connection to nature. From ancient civilizations tending their gardens to modern-day urban farmers, the desire to nurture and harvest has remained constant.
But let’s be honest, sometimes gardening can feel a little daunting, especially when you’re aiming for a specific crop like long beans. That’s where these DIY hacks come in! I’m here to share some easy-to-follow tips and tricks that will help you grow long beans at home successfully, even if you’re a complete beginner.
Why do you need these DIY tricks? Because store-bought vegetables can be expensive, and often lack the freshness and flavor of homegrown produce. Plus, there’s something incredibly satisfying about nurturing a plant from seed to harvest. So, let’s ditch the grocery store and get our hands dirty! I’ll guide you through everything you need to know, from choosing the right seeds to providing the perfect growing conditions, ensuring you’ll be enjoying a bountiful harvest of delicious long beans in no time.
Grow Your Own Delicious Long Beans: A DIY Guide
Hey there, fellow gardening enthusiasts! I’m so excited to share my tried-and-true method for growing long beans right in your own backyard (or even on your balcony!). These prolific climbers are not only delicious but also add a beautiful vertical element to any garden. Get ready to impress your friends and family with your homegrown bounty!
What You’ll Need:
Before we dive in, let’s gather all the necessary supplies. Trust me, having everything ready beforehand will make the whole process much smoother.
* **Long Bean Seeds:** Choose a variety that suits your climate and taste preferences. ‘Yardlong’ is a popular and reliable choice.
* **Well-Draining Soil:** Long beans thrive in soil that’s rich in organic matter and drains well. You can use a good quality potting mix if you’re growing in containers, or amend your garden soil with compost.
* **Compost or Aged Manure:** This will provide essential nutrients for healthy growth.
* **Trellis or Support Structure:** Long beans are climbers, so they need something to climb on. A trellis, fence, bamboo stakes, or even a sturdy tomato cage will work.
* **Gardening Gloves:** Protect your hands from dirt and potential irritants.
* **Watering Can or Hose:** For regular watering.
* **Hand Trowel or Garden Shovel:** For planting and transplanting.
* **Optional: Seed Starting Tray and Potting Mix:** If you prefer to start your seeds indoors.
* **Optional: Organic Fertilizer:** To boost growth and yields.
Preparing for Planting:
The key to successful long bean cultivation lies in proper preparation. Let’s get started!
1. **Choosing the Right Location:** Long beans need at least 6-8 hours of direct sunlight per day. Select a sunny spot in your garden or on your balcony. Make sure the location is sheltered from strong winds, which can damage the delicate vines.
2. **Soil Preparation:** If you’re planting directly in the garden, loosen the soil to a depth of at least 12 inches. Remove any rocks, weeds, or debris. Amend the soil with plenty of compost or aged manure to improve drainage and fertility. If you’re growing in containers, choose a pot that’s at least 12 inches in diameter and fill it with a high-quality potting mix.
3. **Setting Up the Support Structure:** Before planting, install your trellis or support structure. This will give the long bean vines something to climb on as they grow. Make sure the structure is sturdy enough to support the weight of the mature plants and the beans. I personally love using bamboo stakes tied together to create a teepee shape. It looks great and is super functional!
Planting Long Bean Seeds:
Now for the fun part – planting those seeds!
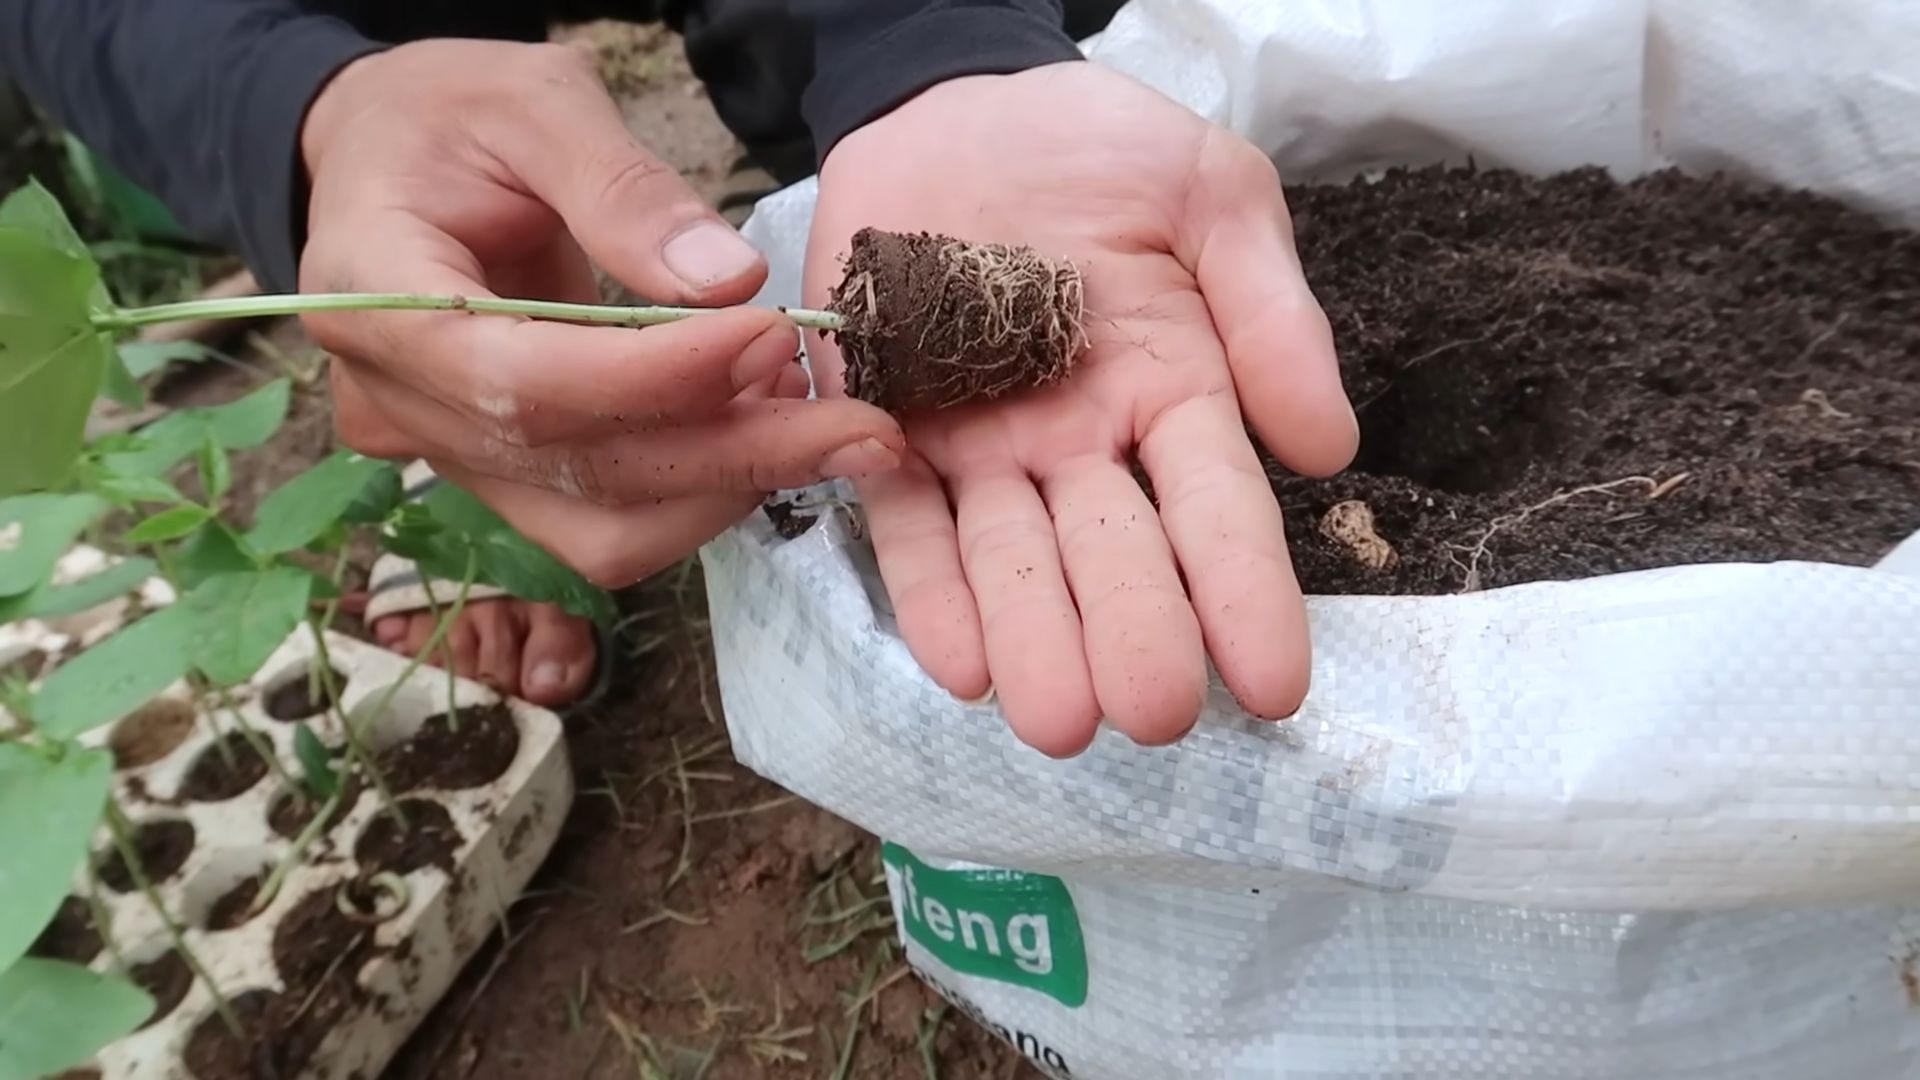
1. **Starting Seeds Indoors (Optional):** If you live in an area with a short growing season, you can start your long bean seeds indoors about 3-4 weeks before the last expected frost. Sow the seeds in seed starting trays filled with potting mix, about 1 inch deep. Keep the soil moist and warm (around 70-80°F). Once the seedlings have developed a few true leaves, you can transplant them outdoors after the danger of frost has passed.
2. **Direct Sowing:** If you live in an area with a longer growing season, you can sow the seeds directly into the garden after the soil has warmed up to at least 60°F. Sow the seeds about 1 inch deep and 2-3 inches apart. Water gently after planting.
3. **Spacing:** Once the seedlings emerge (or after transplanting), thin them out to about 6-8 inches apart. This will give the plants enough room to grow and prevent overcrowding.
Caring for Your Long Bean Plants:
Consistent care is essential for healthy and productive long bean plants.
1. **Watering:** Long beans need consistent moisture, especially during hot weather. Water deeply and regularly, keeping the soil consistently moist but not waterlogged. Avoid overhead watering, which can promote fungal diseases. I usually water in the morning so the foliage has time to dry before nightfall.
2. **Fertilizing:** Feed your long bean plants with an organic fertilizer every 2-3 weeks. Look for a fertilizer that’s high in phosphorus and potassium, which promote flowering and fruiting. You can also side-dress the plants with compost or aged manure.
3. **Weeding:** Keep the area around your long bean plants free of weeds. Weeds compete with the plants for nutrients and water, and they can also harbor pests and diseases.
4. **Training the Vines:** As the long bean vines grow, gently guide them onto the trellis or support structure. You may need to tie them loosely to the structure with twine or plant ties. This will help them climb properly and prevent them from sprawling on the ground.
5. **Pest and Disease Control:** Long beans are generally resistant to pests and diseases, but they can be susceptible to aphids, bean beetles, and fungal diseases. Inspect your plants regularly for signs of pests or diseases. If you find any, treat them promptly with an organic insecticide or fungicide. Neem oil is a great all-purpose solution.
Harvesting Your Long Beans:
The moment you’ve been waiting for!
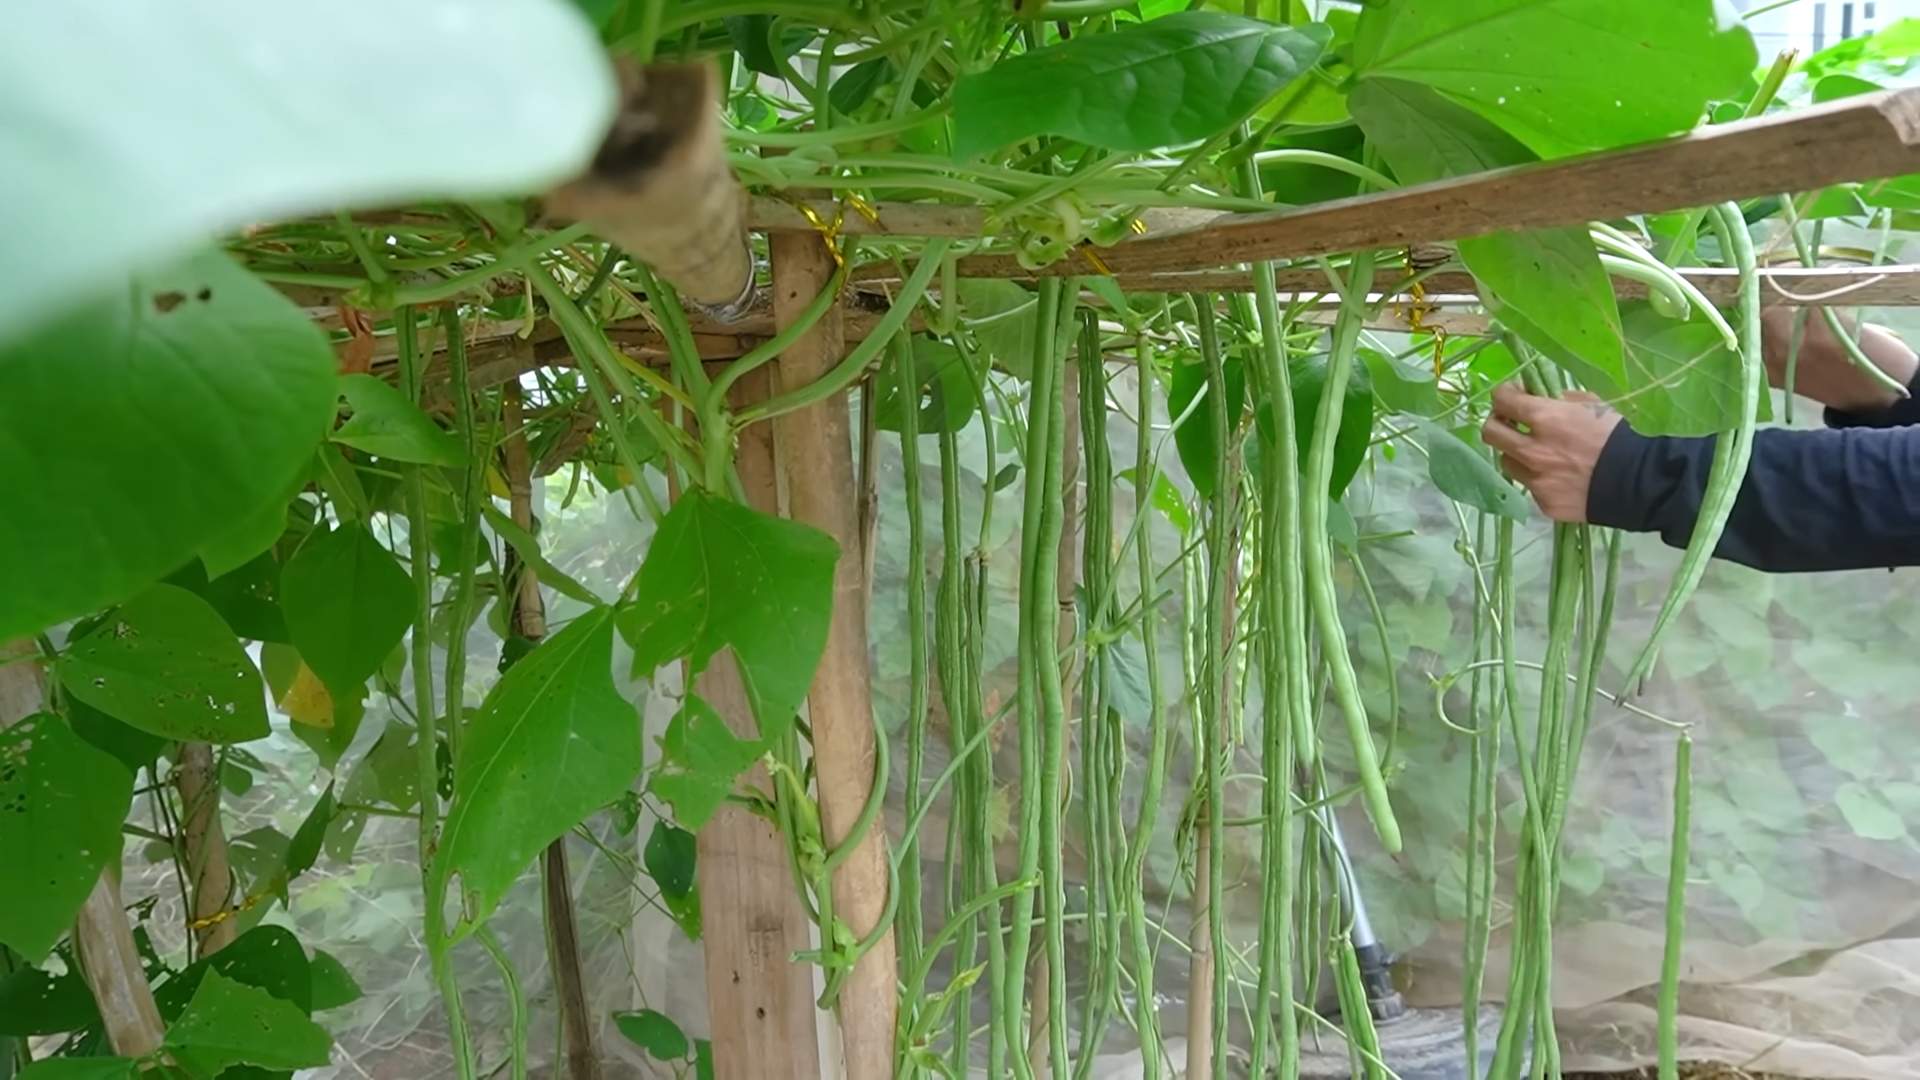
1. **When to Harvest:** Long beans are typically ready to harvest about 60-70 days after planting. Harvest them when they are young and tender, about 12-18 inches long. The beans should be firm and snap easily when bent.
2. **How to Harvest:** Use scissors or pruning shears to cut the beans from the vine. Be careful not to damage the plant. Harvest regularly to encourage continued production. The more you pick, the more they’ll produce!
3. **Storing Your Harvest:** Freshly harvested long beans are best eaten right away. However, you can store them in the refrigerator for up to a week. To store them, wrap them in a damp paper towel and place them in a plastic bag. You can also freeze long beans for longer storage. Blanch them in boiling water for 2-3 minutes, then cool them in ice water. Drain them well and store them in freezer bags.
Troubleshooting:
Even with the best care, you might encounter some challenges along the way. Here are a few common problems and how to address them:
* **Poor Germination:** If your seeds aren’t germinating, make sure the soil is warm enough and consistently moist. You can also try soaking the seeds in water for 24 hours before planting to improve germination rates.
* **Yellowing Leaves:** Yellowing leaves can be a sign of nutrient deficiency, overwatering, or underwatering. Check the soil moisture and adjust your watering accordingly. Fertilize the plants with a balanced fertilizer.
* **Lack of Flowers:** If your plants aren’t flowering, it could be due to insufficient sunlight or nutrient deficiency. Make sure the plants are getting at least 6-8 hours of direct sunlight per day. Fertilize them with a fertilizer that’s high in phosphorus and potassium.
* **Pest Infestations:** If you notice pests on your plants, treat them promptly with an organic insecticide. Neem oil is a great option for controlling a wide range of pests.
* **Disease Problems:** If you notice signs of disease, such as spots on the leaves or wilting, treat the plants with an organic fungicide. Improve air circulation around the plants by thinning them out and removing any dead or diseased foliage.
Enjoying Your Homegrown Long Beans:
Now that you’ve harvested your delicious long beans, it’s time to enjoy them! Long beans can be used in a variety of dishes, from stir-fries and salads to soups and stews. They’re also delicious simply steamed or sautéed with a little garlic and olive oil.
Here are a few of my favorite ways to use long beans:
* **Stir-Fry:** Long beans are a classic ingredient in stir-fries. They pair well with tofu, vegetables, and your favorite sauce.
* **Salad:** Add chopped long beans to your favorite salad for a crunchy and nutritious boost.
* **Soup:** Long beans can be added to soups and stews for extra flavor and texture.
* **Grilled:** Toss long beans with olive oil, salt, and pepper, and grill them until tender-crisp.
* **Pickled:** Pickled long beans are a delicious and tangy snack.
Growing long beans at home is a rewarding experience that allows you to enjoy fresh, healthy, and delicious produce right from your own backyard. With a little bit of planning and care, you can have a bountiful harvest of long beans to share with your friends and family. Happy gardening!
Conclusion
So, there you have it! Growing long beans at home is not only achievable, but it’s also incredibly rewarding. Forget those limp, flavorless beans from the grocery store. Imagine stepping into your own backyard and harvesting vibrant, crisp, and intensely flavorful long beans whenever you need them. This DIY trick, from seed to table, offers a freshness and satisfaction that store-bought produce simply can’t match.
But why is this a must-try? Beyond the superior taste and freshness, growing your own long beans allows you to control exactly what goes into your food. No more worrying about pesticides or unknown chemicals. You can cultivate your long beans organically, ensuring a healthy and delicious harvest for you and your family. Plus, the process itself is incredibly therapeutic. There’s something deeply satisfying about nurturing a plant from a tiny seed to a bountiful producer.
And the possibilities don’t stop there! Once you’ve mastered the basics, you can experiment with different varieties of long beans. Try the classic green varieties, or venture into the world of purple or red long beans for a visually stunning and equally delicious addition to your meals. You can also explore different growing methods. While we’ve focused on traditional soil-based gardening, long beans also thrive in raised beds or even large containers, making them accessible to gardeners with limited space. Consider companion planting with herbs like basil or marigolds to deter pests naturally and enhance the flavor of your beans.
Furthermore, think about the culinary adventures that await you. Freshly harvested long beans are incredibly versatile. Stir-fry them with garlic and ginger for a quick and flavorful side dish. Add them to soups and stews for a hearty and nutritious meal. Pickle them for a tangy and crunchy snack. Or, simply steam them and serve them with a drizzle of olive oil and a sprinkle of sea salt. The possibilities are endless!
Growing long beans at home is more than just a gardening project; it’s an investment in your health, your taste buds, and your well-being. It’s a chance to connect with nature, learn new skills, and enjoy the fruits (or rather, the beans!) of your labor.
We wholeheartedly encourage you to give this DIY trick a try. Don’t be intimidated if you’re a beginner gardener. Long beans are relatively easy to grow, and the rewards are well worth the effort. Start small, follow our simple steps, and watch your long beans flourish.
And most importantly, we want to hear about your experience! Share your photos, tips, and stories with us in the comments below. Let us know what varieties you’re growing, what challenges you’ve faced, and what delicious dishes you’ve created with your homegrown long beans. Together, we can create a community of passionate gardeners who are dedicated to growing their own fresh, healthy, and flavorful food. So, grab your seeds, get your hands dirty, and start growing your own long beans today! You won’t regret it.
Frequently Asked Questions (FAQ)
What is the best time of year to plant long beans?
Long beans are warm-weather crops, so the best time to plant them is in late spring or early summer, after the last frost has passed and the soil has warmed up to at least 60°F (15°C). In warmer climates, you can often plant a second crop in late summer for a fall harvest. Check your local frost dates to determine the optimal planting time for your region.
How much sunlight do long beans need?
Long beans require at least 6-8 hours of direct sunlight per day to thrive. Choose a planting location that receives plenty of sunshine throughout the day. If you’re growing them in containers, make sure to place them in a sunny spot. Insufficient sunlight can lead to weak growth and reduced yields.
What kind of soil is best for growing long beans?
Long beans prefer well-drained, fertile soil that is rich in organic matter. Amend your soil with compost or well-rotted manure before planting to improve its fertility and drainage. A slightly acidic to neutral soil pH (around 6.0 to 7.0) is ideal. Avoid heavy clay soils, as they can become waterlogged and hinder root growth.
How often should I water my long beans?
Long beans need consistent moisture, especially during hot and dry weather. Water deeply and regularly, aiming to keep the soil consistently moist but not waterlogged. Water at the base of the plants to avoid wetting the foliage, which can increase the risk of fungal diseases. Mulching around the plants can help retain moisture in the soil.
Do long beans need a trellis or support?
Yes, long beans are climbing plants and require a trellis, fence, or other support structure to grow properly. Provide a sturdy support system that is at least 6-8 feet tall. You can use bamboo stakes, netting, or a wire trellis. Train the vines to climb the support as they grow.
How long does it take for long beans to mature?
Long beans typically take about 60-90 days to mature after planting. You can start harvesting the beans when they are about 12-18 inches long and still tender. Harvest regularly to encourage continued production. Overripe beans will become tough and less flavorful.
What are some common pests and diseases that affect long beans?
Common pests that can affect long beans include aphids, bean beetles, and spider mites. Control these pests with insecticidal soap, neem oil, or by handpicking them off the plants. Common diseases include powdery mildew and bean rust. Prevent these diseases by providing good air circulation, avoiding overhead watering, and using disease-resistant varieties.
Can I grow long beans in containers?
Yes, long beans can be successfully grown in containers, provided that you choose a large enough container (at least 12 inches in diameter and depth) and provide adequate support for the vines. Use a well-draining potting mix and water regularly. Container-grown long beans may require more frequent fertilization than those grown in the ground.
How do I harvest long beans?
Harvest long beans when they are about 12-18 inches long and still tender. Use scissors or pruning shears to cut the beans from the vine, leaving a short stem attached. Harvest regularly to encourage continued production. Overripe beans will become tough and less flavorful.
Can I save seeds from my long beans?
Yes, you can save seeds from your long beans, but it’s important to note that if you’re growing multiple varieties, they may cross-pollinate, resulting in seeds that don’t produce true-to-type plants. To save seeds, allow a few beans to mature fully on the vine until they are dry and brown. Remove the seeds from the pods and store them in a cool, dry place.
Leave a Comment