
Grow Potatoes Indoors? Absolutely! Imagine harvesting fresh, homegrown potatoes right from your kitchen, no matter the season or the size of your outdoor space. It sounds like a dream, right? Well, it’s a dream within reach, and I’m here to show you how!
For centuries, potatoes have been a staple food source, cultivated across continents and woven into the fabric of countless cultures. From the Andean highlands where they originated to the Irish potato famine that shaped history, potatoes hold a significant place in our world. Now, we’re taking this humble tuber indoors, bringing a touch of agricultural history into our homes.
But why bother learning how to grow potatoes indoors? In today’s world, access to fresh, healthy produce can be a challenge. Maybe you live in an apartment with no garden, or perhaps your climate makes outdoor potato growing difficult. Or maybe, like me, you just love the idea of having a constant supply of fresh potatoes at your fingertips! Whatever your reason, this DIY guide will equip you with the knowledge and simple tricks to successfully cultivate your own indoor potato patch. Get ready to roll up your sleeves and embark on a rewarding journey of indoor gardening!
Growing Potatoes Indoors: A Spud-tacular DIY Guide!
Hey there, fellow gardening enthusiasts! Ever dreamt of harvesting your own potatoes without stepping foot outside? Well, dream no more! I’m going to walk you through the surprisingly simple process of growing potatoes indoors. It’s a fun, rewarding project that brings a little bit of the garden into your home, and you get fresh, homegrown potatoes to boot!
Choosing Your Potato Variety
First things first, let’s talk potatoes. Not all potatoes are created equal, especially when it comes to indoor growing. You’ll want to choose varieties that are known for their smaller size and shorter growing season. Here are a few of my favorites:
* Yukon Gold: These are buttery, flavorful, and relatively quick to mature.
* Red Pontiac: These red-skinned potatoes are great for boiling and have a lovely, slightly sweet taste.
* Fingerling Potatoes: These are fun to grow and have a unique, elongated shape. They come in various colors and flavors.
Avoid large, late-season varieties like Russets, as they require a longer growing period and more space than is practical for indoor gardening.
Sprouting Your Seed Potatoes (Chitting)
Before planting, we need to encourage our potatoes to sprout, a process called “chitting.” This gives them a head start and results in a faster harvest.
1. Gather Your Supplies: You’ll need your chosen seed potatoes, an egg carton or small container, and a bright, cool location (around 60-70°F or 15-21°C).
2. Prepare the Potatoes: If your potatoes are large (bigger than an egg), you can cut them into pieces, ensuring each piece has at least one or two “eyes” (those little buds that will sprout). Let the cut pieces air dry for a day or two to callous over, which helps prevent rot. Smaller potatoes can be planted whole.
3. Arrange the Potatoes: Place the potatoes in the egg carton or container with the “eyes” facing upwards.
4. Provide Light and Cool Temperatures: Put the container in a bright, cool spot. Avoid direct sunlight, as it can dry out the potatoes.
5. Wait for Sprouts: Over the next few weeks, you’ll see sprouts emerging from the eyes. Once the sprouts are about an inch long, your potatoes are ready to plant!
Preparing Your Growing Container and Soil
Now, let’s get our hands dirty (or, well, soil-y)! Choosing the right container and soil is crucial for successful indoor potato growing.
1. Choose a Large Container: Potatoes need plenty of room to grow. I recommend a container that’s at least 10-15 gallons in size. A large bucket, a plastic storage bin, or even a fabric grow bag will work well. Make sure your container has drainage holes at the bottom to prevent waterlogging.
2. Select a Well-Draining Soil Mix: Potatoes thrive in loose, well-draining soil. A good mix consists of equal parts potting soil, compost, and perlite or vermiculite. The compost provides nutrients, while the perlite or vermiculite improves drainage and aeration. Avoid using garden soil, as it can be too heavy and compact for container gardening.
3. Layer the Bottom: Start by adding a few inches of your soil mix to the bottom of the container.
Planting Your Sprouted Potatoes
Time to plant those little spuds!
1. Create Planting Holes: Make holes in the soil that are about 4-6 inches deep and spaced about 8-10 inches apart.
2. Plant the Potatoes: Gently place the sprouted potatoes into the holes, with the sprouts facing upwards.
3. Cover with Soil: Cover the potatoes with soil, leaving the tips of the sprouts exposed.
4. Water Thoroughly: Water the soil well until it’s evenly moist but not soggy.
“Hilling” Your Potatoes
This is a key step in potato growing, both indoors and outdoors. “Hilling” encourages the potatoes to produce more tubers along the stem.
1. Wait for Growth: As the potato plants grow, you’ll notice the stems getting taller.
2. Add More Soil: When the stems are about 6-8 inches tall, add more soil to the container, covering the stems up to about halfway. This encourages the plant to produce more potatoes along the buried stem.
3. Repeat the Process: Continue adding soil every few weeks as the plants grow taller, always leaving the top leaves exposed. This process is called “hilling.”
Caring for Your Indoor Potato Plants
Now that your potatoes are planted and hilled, it’s time to provide them with the care they need to thrive.
1. Light: Potatoes need at least 6-8 hours of sunlight per day. If you don’t have a sunny window, you can supplement with grow lights. Position the grow lights a few inches above the plants.
2. Watering: Keep the soil consistently moist but not waterlogged. Water when the top inch of soil feels dry to the touch. Avoid overwatering, as this can lead to root rot.
3. Fertilizing: Feed your potato plants every 2-3 weeks with a balanced liquid fertilizer. Follow the instructions on the fertilizer label.
4. Temperature: Potatoes prefer temperatures between 60-70°F (15-21°C). Avoid exposing them to extreme temperatures.
5. Pest Control: Keep an eye out for common pests like aphids and spider mites. If you spot any pests, treat them with insecticidal soap or neem oil.
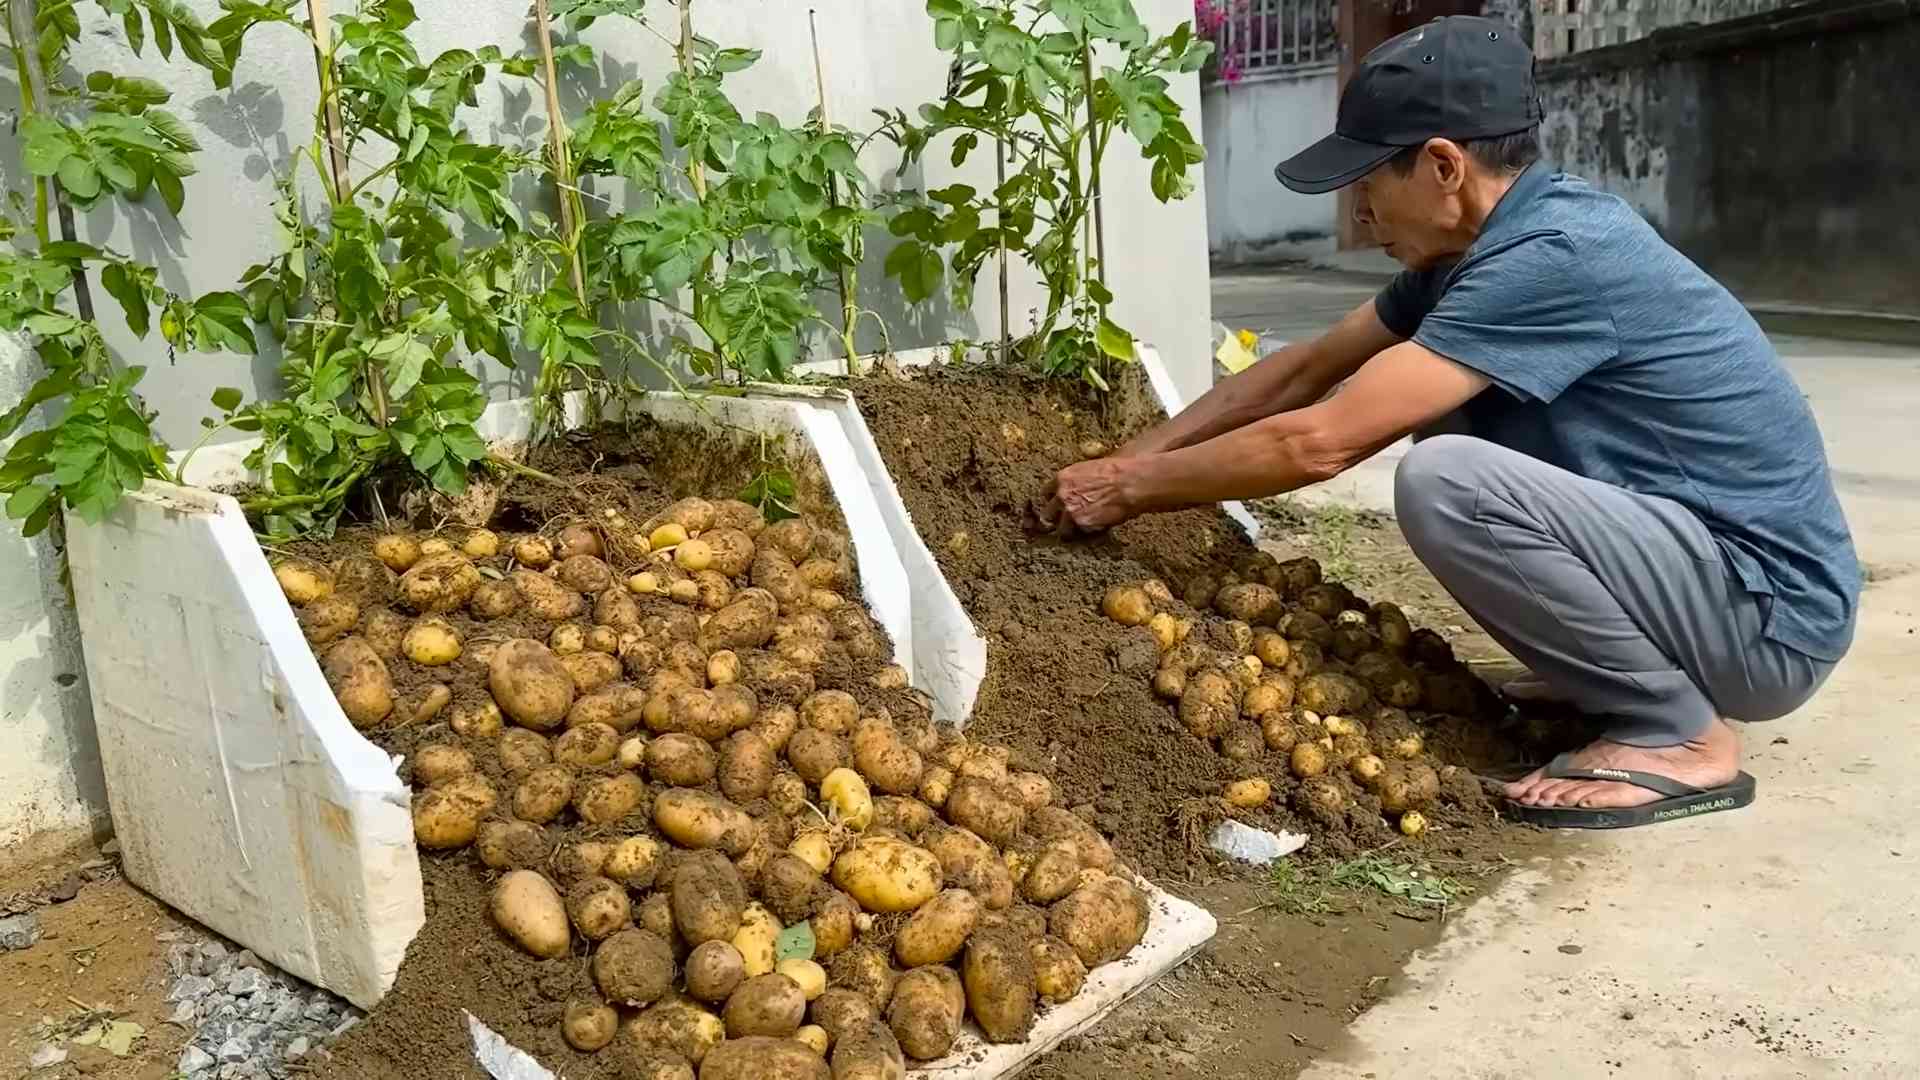
Harvesting Your Indoor Potatoes
The moment we’ve all been waiting for! Harvesting your homegrown potatoes is the most rewarding part of the process.
1. Watch for Signs of Maturity: Potatoes are typically ready to harvest about 70-90 days after planting. The leaves will start to turn yellow and die back, indicating that the potatoes are mature.
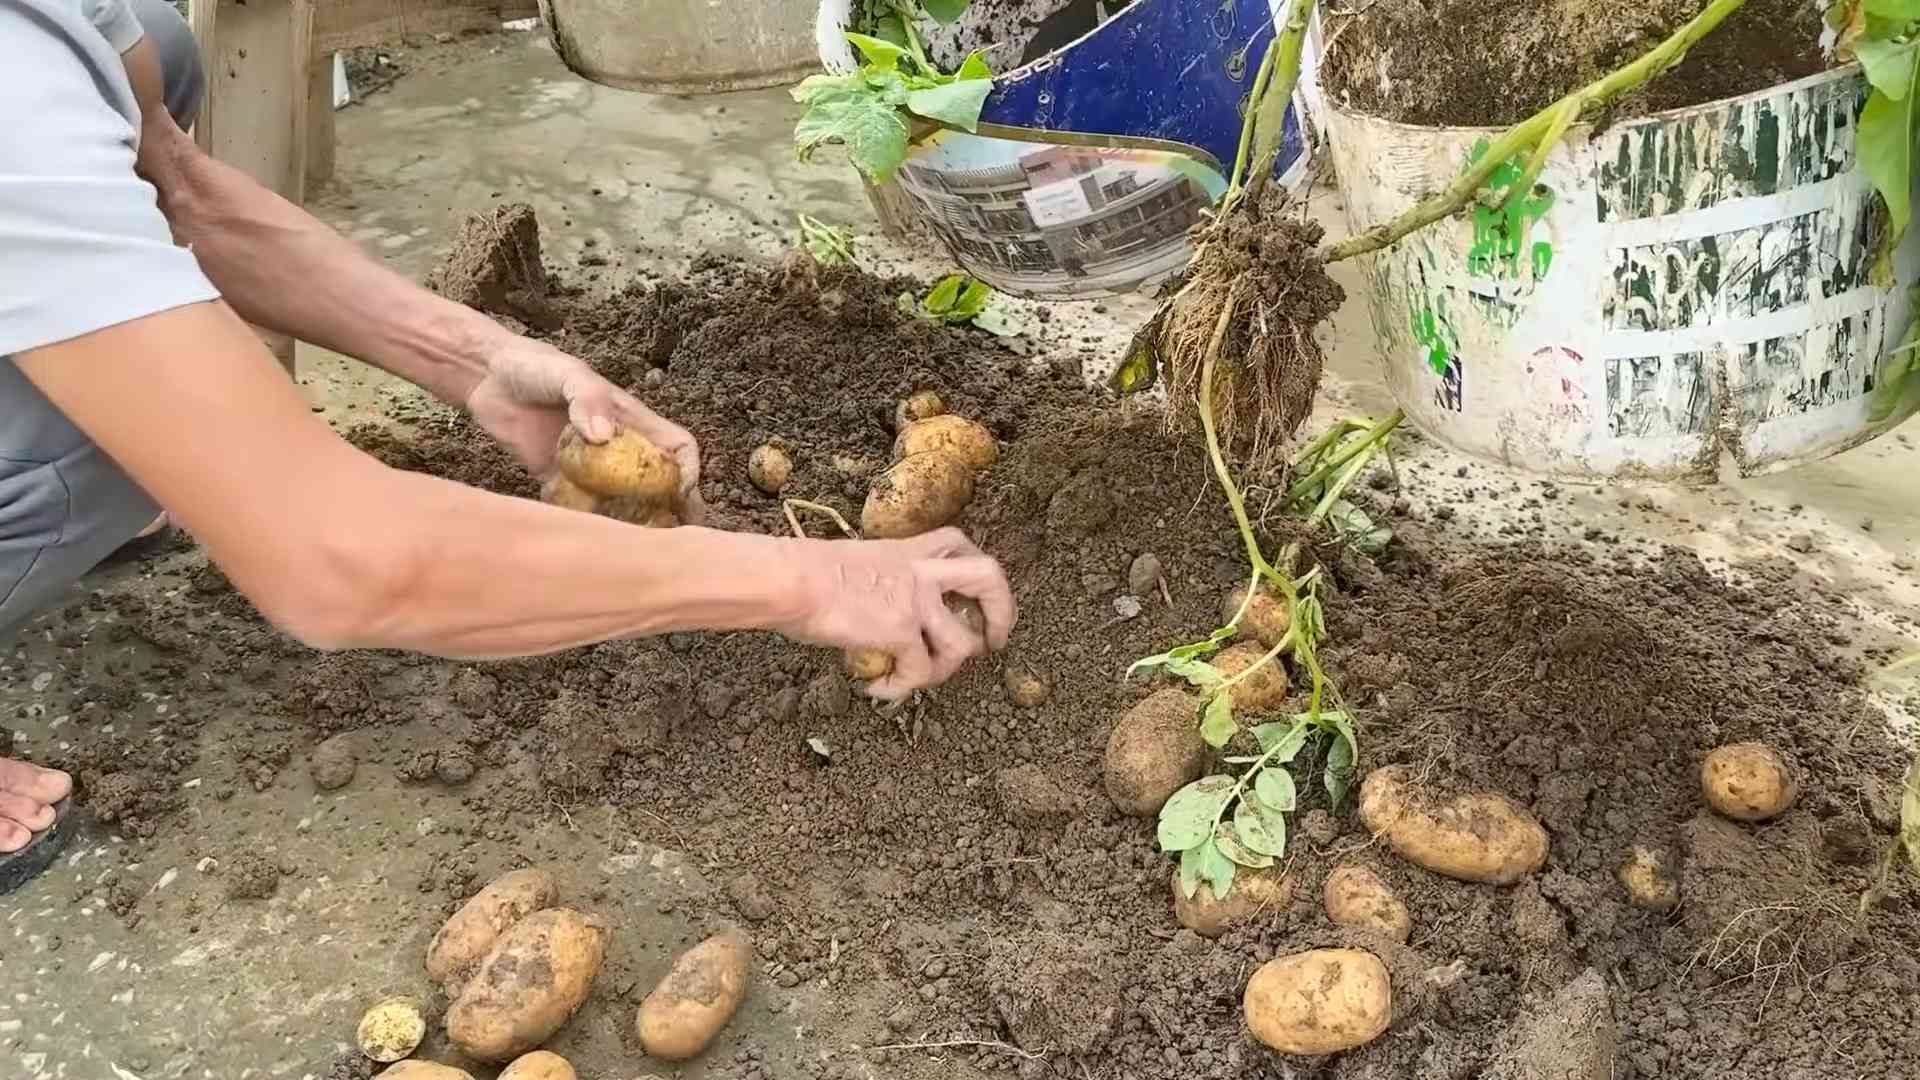
2. Gently Dig Around: Carefully dig around the base of the plants to check the size of the potatoes.
3. Harvesting: Once the potatoes are the size you want, gently dig them up with your hands or a small trowel. Be careful not to damage the potatoes.
4. Curing (Optional): If you plan to store your potatoes for a longer period, you can cure them by spreading them out in a cool, dark, and well-ventilated place for a week or two. This helps to toughen the skins and prevent rot.
Troubleshooting Common Issues
Even with the best care, you might encounter a few challenges along the way. Here are some common issues and how to address them:
* Yellowing Leaves: This could be a sign of overwatering, underwatering, or nutrient deficiency. Adjust your watering schedule and fertilize your plants if needed.
* Leggy Growth: This indicates that your plants aren’t getting enough light. Move them to a sunnier location or supplement with grow lights.
* Small Potatoes: This could be due to insufficient hilling, lack of nutrients, or overcrowding. Make sure you’re hilling your plants regularly and fertilizing them properly. If your container is too small, consider transplanting your potatoes to a larger one.
* Pests: Regularly inspect your plants for pests and treat them promptly with insecticidal soap or neem oil.
Enjoying Your Homegrown Potatoes
Congratulations! You’ve successfully grown potatoes indoors. Now it’s time to enjoy the fruits (or rather, tubers) of your labor. Use your homegrown potatoes in your favorite recipes, from mashed potatoes and roasted potatoes to potato salad and potato soup. There’s nothing quite like the taste of fresh, homegrown potatoes!
I hope this guide has inspired you to try growing potatoes indoors. It’s a fun, rewarding project that brings a little bit of the garden into your home. Happy growing!
Conclusion
So, there you have it! Growing potatoes indoors might seem like a whimsical experiment, but it’s a surprisingly rewarding and practical way to enjoy fresh, homegrown potatoes year-round. Forget relying solely on grocery store produce, often shipped from far away and lacking that just-picked flavor. With a little patience and these simple steps, you can cultivate your own miniature potato farm right in your home.
The beauty of this DIY project lies not only in its accessibility but also in its adaptability. You’re not limited to just one variety of potato. Experiment with different types – Yukon Gold for their creamy texture, Russets for baking, or even colorful varieties like Purple Majesty for a visually stunning harvest. Consider the space you have available and choose potato varieties that are known to thrive in containers.
Beyond the variety, you can also tweak the growing medium. While a standard potting mix works well, you can enrich it with compost or other organic matter to boost nutrient levels and improve drainage. Some gardeners even incorporate perlite or vermiculite to further enhance aeration.
Don’t be afraid to get creative with your containers, too. While grow bags are a popular choice, you can repurpose large buckets, storage bins, or even old laundry baskets, as long as they have adequate drainage holes. The key is to provide enough space for the potato plants to develop a healthy root system and produce a bountiful harvest.
Growing potatoes indoors offers a unique opportunity to connect with your food source and witness the miracle of plant growth firsthand. It’s a fantastic educational project for children and a fulfilling hobby for adults. Plus, there’s nothing quite like the taste of freshly dug potatoes, still warm from the “earth,” that you’ve nurtured from start to finish.
We strongly encourage you to give this DIY trick a try. It’s easier than you might think, and the rewards are well worth the effort. Once you’ve harvested your first crop of homegrown potatoes, we’d love to hear about your experience. Share your tips, tricks, and photos in the comments below. Let’s build a community of indoor potato growers and learn from each other’s successes (and occasional failures!). Happy growing!
Frequently Asked Questions About Growing Potatoes Indoors
What kind of potatoes can I grow indoors?
You can grow almost any type of potato indoors, but some varieties are better suited for container gardening than others. Smaller, early-maturing varieties like Yukon Gold, fingerling potatoes, and red potatoes tend to do well in pots. Avoid larger, late-maturing varieties like Russets unless you have a very large container. Seed potatoes are the best starting point, but you can also sprout potatoes from the grocery store, provided they haven’t been treated with sprout inhibitors. Organic potatoes are generally a safer bet for sprouting.
How much sunlight do indoor potatoes need?
Potatoes need at least 6-8 hours of direct sunlight per day to thrive. If you don’t have a sunny window, you’ll need to supplement with grow lights. LED grow lights are energy-efficient and provide the full spectrum of light that plants need. Position the lights a few inches above the plants and adjust them as the plants grow. Insufficient light will result in weak, leggy plants and a poor harvest.
What kind of soil should I use for growing potatoes indoors?
Use a well-draining potting mix that is rich in organic matter. A mix of equal parts potting soil, compost, and perlite or vermiculite is ideal. Avoid using garden soil, as it can be too heavy and compact, leading to drainage problems. Good drainage is crucial to prevent root rot. The pH of the soil should be slightly acidic, around 6.0 to 6.5.
How often should I water my indoor potato plants?
Water your potato plants regularly, keeping the soil consistently moist but not waterlogged. Check the soil moisture by sticking your finger about an inch into the soil. If it feels dry, it’s time to water. Water deeply, allowing the excess water to drain out of the bottom of the container. Avoid overwatering, as this can lead to root rot. Reduce watering frequency as the plants mature and the foliage begins to die back.
How do I “hill” my potato plants indoors?
“Hilling” is the process of adding more soil to the container as the potato plants grow. This encourages the plants to produce more potatoes along the buried stems. Start with a container that is only partially filled with soil. As the plants grow, gradually add more soil, burying the lower stems. Continue hilling until the container is almost full. This process maximizes potato production.
When will my indoor potatoes be ready to harvest?
Indoor potatoes typically take 70-90 days to mature, depending on the variety. You’ll know they’re ready to harvest when the foliage starts to turn yellow and die back. You can harvest “new potatoes” earlier, about 60 days after planting, by carefully digging around the edges of the container. For a full harvest, wait until the foliage has completely died back before emptying the container.
What are some common problems when growing potatoes indoors?
Some common problems include pests like aphids and spider mites, diseases like early blight and late blight, and nutrient deficiencies. Inspect your plants regularly for signs of pests or diseases. Treat infestations with insecticidal soap or neem oil. Ensure your plants are getting adequate nutrients by fertilizing them regularly with a balanced fertilizer. Proper watering and good air circulation can help prevent fungal diseases.
Can I grow potatoes indoors without soil?
Yes, you can grow potatoes indoors using hydroponics. Hydroponics is a method of growing plants without soil, using nutrient-rich water solutions. There are various hydroponic systems you can use, such as deep water culture, nutrient film technique, and aeroponics. Hydroponics can result in faster growth and higher yields, but it requires more specialized equipment and knowledge.
How do I store my homegrown potatoes?
Store your harvested potatoes in a cool, dark, and dry place. A temperature of around 40-50°F (4-10°C) is ideal. Avoid storing potatoes in the refrigerator, as this can cause them to develop a sweet taste. Store them in a breathable container, such as a burlap sack or a paper bag with holes. Do not wash the potatoes before storing them, as this can promote spoilage. Properly stored potatoes can last for several months.
What fertilizer should I use for growing potatoes indoors?
Use a balanced fertilizer with an NPK ratio of around 10-10-10 or 14-14-14. You can also use a fertilizer specifically formulated for potatoes or vegetables. Apply the fertilizer according to the package directions, typically every 2-3 weeks. Avoid over-fertilizing, as this can lead to excessive foliage growth and reduced potato production. Organic fertilizers, such as compost tea or fish emulsion, are also good options.
Leave a Comment