
Grow Radicchio Indoors Easily and unlock a world of vibrant color and slightly bitter flavor right in your own home! Have you ever dreamed of adding a touch of Italian flair to your salads, even when the snow is falling outside? Well, dream no more! This DIY guide is your passport to cultivating this beautiful leafy vegetable, regardless of your outdoor space or the season.
Radicchio, with its striking crimson leaves and crisp texture, has a rich history rooted in the Veneto region of Italy. For centuries, it’s been a staple in Italian cuisine, adding a unique zest to everything from salads and risottos to grilled dishes. But you don’t need to be a seasoned gardener or live in Italy to enjoy fresh, homegrown radicchio.
I know what you’re thinking: “Indoor gardening? Sounds complicated!” But trust me, it’s not! In this article, I’m going to share some simple, yet effective, tricks and hacks that will make growing radicchio indoors easily a breeze. We’ll cover everything from choosing the right container and soil to providing the perfect light and watering conditions. Plus, I’ll share some insider tips to help you avoid common pitfalls and maximize your harvest. So, ditch the expensive grocery store radicchio and get ready to enjoy the satisfaction of growing your own fresh, flavorful greens – all from the comfort of your home!
Grow Radicchio Indoors: A Beginner’s Guide
Hey there, fellow gardening enthusiasts! Ever thought about growing radicchio indoors? It’s easier than you might think, and you get to enjoy that slightly bitter, beautiful leafy vegetable even when the weather outside is frightful. I’ve been experimenting with indoor radicchio for a while now, and I’m excited to share my secrets with you. Let’s get started!
What You’ll Need
Before we dive into the nitty-gritty, let’s gather our supplies. Here’s a list of everything you’ll need to successfully grow radicchio indoors:
* **Radicchio Seeds:** Choose a variety that you like. Some popular options include ‘Chioggia’, ‘Treviso’, and ‘Castelfranco’. I personally love ‘Chioggia’ for its beautiful round heads.
* **Seed Starting Trays or Small Pots:** These are perfect for getting your seeds germinated.
* **Seed Starting Mix:** This is a light, airy soil mix specifically designed for seedlings. Don’t use regular garden soil; it’s too heavy.
* **Larger Pots (6-8 inches in diameter):** Once your seedlings are big enough, they’ll need to be transplanted into larger pots.
* **Potting Soil:** A good quality potting mix is essential for healthy growth.
* **Grow Lights:** Radicchio needs plenty of light, especially indoors. LED grow lights are energy-efficient and work wonders.
* **Watering Can or Spray Bottle:** For gentle watering.
* **Fertilizer:** A balanced liquid fertilizer will help your radicchio thrive.
* **A Well-Ventilated Space:** Good air circulation is important to prevent fungal diseases.
* **Optional: Heat Mat:** This can speed up germination, but it’s not essential.
Phase 1: Starting Your Radicchio Seeds
This is where the magic begins! Getting your seeds to sprout is the first step towards a bountiful indoor radicchio harvest.
1. **Prepare Your Seed Starting Trays:** Fill your seed starting trays or small pots with seed starting mix. Gently press down the soil to create a firm surface.
2. **Sow the Seeds:** Sprinkle a few radicchio seeds on top of the soil in each cell or pot. I usually aim for 2-3 seeds per cell, just in case some don’t germinate.
3. **Cover the Seeds:** Lightly cover the seeds with a thin layer of seed starting mix. Radicchio seeds need light to germinate, so don’t bury them too deep.
4. **Water Gently:** Use a spray bottle or watering can with a gentle nozzle to moisten the soil. You want the soil to be damp, but not soggy.
5. **Provide Warmth and Light:** Place your seed starting trays in a warm location. A temperature of around 65-75°F (18-24°C) is ideal. If you’re using a heat mat, place the trays on top of it. Position your grow lights about 2-4 inches above the trays.
6. **Maintain Moisture:** Keep the soil consistently moist by misting it regularly. Don’t let it dry out.
7. **Wait for Germination:** Radicchio seeds typically germinate in 5-10 days. Be patient!
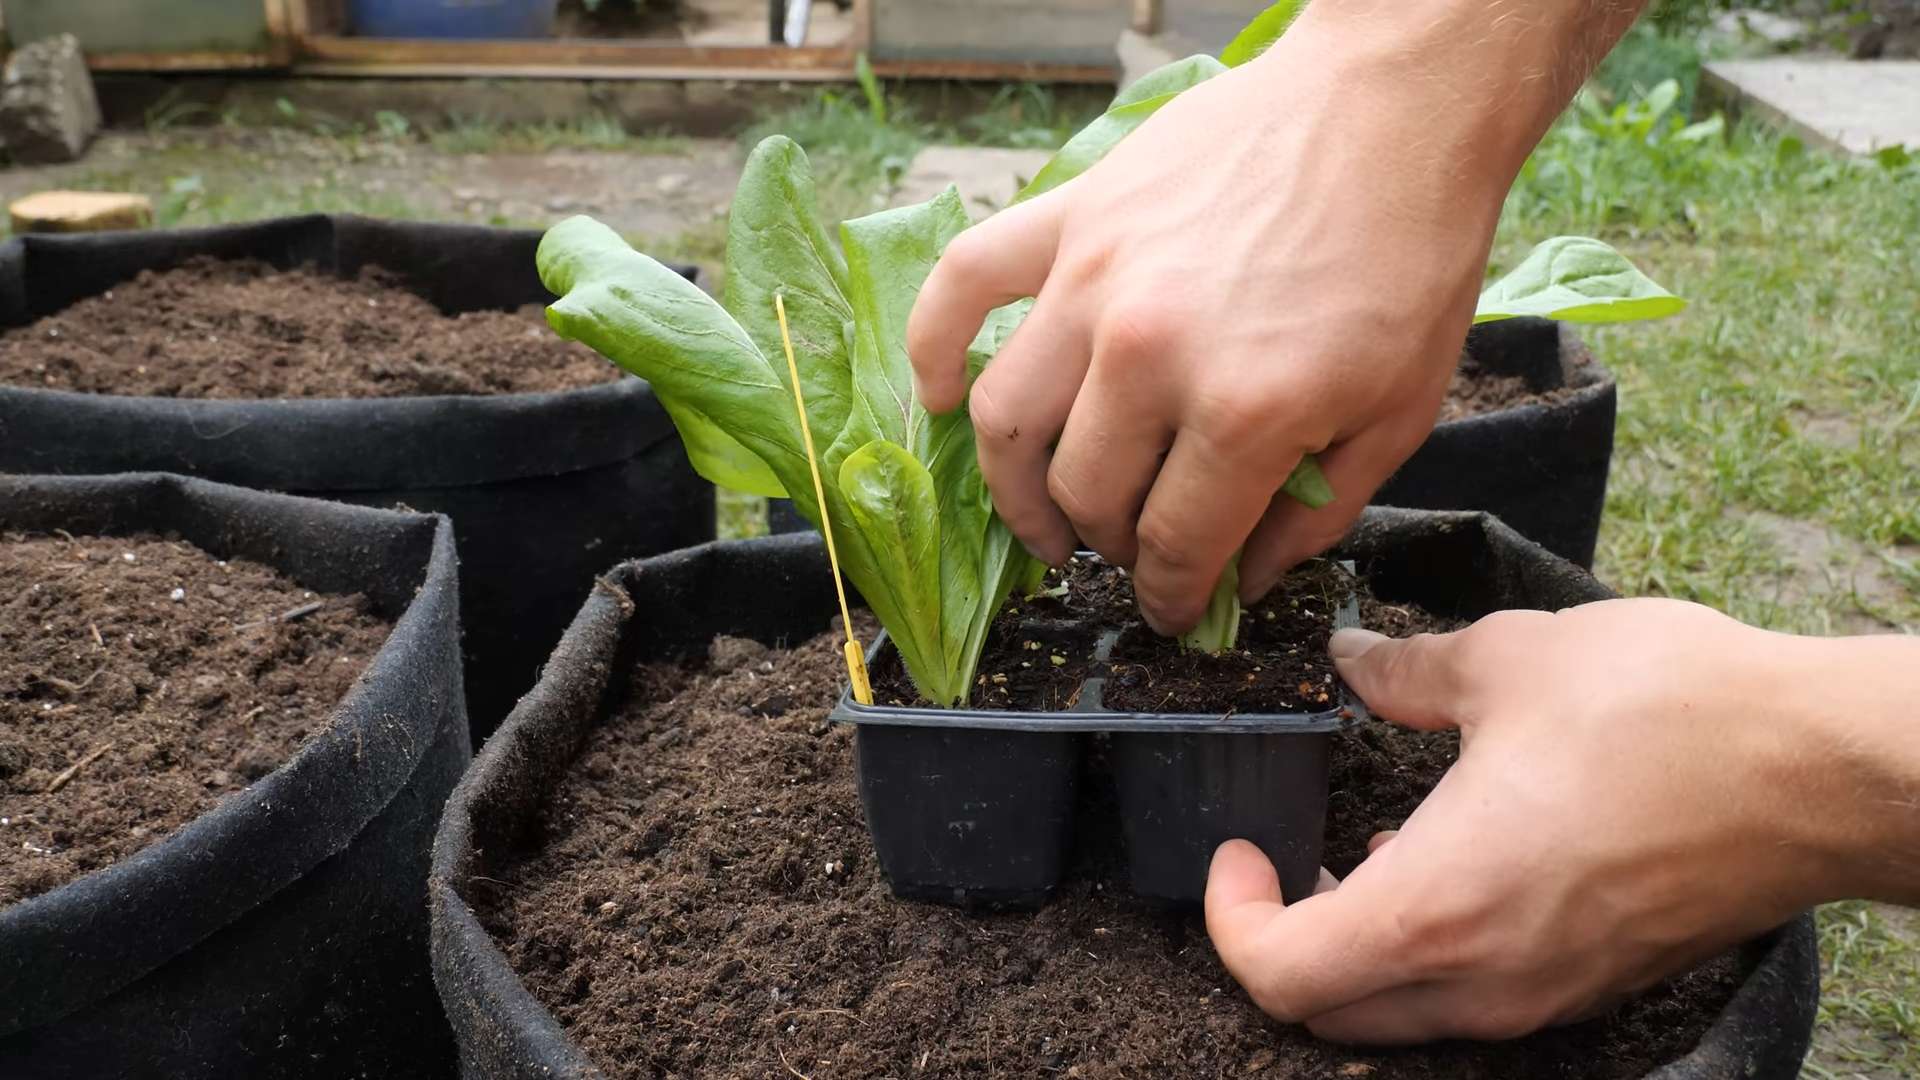
Phase 2: Transplanting Your Seedlings
Once your seedlings have developed a few sets of true leaves (the leaves that look like miniature radicchio leaves, not just the initial seed leaves), it’s time to transplant them into larger pots.
1. **Prepare Your Larger Pots:** Fill your 6-8 inch pots with potting soil. Leave about an inch of space at the top of the pot.
2. **Gently Remove Seedlings:** Carefully remove the seedlings from the seed starting trays. If you planted multiple seeds in one cell, you can gently separate them. Try to disturb the roots as little as possible.
3. **Plant the Seedlings:** Make a small hole in the center of the potting soil in each pot. Place the seedling in the hole and gently backfill with soil. Make sure the top of the root ball is level with the soil surface.
4. **Water Thoroughly:** Water the newly transplanted seedlings thoroughly.
5. **Provide Light and Air Circulation:** Place the pots under your grow lights. Ensure good air circulation by opening a window or using a small fan.
Phase 3: Caring for Your Radicchio Plants
Now that your radicchio plants are in their permanent homes, it’s time to provide them with the care they need to thrive.
1. **Watering:** Water your radicchio plants regularly, keeping the soil consistently moist but not waterlogged. Check the soil moisture by sticking your finger into the soil. If the top inch feels dry, it’s time to water.
2. **Fertilizing:** Feed your radicchio plants with a balanced liquid fertilizer every 2-3 weeks. Follow the instructions on the fertilizer label. I like to use a fertilizer that’s specifically formulated for leafy greens.
3. **Light:** Radicchio needs at least 6-8 hours of light per day. If you’re using grow lights, keep them on for 12-14 hours per day. Adjust the height of the lights as your plants grow to keep them about 2-4 inches above the foliage.
4. **Temperature:** Radicchio prefers cooler temperatures, around 60-70°F (15-21°C). Avoid placing your plants near heat sources.
5. **Air Circulation:** Good air circulation is essential to prevent fungal diseases. Make sure your plants have plenty of space around them and that the air is circulating freely.
6. **Pest Control:** Keep an eye out for pests like aphids and spider mites. If you spot any pests, you can try spraying your plants with insecticidal soap or neem oil.
7. **Blanching (Optional):** Some radicchio varieties benefit from blanching, which helps to reduce bitterness. To blanch, cover the heads of the radicchio plants with a dark cloth or container for a week or two before harvesting.
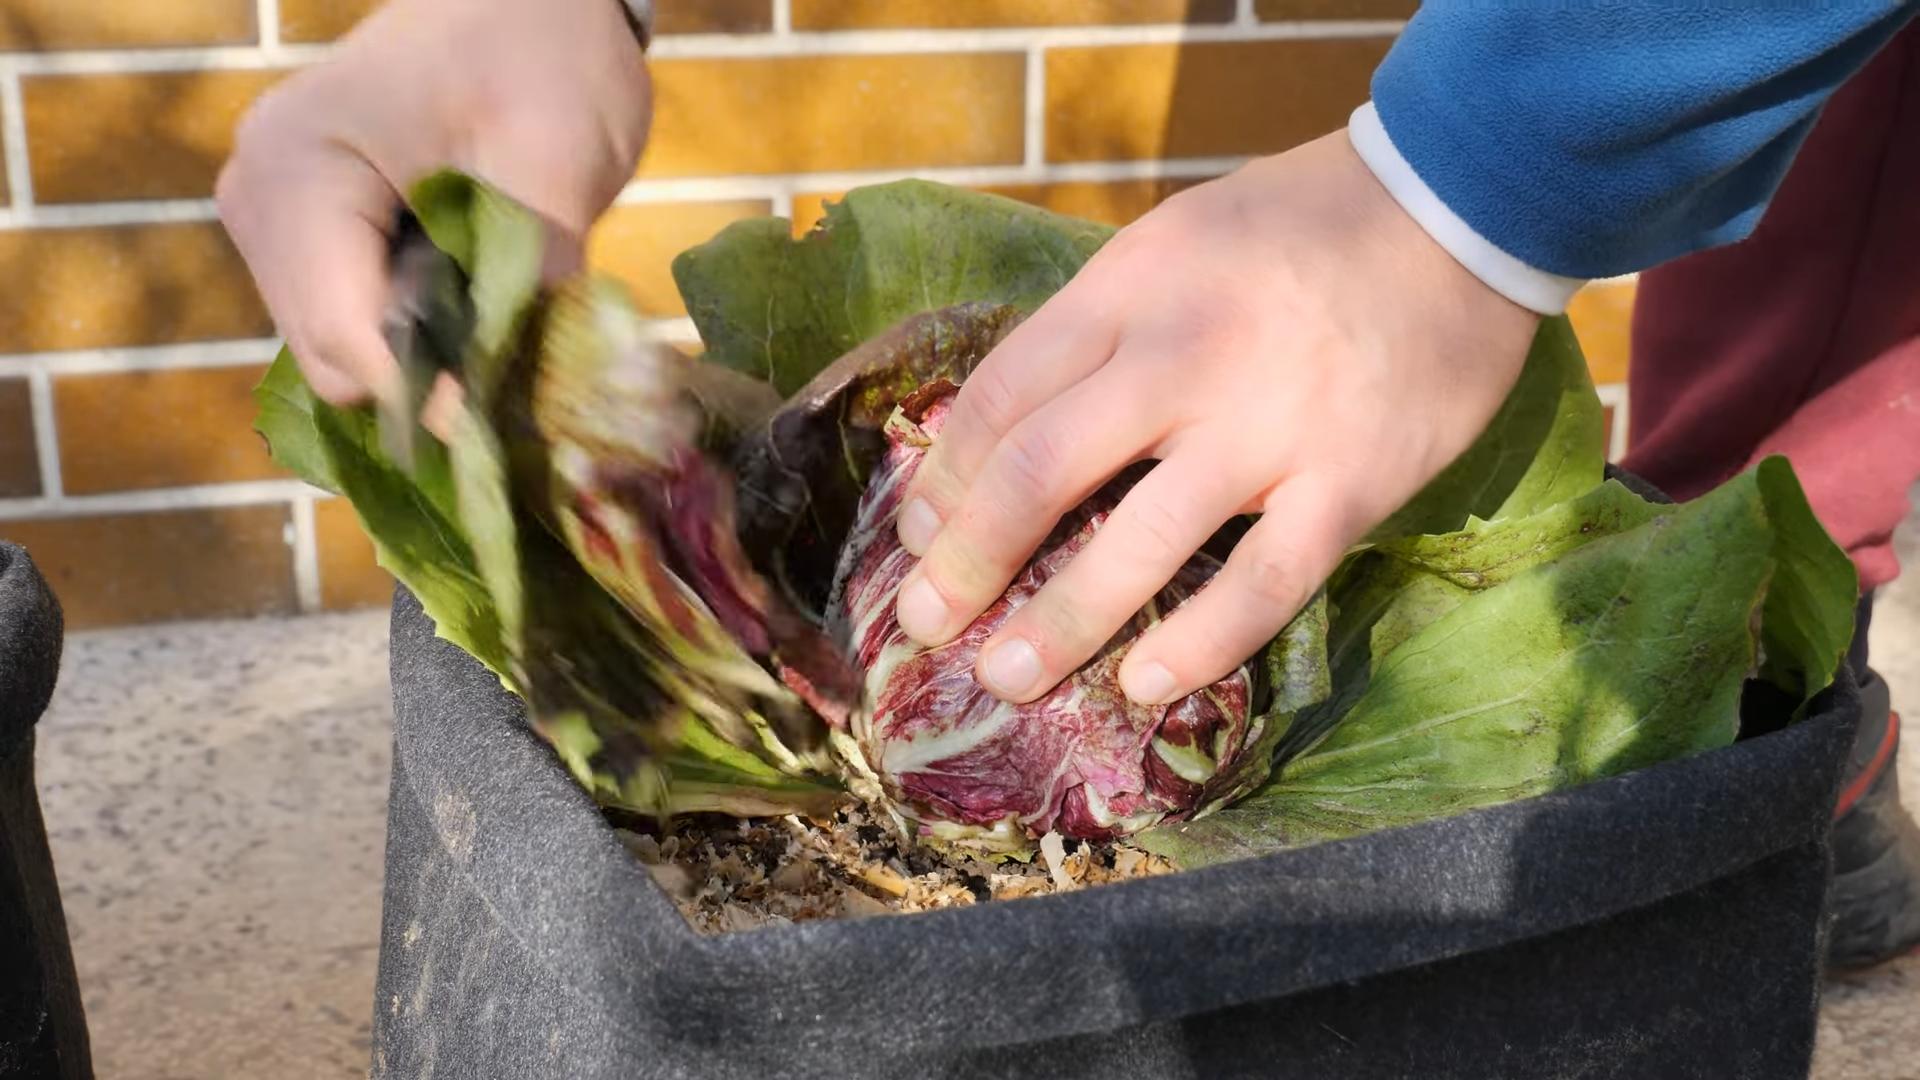
Phase 4: Harvesting Your Radicchio
The moment you’ve been waiting for! Harvesting your own homegrown radicchio is incredibly rewarding.
1. **Harvest Time:** Radicchio is typically ready to harvest in 80-90 days from sowing. The heads should be firm and well-formed.
2. **Harvesting Technique:** Use a sharp knife to cut the radicchio head at the base of the plant.
3. **Enjoy Your Harvest:** Radicchio can be eaten raw in salads, grilled, roasted, or added to soups and stews. Its slightly bitter flavor adds a unique touch to any dish.
Troubleshooting Tips
Even with the best care, you might encounter some challenges along the way. Here are a few common problems and how to solve them:
* **Seeds Not Germinating:** Make sure your seeds are fresh and that the soil is warm and moist. You can also try scarifying the seeds by gently rubbing them with sandpaper before sowing.
* **Leggy Seedlings:** This means your seedlings aren’t getting enough light. Move them closer to your grow lights or provide more natural light.
* **Yellowing Leaves:** This could be a sign of overwatering, underwatering, or nutrient deficiency. Check the soil moisture and adjust your watering accordingly. Fertilize your plants regularly.
* **Bitter Taste:** Some radicchio varieties are naturally more bitter than others. Blanching can help to reduce bitterness.
Choosing the Right Radicchio Variety for Indoors
While you can technically grow any radicchio variety indoors, some are better suited for container gardening than others. Here are a few of my favorites:
* **’Chioggia’:** This is a classic variety with round, tightly packed heads. It’s relatively easy to grow and has a mild, slightly bitter flavor.
* **’Treviso’:** This variety has elongated heads with beautiful red and white leaves. It’s a bit more challenging to grow than ‘Chioggia’, but the flavor is worth the effort.
* **’Castelfranco’:** This variety has loose, open heads with speckled leaves. It’s known for its mild, sweet flavor.
* **’Palla Rossa’:** Similar to Chioggia, this is a reliable and compact variety, making it ideal for smaller indoor spaces.
Extra Tips for Success
* **Rotate Your Crops:** If you’re growing radicchio in the same pots year after year, it’s a good idea to rotate your crops to prevent soilborne diseases.
* **Clean Your Pots:** Before planting, clean your pots with a solution of bleach and water to kill any lingering pathogens.
* **Monitor Your Plants Regularly:** The more closely you monitor your plants, the sooner you’ll be able to spot any problems and take corrective action.
* **Don’t Be Afraid to Experiment:** Gardening is all about learning and experimenting. Don’t be afraid to try new things and see what works best for you.
Growing radicchio indoors can be a fun
Conclusion
So, there you have it! Growing radicchio indoors easily is not just a possibility; it’s a rewarding and surprisingly simple endeavor. Forget the complexities of outdoor gardening and the unpredictable weather patterns. With this straightforward DIY trick, you can enjoy the slightly bitter, beautifully colored leaves of fresh radicchio right from your windowsill, all year round.
Why is this a must-try? Because it puts you in control. You dictate the environment, ensuring optimal growing conditions for your radicchio. No more battling pests, worrying about frost, or contending with poor soil. Plus, the satisfaction of harvesting your own homegrown produce, even in the dead of winter, is an unparalleled feeling. It’s a small act of self-sufficiency that connects you to the food you eat and empowers you to live a more sustainable lifestyle.
But the beauty of this DIY trick lies in its adaptability. Feel free to experiment with different varieties of radicchio. Some, like the Chioggia type, form tight, round heads, while others, like the Treviso type, are more elongated and loose-leafed. Each offers a unique flavor profile and visual appeal. You can also play around with the lighting. While a sunny windowsill is ideal, supplementing with a grow light can significantly boost growth, especially during the darker months. Consider using different types of potting mix to see which yields the best results for you. A well-draining mix is crucial, but you can experiment with adding compost or other organic matter to enrich the soil.
Don’t be afraid to get creative with your containers, either. While a standard pot works perfectly well, you could also repurpose old containers, like plastic tubs or even large yogurt containers, as long as they have drainage holes. This is a great way to reduce waste and add a personal touch to your indoor garden.
And remember, growing radicchio indoors easily isn’t just about the harvest; it’s about the journey. It’s about observing the subtle changes in the plant as it grows, learning about its needs, and nurturing it to maturity. It’s a therapeutic and educational experience that can bring joy and satisfaction to your life.
We wholeheartedly encourage you to give this DIY trick a try. It’s a simple, affordable, and incredibly rewarding way to enjoy fresh, homegrown radicchio, no matter where you live or what the weather is like outside. Once you’ve experienced the joy of harvesting your own radicchio, you’ll never look at store-bought produce the same way again.
But don’t just take our word for it. We want to hear about your experiences! Share your photos, tips, and tricks in the comments below. Let us know what varieties of radicchio you’re growing, what challenges you’ve faced, and what successes you’ve celebrated. Together, we can create a community of indoor radicchio growers, sharing our knowledge and inspiring others to embrace the joys of homegrown produce. So, grab your seeds, your potting mix, and your containers, and get ready to embark on a delicious and rewarding adventure. Happy growing!
Frequently Asked Questions (FAQ)
What kind of radicchio is best for growing indoors?
While you can technically grow any type of radicchio indoors, some varieties are better suited for container gardening than others. Chioggia radicchio, with its compact, round heads, is a popular choice due to its manageable size. Treviso radicchio, with its elongated leaves, can also be grown successfully, but it may require a slightly larger container. Consider also the ‘Palla Rossa’ variety, known for its good flavor and relatively quick growth. Ultimately, the best variety for you will depend on your personal preferences and the space you have available. Experimenting with different types is part of the fun!
How much light does radicchio need indoors?
Radicchio thrives in bright light. A south-facing windowsill is ideal, providing at least six hours of direct sunlight per day. If you don’t have access to a sunny windowsill, you can supplement with a grow light. Fluorescent or LED grow lights are both excellent options. Position the light a few inches above the plants and keep it on for 12-14 hours per day. Insufficient light can lead to leggy growth and poor head formation.
What kind of soil should I use for growing radicchio indoors?
Radicchio prefers well-draining soil that is rich in organic matter. A good potting mix specifically formulated for vegetables is a great starting point. You can also amend your potting mix with compost or other organic matter to improve its fertility and drainage. Avoid using garden soil, as it can be too heavy and may contain pests or diseases. The ideal pH for radicchio is between 6.0 and 7.0.
How often should I water my indoor radicchio plants?
Water your radicchio plants regularly, keeping the soil consistently moist but not waterlogged. Check the soil moisture level by sticking your finger into the soil. If the top inch feels dry, it’s time to water. Avoid overwatering, as this can lead to root rot. Ensure your containers have adequate drainage holes to prevent water from pooling at the bottom. During warmer months, you may need to water more frequently.
How do I fertilize my indoor radicchio plants?
Radicchio is a relatively light feeder, but it will benefit from regular fertilization. Use a balanced liquid fertilizer, diluted to half strength, every two to three weeks. Alternatively, you can use a slow-release fertilizer at planting time. Avoid over-fertilizing, as this can lead to excessive leaf growth and poor head formation. Look for fertilizers specifically formulated for leafy greens.
How long does it take to grow radicchio indoors?
The time it takes to grow radicchio indoors depends on the variety, growing conditions, and your starting method (seeds or transplants). Generally, you can expect to harvest your first leaves in about 50-60 days from seed. Transplants will mature more quickly, typically in 30-40 days. Keep in mind that these are just estimates, and your results may vary.
How do I harvest radicchio indoors?
You can harvest radicchio leaves as soon as they are large enough to use. For loose-leaf varieties, simply snip off the outer leaves as needed, allowing the inner leaves to continue growing. For head-forming varieties, you can harvest the entire head when it is firm and well-formed. Cut the head at the base of the plant, leaving about an inch of stem.
What pests and diseases affect indoor radicchio?
While indoor radicchio is generally less susceptible to pests and diseases than outdoor radicchio, it can still be affected by common problems such as aphids, spider mites, and fungal diseases. Inspect your plants regularly for signs of infestation or disease. If you spot any problems, treat them promptly with an appropriate organic pesticide or fungicide. Good air circulation and proper watering practices can help prevent many common problems.
Can I grow radicchio indoors year-round?
Yes, you can grow radicchio indoors year-round, provided you provide adequate light and temperature. Radicchio prefers cooler temperatures, ideally between 60 and 70 degrees Fahrenheit. If your home is too warm, you may need to provide additional ventilation or cooling. Supplemental lighting is essential during the darker months to ensure optimal growth.
What can I do with my homegrown radicchio?
Radicchio is a versatile vegetable that can be used in a variety of dishes. It can be eaten raw in salads, grilled or roasted as a side dish, or added to soups and stews. Its slightly bitter flavor pairs well with sweet and savory ingredients. Try it in a salad with citrus fruits and walnuts, or grill it with balsamic vinegar and olive oil. The possibilities are endless!

Leave a Comment