
Grow Watermelon at Home – imagine biting into a juicy, sweet, homegrown watermelon on a hot summer day! Sounds idyllic, right? For centuries, watermelons have been a symbol of summer, refreshment, and community gatherings. Originating in Africa, these delightful fruits have traveled the globe, becoming a beloved treat in countless cultures. But you don’t need acres of farmland to enjoy this summertime staple. I’m here to tell you that you can absolutely cultivate your own watermelons, even if you only have a small backyard or patio!
Many people believe that growing watermelons is only for experienced farmers, but I’m about to debunk that myth. This DIY guide is packed with simple, effective tricks and hacks that will empower you to grow watermelon at home successfully. We’ll cover everything from seed selection and soil preparation to pollination and pest control. Why spend a fortune at the grocery store when you can harvest your own delicious, organic watermelons? Plus, there’s nothing quite like the satisfaction of nurturing a plant from seed to fruit. Let’s get started and transform your space into a watermelon wonderland!
Growing Strawberries From Seed: A Comprehensive DIY Guide
Okay, strawberry lovers! So, you want to grow your own strawberries from seed? It’s a bit more challenging than buying starter plants, but trust me, the satisfaction of nurturing those tiny seeds into juicy red berries is totally worth it. Plus, you get access to varieties you might not find at your local garden center. Let’s dive in!
Why Grow Strawberries From Seed?
Before we get started, let’s quickly touch on why you might choose to grow strawberries from seed instead of buying established plants.
* Variety: You’ll have access to a wider range of strawberry varieties, including heirloom and alpine types.
* Cost-Effective: Seeds are generally cheaper than starter plants, especially if you’re planning to grow a large number of strawberries.
* Control: You have complete control over the growing process from the very beginning, ensuring your plants are healthy and disease-free.
* Personal Satisfaction: There’s just something incredibly rewarding about growing your own food from seed!
Phase 1: Seed Starting – Getting Those Tiny Seeds to Sprout
This is arguably the most crucial part. Strawberry seeds need a cold stratification period to break dormancy and germinate successfully. Don’t skip this step!
1. Gather Your Supplies:
* Strawberry seeds (choose your variety wisely!)
* Seed starting trays or small pots
* Seed starting mix (a fine, sterile mix is essential)
* Spray bottle filled with water
* Plastic wrap or a humidity dome
* Refrigerator
* Grow lights (optional, but highly recommended)
* Small labels and a marker
2. Cold Stratification (The Fridge Trick):
* Moisten the seed starting mix. It should be damp, not soaking wet.
* Fill your seed starting trays or pots with the moistened mix.
* Sow the strawberry seeds on the surface of the soil. Don’t bury them too deep; they need light to germinate. Gently press them into the soil.
* Lightly mist the surface with water using your spray bottle.
* Cover the trays or pots with plastic wrap or a humidity dome to create a humid environment.
* Label each tray or pot with the strawberry variety and the date.
* Place the trays or pots in the refrigerator for 4-6 weeks. This cold period mimics winter and helps the seeds break dormancy. Make sure the temperature is consistently between 33-40°F (0-4°C).
3. Germination Time (Warmth and Light):
* After the cold stratification period, remove the trays or pots from the refrigerator.
* Place them in a warm location with bright, indirect light. A south-facing windowsill can work, but grow lights are ideal for consistent results.
* Remove the plastic wrap or humidity dome for a few hours each day to allow for air circulation and prevent mold growth.
* Keep the soil consistently moist, but not waterlogged. Mist the surface with water as needed.
* Be patient! Strawberry seeds can be slow to germinate. It may take 2-4 weeks for seedlings to emerge.
4. Caring for Seedlings:
* Once the seedlings emerge, provide them with plenty of light. If you’re using grow lights, position them a few inches above the seedlings.
* Water gently whenever the soil surface feels dry. Avoid overwatering, which can lead to damping-off disease.
* Thin the seedlings if necessary, leaving only the strongest one in each cell or pot.
* Once the seedlings have developed a few sets of true leaves, you can start fertilizing them with a diluted liquid fertilizer. Follow the instructions on the fertilizer label.
Phase 2: Transplanting and Growing On
Now that you have healthy strawberry seedlings, it’s time to transplant them into larger pots and eventually into your garden or containers.
1. Hardening Off (Preparing for the Outdoors):
* Before transplanting your seedlings outdoors, you need to “harden them off.” This process gradually acclimates them to outdoor conditions.
* Start by placing the seedlings outdoors in a sheltered location for a few hours each day.
* Gradually increase the amount of time they spend outdoors each day, exposing them to more sunlight and wind.
* After about a week or two, the seedlings should be ready to be transplanted into their final growing location.
2. Choosing a Location (Sun and Soil):
* Strawberries need at least 6-8 hours of sunlight per day. Choose a location that receives plenty of sun.
* The soil should be well-draining and rich in organic matter. Amend the soil with compost or other organic materials before planting.
* Strawberries prefer slightly acidic soil with a pH between 5.5 and 6.5. You can test your soil pH with a soil testing kit.
3. Transplanting into Larger Pots (If Necessary):
* If your seedlings are still in small seed starting trays, transplant them into larger pots (4-6 inches in diameter) before planting them in the garden.
* Gently remove the seedlings from their cells or pots, being careful not to damage the roots.
* Plant them in the larger pots, burying the crown (the point where the roots meet the stem) at soil level.
* Water thoroughly after transplanting.
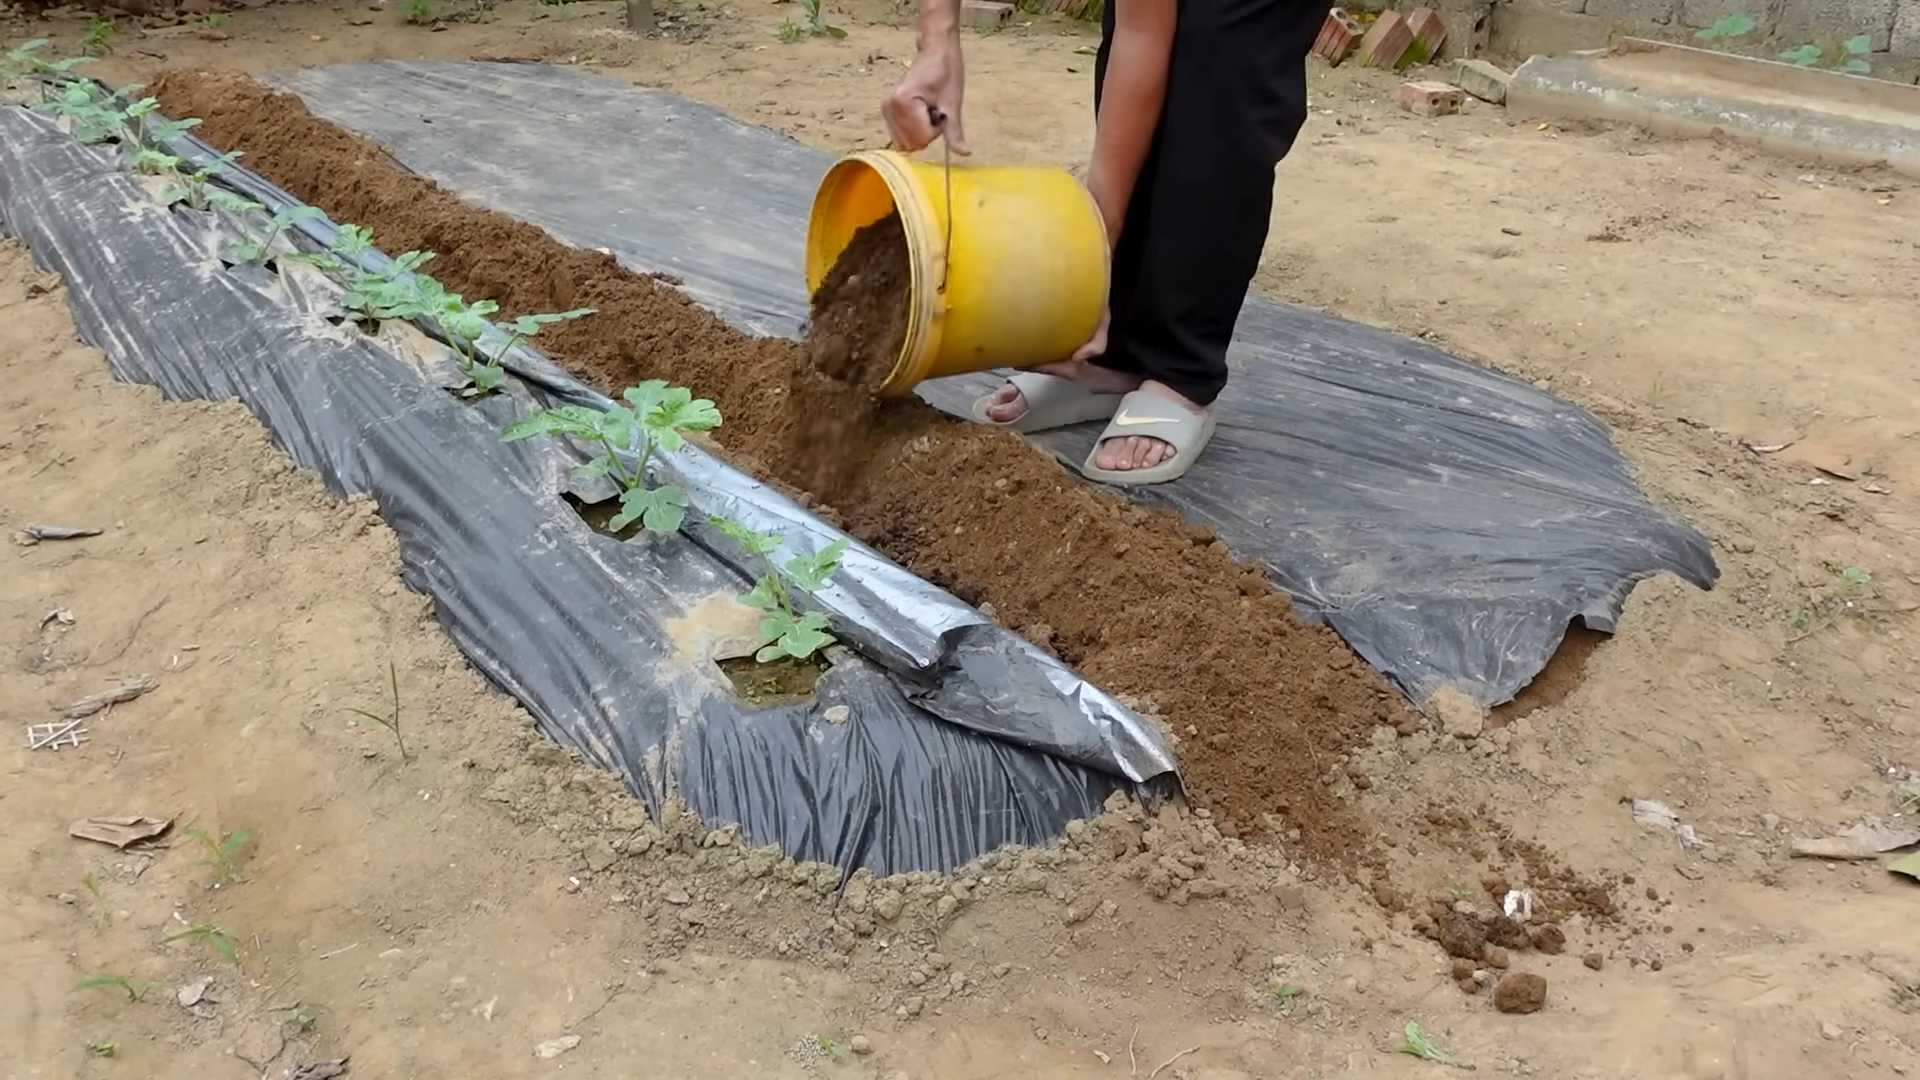
4. Planting in the Garden or Containers:
* Space strawberry plants about 12-18 inches apart in rows that are 2-3 feet apart.
* If you’re growing strawberries in containers, choose pots that are at least 12 inches in diameter.
* Plant the seedlings at the same depth they were growing in their previous pots, burying the crown at soil level.
* Water thoroughly after planting.
Phase 3: Ongoing Care – Keeping Your Strawberries Happy
Once your strawberries are planted, they’ll need regular care to thrive and produce delicious berries.
1. Watering:
* Water your strawberry plants regularly, especially during dry periods.
* Aim to keep the soil consistently moist, but not waterlogged.
* Water at the base of the plants to avoid wetting the foliage, which can lead to fungal diseases.
2. Fertilizing:
* Fertilize your strawberry plants regularly with a balanced fertilizer.
* Follow the instructions on the fertilizer label.
* Avoid over-fertilizing, which can lead to excessive foliage growth and fewer berries.
3. Mulching:
* Mulch around your strawberry plants with straw, wood chips, or other organic materials.
* Mulch helps to retain moisture, suppress weeds, and keep the berries clean.
4. Weeding:
* Keep your strawberry patch free of weeds. Weeds compete with strawberries for nutrients and water.
* Hand-pull weeds regularly or use a hoe to cultivate the soil.
5. Pest and Disease Control:
* Monitor your strawberry plants regularly for pests and diseases.
* Common strawberry pests include aphids, spider mites, and slugs.
* Common strawberry diseases include powdery mildew, gray mold, and leaf spot.
* Treat pests and diseases promptly with appropriate organic or chemical controls.
6. Removing Runners:
* Strawberry plants produce runners, which are horizontal stems that grow along the ground and produce new plants.
* If you want to encourage berry production, remove the runners regularly.
* If you want to propagate new strawberry plants, allow the runners to root in small pots filled with soil.
7. Winter Protection:
* In cold climates, protect your strawberry plants from winter damage by covering them with straw or other insulating materials.
* This will help to prevent the plants from freezing and dying.
Phase 4: Harvesting and Enjoying Your Strawberries
The moment you’ve been waiting for! Harvesting your own homegrown strawberries is one of life’s simple pleasures.
1. When to Harvest:
* Strawberries are ready to harvest when they are fully red and slightly soft to the touch.
* The berries should also detach easily from the plant.
2. How to Harvest:
* Gently grasp the berry and twist it off the plant, leaving a small piece of the stem attached.
* Avoid pulling or yanking the berries, which can damage the plant.
3. Storing Strawberries:
* Freshly harvested strawberries are best eaten immediately.
* If you need to store them, keep them in the refrigerator in a single layer.
* Do not wash the strawberries until you are ready to eat them.
4. Enjoying Your Harvest:
* Eat your strawberries fresh, add them to smoothies, bake them
Conclusion
So, there you have it! Growing watermelon at home, while it might seem daunting at first, is absolutely achievable with a little patience, the right techniques, and a whole lot of sunshine. We’ve walked you through the essential steps, from selecting the perfect variety for your climate to nurturing those precious seedlings and finally, harvesting your own juicy, homegrown treasure.
Why is this DIY trick a must-try? Because the satisfaction of biting into a watermelon you’ve personally cultivated is unparalleled. It’s a connection to nature, a testament to your gardening skills, and a guarantee of fresh, flavorful fruit free from the uncertainties of store-bought produce. You know exactly what went into growing it, ensuring a healthy and delicious treat for you and your family. Plus, let’s be honest, bragging rights are definitely part of the appeal!
But the journey doesn’t end here. Feel free to experiment with different watermelon varieties. Perhaps try a smaller, personal-sized melon like ‘Sugar Baby’ if you’re short on space, or go bold with a yellow-fleshed variety for a unique twist. Consider companion planting with herbs like basil or marigolds to deter pests and enhance the flavor of your watermelon. You can also explore different trellising methods to maximize space and improve air circulation, especially if you’re growing in a smaller garden.
Don’t be afraid to adapt the techniques we’ve discussed to suit your specific environment and resources. Gardening is all about learning and adapting. The most important thing is to get started and embrace the process.
We wholeheartedly encourage you to give this DIY trick a try. Imagine the joy of sharing your homegrown watermelon with friends and family at your next summer barbecue. Picture the smiles on their faces as they savor the sweet, refreshing taste of your labor.
And most importantly, we want to hear about your experience! Share your successes, your challenges, and any tips or tricks you discover along the way. Post photos of your growing watermelons on social media using #HomegrownWatermelon or tag us in your posts. Let’s create a community of watermelon enthusiasts and inspire others to embark on this rewarding gardening adventure. Growing watermelon at home is not just about the fruit; it’s about the journey, the connection to nature, and the joy of sharing your harvest. So, grab your seeds, get your hands dirty, and get ready to enjoy the sweetest reward of all!
Frequently Asked Questions (FAQ)
Q: What is the best time to start growing watermelon seeds?
A: The ideal time to start watermelon seeds depends on your climate. Generally, you should start seeds indoors about 6-8 weeks before the last expected frost. Watermelons need warm weather to thrive, so ensure the soil temperature is consistently above 70°F (21°C) before transplanting seedlings outdoors. If you live in a warmer climate with a longer growing season, you can directly sow seeds into the ground after the last frost. Check your local weather forecasts and planting guides for the most accurate timing for your region.
Q: How much space do watermelons need to grow?
A: Watermelons are sprawling plants and require a significant amount of space. Each plant typically needs at least 4-6 feet of space in all directions. If you’re growing multiple plants, space them 2-3 feet apart in rows that are 8-10 feet apart. For smaller gardens, consider growing bush or dwarf varieties, or using trellises to support the vines vertically. Trellising not only saves space but also improves air circulation and reduces the risk of fungal diseases.
Q: What type of soil is best for growing watermelons?
A: Watermelons prefer well-drained, sandy loam soil that is rich in organic matter. The soil should have a pH between 6.0 and 6.8. Before planting, amend the soil with compost or well-rotted manure to improve its fertility and drainage. Avoid heavy clay soils, as they can retain too much moisture and lead to root rot. If you have clay soil, consider growing watermelons in raised beds or containers filled with a suitable potting mix.
Q: How often should I water my watermelon plants?
A: Watermelons need consistent moisture, especially during fruit development. Water deeply and regularly, aiming for about 1-2 inches of water per week. Water at the base of the plant to avoid wetting the foliage, which can encourage fungal diseases. During hot, dry periods, you may need to water more frequently. Use a soil moisture meter or simply check the soil with your finger to determine if it’s time to water. Reduce watering as the fruits ripen to concentrate the sugars and improve their flavor.
Q: What are some common pests and diseases that affect watermelons?
A: Common pests that can affect watermelons include aphids, squash bugs, cucumber beetles, and vine borers. Diseases include powdery mildew, fusarium wilt, and anthracnose. Regularly inspect your plants for signs of pests or diseases. Use organic pest control methods such as insecticidal soap, neem oil, or handpicking pests. Ensure good air circulation and avoid overhead watering to prevent fungal diseases. Choose disease-resistant varieties whenever possible.
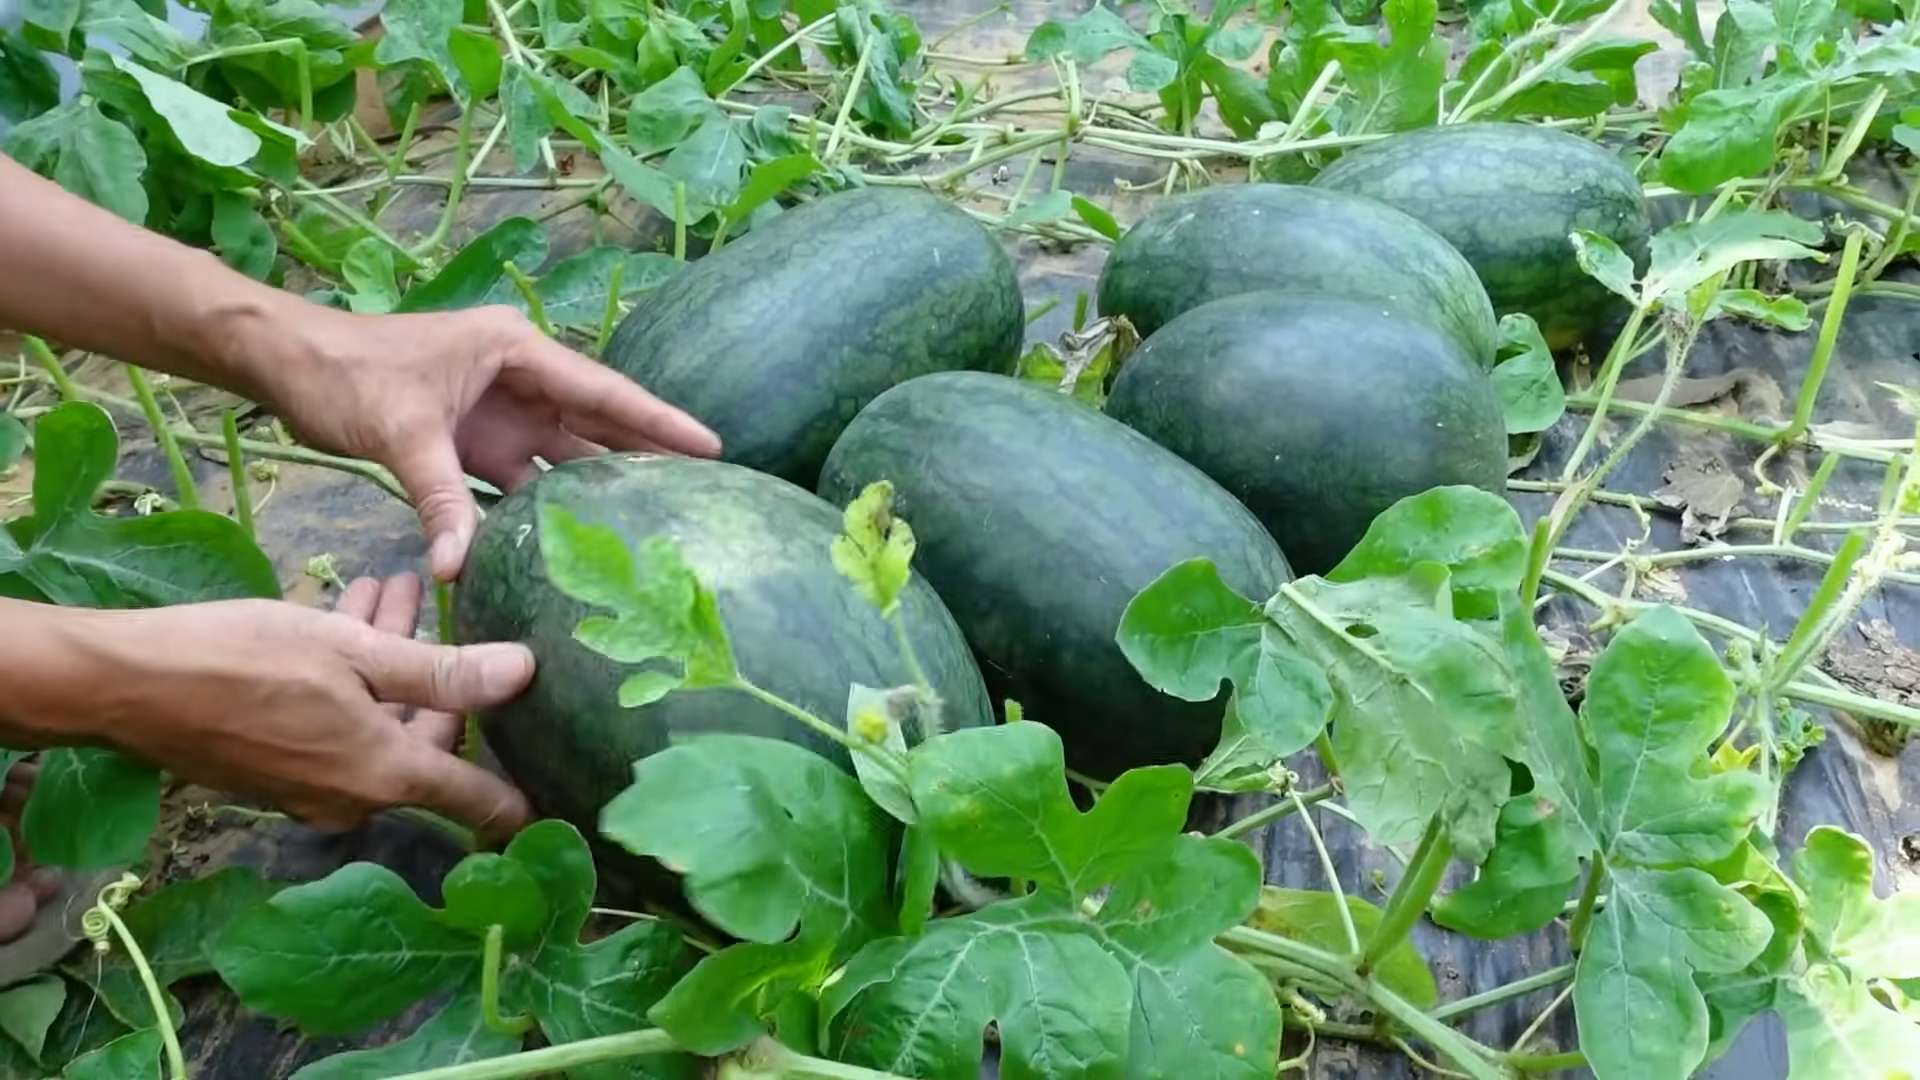
Q: How do I know when my watermelon is ripe?
A: Determining when a watermelon is ripe can be tricky, but there are several indicators to look for. The tendril closest to the fruit should be brown and dry. The underside of the watermelon, where it rests on the ground (the “ground spot”), should be yellow or cream-colored. The watermelon should also sound hollow when you thump it. With practice, you’ll develop a feel for the right sound. Finally, the skin should be dull rather than shiny.
Q: Can I grow watermelons in containers?
A: Yes, you can grow watermelons in containers, but you’ll need a large container (at least 20 gallons) and a bush or dwarf variety. Ensure the container has good drainage and use a high-quality potting mix. Water container-grown watermelons more frequently than those grown in the ground, as the soil in containers tends to dry out faster. You may also need to provide support for the vines, such as a trellis or stake.
Q: How can I improve the sweetness of my watermelons?
A: Several factors can influence the sweetness of watermelons. Choose a variety known for its sweetness. Ensure the plants receive plenty of sunlight (at least 6-8 hours per day). Provide adequate water and nutrients, but avoid over-fertilizing with nitrogen, which can promote leafy growth at the expense of fruit development. Reduce watering as the fruits ripen to concentrate the sugars. Finally, harvest the watermelons at the peak of ripeness.
Q: What are some good companion plants for watermelons?
A: Companion planting can benefit watermelons by deterring pests, attracting pollinators, and improving soil health. Good companion plants for watermelons include marigolds, nasturtiums, basil, oregano, and rosemary. These herbs can help repel pests like aphids and squash bugs. Flowers like sunflowers and zinnias attract pollinators, which are essential for fruit set. Legumes like beans and peas can fix nitrogen in the soil, benefiting the watermelon plants.
Q: My watermelon plant is producing flowers, but no fruit. What could be the problem?
A: There are several reasons why your watermelon plant might be producing flowers but no fruit. One common reason is a lack of pollination. Watermelons require pollination to set fruit. Ensure there are plenty of pollinators in your garden, such as bees and butterflies. You can also hand-pollinate the flowers by transferring pollen from the male flowers to the female flowers using a small brush. Other possible causes include nutrient deficiencies, insufficient sunlight, and stress from pests or diseases.
Leave a Comment