
Grow Winter Red Radish, even when the frosty winds howl! Have you ever dreamt of plucking vibrant, peppery radishes from your own garden in the dead of winter? It sounds like a fairytale, right? But I’m here to tell you it’s absolutely achievable with a few clever tricks and a dash of DIY spirit.
Radishes, with their crisp texture and zesty bite, have been cultivated for centuries, dating back to ancient Egypt and Greece. They were prized not only for their flavor but also for their medicinal properties. Today, we often think of them as a spring crop, but the ‘Winter Red’ variety is specifically bred to thrive in cooler temperatures, offering a burst of freshness when other garden staples are dormant.
Why bother with a winter radish garden? Well, imagine adding a pop of color and flavor to your winter salads and dishes when everything else is looking a bit drab. Plus, growing your own food, even in a small space, is incredibly rewarding. It connects you to nature, reduces your reliance on store-bought produce, and gives you the satisfaction of knowing exactly where your food comes from. This DIY guide will equip you with the knowledge and simple techniques you need to successfully grow Winter Red Radish, bringing a touch of spring to your winter table. Let’s get started!
Grow Your Own Winter Red Radishes: A DIY Guide
Hey there, fellow gardening enthusiasts! Ever dreamt of adding a vibrant pop of color and a peppery kick to your winter salads? Well, dream no more! I’m going to walk you through the surprisingly simple process of growing your own winter red radishes. These little gems are incredibly rewarding, offering a quick harvest and a burst of flavor when you need it most. Let’s get our hands dirty!
Choosing the Right Radish Variety
Not all radishes are created equal, especially when it comes to winter growing. We need to select varieties that are specifically bred for cooler temperatures and shorter days.
* Cherry Belle: A classic, reliable choice. These mature quickly and have a mild, slightly sweet flavor.
* French Breakfast: These elongated radishes have a delicate flavor and are perfect for snacking.
* Sparkler: Another fast-growing option with a crisp texture and mild taste.
* Black Spanish Round: For a bolder flavor and longer storage, consider these. They take a bit longer to mature but are well worth the wait.
I personally love the Cherry Belle for its speed and versatility, but feel free to experiment and find your favorite!
Preparing Your Growing Space
Radishes are pretty adaptable, but they thrive in well-drained soil and need at least six hours of sunlight per day. Here’s how to get your growing space ready:
* Soil Preparation: Radishes prefer loose, fertile soil. If your soil is heavy clay, amend it with plenty of compost or well-rotted manure. This will improve drainage and provide essential nutrients. I usually dig in about 2-3 inches of compost.
* Sunlight: Choose a location that receives ample sunlight, even during the shorter winter days. A south-facing spot is ideal.
* Container Gardening (Optional): If you don’t have a garden bed, radishes grow beautifully in containers. Use a pot that’s at least 6 inches deep and has drainage holes.
* Raised Beds (Optional): Raised beds are fantastic for winter gardening as they warm up faster than the ground and offer better drainage.
Planting Your Radish Seeds
Now for the fun part! Planting radish seeds is a breeze.
1. Timing is Key: For a winter harvest, sow your radish seeds about 4-6 weeks before the first expected frost. Check your local frost dates to determine the best time to plant. I usually start mine in late September or early October.
2. Sowing the Seeds: Create shallow furrows about ½ inch deep and 1 inch apart. Sprinkle the radish seeds evenly along the furrows.
3. Cover and Water: Gently cover the seeds with soil and water thoroughly. Keep the soil consistently moist until the seeds germinate.
4. Thinning: Once the seedlings emerge (usually within 4-7 days), thin them to about 1-2 inches apart. This will give the radishes enough space to develop properly. Don’t be afraid to snip off the extra seedlings; overcrowding can lead to small, misshapen radishes.
Caring for Your Radishes
Radishes are relatively low-maintenance, but here are a few tips to ensure a successful harvest:
* Watering: Keep the soil consistently moist, but avoid overwatering. Soggy soil can lead to root rot. I usually water every 2-3 days, depending on the weather.
* Weeding: Regularly remove any weeds that pop up around your radishes. Weeds compete for nutrients and can stunt their growth.
* Fertilizing (Optional): If your soil is particularly poor, you can give your radishes a boost with a diluted liquid fertilizer. I prefer using a fish emulsion or seaweed extract.
* Protecting from Frost: If you experience a sudden cold snap, protect your radishes with a row cover or blanket. This will help prevent frost damage.
Dealing with Pests and Diseases
Radishes are generally pest-resistant, but here are a few potential problems to watch out for:
* Flea Beetles: These tiny beetles can create small holes in the leaves. Cover your radishes with a row cover to prevent flea beetle infestations.
* Root Maggots: These larvae can tunnel into the roots, causing them to rot. Rotate your crops regularly and avoid planting radishes in the same spot year after year.
* Downy Mildew: This fungal disease can cause yellow spots on the leaves. Improve air circulation by thinning your plants and avoid overhead watering.
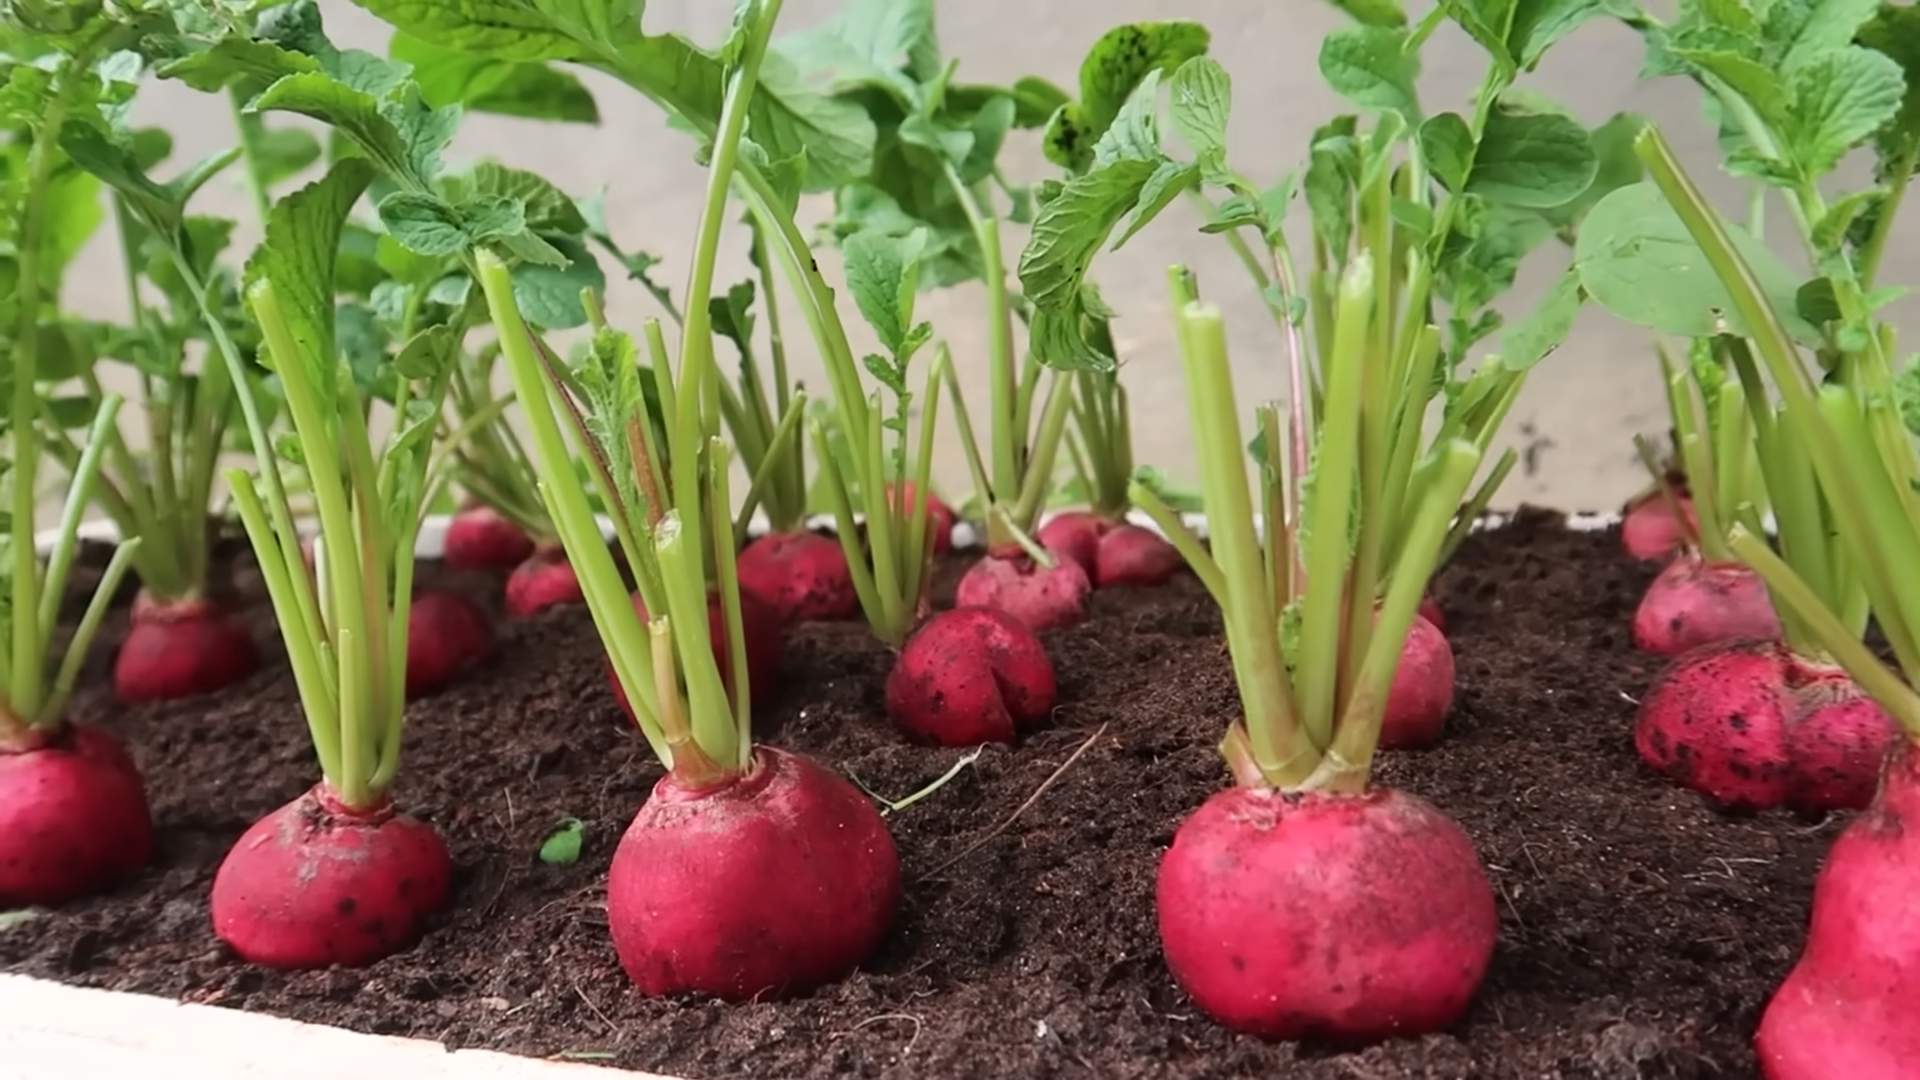
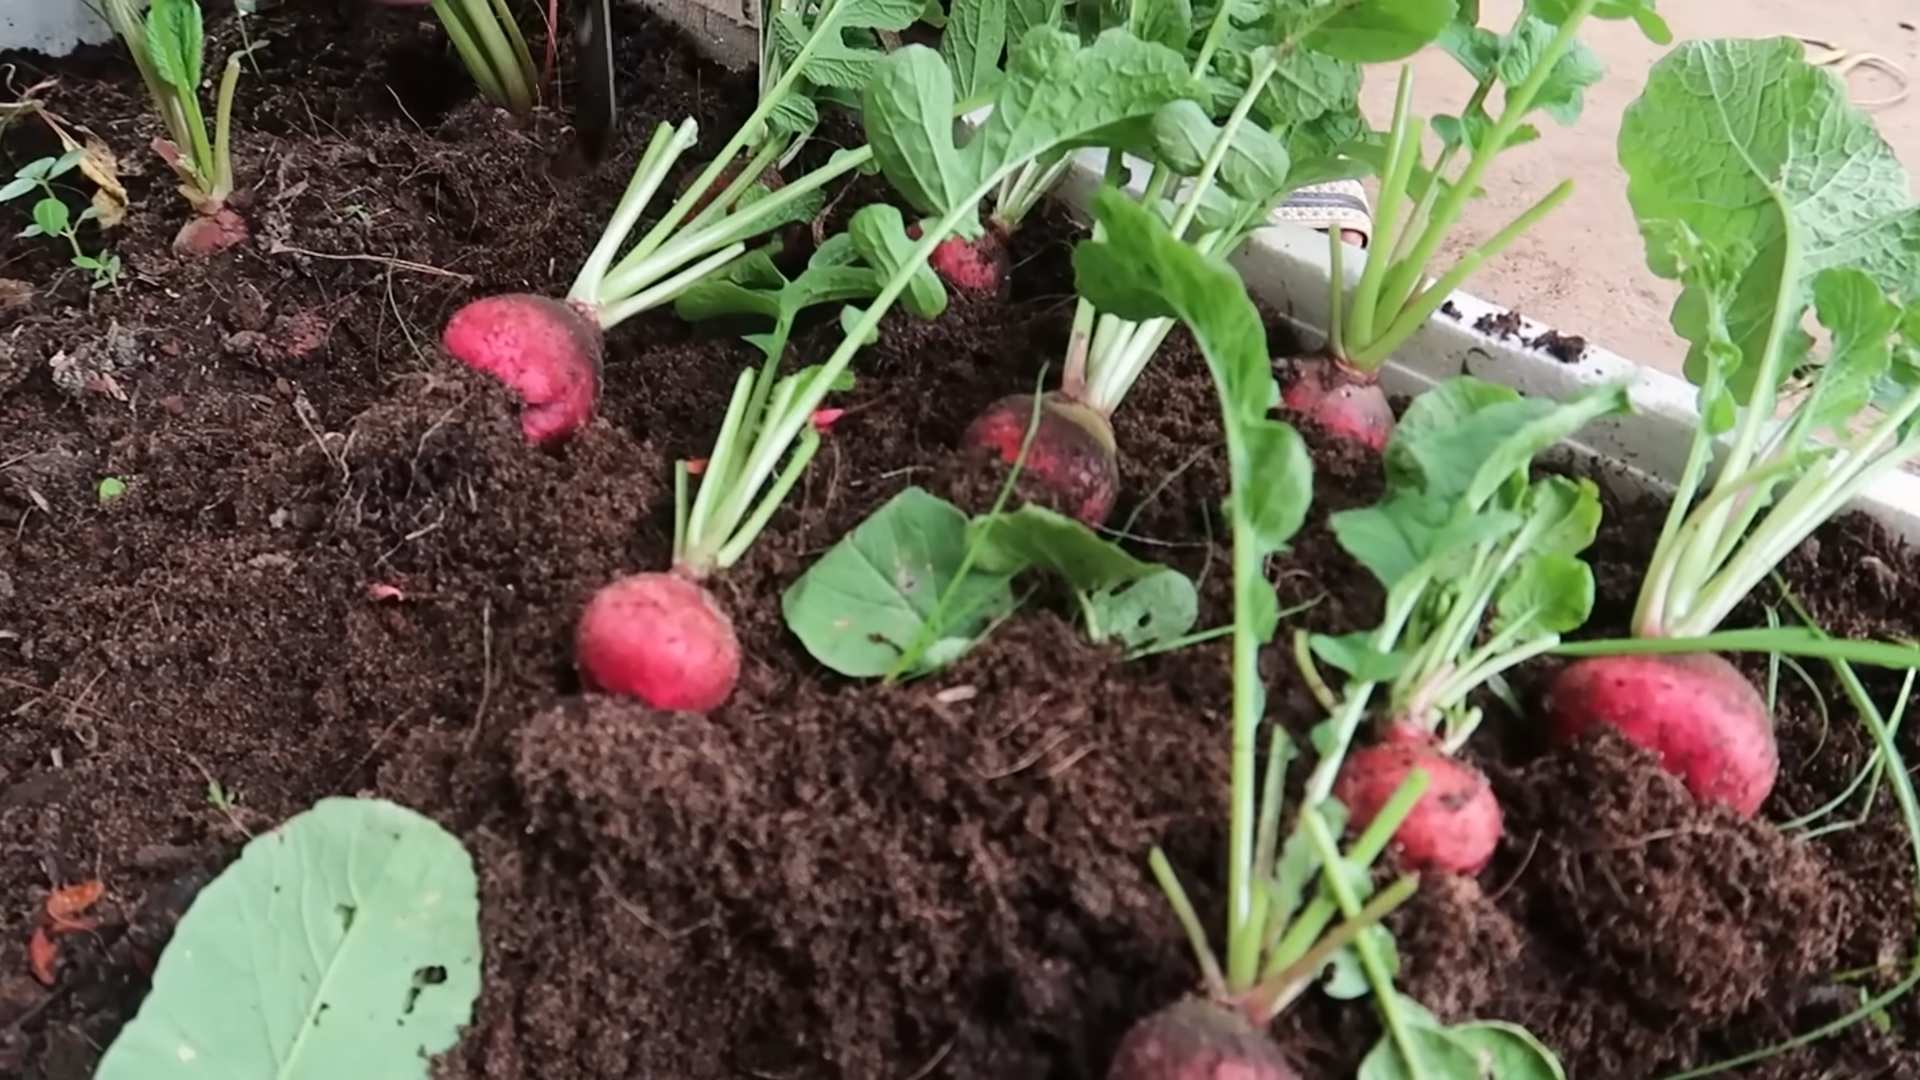
Harvesting Your Radishes
The best part! Radishes are incredibly fast-growing, and you can usually harvest them within 3-4 weeks of planting.
1. Check for Size: Gently brush away the soil around the base of the radish to check its size. Most varieties are ready to harvest when they are about 1 inch in diameter.
2. Pull Gently: Grasp the radish leaves near the base and gently pull the radish out of the soil. If it’s stubborn, loosen the soil around it with a trowel.
3. Wash and Store: Wash the radishes thoroughly and remove the leaves. Store them in a plastic bag in the refrigerator for up to a week.
Extending Your Harvest
Want to keep the radish goodness coming all winter long? Here are a few tips:
* Succession Planting: Sow a new batch of radish seeds every 1-2 weeks to ensure a continuous harvest.
* Cold Frames: If you live in a colder climate, consider using a cold frame to extend your growing season.
* Indoor Growing: Radishes can also be grown indoors under grow lights. This is a great option if you don’t have a garden or if you want to enjoy fresh radishes year-round.
Troubleshooting
Sometimes, things don’t go exactly as planned. Here are a few common problems and how to fix them:
* Radishes are small and skinny: This is usually caused by overcrowding or poor soil. Thin your plants and amend the soil with compost.
* Radishes are cracked: This can be caused by inconsistent watering. Keep the soil consistently moist, but avoid overwatering.
* Radishes are too spicy: This can be caused by hot weather or dry soil. Water regularly and provide some shade during the hottest part of the day.
* Radishes are all leaves and no root: This is often due to too much nitrogen in the soil. Avoid using high-nitrogen fertilizers.
Radish Recipes to Enjoy
Now that you’ve harvested your beautiful winter red radishes, it’s time to enjoy them! Here are a few of my favorite ways to use them:
* Salads: Thinly sliced radishes add a peppery crunch to any salad.
* Snacks: Serve radishes with butter and sea salt for a simple and delicious snack.
* Pickled Radishes: These are a tangy and flavorful addition to sandwiches and tacos.
* Radish Greens: Don’t throw away the radish greens! They are edible and can be used in salads, soups, or stir-fries.
Bonus Tip: Saving Radish Seeds
If you want to save seeds from your radishes for next year, allow a few plants to bolt (flower). Once the seed pods are dry and brown, harvest them and store them in a cool, dry place.
Conclusion
Growing winter red radishes is a fun and rewarding experience. With a little bit of planning and care, you can enjoy a fresh and flavorful harvest all winter long. So, grab your seeds, get your hands dirty, and start growing! Happy gardening!
Conclusion
So, there you have it! Growing winter red radishes at home is not only achievable but also incredibly rewarding. Forget bland, store-bought radishes that lack that peppery punch. With this simple DIY trick, you can cultivate vibrant, crisp, and flavorful radishes right in your own backyard, even when the weather turns chilly.
Why is this a must-try? Because it puts you in control. You control the soil, the watering, and the overall environment, resulting in a superior product compared to anything you can find at the grocery store. Plus, there’s an undeniable satisfaction in harvesting something you’ve nurtured from seed to table. Imagine the pride you’ll feel serving a salad featuring your own homegrown winter red radishes!
But the benefits don’t stop there. Growing your own radishes is also a sustainable choice. You’re reducing your carbon footprint by eliminating transportation costs and packaging waste. You’re also ensuring that your radishes are free from harmful pesticides and herbicides, giving you peace of mind about what you’re putting into your body.
Ready to take your radish game to the next level? Consider these variations:
* Succession Planting: Plant a new batch of seeds every two weeks to ensure a continuous harvest throughout the winter.
* Companion Planting: Plant your radishes alongside carrots, lettuce, or spinach. They can help deter pests and improve soil health.
* Container Gardening: If you don’t have a garden, you can still grow radishes in containers on your balcony or patio. Just make sure to choose a pot that’s at least 6 inches deep.
* Experiment with Varieties: While we’ve focused on winter red radishes, there are many other varieties you can try, such as French Breakfast radishes or Black Spanish radishes. Each has its own unique flavor and texture.
* Radish Greens: Don’t throw away the radish greens! They’re packed with nutrients and can be used in salads, soups, or stir-fries.
This DIY trick for growing winter red radishes is more than just a gardening project; it’s an investment in your health, your taste buds, and the environment. It’s a chance to connect with nature, learn new skills, and enjoy the fruits (or rather, the roots) of your labor.
So, what are you waiting for? Grab some seeds, prepare your soil, and get ready to experience the joy of growing your own winter red radishes. We’re confident that you’ll be amazed by the results.
We encourage you to try this DIY trick and share your experience with us! Post photos of your radish harvest on social media using #HomegrownRadishes and tag us so we can see your success. We’re eager to hear your tips, tricks, and any variations you’ve tried. Let’s build a community of radish enthusiasts and inspire others to grow their own food!
Frequently Asked Questions (FAQ)
What is the best time to plant winter red radishes?
The ideal time to plant winter red radishes is typically in late summer or early fall, about 4-6 weeks before the first expected frost. This allows them enough time to mature before the coldest part of winter sets in. Check your local frost dates to determine the optimal planting window for your region. Planting too early can result in bolting (premature flowering), while planting too late may not give them enough time to develop properly.
What kind of soil is best for growing winter red radishes?
Winter red radishes thrive in well-drained, loose soil that is rich in organic matter. Amend your soil with compost or well-rotted manure before planting to improve its fertility and drainage. Radishes prefer a slightly acidic to neutral soil pH, ideally between 6.0 and 7.0. Avoid heavy clay soils, as they can restrict root growth and lead to misshapen radishes. If you have clay soil, consider growing your radishes in raised beds or containers with a suitable potting mix.
How much sunlight do winter red radishes need?
Winter red radishes need at least 6 hours of sunlight per day to grow properly. Choose a planting location that receives full sun, especially during the shorter days of winter. If you’re growing them indoors under grow lights, ensure that the lights are positioned close enough to the plants to provide adequate illumination. Insufficient sunlight can result in leggy growth and smaller radishes.
How often should I water my winter red radishes?
Keep the soil consistently moist, but not waterlogged. Water deeply whenever the top inch of soil feels dry to the touch. Avoid letting the soil dry out completely, as this can cause the radishes to become tough and bitter. Overwatering, on the other hand, can lead to root rot. Adjust your watering schedule based on the weather conditions and the type of soil you have.
Do I need to fertilize my winter red radishes?
Radishes are relatively light feeders and don’t require heavy fertilization. However, a light application of a balanced fertilizer at planting time can help promote healthy growth. Avoid using fertilizers that are high in nitrogen, as this can encourage leafy growth at the expense of root development. You can also side-dress your radishes with compost tea or diluted fish emulsion every few weeks to provide them with a boost of nutrients.
How long does it take for winter red radishes to mature?
Winter red radishes typically mature in about 30-40 days, depending on the variety and growing conditions. Check the seed packet for specific maturity dates. You can start harvesting them when they reach the desired size, usually about 1 inch in diameter. Don’t let them grow too large, as they can become woody and bitter.
What are some common pests and diseases that affect winter red radishes?
Common pests that can affect winter red radishes include flea beetles, root maggots, and aphids. Flea beetles can be controlled with row covers or insecticidal soap. Root maggots can be prevented by using crop rotation and covering the soil with netting. Aphids can be washed off with a strong stream of water or treated with insecticidal soap. Diseases that can affect radishes include damping-off and root rot. Prevent these diseases by using well-drained soil and avoiding overwatering.
Can I grow winter red radishes indoors?
Yes, you can grow winter red radishes indoors, especially if you live in an area with harsh winters. Choose a sunny windowsill or use grow lights to provide adequate illumination. Use a well-draining potting mix and a container that is at least 6 inches deep. Keep the soil consistently moist and fertilize lightly every few weeks.
How do I store winter red radishes after harvesting?
After harvesting, remove the radish greens and store them separately. Wash the radishes thoroughly and pat them dry. Store them in a plastic bag in the refrigerator for up to two weeks. The radish greens can be stored in a separate plastic bag in the refrigerator for up to a week.
Why are my winter red radishes cracking?
Cracking in radishes is often caused by inconsistent watering. If the soil dries out and then is suddenly saturated, the radishes can absorb water too quickly, causing them to crack. To prevent this, ensure consistent watering and avoid letting the soil dry out completely. Mulching around the plants can also help retain moisture in the soil.
Can I eat the radish greens?
Yes, radish greens are edible and nutritious! They have a peppery flavor similar to the radishes themselves. You can use them in salads, soups, stir-fries, or as a garnish. Make sure to wash them thoroughly before using.
Leave a Comment