
Growing Brussel Sprouts in Pots might seem like a challenge reserved for seasoned gardeners with sprawling acres, but I’m here to tell you it’s totally achievable, even if your “garden” is a sunny balcony or a small patio! For centuries, Brussel sprouts have been a staple in European cuisine, with their cultivation dating back to 13th-century Belgium – hence the name. These mini cabbages were traditionally grown in large fields, but times have changed, and so have our gardening methods.
Are you tired of bland, store-bought Brussel sprouts that lack that fresh, slightly nutty flavor? Do you dream of harvesting your own delicious, homegrown veggies but lack the space for a traditional garden? That’s where this DIY guide comes in! I’m going to share my tried-and-true secrets for successfully growing Brussel Sprouts in Pots.
This isn’t just about saving money; it’s about connecting with nature, enjoying the satisfaction of nurturing your own food, and savoring the unparalleled taste of freshly picked Brussel sprouts. Plus, it’s a fantastic way to add some greenery to your living space. So, grab your gardening gloves, and let’s get started on this exciting journey of growing your own delicious Brussel sprouts, right in the comfort of your home!
Growing Brussels Sprouts in Pots: A Complete DIY Guide
Hey there, fellow gardening enthusiasts! I’m so excited to share my experience growing Brussels sprouts in pots. It might seem daunting, but trust me, with a little patience and the right know-how, you can enjoy fresh, homegrown Brussels sprouts even if you don’t have a sprawling garden. I’ve learned a lot through trial and error, and I’m here to guide you through every step.
Choosing the Right Pot and Soil
Before we even think about seeds, let’s talk about the foundation of our Brussels sprouts adventure: the pot and the soil.
* Pot Size Matters: Brussels sprouts need room to grow, both above and below the soil. I recommend a pot that’s at least 12 inches in diameter and 12 inches deep, but bigger is always better! A 15-gallon container is ideal. This gives the roots plenty of space to spread out and support the plant’s growth.
* Drainage is Key: Make sure your pot has drainage holes. Brussels sprouts hate sitting in soggy soil, which can lead to root rot. If your pot doesn’t have enough drainage, you can drill a few extra holes.
* Soil Selection: Forget garden soil! It’s too heavy and compacts easily in pots. Instead, opt for a high-quality potting mix. I prefer a mix that’s specifically formulated for vegetables, as it usually contains the right balance of nutrients. You can also amend a general-purpose potting mix with compost for added fertility and drainage.
Starting from Seed or Seedlings
You have two options here: starting from seed or buying seedlings. Both have their pros and cons.
* Starting from Seed: This is the more economical option, and it gives you more control over the entire growing process. However, it requires more time and attention.
* Buying Seedlings: This is the easier option, especially if you’re short on time or new to gardening. Just make sure you choose healthy-looking seedlings with no signs of disease or pests.
Planting Your Brussels Sprouts
Okay, now for the fun part! Let’s get those Brussels sprouts planted.
Starting from Seed:
1. Sow Seeds Indoors (6-8 weeks before the last frost): Fill small pots or seed trays with seed-starting mix. Sow the seeds about ½ inch deep and water gently. Keep the soil consistently moist but not soggy.
2. Provide Light: Place the seed trays in a warm, sunny location or under grow lights. Brussels sprouts need plenty of light to germinate and grow strong.
3. Harden Off Seedlings: Once the seedlings have developed a few sets of true leaves, it’s time to harden them off. This means gradually exposing them to outdoor conditions over a period of a week or two. Start by placing them outside for an hour or two each day, gradually increasing the amount of time they spend outdoors.
4. Transplant Seedlings: Once the danger of frost has passed and the seedlings are hardened off, you can transplant them into your pots. Dig a hole that’s slightly larger than the root ball of the seedling. Gently remove the seedling from its container and place it in the hole. Backfill with potting mix and water thoroughly. Space seedlings about 18-24 inches apart if planting multiple plants in a large container.
Planting Seedlings:
1. Prepare the Pot: Fill your pot with potting mix, leaving a few inches of space at the top.
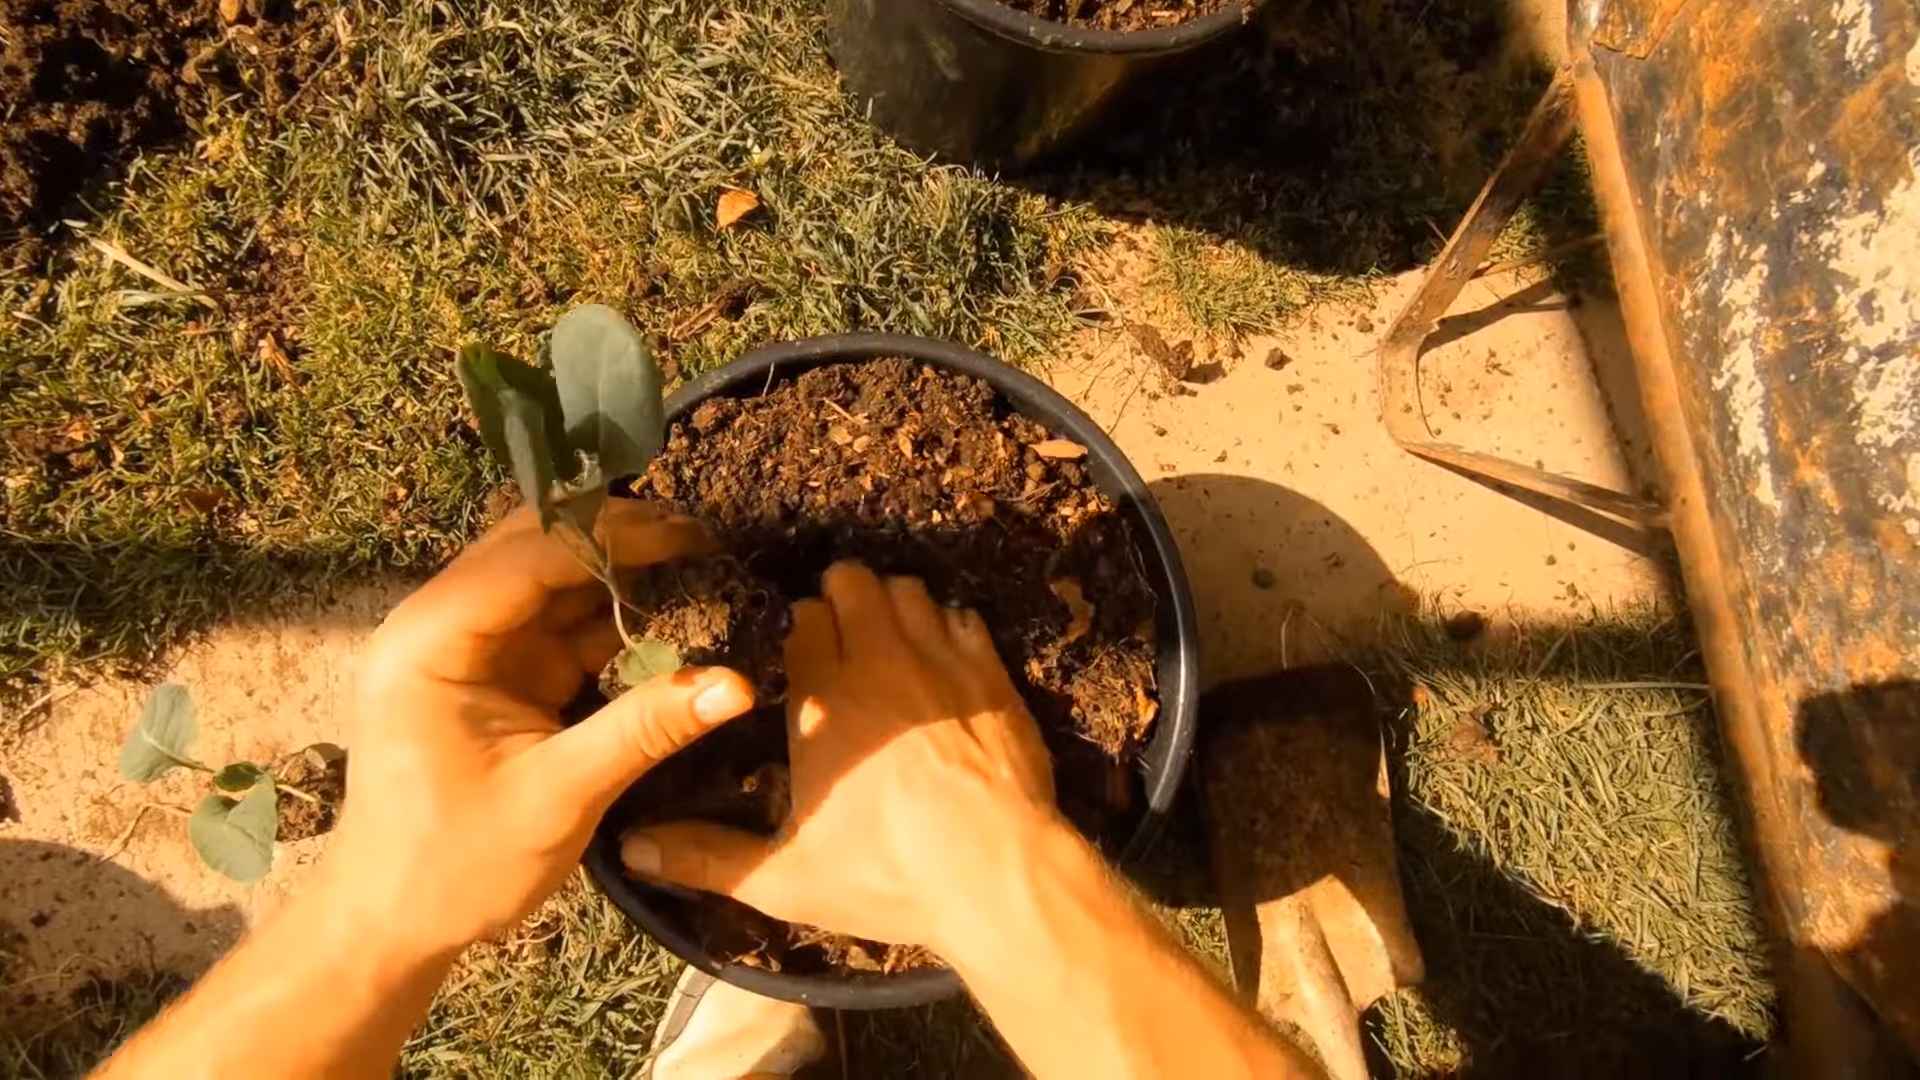
2. Remove Seedling from Container: Gently remove the seedling from its container, being careful not to damage the roots.
3. Plant the Seedling: Dig a hole in the potting mix that’s slightly larger than the root ball of the seedling. Place the seedling in the hole and backfill with potting mix. Gently firm the soil around the base of the plant.
4. Water Thoroughly: Water the seedling thoroughly after planting.
Caring for Your Brussels Sprouts
Now that your Brussels sprouts are planted, it’s time to provide them with the care they need to thrive.
* Watering: Brussels sprouts need consistent moisture, especially during hot weather. Water deeply whenever the top inch of soil feels dry to the touch. Avoid overwatering, as this can lead to root rot. I usually check the soil moisture every day or two.
* Fertilizing: Brussels sprouts are heavy feeders, so they need regular fertilization. I like to use a balanced liquid fertilizer every two to three weeks. You can also amend the soil with compost or aged manure for added nutrients.
* Sunlight: Brussels sprouts need at least six hours of sunlight per day. Place your pots in a sunny location where they’ll receive plenty of light.
* Pest Control: Keep an eye out for pests like aphids, cabbage worms, and flea beetles. I prefer to use organic pest control methods, such as insecticidal soap or neem oil. You can also handpick pests off the plants.
* Support: As your Brussels sprouts grow, they may need support to prevent them from falling over. You can use stakes or cages to provide support. I’ve found that bamboo stakes work well.
* Remove Yellowing Leaves: As the plant grows, the lower leaves may turn yellow and die. Remove these leaves to improve air circulation and prevent disease.
Dealing with Common Problems
Even with the best care, you might encounter some problems along the way. Here are a few common issues and how to deal with them:
* Aphids: These tiny pests can suck the sap from your plants, causing them to weaken and become distorted. Spray them with insecticidal soap or neem oil.
* Cabbage Worms: These green caterpillars can devour the leaves of your Brussels sprouts. Handpick them off the plants or use Bacillus thuringiensis (Bt), a natural insecticide.
* Flea Beetles: These tiny beetles can create small holes in the leaves of your Brussels sprouts. Cover the plants with row covers or spray them with insecticidal soap.
* Clubroot: This fungal disease can cause the roots of your Brussels sprouts to become swollen and distorted. Prevent clubroot by planting in well-drained soil and avoiding planting brassicas (like cabbage, broccoli, and cauliflower) in the same spot year after year.
* Buttoning: This occurs when the Brussels sprouts form small, loose heads instead of tight, compact sprouts. Buttoning can be caused by stress, such as lack of water or nutrients. Make sure your plants are getting enough water and fertilizer.
Harvesting Your Brussels Sprouts
The moment we’ve all been waiting for! Harvesting your homegrown Brussels sprouts.
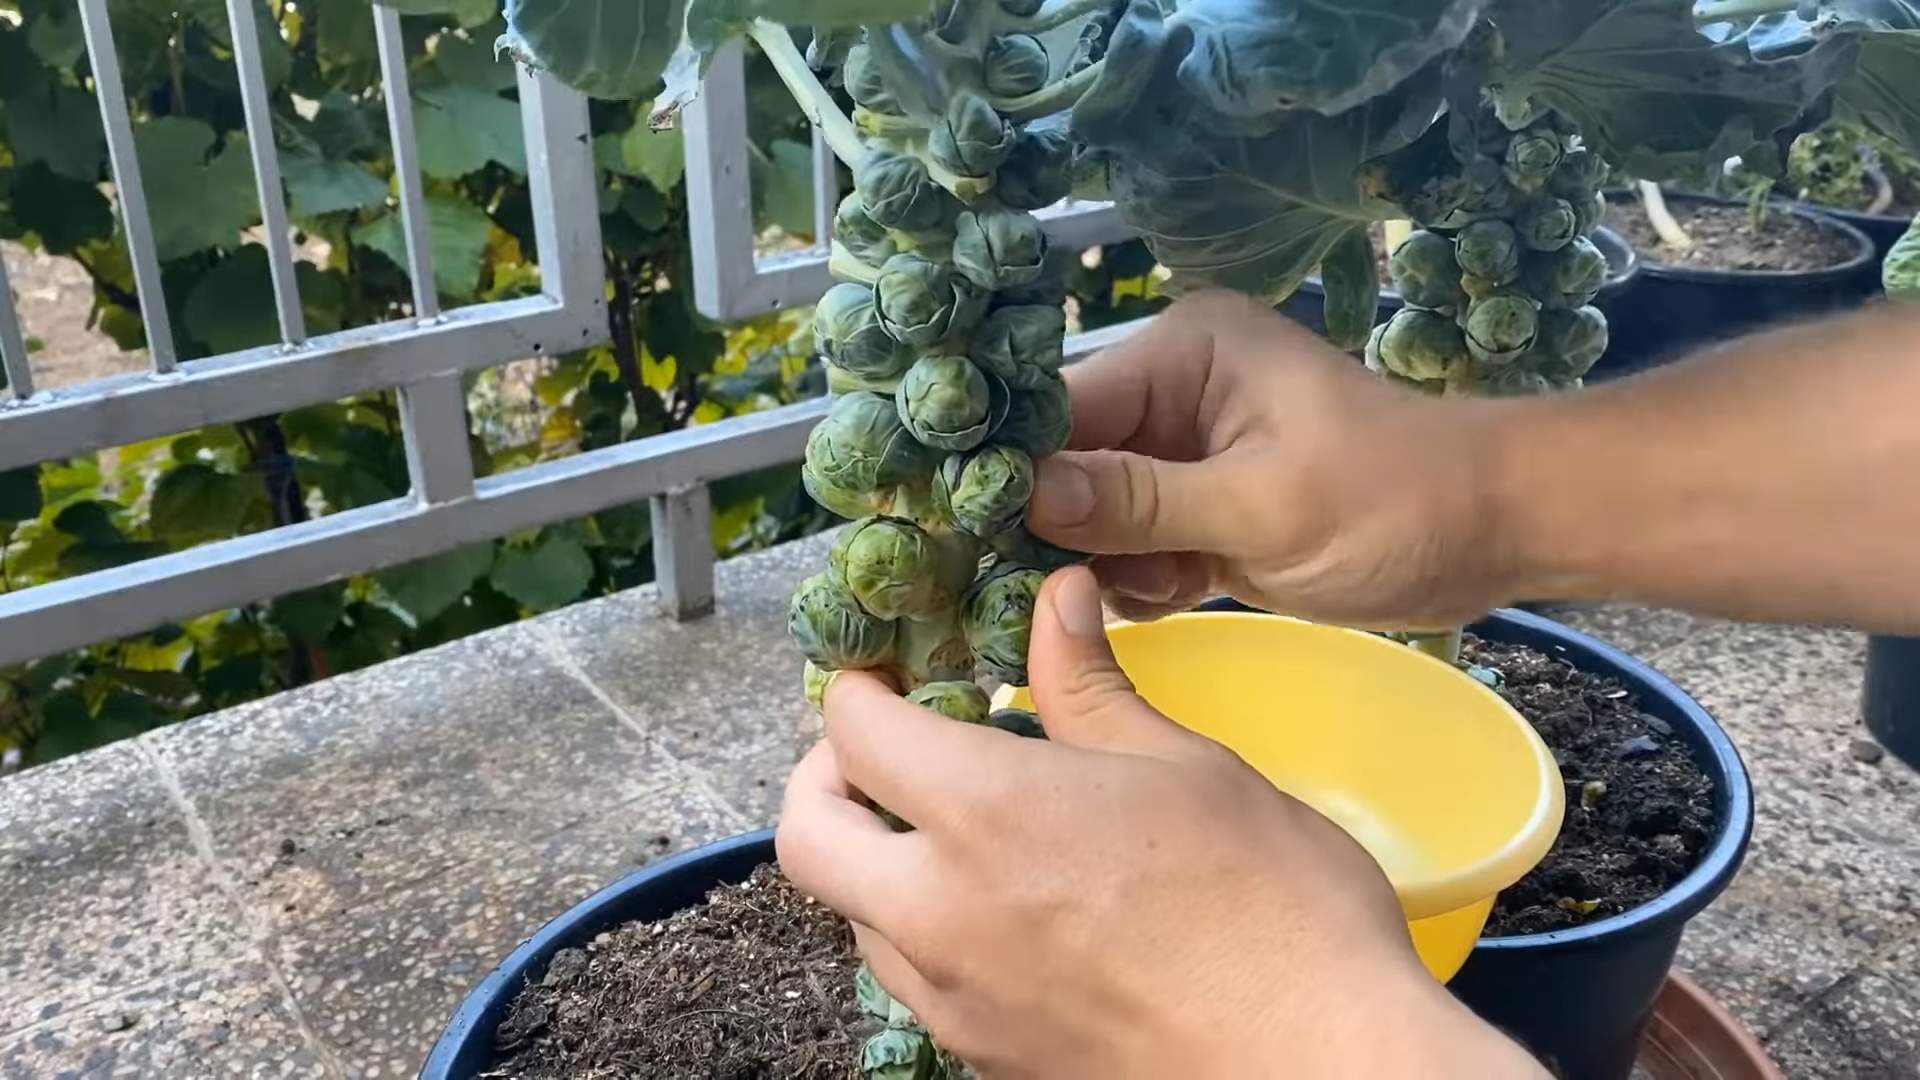
* Timing is Key: Brussels sprouts are typically ready to harvest in the fall or early winter, after they’ve been exposed to a few frosts. The sprouts should be firm and about 1-2 inches in diameter.
* Harvesting Technique: Start harvesting from the bottom of the plant, working your way up. Twist the sprouts off the stem. You can also remove the leaves below the sprouts to encourage further growth.
* Storage: Brussels sprouts can be stored in the refrigerator for up to a week. For longer storage, you can freeze them.
Extending the Growing Season
If you live in a colder climate, you can extend the growing season by using row covers or a cold frame. These structures will protect your plants from frost and allow you to harvest Brussels sprouts for a longer period of time. I’ve used row covers with great success!
Choosing the Right Variety
There are many different varieties of Brussels sprouts to choose from, each with its own unique characteristics. Some popular varieties include:
* ‘Long Island Improved’: A classic variety that produces small, tight sprouts.
* ‘Jade Cross’: A hybrid variety that’s known for its high yields and disease resistance.
* ‘Diablo’: A red Brussels sprout variety that’s both beautiful and delicious.
* ‘Royal Marvel’: A variety that produces large, uniform sprouts.
I encourage you to experiment with different varieties to find the ones that you like best.
Troubleshooting Tips
Here are a few extra tips to help you troubleshoot any problems you might encounter:
* If your Brussels sprouts are not forming sprouts: Make sure they’re getting enough sunlight and fertilizer. Also, check for pests and diseases.
* If your Brussels sprouts are bitter: This can be caused by overwatering or lack of sunlight. Make sure your plants are getting the right amount of water and sunlight.
* If your Brussels sprouts are loose and leafy: This can be caused by buttoning. Make sure your plants are getting enough water and fertilizer.
Final Thoughts
Growing Brussels sprouts in pots is a rewarding experience. With a little bit of effort, you can enjoy fresh, homegrown Brussels sprouts all season long. Don’t be afraid to experiment and learn from your mistakes. Happy gardening! Remember, every garden is a learning experience, and even seasoned gardeners face challenges. The key is to stay persistent, observe your plants closely, and adjust your
Conclusion
So, there you have it! Growing Brussels sprouts in pots might seem like a daunting task, reserved for seasoned gardeners with sprawling acres. But as we’ve shown, with a little planning, the right materials, and a dash of patience, you can cultivate these nutritious and delicious mini-cabbages right on your balcony, patio, or even a sunny windowsill.
Why is this DIY trick a must-try? Because it democratizes fresh, homegrown produce. It empowers you to control the quality of your food, ensuring it’s free from unwanted pesticides and brimming with flavor. Store-bought Brussels sprouts simply can’t compare to the taste of those harvested fresh from your own container garden. Plus, it’s incredibly rewarding to nurture a plant from seedling to harvest, witnessing the miracle of nature unfold before your eyes.
But the benefits don’t stop there. Growing Brussels sprouts in pots offers unparalleled flexibility. You can easily move your plants to chase the sun, protect them from harsh weather, or even bring them indoors during the coldest months to extend your harvest. This adaptability is especially valuable for those living in urban environments or regions with unpredictable climates.
Looking for variations? Consider experimenting with different Brussels sprouts varieties. ‘Long Island Improved’ is a classic choice, known for its reliable yields and excellent flavor. For a more compact option, try ‘Redarling,’ which produces beautiful red-tinged sprouts. You can also companion plant with herbs like thyme or rosemary to deter pests and enhance the flavor of your sprouts. Another variation is to try different soil mixes. While the recommended mix works well, experimenting with slightly different ratios of compost, perlite, and potting soil can help you fine-tune the growing conditions to your specific environment.
Don’t be afraid to get creative with your container selection, too. While a large plastic pot is perfectly functional, you can also use repurposed containers like old buckets, wooden crates, or even galvanized tubs. Just be sure to drill drainage holes to prevent waterlogging.
Ultimately, the success of your potted Brussels sprouts depends on your willingness to experiment and adapt. Pay close attention to your plants, observe their growth patterns, and adjust your watering and fertilizing accordingly. Remember, gardening is a journey, not a destination. There will be challenges along the way, but the rewards of fresh, homegrown Brussels sprouts are well worth the effort.
We wholeheartedly encourage you to give this DIY trick a try. It’s a fun, educational, and ultimately delicious way to connect with nature and enjoy the fruits (or rather, vegetables) of your labor. And most importantly, we want to hear about your experience! Share your photos, tips, and triumphs with us in the comments below. Let’s build a community of potted Brussels sprouts enthusiasts and inspire others to embrace the joy of homegrown goodness. Let us know what kind of DIY Brussels sprouts growing method worked best for you.
Frequently Asked Questions (FAQs)
How much sunlight do Brussels sprouts in pots really need?
Brussels sprouts are sun-loving plants, and they need at least 6-8 hours of direct sunlight per day to thrive. Without sufficient sunlight, they will become leggy, produce smaller sprouts, and be more susceptible to pests and diseases. If you don’t have a spot that receives full sun, consider using grow lights to supplement the natural light. Position the grow lights about 6-12 inches above the plants and keep them on for 12-14 hours per day. Rotate your pots regularly to ensure that all sides of the plants receive equal exposure to sunlight.
What’s the best way to water Brussels sprouts in pots?
Watering is crucial for healthy Brussels sprouts growth. The key is to keep the soil consistently moist but not waterlogged. Check the soil moisture regularly by sticking your finger about an inch deep into the soil. If it feels dry, it’s time to water. Water deeply, until water drains out of the drainage holes at the bottom of the pot. Avoid watering the foliage directly, as this can promote fungal diseases. Water early in the morning to allow the foliage to dry before nightfall. During hot, dry weather, you may need to water your Brussels sprouts daily. In cooler weather, you can reduce the frequency of watering.
How often should I fertilize my potted Brussels sprouts?
Brussels sprouts are heavy feeders, meaning they require a lot of nutrients to produce a good harvest. Fertilize your plants every 2-3 weeks with a balanced liquid fertilizer, such as a 10-10-10 or 20-20-20 formula. Follow the instructions on the fertilizer package for proper dilution rates. You can also supplement with organic fertilizers, such as compost tea or fish emulsion. Avoid over-fertilizing, as this can lead to excessive foliage growth and fewer sprouts.
What are common pests and diseases that affect Brussels sprouts in pots, and how can I prevent them?
Brussels sprouts are susceptible to several pests and diseases, including aphids, cabbage worms, cabbage loopers, and clubroot. To prevent these problems, start by choosing disease-resistant varieties. Inspect your plants regularly for signs of pests or diseases. Handpick any pests you find, or use insecticidal soap or neem oil to control infestations. To prevent clubroot, ensure that your soil is well-drained and has a pH of 6.5-7.0. Rotate your crops regularly to avoid building up disease organisms in the soil. You can also use row covers to protect your plants from pests.
When are Brussels sprouts ready to harvest from pots?
Brussels sprouts are typically ready to harvest about 90-100 days after planting. The sprouts should be firm, tightly closed, and about 1-2 inches in diameter. Start harvesting from the bottom of the plant, working your way upwards. Twist or cut the sprouts off the stem, leaving the upper sprouts to continue developing. You can harvest Brussels sprouts over several weeks, as they mature at different rates. The flavor of Brussels sprouts improves after a light frost, so don’t be afraid to leave them on the plant until after the first frost of the season.
Can I grow Brussels sprouts in pots indoors?
While it’s possible to grow Brussels sprouts indoors, it can be challenging. They require a lot of light, so you’ll need to provide supplemental lighting with grow lights. You’ll also need to ensure that they have adequate ventilation and humidity. Indoor-grown Brussels sprouts may not produce as many sprouts as those grown outdoors. If you’re determined to grow them indoors, choose a compact variety and provide them with the best possible growing conditions.
What size pot is really needed for Brussels sprouts?
A pot that is at least 12 inches in diameter and 12 inches deep is recommended for growing Brussels sprouts. However, a larger pot, such as a 15-gallon container, is even better, as it will provide more room for the roots to grow and allow the plant to reach its full potential. The larger the pot, the more moisture and nutrients it can hold, which will reduce the frequency of watering and fertilizing.
Can I reuse the soil from my Brussels sprouts pots for other plants?
It’s generally not recommended to reuse soil from Brussels sprouts pots for other plants, especially if your Brussels sprouts were affected by pests or diseases. The soil may contain disease organisms or pest eggs that could infect your new plants. If you do reuse the soil, sterilize it first by baking it in the oven at 180 degrees Fahrenheit for 30 minutes. You can also amend the soil with compost and other organic matter to improve its fertility and drainage.
How do I know if my Brussels sprouts are getting enough water?
The best way to tell if your Brussels sprouts are getting enough water is to check the soil moisture regularly. Stick your finger about an inch deep into the soil. If it feels dry, it’s time to water. You can also use a moisture meter to get a more accurate reading. Overwatering can be just as harmful as underwatering, so be sure to let the soil dry out slightly between waterings. Wilting leaves can be a sign of both underwatering and overwatering, so it’s important to check the soil moisture before watering.
Leave a Comment