
Growing Kale Indoors might seem like a challenge reserved for seasoned gardeners, but trust me, it’s totally achievable, even if you’re a complete beginner! Have you ever dreamt of snipping fresh, vibrant kale leaves right from your kitchen windowsill, adding a burst of healthy goodness to your meals without even stepping outside? Well, dream no more! This DIY guide is your passport to a thriving indoor kale garden.
Kale, a nutritional powerhouse, has a rich history dating back to ancient Greece and Rome, where it was a staple food. Over centuries, it has spread across the globe, becoming a beloved ingredient in countless cuisines. But let’s face it, not everyone has the space or climate for a traditional outdoor garden. That’s where the magic of indoor gardening comes in!
In today’s fast-paced world, access to fresh, healthy produce can be a struggle. Supermarket kale, while convenient, often lacks the vibrant flavor and nutritional punch of homegrown varieties. Plus, let’s be honest, there’s something incredibly satisfying about nurturing your own food from seed to table. This DIY trick will empower you to enjoy fresh, organic kale year-round, regardless of your living situation. I’m going to show you how easy it is to start growing kale indoors and enjoy the benefits of this amazing leafy green!
Growing Kale Indoors: A Beginner’s Guide to Leafy Green Goodness
Hey there, fellow plant enthusiasts! Ever dreamt of having fresh, vibrant kale right at your fingertips, even when the weather outside is frightful? Well, dream no more! Growing kale indoors is totally achievable, and I’m here to guide you through every step of the process. Trust me, there’s nothing quite like snipping off a few leaves for a smoothie or salad, knowing you grew them yourself. Let’s get started!
Choosing the Right Kale Variety
First things first, not all kale varieties are created equal when it comes to indoor growing. Some get HUGE, which isn’t ideal for a limited indoor space. Here are a few of my favorites that tend to thrive indoors:
* Dwarf Blue Curled Vates: This is a classic for a reason! It’s compact, cold-hardy, and produces those beautiful, frilly blue-green leaves we all know and love.
* Red Russian: If you’re looking for a pop of color, Red Russian is the way to go. Its flat, oak-leaf shaped leaves have a mild flavor and a gorgeous reddish-purple hue.
* Lacinato (Dinosaur) Kale: While it can get a bit taller than the others, Lacinato kale is still manageable indoors. Its dark, almost black leaves have a unique texture and a slightly sweeter flavor.
Gathering Your Supplies
Okay, now that we’ve picked our kale variety, let’s gather everything we need to get started. Here’s your shopping list:
* Kale Seeds: Obviously! Make sure you get them from a reputable source to ensure good germination rates.
* Seed Starting Trays or Small Pots: These will be your kale’s first home.
* Seed Starting Mix: This is a light, airy soil mix specifically designed for starting seeds. Don’t use regular potting soil for this step!
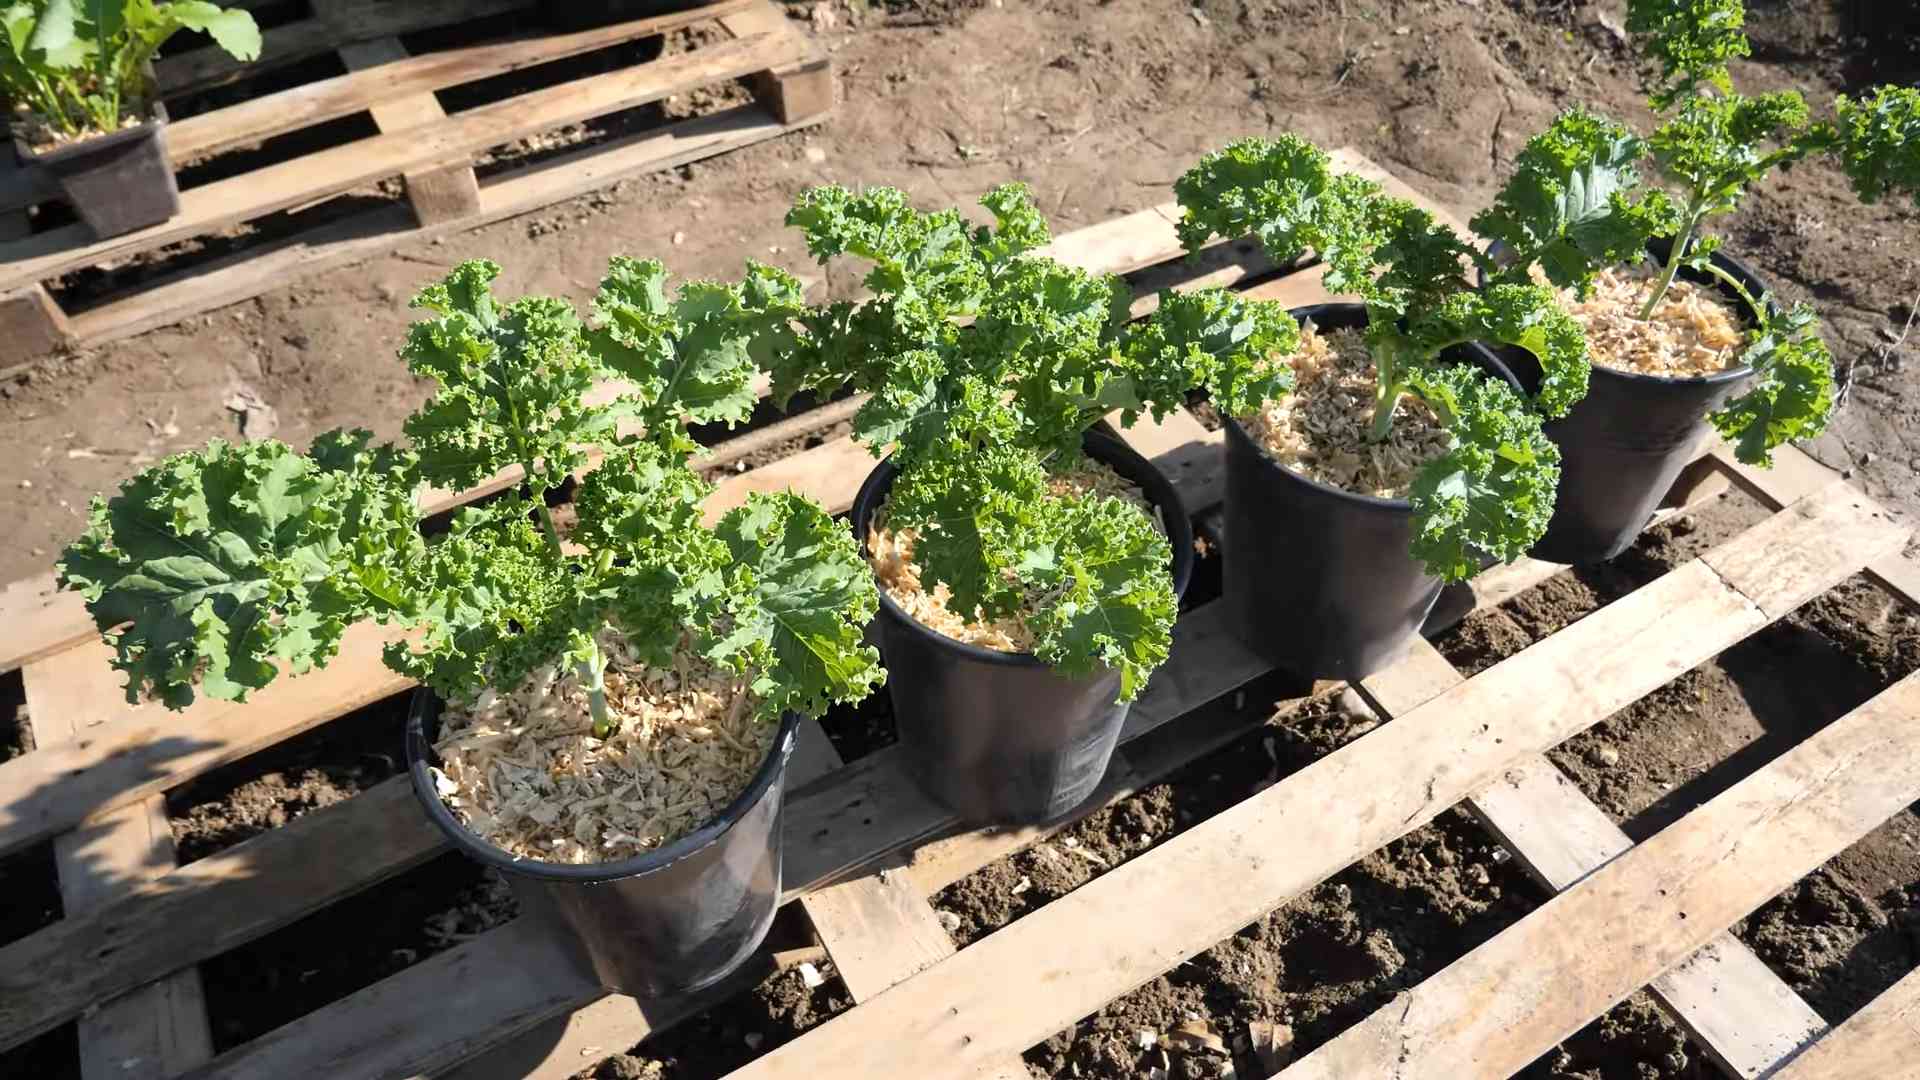
* Larger Pots (at least 6 inches in diameter): Once your seedlings are big enough, they’ll need to be transplanted into larger pots.
* Potting Soil: Choose a good quality potting mix that drains well.
* Grow Lights: Kale needs a lot of light to thrive, especially indoors. LED grow lights are energy-efficient and work great.
* Watering Can or Spray Bottle: For gentle watering.
* Fertilizer: A balanced liquid fertilizer will help your kale grow strong and healthy.
* Optional: Heat Mat: This can speed up germination, but it’s not essential.
Step-by-Step Instructions: From Seed to Salad
Alright, let’s get our hands dirty! Here’s a detailed guide to growing kale indoors:
Phase 1: Starting Your Seeds
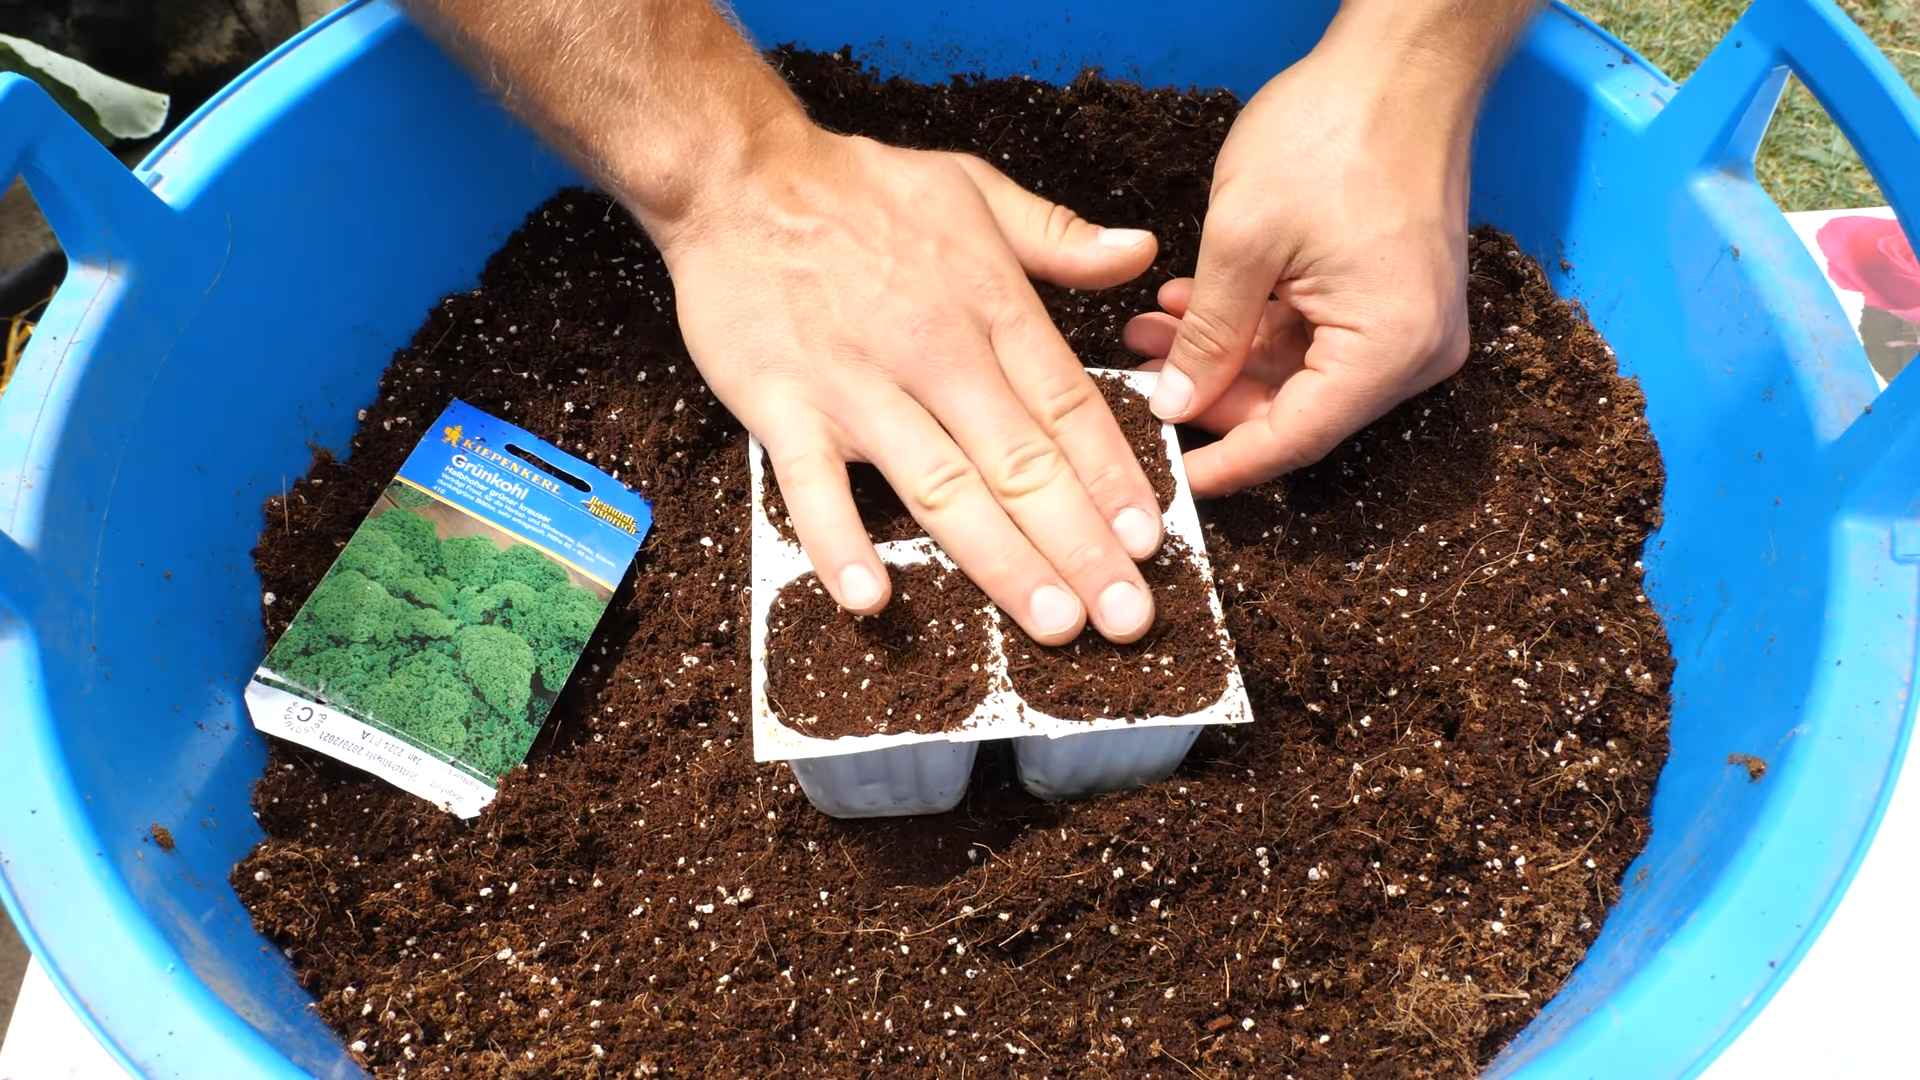
1. Prepare Your Seed Starting Trays: Fill your seed starting trays or small pots with seed starting mix. Gently pat it down to remove any air pockets.
2. Sow Your Seeds: Make a small indentation (about 1/4 inch deep) in the soil of each cell or pot. Place 2-3 kale seeds in each indentation. This increases your chances of at least one seed germinating.
3. Cover the Seeds: Gently cover the seeds with a thin layer of seed starting mix.
4. Water Thoroughly: Use a spray bottle or watering can to gently water the soil until it’s evenly moist. Be careful not to overwater!
5. Provide Warmth and Light: Place your seed starting trays in a warm location (around 70-75°F). If you’re using a heat mat, place the trays on top of it. Turn on your grow lights and position them a few inches above the trays.
6. Maintain Moisture: Keep the soil consistently moist, but not soggy. Check the soil daily and water as needed.
7. Wait for Germination: Kale seeds typically germinate in 5-10 days. Be patient!
Phase 2: Transplanting Your Seedlings
1. Observe Seedling Growth: Once your seedlings have developed their first set of true leaves (the leaves that look like miniature kale leaves, not just the initial seed leaves), it’s time to transplant them.
2. Prepare Your Larger Pots: Fill your larger pots with potting soil, leaving about an inch of space at the top.
3. Gently Remove Seedlings: Carefully remove the seedlings from the seed starting trays or small pots. If you planted multiple seeds in each cell, choose the strongest seedling and gently snip off the others at the soil line.
4. Create a Hole: Make a hole in the center of the potting soil in each larger pot, large enough to accommodate the seedling’s root ball.
5. Transplant the Seedlings: Gently place the seedling into the hole and cover the roots with potting soil. Pat the soil down gently.
6. Water Thoroughly: Water the transplanted seedlings thoroughly.
7. Provide Light and Nutrients: Place the pots under your grow lights and start fertilizing with a balanced liquid fertilizer diluted to half strength. Follow the instructions on the fertilizer package.
Phase 3: Caring for Your Indoor Kale
1. Light: Kale needs at least 6-8 hours of light per day. If you’re using grow lights, keep them on for that amount of time. If you’re relying on natural light, place your kale near a sunny window. Rotate the pots regularly to ensure even growth.
2. Watering: Water your kale when the top inch of soil feels dry to the touch. Avoid overwatering, as this can lead to root rot.
3. Fertilizing: Continue fertilizing your kale every 2-3 weeks with a balanced liquid fertilizer.
4. Temperature: Kale prefers cooler temperatures (60-70°F). Avoid placing your kale near heat sources.
5. Air Circulation: Good air circulation is important to prevent fungal diseases. You can use a small fan to circulate the air around your plants.
6. Pest Control: Keep an eye out for pests like aphids and spider mites. If you spot any, you can try spraying them with insecticidal soap or neem oil.
7. Pruning: As your kale grows, you can prune off any yellowing or damaged leaves. This will encourage new growth.
Phase 4: Harvesting Your Kale
1. Harvesting Time: You can start harvesting your kale leaves when they are about 4-6 inches long.
2. Harvesting Technique: Harvest the outer leaves first, leaving the inner leaves to continue growing. You can use scissors or your fingers to snip off the leaves.
3. Continuous Harvest: Kale is a cut-and-come-again crop, meaning you can harvest leaves continuously over several weeks or even months.
4. Enjoy Your Harvest: Wash your kale leaves thoroughly and enjoy them in salads, smoothies, soups, or any other dish you like!
Troubleshooting Common Problems
Even with the best care, you might encounter a few challenges along the way. Here are some common problems and how to fix them:
* Leggy Seedlings: This means your seedlings aren’t getting enough light. Move them closer to your grow lights or provide more natural light.
* Yellowing Leaves: This could be a sign of overwatering, underwatering, or nutrient deficiency. Check the soil moisture and adjust your watering accordingly. Fertilize your kale if necessary.
* Pests: As mentioned earlier, aphids and spider mites are common pests. Treat them with insecticidal soap or neem oil.
* Slow Growth: This could be due to a lack of light, nutrients, or warmth. Make sure your kale is getting enough light and fertilizer, and that the temperature is within the ideal range.
Tips for Success
Here are a few extra tips to help you succeed in growing kale indoors:
* Choose the Right Pot Size: Make sure your pots are large enough to accommodate the kale’s root system. At least 6 inches in diameter is a good starting point.
* Use Well-Draining Soil: Kale doesn’t like to sit in soggy soil. Choose a potting mix that drains well.
* Don’t Overwater: Overwatering is a common mistake that can lead to root rot. Water your kale only when the top inch of soil feels dry.
* Provide Adequate Light: Kale needs a lot of light to thrive. If you’re using grow lights, make sure they’re strong enough and positioned correctly.
* Fertilize Regularly: Kale is a heavy feeder, so it needs regular fertilization.
* Be Patient: Growing kale indoors takes time and effort. Don’t get discouraged if you don’t see results immediately.
Growing kale indoors is a rewarding experience that allows you to enjoy fresh, healthy greens year-round. With a little bit of care and
Conclusion
So, there you have it! Growing kale indoors is not only achievable, but it’s a rewarding experience that brings fresh, nutritious greens right to your fingertips, regardless of the season or your outdoor space limitations. We’ve walked through the essential steps, from selecting the right kale variety and providing adequate lighting to ensuring proper watering and pest control. The beauty of this DIY project lies in its simplicity and adaptability.
Why is this a must-try? Because it empowers you to take control of your food source, offering a sustainable and cost-effective way to enjoy the health benefits of kale year-round. Imagine adding freshly harvested kale to your morning smoothie, tossing it into a vibrant salad, or sautéing it as a delicious side dish – all grown with your own two hands! The taste difference between store-bought and homegrown kale is remarkable; the latter boasts a sweeter, less bitter flavor that will elevate your culinary creations.
Beyond the basic method, there’s plenty of room for experimentation. Consider trying different kale varieties like Lacinato (dinosaur kale) or Red Russian kale to diversify your harvest and add visual appeal to your indoor garden. You can also explore hydroponic systems for an even more efficient and space-saving approach to growing kale indoors. Another variation is to use a self-watering system to minimize the need for constant monitoring, especially if you’re a busy individual. You can also try companion planting with herbs like basil or rosemary to deter pests naturally and enhance the flavor of your kale.
Don’t be intimidated by the idea of indoor gardening. It’s a learning process, and even experienced gardeners encounter challenges along the way. The key is to be patient, observant, and willing to adjust your approach as needed. Start small, perhaps with just a few kale plants, and gradually expand your indoor garden as you gain confidence and experience.
We are confident that with the information provided, you’re well-equipped to embark on your own indoor kale-growing adventure. The satisfaction of harvesting your own fresh, organic greens is truly unparalleled.
Now, we want to hear from you! Give this DIY trick a try and share your experiences with us. What challenges did you encounter? What successes did you celebrate? What tips and tricks did you discover along the way? Your feedback will not only help us improve this guide but also inspire other readers to embrace the joys of growing kale indoors. Share your photos and stories on social media using #IndoorKale or tag us in your posts. Let’s create a community of indoor gardeners and spread the word about the benefits of homegrown goodness! We are eager to see your kale thriving!
Frequently Asked Questions (FAQ)
What is the best variety of kale to grow indoors?
While many kale varieties can be grown indoors, some are better suited than others due to their size and growth habits. Dwarf varieties like Dwarf Blue Curled Vates are excellent choices because they stay relatively compact and don’t require as much space. Lacinato (dinosaur kale) is another popular option known for its distinctive texture and flavor. Red Russian kale is also a good choice, offering a beautiful color contrast and a slightly sweeter taste. Ultimately, the best variety depends on your personal preferences and the space you have available. Experiment with different varieties to see which ones thrive best in your indoor environment.
How much light does kale need when grown indoors?
Adequate lighting is crucial for successful indoor kale cultivation. Kale requires at least 6-8 hours of direct sunlight per day. If you don’t have a sunny window that provides sufficient light, you’ll need to supplement with artificial grow lights. LED grow lights are a popular choice because they are energy-efficient and provide the full spectrum of light that plants need to thrive. Position the grow lights about 6-12 inches above the kale plants and adjust the height as the plants grow. Monitor your kale plants closely for signs of insufficient light, such as leggy growth or pale leaves.
How often should I water my indoor kale plants?
Watering frequency depends on several factors, including the size of the pot, the type of soil, and the ambient temperature and humidity. As a general rule, water your kale plants when the top inch of soil feels dry to the touch. Avoid overwatering, as this can lead to root rot. Ensure that your pots have drainage holes to allow excess water to escape. During the warmer months, you may need to water more frequently than during the cooler months. Check the soil moisture regularly and adjust your watering schedule accordingly.
What type of soil is best for growing kale indoors?
Kale prefers well-draining soil that is rich in organic matter. A good potting mix for kale should consist of a blend of peat moss, perlite, and vermiculite. You can also amend the soil with compost or other organic matter to improve its fertility and drainage. Avoid using garden soil, as it can be too heavy and may contain pests or diseases. Ensure that the soil pH is between 6.0 and 7.5, which is slightly acidic to neutral.
How do I fertilize my indoor kale plants?
Kale is a heavy feeder and requires regular fertilization to thrive. Use a balanced liquid fertilizer, such as a 10-10-10 or 20-20-20 formula, diluted to half strength. Fertilize your kale plants every 2-3 weeks during the growing season. Avoid over-fertilizing, as this can lead to nutrient burn. You can also supplement with organic fertilizers, such as compost tea or fish emulsion.
How do I deal with pests on my indoor kale plants?
Even indoors, kale plants can be susceptible to pests such as aphids, spider mites, and whiteflies. Regularly inspect your plants for signs of infestation. If you spot pests, you can try washing them off with a strong stream of water or using insecticidal soap or neem oil. These are natural and effective ways to control pests without harming your plants or the environment. You can also introduce beneficial insects, such as ladybugs, to help control pest populations.
How long does it take to harvest kale after planting?
The time it takes to harvest kale depends on the variety and growing conditions. Generally, you can start harvesting kale leaves about 6-8 weeks after planting. Harvest the outer leaves first, leaving the inner leaves to continue growing. This will allow you to enjoy a continuous harvest of fresh kale leaves for several weeks.
Can I grow kale indoors year-round?
Yes, you can grow kale indoors year-round, provided you provide adequate light, water, and nutrients. Indoor growing allows you to control the environment and protect your kale plants from extreme weather conditions. With proper care, you can enjoy a continuous supply of fresh kale leaves throughout the year.
What are some common problems when growing kale indoors and how can I fix them?
Some common problems include yellowing leaves (often due to overwatering or nutrient deficiency), leggy growth (insufficient light), and pest infestations. Adjust your watering and fertilization schedule as needed. Provide adequate light by using grow lights or moving your plants to a sunnier location. Treat pest infestations with insecticidal soap or neem oil. Regularly monitor your plants for signs of problems and address them promptly to ensure healthy growth.
Is growing kale indoors organic?
Yes, growing kale indoors can be organic. By using organic potting mix, fertilizers, and pest control methods, you can ensure that your kale is grown without synthetic chemicals. This allows you to enjoy fresh, healthy, and organically grown kale right from your own home.
Leave a Comment