
Growing Peppers in Bottles: Sounds a little crazy, right? But trust me, it’s a game-changer! Have you ever dreamt of a bountiful pepper harvest, even without a sprawling garden? Or maybe you’re tired of battling pests and unpredictable weather ruining your precious pepper plants? Well, you’re in the right place! This DIY guide will unlock a simple, yet surprisingly effective, method for growing peppers in bottles, bringing the joy of fresh, homegrown peppers right to your windowsill or balcony.
The concept of container gardening, in general, has been around for centuries, dating back to ancient civilizations who used pots and vessels to cultivate plants in limited spaces. While not specifically bottles, the ingenuity of adapting available resources for gardening is a timeless tradition. Today, with increasing urbanization and a growing desire for sustainable living, the need for space-saving gardening solutions is greater than ever.
That’s where this DIY trick comes in. Growing peppers in bottles offers a fantastic solution for apartment dwellers, those with limited garden space, or anyone looking for a fun and eco-friendly way to grow their own food. Plus, it’s a fantastic way to recycle those plastic bottles that might otherwise end up in a landfill! I’m excited to share this easy-to-follow guide that will empower you to cultivate delicious peppers, regardless of your gardening experience or space constraints. Let’s get started and transform those bottles into mini pepper paradises!
Growing Peppers in Bottles: A Fun and Space-Saving DIY Project
Hey there, fellow gardening enthusiasts! Are you short on space but dreaming of a bountiful pepper harvest? Or maybe you just want a unique and eye-catching way to grow your favorite spicy treats? Well, you’ve come to the right place! I’m going to walk you through a super cool DIY project: growing peppers in plastic bottles. It’s surprisingly easy, budget-friendly, and a fantastic way to recycle. Let’s get started!
Materials You’ll Need
Before we dive in, let’s gather our supplies. This is a pretty low-cost project, which is always a win in my book!
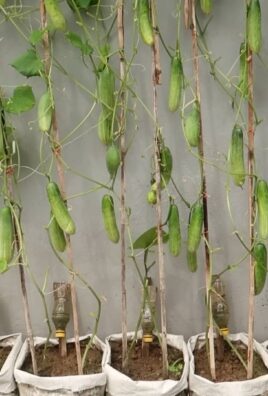
* Plastic Bottles: The star of the show! I recommend using 2-liter soda bottles or larger water bottles. The bigger, the better, as it gives your pepper plants more room to grow. Make sure they’re clean and free of any sticky residue.
* Potting Soil: Use a good quality potting mix that drains well. Avoid using garden soil, as it can compact in the bottles and hinder drainage.
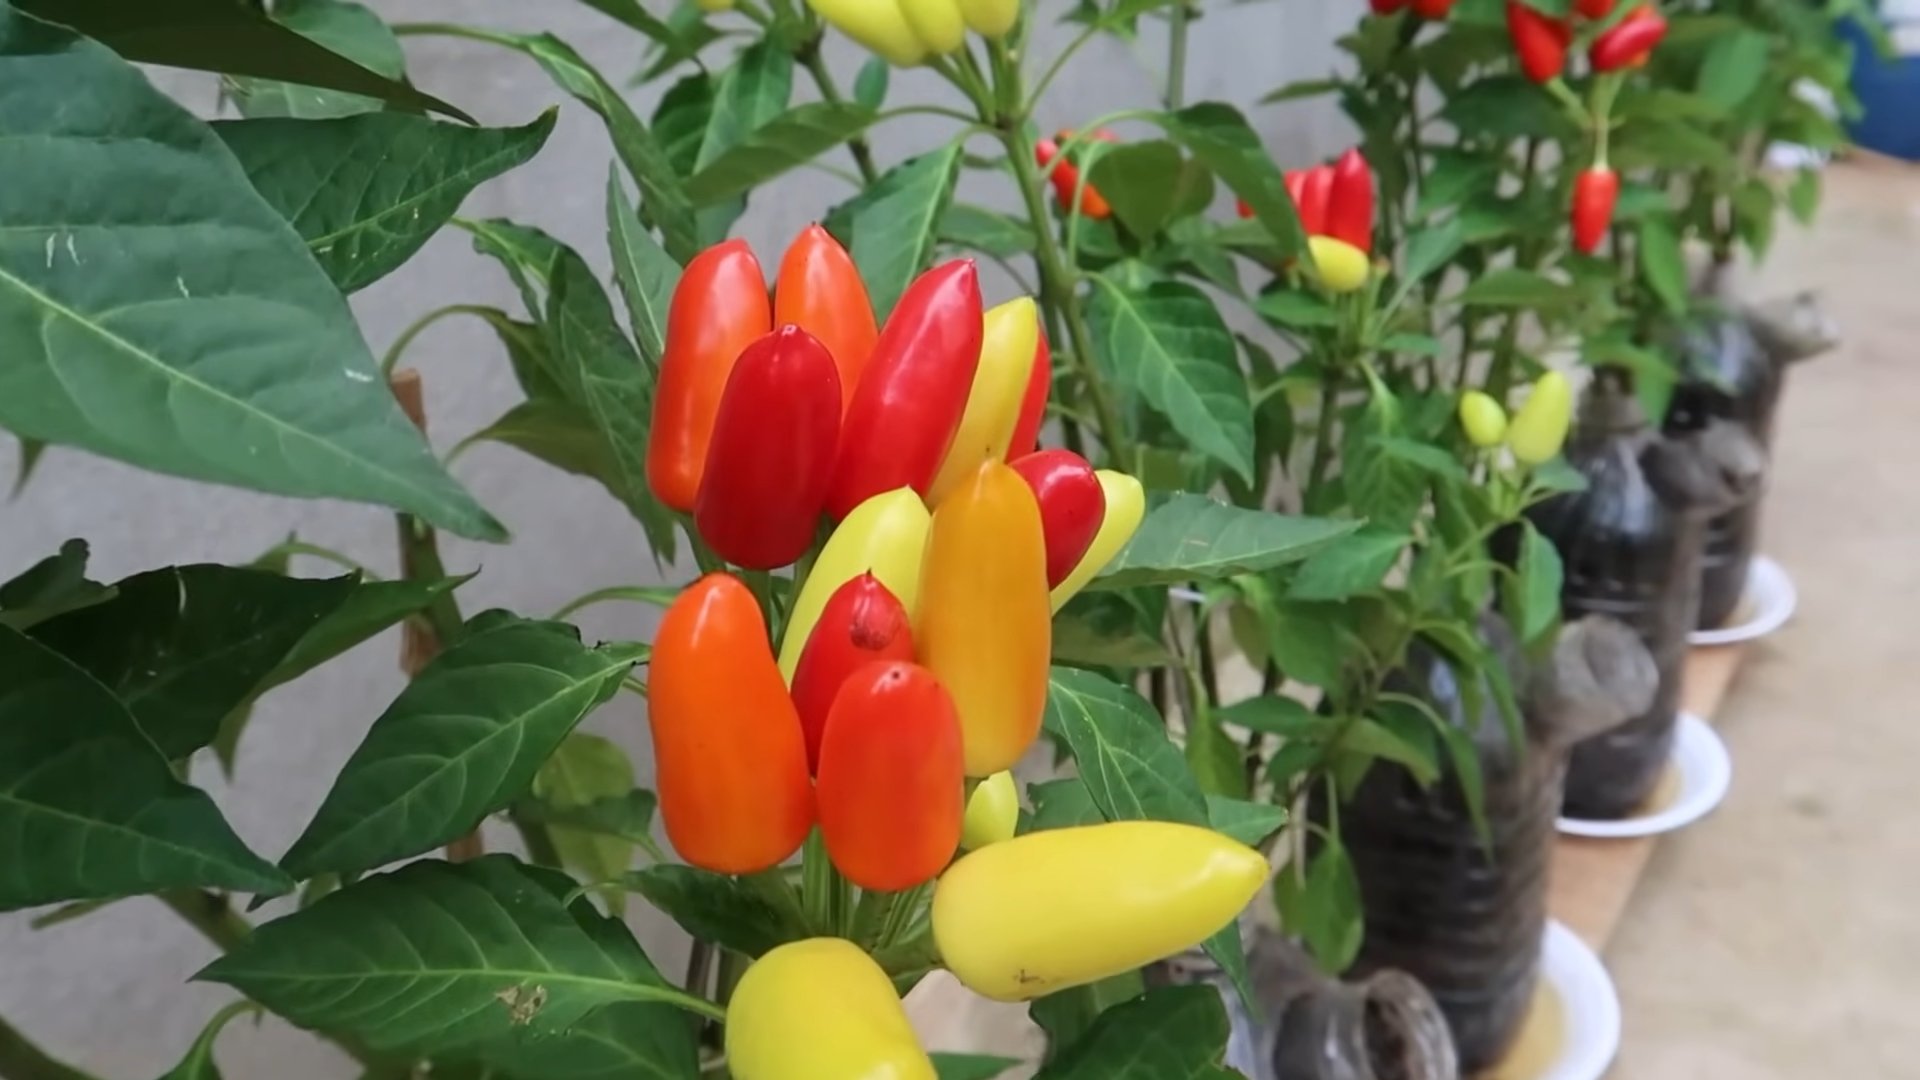
* Pepper Seeds or Seedlings: Choose your favorite pepper varieties! Bell peppers, jalapenos, habaneros – the choice is yours. If you’re starting from seeds, you’ll need to start them indoors a few weeks before transplanting.
* Scissors or a Utility Knife: For cutting the bottles. Be careful!
* Drill or Nail: To create drainage holes.
* Water: Essential for, well, everything!
* Optional:
* Gravel or Small Stones: To improve drainage at the bottom of the bottle.
* Plant Food: A balanced liquid fertilizer to give your peppers a boost.
* Gloves: To keep your hands clean.
* Labels: To identify your pepper varieties.
* Spray Paint: To decorate your bottles (optional, but fun!).
Preparing the Bottles
This is where we transform those humble plastic bottles into mini pepper paradises!
1. Clean the Bottles: Give your bottles a good rinse with soap and water to remove any leftover soda or residue. Make sure to dry them thoroughly.
2. Cut the Bottles: There are a couple of ways to do this, depending on the look you’re going for.
* Method 1: Hanging Planter: Cut the bottle in half horizontally. You’ll be using the bottom half as the planter. The top half can be discarded or used as a mini greenhouse cover when the seedlings are small.
* Method 2: Self-Watering Planter (Slightly More Advanced): Cut the bottle about two-thirds of the way up. Invert the top portion and nest it inside the bottom portion. This creates a self-watering system. You’ll need to drill a small hole in the bottle cap to allow water to wick up.
3. Drill Drainage Holes: This is crucial! Drill several drainage holes in the bottom of the bottle (or the bottom of the bottom half if you’re making a self-watering planter). This prevents waterlogging, which can kill your pepper plants. I usually make about 5-6 holes.
4. (Optional) Decorate the Bottles: If you want to add a personal touch, now’s the time to paint or decorate your bottles. Use spray paint designed for plastic, or get creative with markers and stickers. Just make sure any paint is completely dry before you start planting.
Planting Your Peppers
Alright, let’s get our hands dirty! This is the fun part.
1. Add Drainage Layer (Optional): If you’re using gravel or small stones, place a layer at the bottom of the bottle to improve drainage. This is especially helpful if you live in an area with heavy rainfall.
2. Fill with Potting Soil: Fill the bottle with potting soil, leaving about an inch or two of space at the top. Gently pat down the soil to remove any air pockets.
3. Plant Your Seeds or Seedlings:
* From Seeds: Make a small indentation in the soil and sow a few pepper seeds. Cover them lightly with soil and water gently. Keep the soil moist but not soggy until the seeds germinate.
* From Seedlings: Carefully remove the seedling from its container. Gently loosen the roots and place the seedling in the center of the bottle. Fill in around the seedling with potting soil and gently pat it down.
4. Water Thoroughly: Water the newly planted peppers thoroughly until water drains out of the drainage holes. This helps settle the soil and ensures the roots are well-hydrated.
5. Label Your Peppers: If you’re growing multiple varieties, label each bottle so you know which pepper is which.
Caring for Your Pepper Plants
Now that your peppers are planted, it’s time to provide them with the TLC they need to thrive.
1. Sunlight: Peppers need plenty of sunlight – at least 6-8 hours per day. Place your bottles in a sunny location, such as a patio, balcony, or windowsill. If you don’t have enough natural sunlight, you can supplement with grow lights.
2. Watering: Water your peppers regularly, especially during hot weather. Check the soil moisture by sticking your finger into the soil. If the top inch feels dry, it’s time to water. Avoid overwatering, as this can lead to root rot.
3. Fertilizing: Feed your pepper plants with a balanced liquid fertilizer every few weeks. Follow the instructions on the fertilizer label. I like to use a fertilizer that’s specifically formulated for vegetables.
4. Pest Control: Keep an eye out for pests, such as aphids, spider mites, and whiteflies. If you spot any pests, treat them with an insecticidal soap or neem oil.
5. Support: As your pepper plants grow, they may need support to prevent them from falling over. You can use stakes or tomato cages to provide support.
6. Pruning: Pruning can help improve air circulation and encourage fruit production. Remove any yellowing or dead leaves. You can also pinch off the tips of the branches to encourage bushier growth.
Harvesting Your Peppers
The moment we’ve all been waiting for! Harvesting your peppers is the most rewarding part of the process.
1. Timing: The time it takes for peppers to mature depends on the variety. Generally, bell peppers take about 60-90 days to mature, while hot peppers can take longer.
2. Ripeness: Peppers are typically ready to harvest when they’ve reached their mature size and color. Bell peppers will turn from green to red, yellow, or orange, depending on the variety. Hot peppers will also change color as they ripen.
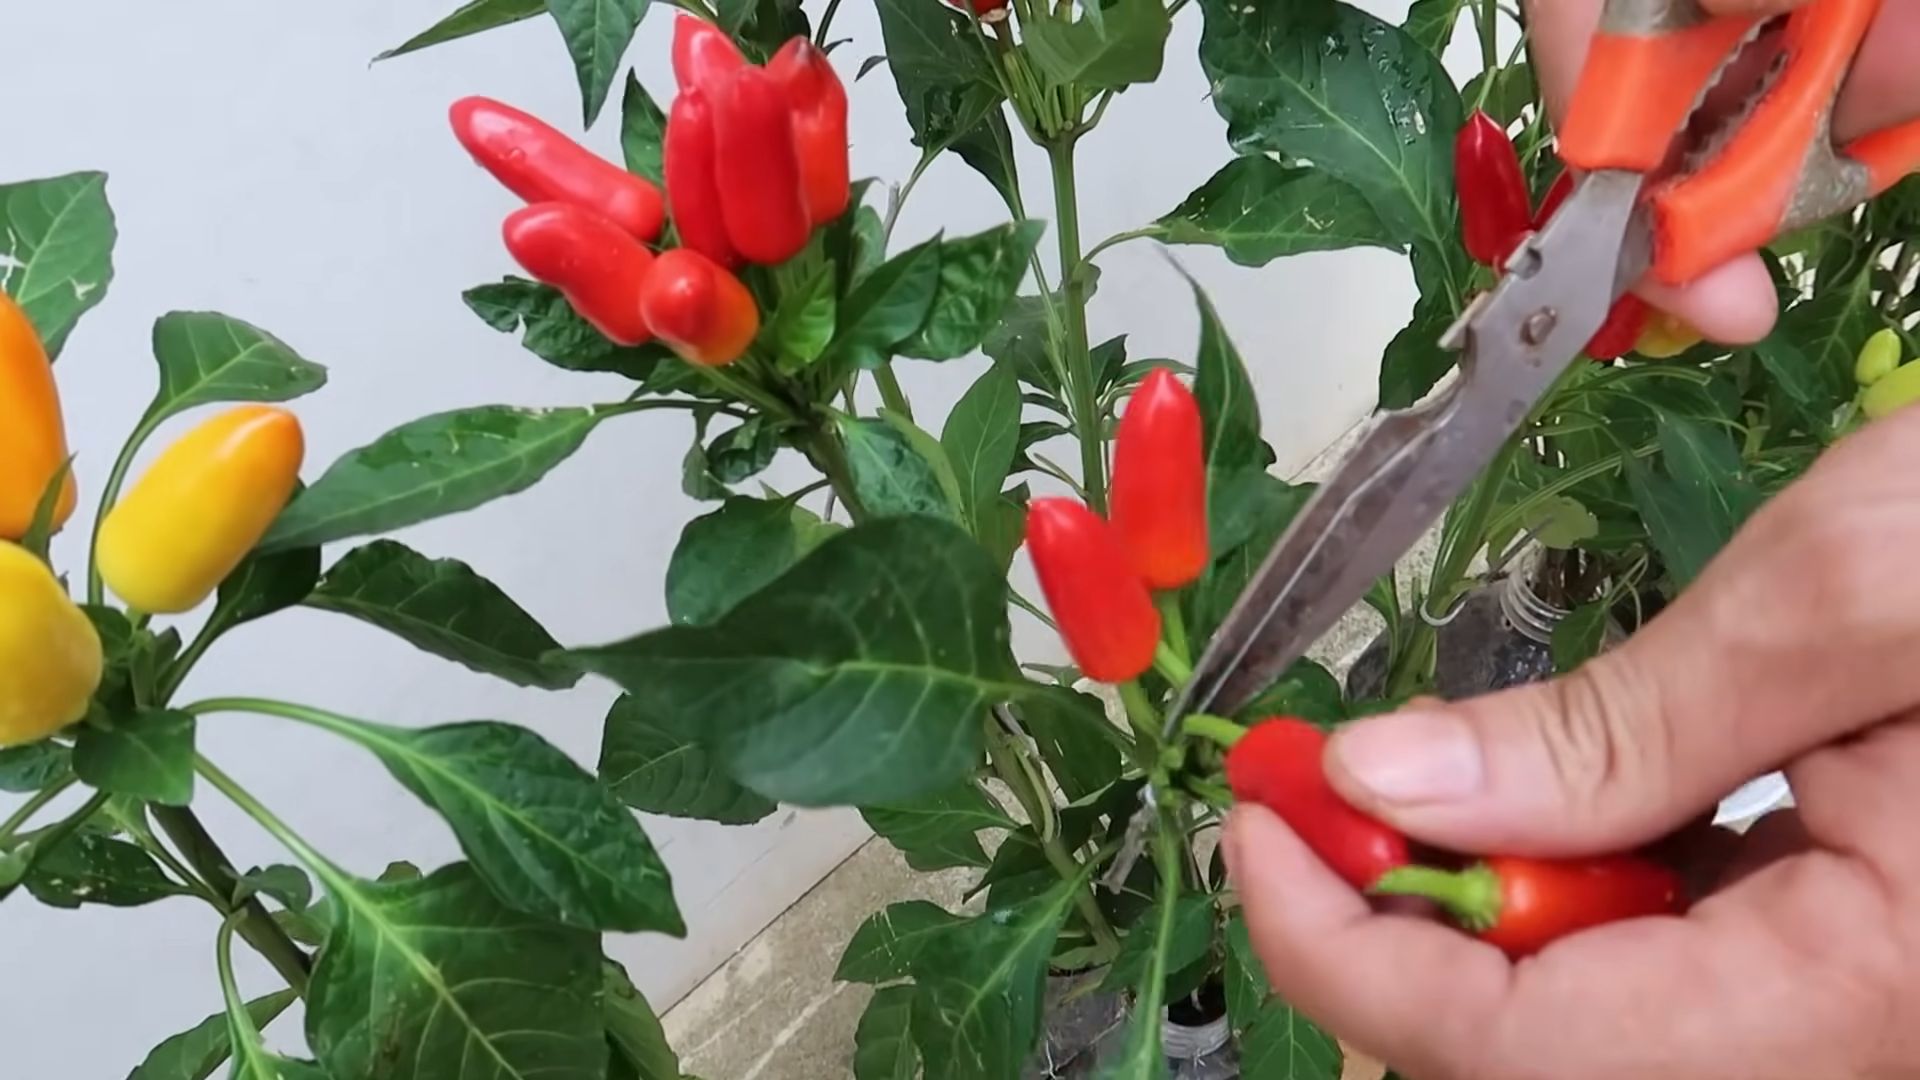
3. Harvesting: Use scissors or pruning shears to cut the peppers from the plant. Be careful not to damage the plant.
4. Enjoy! Now you can enjoy your homegrown peppers in your favorite recipes! Use them fresh, roast them, pickle them, or dry them for later use.
Troubleshooting
Even with the best care, you might encounter some challenges along the way. Here are a few common problems and how to fix them:
* Yellowing Leaves: This could be a sign of overwatering, underwatering, or nutrient deficiency. Check the soil moisture and adjust your watering schedule accordingly. Fertilize your plants with a balanced fertilizer.
* Blossom End Rot: This is a common problem in peppers and tomatoes, caused by a calcium deficiency. Add calcium to the soil by mixing in bone meal or crushed eggshells.
* Pests: As mentioned earlier, keep an eye out for pests and treat them with an appropriate insecticide.
* Slow Growth: This could be due to lack of sunlight, poor soil, or cold temperatures. Make sure your plants are getting enough sunlight and are planted in well-draining soil. If it’s cold, move your plants indoors or provide them with some protection.
Tips and Tricks for Success
Here are a few extra tips to help you grow the best peppers possible:
* Choose the Right Variety: Consider your climate and growing conditions when choosing pepper varieties. Some peppers are better suited for hot weather, while others are more tolerant of cooler temperatures.
* Start Seeds Indoors: Starting your pepper seeds indoors a few weeks before transplanting gives them a head start.
* Harden Off Seedlings: Before transplanting your seedlings outdoors, gradually acclimate them to the outdoor conditions by hardening them off. This involves exposing them to increasing amounts of sunlight and wind over a period of a week or two.
* Use a Self-Watering System: If you’re prone to forgetting to water your plants, a self-watering system can be a lifesaver.
* Rotate Your Crops: Avoid planting peppers in the same spot year after year, as this can deplete the soil of nutrients and increase the risk of disease.
*
Conclusion
So, there you have it! Growing peppers in bottles isn’t just a quirky gardening experiment; it’s a surprisingly effective and space-saving method that can bring a burst of fresh, homegrown flavor right to your windowsill or balcony. We’ve walked you through the simple steps, from selecting the right bottle and preparing your potting mix to transplanting your seedlings and providing the necessary care.
But why is this DIY trick a must-try? Firstly, it’s incredibly accessible. Most of us have plastic bottles readily available, turning what would otherwise be waste into a valuable resource. Secondly, it’s perfect for urban gardeners or anyone with limited space. Vertical gardening is all the rage, and bottle gardening allows you to maximize your yield without sacrificing precious square footage. Thirdly, it’s a fantastic way to control the growing environment. The bottle acts as a mini-greenhouse, protecting your peppers from harsh weather and pests, while also retaining moisture.
Beyond the basic method, there’s plenty of room for experimentation. Consider using different types of bottles – larger bottles for bigger pepper varieties, or colored bottles to see if they affect plant growth. You could also try adding companion plants like basil or marigolds to your bottle garden to deter pests and improve the flavor of your peppers. Another variation is to create a self-watering system by adding a wick that draws water from a reservoir at the bottom of the bottle. This is especially helpful if you tend to forget to water your plants regularly.
Don’t be afraid to get creative with your bottle garden! Paint the bottles, decorate them with twine, or even create a hanging garden by suspending them from a balcony railing. The possibilities are endless.
Ultimately, the success of your bottle pepper garden hinges on providing the right conditions for your plants to thrive. Ensure they receive plenty of sunlight, water them regularly, and fertilize them as needed. Keep an eye out for pests and diseases, and take action promptly if you notice any problems.
We’re confident that you’ll be amazed by the results. Imagine the satisfaction of harvesting your own fresh, flavorful peppers, grown right in your own home using recycled materials. It’s a rewarding experience that connects you to nature and provides you with a sustainable source of food.
So, what are you waiting for? Gather your bottles, grab some potting mix, and start growing your own peppers in bottles today! We encourage you to try this DIY trick and share your experiences with us. Post photos of your bottle gardens on social media using #BottlePepperGarden and let us know what varieties of peppers you’re growing and any tips or tricks you’ve discovered along the way. We can’t wait to see your creations! Happy gardening!
FAQ
What types of peppers are best suited for growing in bottles?
Smaller pepper varieties, such as chili peppers, bell peppers (especially dwarf varieties), and jalapeños, tend to thrive best in bottle gardens. These varieties don’t require as much space for their root systems to develop fully. However, with proper care and larger bottles, you can successfully grow larger pepper varieties as well. Experiment to see what works best for your climate and growing conditions. Remember to choose varieties that mature relatively quickly, as the limited space can sometimes slow down growth.
How often should I water my pepper plants in bottles?
Watering frequency depends on several factors, including the size of the bottle, the type of potting mix, the weather, and the size of the plant. Generally, you should water your pepper plants when the top inch of soil feels dry to the touch. Avoid overwatering, as this can lead to root rot. Ensure that the bottle has adequate drainage holes to prevent water from accumulating at the bottom. During hot, dry weather, you may need to water your plants daily, while during cooler, wetter weather, you may only need to water them every few days. A good rule of thumb is to check the soil moisture regularly and water accordingly.
What kind of potting mix should I use for growing peppers in bottles?
A well-draining potting mix is essential for growing healthy pepper plants in bottles. Avoid using garden soil, as it can become compacted and doesn’t provide adequate drainage. A good potting mix should consist of a blend of peat moss, perlite, and vermiculite. You can also add compost to the mix to provide additional nutrients. Look for a potting mix specifically formulated for vegetables or containers. The ideal mix should be lightweight, airy, and able to retain moisture without becoming waterlogged.
How much sunlight do pepper plants need when grown in bottles?
Pepper plants require at least 6-8 hours of direct sunlight per day to thrive. Place your bottle garden in a sunny location, such as a south-facing window or balcony. If you don’t have access to enough natural sunlight, you can supplement with grow lights. LED grow lights are a good option, as they are energy-efficient and don’t produce excessive heat. Rotate the bottles regularly to ensure that all sides of the plants receive adequate sunlight. Insufficient sunlight can lead to leggy growth and reduced fruit production.
How do I fertilize my pepper plants in bottles?
Pepper plants are heavy feeders and require regular fertilization to produce abundant fruit. Use a balanced fertilizer specifically formulated for vegetables. You can use a liquid fertilizer or a slow-release granular fertilizer. Follow the instructions on the fertilizer package carefully. Fertilize your plants every 2-3 weeks during the growing season. Avoid over-fertilizing, as this can damage the plants. Look for a fertilizer with a higher phosphorus content, as this promotes flowering and fruit development.
How do I protect my pepper plants in bottles from pests and diseases?
Regularly inspect your pepper plants for signs of pests and diseases. Common pests that can affect pepper plants include aphids, spider mites, and whiteflies. You can control these pests by spraying your plants with insecticidal soap or neem oil. Diseases that can affect pepper plants include fungal diseases like powdery mildew and blight. Prevent these diseases by ensuring good air circulation and avoiding overwatering. If you notice any signs of disease, remove the affected leaves or plants immediately. You can also use a fungicide to control fungal diseases.
Can I grow peppers in bottles indoors year-round?
Yes, you can grow peppers in bottles indoors year-round, provided you provide them with the necessary conditions. This includes adequate sunlight (or grow lights), proper watering, fertilization, and pest control. Choose pepper varieties that are well-suited for indoor growing. You may need to adjust your watering and fertilization schedule depending on the season. During the winter months, when sunlight is less intense, you may need to supplement with grow lights.
What do I do if my pepper plant outgrows the bottle?
If your pepper plant outgrows the bottle, you have a couple of options. You can either transplant it into a larger container or prune the roots to keep it contained within the bottle. If you choose to transplant it, select a pot that is at least twice the size of the bottle. If you choose to prune the roots, carefully remove the plant from the bottle and trim back about one-third of the roots. Then, replant it in the same bottle with fresh potting mix. Root pruning can help to control the size of the plant and prevent it from becoming root-bound.
How long does it take to grow peppers in bottles?
The time it takes to grow peppers in bottles depends on the variety of pepper, the growing conditions, and the size of the plant. Generally, it takes about 60-90 days from transplanting seedlings to harvesting mature peppers. Some pepper varieties may mature faster than others. Ensure that your plants receive adequate sunlight, water, and nutrients to promote rapid growth.
What are some creative ways to decorate my bottle pepper garden?
There are many creative ways to decorate your bottle pepper garden. You can paint the bottles with bright colors or patterns. You can also wrap them with twine, burlap, or other decorative materials. Add labels to identify the different pepper varieties. Create a hanging garden by suspending the bottles from a balcony railing or a ceiling. Use decorative stones or pebbles to cover the soil surface. Get creative and personalize your bottle garden to reflect your own style.
Leave a Comment