
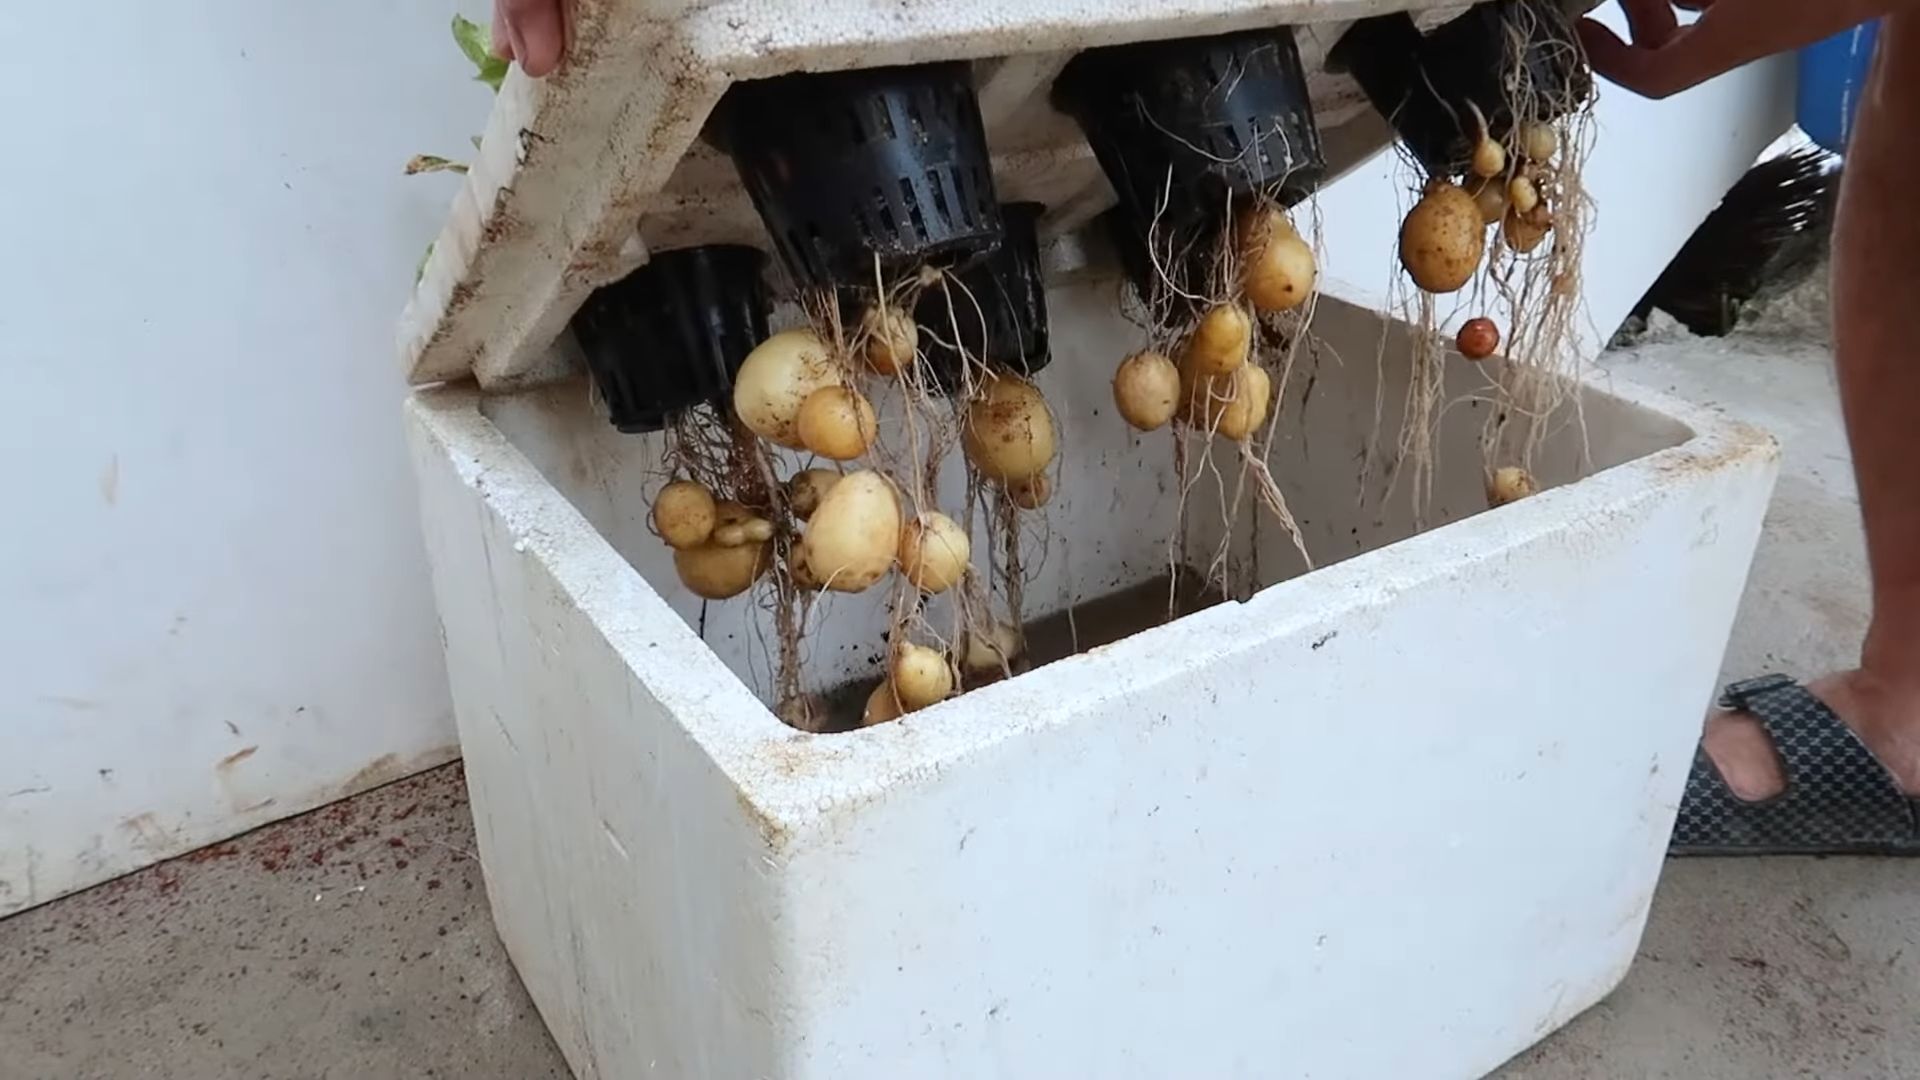
Growing Potatoes in Water: Sounds a little crazy, right? But trust me, it’s one of the most rewarding and space-saving gardening hacks I’ve ever tried! Forget acres of farmland; you can cultivate your own spuds right on your windowsill.
The idea of growing plants in water, also known as hydroponics, isn’t new. While large-scale hydroponics is a relatively modern agricultural technique, the basic principle has roots stretching back to ancient civilizations. Think of the Hanging Gardens of Babylon – a testament to humanity’s ingenuity in nurturing plants without traditional soil. Now, we’re bringing that ingenuity into our homes, one potato at a time!
Why should you try growing potatoes in water? Well, for starters, it’s perfect for apartment dwellers or anyone with limited outdoor space. Plus, it’s a fantastic way to recycle those potatoes that have started to sprout in your pantry. More importantly, it’s incredibly satisfying to watch the entire process unfold before your eyes, from tiny roots emerging to the first signs of leafy growth. It’s a fun and educational project for kids and adults alike, and it’s a great way to enjoy fresh, homegrown potatoes without the hassle of traditional gardening. So, let’s dive in and discover the secrets to successfully growing potatoes in water!
Growing Potatoes in Water: A Fun and Easy DIY Project!
Hey there, fellow gardening enthusiasts! Ever thought about growing potatoes without soil? It sounds a bit crazy, right? But trust me, it’s not only possible but also a super fun and rewarding DIY project. I’m going to walk you through the entire process, step-by-step, so you can enjoy fresh, homegrown potatoes even if you don’t have a garden!
What You’ll Need
Before we dive in, let’s gather all the necessary supplies. This will make the whole process smoother and more enjoyable.
* Potatoes: You’ll need seed potatoes or potatoes that have already started sprouting “eyes.” Organic potatoes are best, as they are less likely to be treated with sprout inhibitors. Avoid potatoes that are soft or have signs of rot.
* Clear Container: A glass jar, vase, or any clear container that can hold water and the potato. The size will depend on the size of your potato. I prefer using a wide-mouthed jar for easy access.
* Water: Clean, dechlorinated water is essential. Tap water can contain chemicals that inhibit growth. Let tap water sit out for 24 hours to allow the chlorine to evaporate, or use filtered water.
* Toothpicks or Skewers: These will be used to suspend the potato in the water.
* Optional: Liquid fertilizer (specifically formulated for vegetables) can be added to the water later to provide extra nutrients.
Preparing Your Potato
This is a crucial step to ensure your potato sprouts properly.
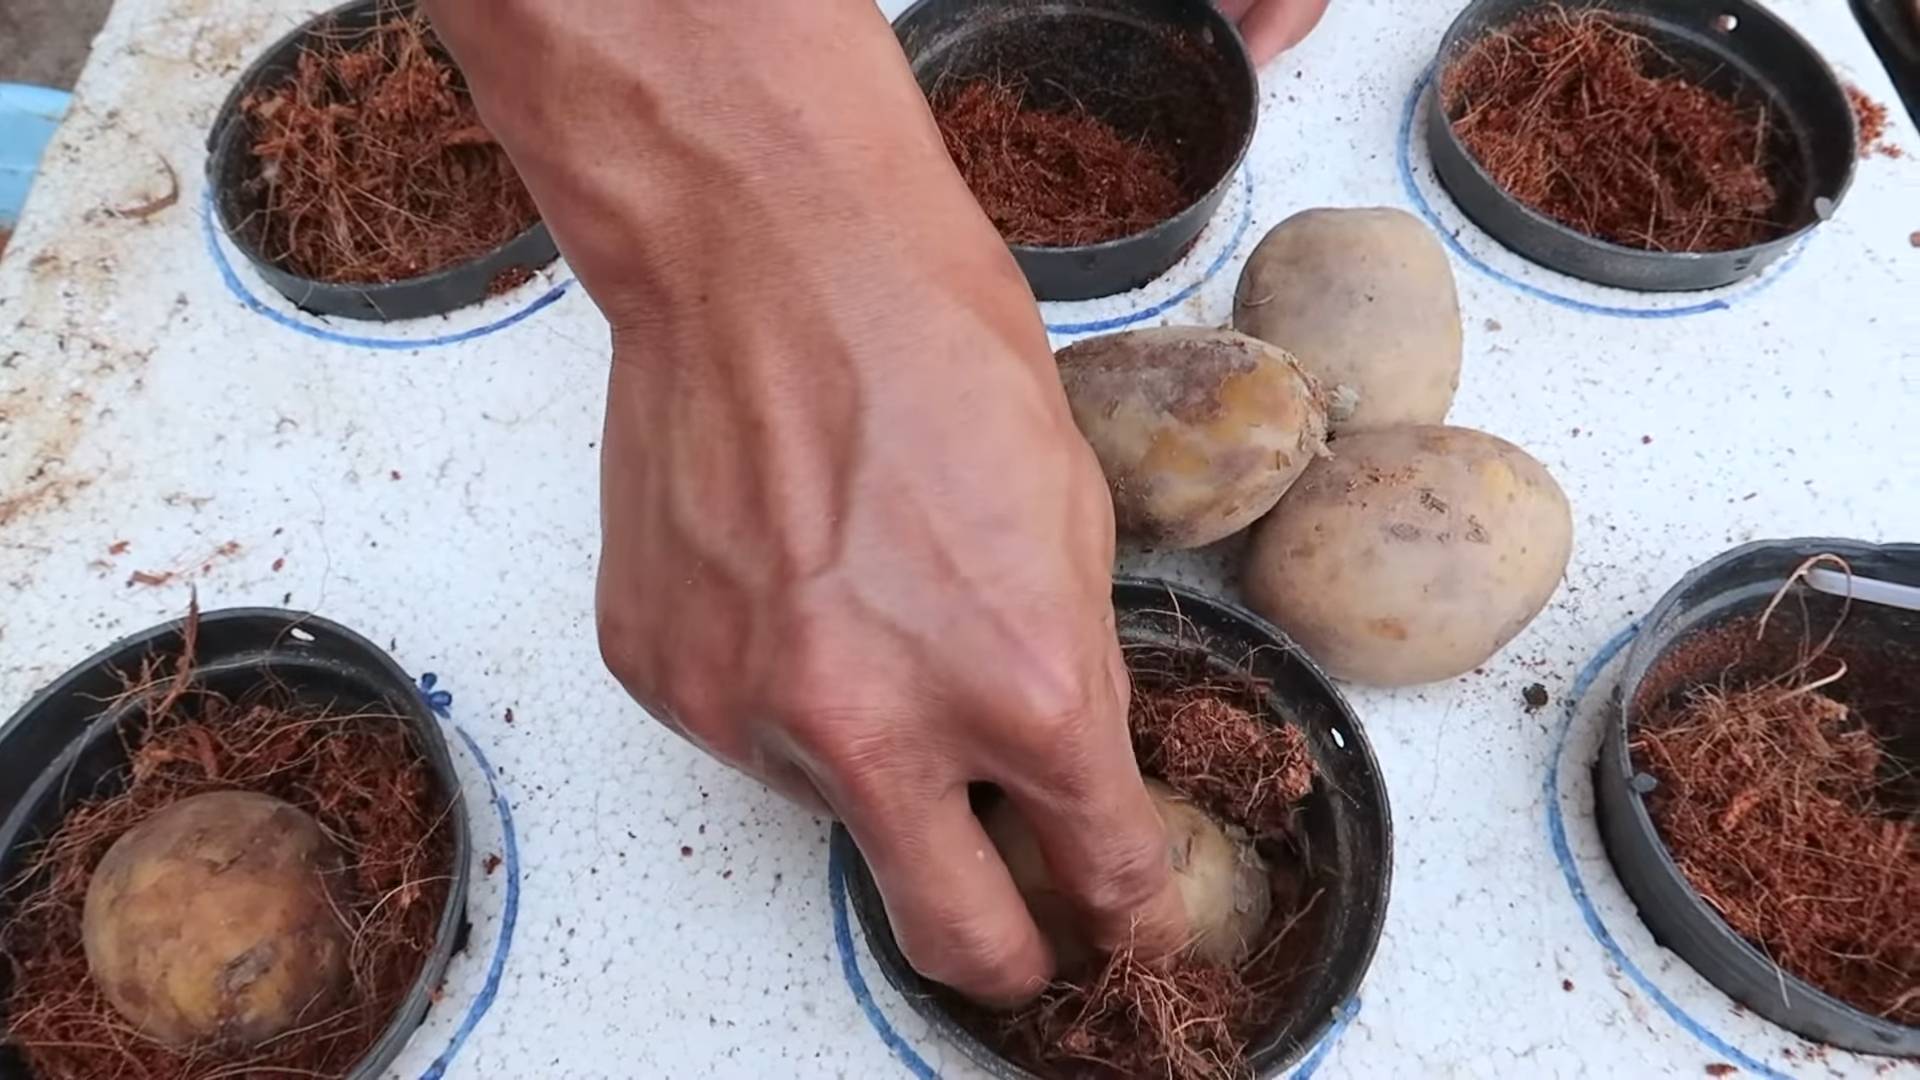
1. Choose the Right Potato: Look for potatoes with several “eyes” (those little bumps where sprouts will emerge). The more eyes, the more potential sprouts!
2. Cut the Potato (If Necessary): If your potato is large, you can cut it into pieces, ensuring each piece has at least 2-3 eyes. This will give you multiple plants. Let the cut pieces air dry for a day or two to callous over. This helps prevent rot.
3. Let the Eyes Sprout (Optional): You can encourage sprouting by placing the potato in a bright, warm location for a few days before putting it in water. This isn’t strictly necessary, but it can speed up the process.
Setting Up Your Water Garden
Now for the fun part – creating the perfect environment for your potato to thrive!
1. Clean Your Container: Thoroughly wash your chosen container with soap and water to remove any dirt or residue.
2. Insert Toothpicks/Skewers: This is how we’ll suspend the potato. Insert 3-4 toothpicks or skewers evenly spaced around the middle of the potato. The goal is to create a “platform” that will hold the potato just above the water level.
3. Fill the Container with Water: Pour water into the container, leaving about an inch of space at the top.
4. Position the Potato: Carefully place the potato on top of the container, resting on the toothpicks/skewers. The bottom half of the potato should be submerged in the water, while the top half remains dry. Make sure the eyes are facing upwards.
Caring for Your Water Potato
This is where patience comes in! It takes time for the potato to sprout and grow.
1. Choose the Right Location: Place your container in a bright, indirect sunlight location. Avoid direct sunlight, which can overheat the water and damage the potato. A windowsill facing east or west is ideal.
2. Change the Water Regularly: This is super important! Change the water every 2-3 days to prevent bacteria and algae growth. Use fresh, dechlorinated water each time.
3. Monitor Water Level: Make sure the bottom half of the potato remains submerged in water. Add more water as needed to maintain the water level.
4. Watch for Sprouts: Within a week or two, you should start to see sprouts emerging from the eyes. These sprouts will eventually grow into stems and leaves.
5. Add Fertilizer (Optional): Once the sprouts are a few inches tall, you can add a small amount of liquid fertilizer to the water every two weeks. Follow the instructions on the fertilizer package carefully. Over-fertilizing can harm the plant. I usually dilute the fertilizer to half strength.
6. Support the Plant (Optional): As the plant grows taller, it may need support. You can use a small trellis or stakes to keep the stems from falling over.
Troubleshooting
Sometimes things don’t go exactly as planned. Here are some common issues and how to address them:
* Potato Rotting: If the potato starts to rot, it’s usually due to bacteria or fungus. Remove the potato immediately and discard it. Start with a fresh potato and make sure to change the water more frequently. Also, ensure the cut surfaces of the potato have calloused over properly before placing it in water.
* No Sprouts: If you don’t see any sprouts after a few weeks, the potato may be too old or treated with sprout inhibitors. Try using a different potato, preferably an organic one. Also, make sure the potato is in a warm, bright location.
* Yellowing Leaves: Yellowing leaves can indicate a nutrient deficiency. Try adding a small amount of liquid fertilizer to the water. It can also be caused by overwatering, but since we’re growing in water, that’s less likely. Make sure the water is changed regularly.
* Algae Growth: Algae can grow in the water, especially if the container is exposed to direct sunlight. Change the water more frequently and move the container to a less sunny location. You can also clean the container with a mild bleach solution (rinse thoroughly!) before refilling it.
From Water to Soil (Optional)
While you can technically grow potatoes in water indefinitely, you’ll get a much larger yield if you eventually transplant them to soil. Here’s how:
1. Wait for Roots to Develop: Before transplanting, wait until the plant has developed a good root system in the water. This usually takes a few weeks.
2. Prepare a Pot: Choose a large pot (at least 5 gallons) with drainage holes. Fill it with a well-draining potting mix.
3. Carefully Remove the Plant: Gently remove the potato plant from the water, being careful not to damage the roots.
4. Plant the Potato: Dig a hole in the potting mix and plant the potato, covering it with soil. Leave the top of the plant exposed.
5. Water Thoroughly: Water the plant thoroughly after planting.
6. Care for the Plant: Place the pot in a sunny location and water regularly. Fertilize every few weeks.
Harvesting Your Potatoes (If Transplanted to Soil)
If you transplanted your potato plant to soil, you can expect to harvest potatoes in a few months.
1. Wait for the Plant to Die Back: The leaves of the plant will start to turn yellow and die back when the potatoes are ready to harvest.
2. Dig Up the Potatoes: Carefully dig around the base of the plant to unearth the potatoes.
3. Enjoy Your Harvest! Wash the potatoes and enjoy them in your favorite recipes.
Growing Potatoes in Water: Advanced Techniques
Once you’ve mastered the basics, you can experiment with some advanced techniques to maximize your yield and enjoyment.
Using Different Potato Varieties
Experiment with different potato varieties to see which ones grow best in water. Some varieties, like fingerling potatoes, are known for their smaller size and may be better suited for container gardening.
Adding Air Stones
Adding an air stone to the water can help oxygenate the water and promote root growth. This is especially beneficial if you’re growing potatoes in water for an extended period.
Hydroponic Systems
If you’re serious about growing potatoes in water, you can invest in a hydroponic system. These systems provide a controlled environment for growing plants without soil and can significantly increase your yield.
Vertical Gardening
Consider using a vertical gardening system to grow multiple potato plants in a small space. This is a great option for apartment dwellers or anyone with limited gardening space.
Final Thoughts
Growing potatoes in water is a fantastic way to learn about plant growth and enjoy fresh, homegrown produce. It’s a simple, rewarding project that anyone can do, regardless of their gardening experience. So, grab a potato, a jar, and some water, and get ready to embark on a fun and educational gardening adventure! I hope you found this guide helpful, and happy growing!
Conclusion
So, there you have it! Growing potatoes in water is not just a quirky gardening experiment; it’s a genuinely rewarding and surprisingly simple way to enjoy fresh, homegrown potatoes, even without a traditional garden. This method offers a fantastic opportunity to witness the entire potato life cycle up close, from sprouting eyes to the development of new tubers. It’s a particularly appealing option for apartment dwellers, urban gardeners, or anyone looking for a fun and educational project to do with kids.
Why is this DIY trick a must-try? Because it’s accessible, space-saving, and yields delicious results. Imagine the satisfaction of harvesting your own baby potatoes, knowing exactly where they came from and how they were grown. Plus, it’s a conversation starter! Your friends and family will be amazed by your innovative approach to potato cultivation.
But the fun doesn’t stop there. Feel free to experiment with different potato varieties. Russets, Yukon Golds, and red potatoes all respond well to water propagation. You can also play around with the nutrient solution. Some gardeners add a diluted liquid fertilizer specifically formulated for vegetables to boost growth and yield. Just be sure to monitor the water quality and change it regularly to prevent algae growth and maintain optimal conditions.
Another exciting variation is to try growing potatoes in colored glass jars or vases. This not only adds a decorative element to your indoor garden but also helps to filter the light, potentially promoting healthier root development. You can even create a tiered system by placing smaller jars inside larger ones, allowing for multiple potato plants to thrive in a compact space.
Don’t be afraid to get creative with your setup. Use recycled materials like plastic bottles or glass containers to minimize waste and give your project a unique, eco-friendly touch. The possibilities are endless!
Ultimately, the success of growing potatoes in water hinges on providing the right environment: consistent moisture, adequate light, and proper nutrients. By following the simple steps outlined in this guide, you’ll be well on your way to harvesting a bountiful crop of homegrown potatoes.
We wholeheartedly encourage you to give this DIY trick a try. It’s a fun, educational, and ultimately delicious experience that will transform the way you think about potato cultivation. And most importantly, don’t forget to share your experiences with us! We’d love to see your potato-growing setups, hear about your successes (and any challenges you encounter), and learn from your unique approaches. Post photos and stories on social media using relevant hashtags, or leave a comment below to connect with fellow potato enthusiasts. Let’s cultivate a community of water-grown potato aficionados! Embrace the simplicity and joy of this method, and discover the magic of growing your own food, one potato at a time. Remember, even a small space can yield a surprising harvest with the right techniques. So, grab a potato, a jar of water, and get ready to embark on a rewarding gardening adventure. You might just be surprised at how easy and fulfilling it is to grow your own delicious, homegrown potatoes in water.
Frequently Asked Questions (FAQs)
What kind of potatoes work best for growing in water?
Almost any potato variety can be grown in water, but some tend to be more successful than others. Smaller potatoes, like fingerling potatoes or new potatoes, often sprout and grow more readily in water. Yukon Gold and red potatoes are also popular choices due to their relatively quick growth and delicious flavor. Russet potatoes can be grown in water, but they may take longer to sprout and require more space due to their larger size. Experimenting with different varieties is part of the fun! Just make sure the potatoes you choose are organic and free from any sprout inhibitors.
How much light do potatoes grown in water need?
Potatoes grown in water need plenty of indirect sunlight. A location near a bright window is ideal. Avoid direct sunlight, especially during the hottest part of the day, as it can overheat the water and damage the developing roots. If you don’t have access to sufficient natural light, you can supplement with a grow light. Aim for at least 6-8 hours of light per day. The leaves should be a healthy green color; if they start to turn yellow or pale, it could be a sign that they’re not getting enough light.
How often should I change the water?
It’s crucial to change the water regularly to prevent algae growth and maintain a healthy environment for your potatoes. Aim to change the water every 2-3 days, or more frequently if you notice any cloudiness or discoloration. When changing the water, gently rinse the potatoes and the container to remove any accumulated debris. Using filtered water can also help to prevent mineral buildup and promote healthier growth.
Do I need to add nutrients to the water?
While potatoes can grow in plain water, adding a diluted nutrient solution can significantly boost their growth and yield. Use a liquid fertilizer specifically formulated for vegetables, diluted to half the recommended strength. Add the fertilizer to the water every other water change. Be careful not to over-fertilize, as this can lead to nutrient burn and damage the plants. Monitor the leaves for any signs of nutrient deficiency, such as yellowing or stunted growth, and adjust the fertilizer accordingly.
How long does it take to grow potatoes in water?
The time it takes to grow potatoes in water can vary depending on the variety, environmental conditions, and the care you provide. Generally, you can expect to see sprouts within 1-2 weeks. Small roots will start to develop shortly after. It typically takes 2-3 months from sprouting to harvest a crop of baby potatoes. You’ll know they’re ready to harvest when the leaves start to yellow and die back.
Can I grow potatoes in water indefinitely?
While you can keep a potato plant alive in water for an extended period, it’s not typically sustainable for long-term potato production. The plant will eventually exhaust the available nutrients in the water, and the tubers may not reach their full potential. For optimal results, it’s best to harvest the potatoes after a few months and start a new batch. You can, however, take cuttings from the potato plant and propagate them in water to create new plants.
What do I do if my potatoes start to rot in the water?
If you notice any signs of rot, such as soft spots or a foul odor, remove the affected potato immediately to prevent the spread of disease. Discard the potato and thoroughly clean the container with soap and water. Ensure that the remaining potatoes have adequate space and are not overcrowded. Improve ventilation by placing the container in a well-ventilated area. Changing the water more frequently and adding a small amount of hydrogen peroxide (3%) to the water can also help to prevent rot.
Can I eat the potato leaves?
No, you should not eat the leaves of potato plants. Potato leaves contain solanine, a toxic alkaloid that can cause gastrointestinal distress and other health problems. Only the tubers (the potatoes themselves) are safe to eat.
What are some common problems when growing potatoes in water and how can I fix them?
Some common problems include algae growth, root rot, and nutrient deficiencies. Algae growth can be prevented by changing the water regularly and keeping the container out of direct sunlight. Root rot can be addressed by removing affected potatoes, cleaning the container, and improving ventilation. Nutrient deficiencies can be corrected by adding a diluted liquid fertilizer to the water. Also, keep an eye out for pests like aphids, and treat them with insecticidal soap if necessary.
Can I transfer my water-grown potatoes to soil?
Yes, you can transfer your water-grown potatoes to soil. Once the roots are well-developed, carefully remove the potato from the water and plant it in a pot filled with well-draining potting mix. Water thoroughly and place the pot in a sunny location. The potato plant will continue to grow in the soil, and you may even get a larger harvest than you would in water alone. This is a great option if you want to transition your water-grown potatoes to a more traditional gardening setup.

Leave a Comment