
Growing Purple Bush Beans can seem intimidating, but trust me, it’s a rewarding experience that’s easier than you think! Have you ever dreamed of strolling through your own backyard, plucking vibrant, jewel-toned beans straight from the vine for a fresh, healthy meal? This DIY guide will transform that dream into a delicious reality.
Beans, in general, have a rich history, dating back thousands of years and playing a vital role in the diets of cultures worldwide. From ancient civilizations in the Americas to traditional European cuisines, beans have been a staple source of protein and essential nutrients. Now, we’re taking it a step further by focusing on the visually stunning and equally nutritious purple bush bean!
Why should you learn this DIY trick? Well, for starters, growing purple bush beans allows you to control the quality of your food, ensuring it’s free from harmful pesticides and packed with flavor. Plus, there’s something incredibly satisfying about nurturing a plant from seed to harvest. Beyond the health benefits and personal satisfaction, it’s also a fantastic way to connect with nature, reduce your carbon footprint, and even save money on groceries. This guide will provide you with simple, step-by-step instructions and clever hacks to make your purple bush bean growing journey a resounding success, even if you’re a complete beginner. Let’s get started!
Growing Purple Bush Beans: A DIY Guide from Seed to Table
Hey there, fellow gardeners! I’m so excited to share my experience growing purple bush beans. They’re not only delicious but also add a vibrant splash of color to your garden. This guide will walk you through every step, from choosing the right seeds to harvesting your beautiful, edible bounty. Let’s get started!
Choosing Your Seeds and Preparing the Soil
Before we even think about planting, let’s talk about the foundation of a successful bean harvest: the seeds and the soil.
* Seed Selection: Look for reputable seed companies that offer purple bush bean varieties. Some popular choices include ‘Royal Burgundy,’ ‘Purple Queen,’ and ‘Amethyst.’ I personally love ‘Royal Burgundy’ because they’re reliable and produce a ton of beans. Make sure the seeds are relatively fresh for the best germination rates.
* Soil Preparation: Bush beans thrive in well-drained soil that’s rich in organic matter. Before planting, I always amend my garden bed with compost. This improves drainage, adds nutrients, and helps retain moisture.
* Sunlight: Purple bush beans need at least 6-8 hours of direct sunlight per day. Choose a sunny spot in your garden where they’ll get plenty of light.
Planting Your Purple Bush Beans
Now for the fun part – getting those seeds in the ground!
1. Timing is Key: Wait until the danger of frost has passed and the soil has warmed up to at least 60°F (15°C). I usually plant my beans about two weeks after the last expected frost. You can check your local weather forecast to be sure.
2. Direct Sowing: Bush beans are best direct-sown, meaning you plant the seeds directly into the garden bed. They don’t transplant well, so starting them indoors is generally not recommended.
3. Spacing: Sow the seeds about 1 inch deep and 2-3 inches apart in rows that are 18-24 inches apart. I like to use a garden trowel to create small furrows for the seeds.
4. Watering: After planting, gently water the soil to ensure good seed-to-soil contact. Keep the soil consistently moist but not waterlogged until the seedlings emerge.
5. Marking Rows: Don’t forget to label your rows! It’s easy to forget what you planted where, especially if you have multiple varieties.
Caring for Your Growing Beans
Once your seedlings emerge, it’s time to provide them with the care they need to flourish.
* Watering: Bush beans need consistent moisture, especially during flowering and pod development. Water deeply at the base of the plants, avoiding wetting the foliage, which can lead to fungal diseases. I usually water every 2-3 days, depending on the weather.
* Weeding: Keep the garden bed free of weeds, which compete with the beans for nutrients and water. Hand-pulling weeds is the best option to avoid damaging the bean plants.
* Fertilizing: Bush beans are relatively light feeders, but a side dressing of compost or a balanced organic fertilizer can help boost growth. I usually fertilize them about 3-4 weeks after they emerge.
* Pest Control: Keep an eye out for common bean pests like aphids, bean beetles, and slugs. I prefer to use organic pest control methods, such as insecticidal soap or diatomaceous earth. You can also hand-pick pests off the plants.
* Support (Optional): While bush beans don’t typically need support like pole beans, you can provide some support if the plants become heavy with pods. I sometimes use small stakes or tomato cages to prevent the plants from falling over.
Dealing with Common Problems
Even with the best care, you might encounter some challenges while growing purple bush beans. Here are a few common problems and how to address them:
* Poor Germination: If your seeds aren’t germinating well, it could be due to cold soil, poor seed quality, or overwatering. Make sure the soil is warm enough before planting, use fresh seeds, and avoid overwatering.
* Yellowing Leaves: Yellowing leaves can indicate a nutrient deficiency, overwatering, or a pest infestation. Check the soil moisture, fertilize if necessary, and inspect the plants for pests.
* Fungal Diseases: Fungal diseases like powdery mildew and bean rust can affect bean plants, especially in humid conditions. To prevent these diseases, provide good air circulation, avoid wetting the foliage, and use a fungicide if necessary.
* Bean Beetles: Bean beetles can quickly decimate bean plants. Hand-pick the beetles and their larvae off the plants, use insecticidal soap, or cover the plants with row covers.
* Aphids: Aphids are small, sap-sucking insects that can weaken bean plants. Spray the plants with insecticidal soap or blast them with a strong stream of water.
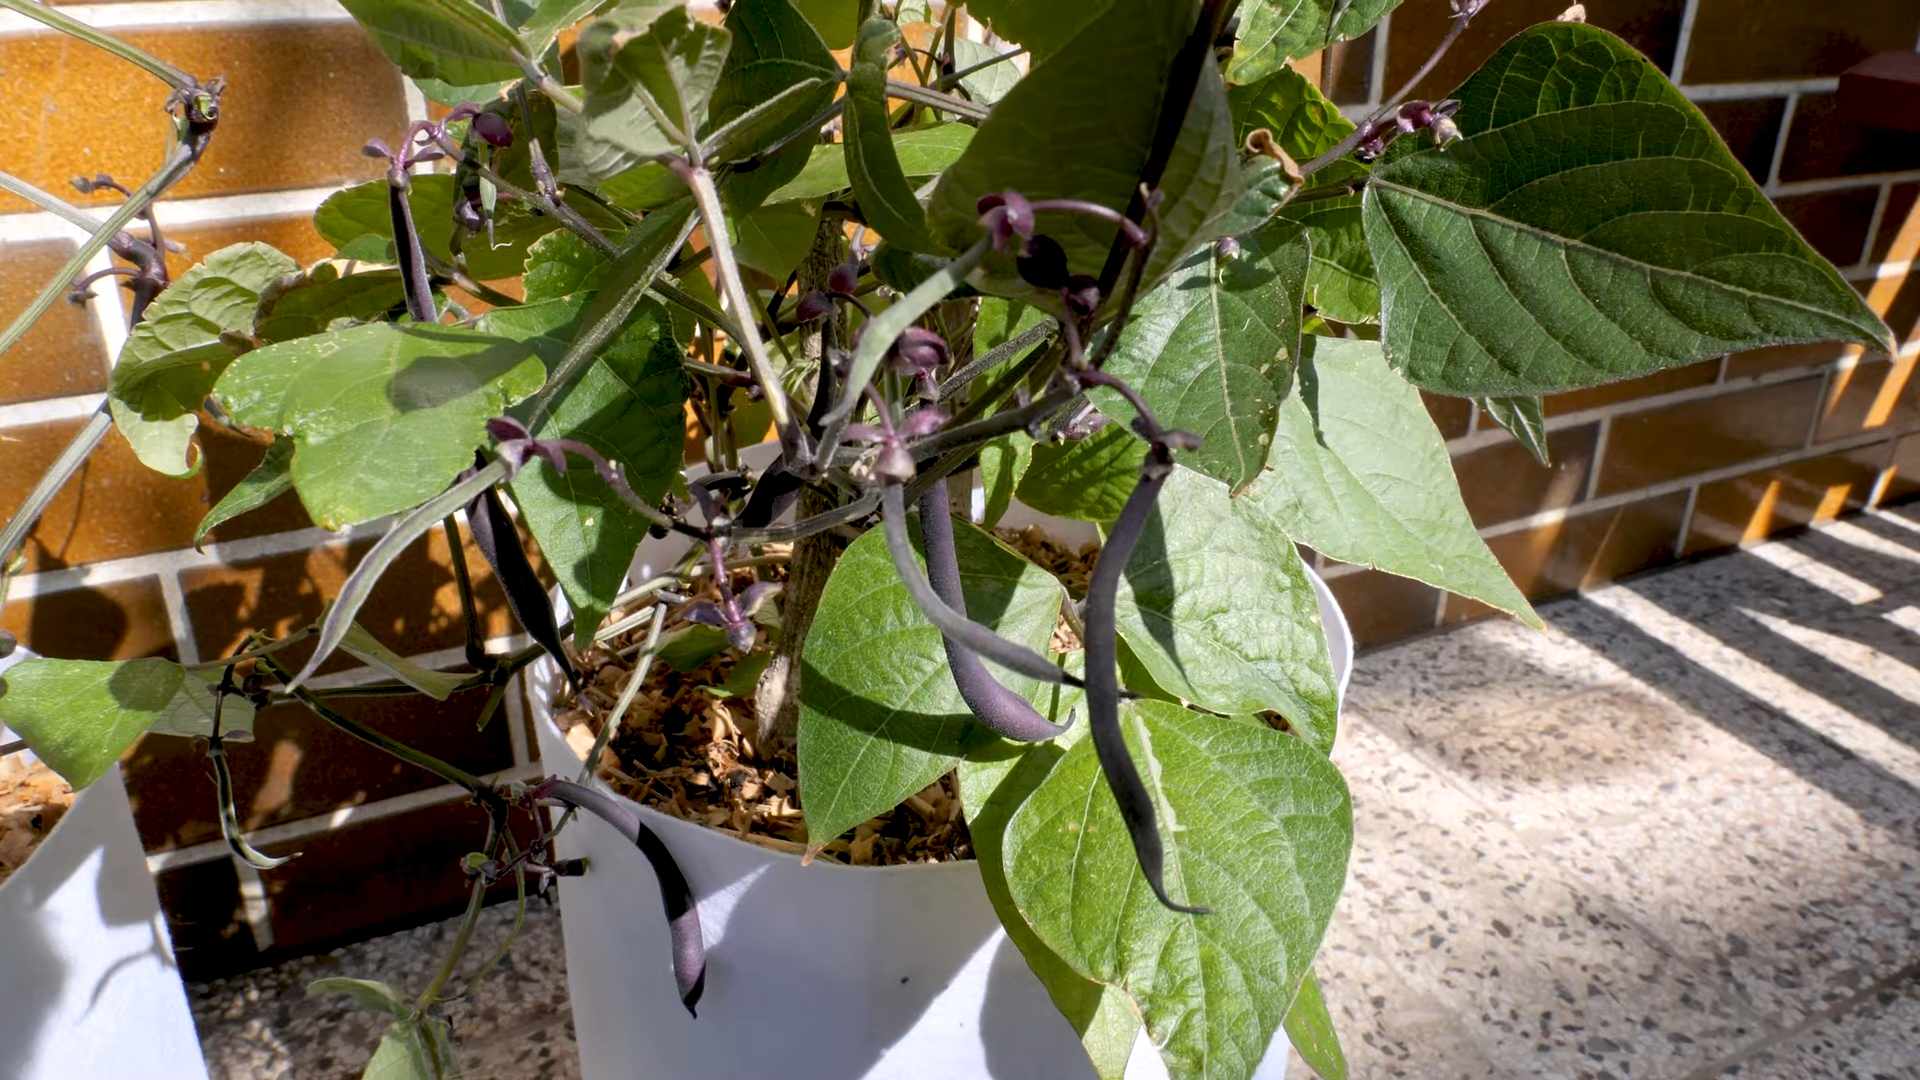
Harvesting Your Purple Bush Beans
The moment we’ve all been waiting for – harvesting those beautiful purple beans!
1. Timing: Bush beans are typically ready to harvest about 50-60 days after planting. The pods should be firm, plump, and about 4-6 inches long.
2. Harvesting Technique: Gently snap the pods off the plants, being careful not to damage the stems. I like to use two hands – one to hold the stem and the other to pull off the pod.
3. Regular Harvesting: Harvest the beans regularly, about every 2-3 days, to encourage continued production. Overripe beans can become tough and stringy.
4. Color Change: Keep in mind that some purple bean varieties will turn green when cooked. If you want to preserve the purple color, try steaming them lightly or eating them raw in salads.
5. End of Season: As the season winds down, you can let some of the pods dry on the plants and save the seeds for next year.
Enjoying Your Harvest
Now that you’ve harvested your purple bush beans, it’s time to enjoy the fruits (or rather, vegetables) of your labor!
* Fresh Eating: Purple bush beans are delicious eaten fresh in salads, stir-fries, or as a side dish. They have a slightly sweet and earthy flavor.
* Cooking: You can steam, boil, sauté, or roast purple bush beans. Be careful not to overcook them, as they can become mushy.
* Freezing: To preserve your harvest for later, you can blanch and freeze the beans. Blanching involves briefly boiling the beans and then plunging them into ice water to stop the cooking process.
* Canning: You can also can purple bush beans, but be sure to follow proper canning procedures to prevent spoilage.
* Sharing: Don’t forget to share your bounty with friends, family, and neighbors! Homegrown vegetables are always a welcome gift.
Saving Seeds for Next Year
If you want to save seeds from your purple bush beans for next year, here’s how:
1. Select Healthy Plants: Choose plants that are healthy, vigorous, and produce abundant pods.
2. Let Pods Dry: Allow some of the pods to dry completely on the plants. The pods should turn brown and brittle.
3. Harvest Seeds: Once the pods are dry, harvest them and shell the seeds.
4. Dry Seeds: Spread the seeds out on a tray and let them dry for a few more days.
5. Store Seeds: Store the seeds in an airtight container in a cool, dark, and dry place.
6. Label Seeds: Don’t forget to label the container with the variety and date.
Troubleshooting: Why Aren’t My Beans Producing?
Sometimes, despite our best efforts, our bean plants might not produce as many beans as we’d hoped. Here are some common reasons and how to troubleshoot them:
* Lack of Pollination: While bush beans are self-pollinating, sometimes environmental factors can hinder pollination. Ensure there are plenty of pollinators in your garden by planting flowers that attract bees and other beneficial insects.
* High Temperatures: Extreme heat can cause bean flowers to drop, resulting in fewer pods. Provide shade during the hottest part of the day or water more frequently to help the plants cope with the heat.
* Poor Soil: Nutrient-poor soil can limit bean production. Amend the soil with compost or a balanced fertilizer to provide the plants with the nutrients they need.
* Overwatering or Underwatering: Both overwatering and underwatering can stress bean plants and reduce their yield. Water deeply but infrequently, allowing the soil to dry out slightly between waterings.
* Pest Infestations: Pests like aphids and bean beetles can weaken bean plants and reduce their productivity. Control pests with organic methods like insecticidal soap or hand-picking.
Final Thoughts
Growing purple bush beans is a rewarding experience that adds beauty and flavor to your garden and your table. With a

Conclusion
So, there you have it! Growing your own purple bush beans isn’t just a fun gardening project; it’s a gateway to incredibly fresh, flavorful, and visually stunning meals. Forget those bland, store-bought beans that have traveled miles and lost their vibrancy. With a little effort, you can cultivate a bounty of these gorgeous purple gems right in your own backyard or even in containers on your balcony.
Why is this DIY trick a must-try? Because it puts you in control. You control the quality of the soil, the amount of sunlight, and the absence of harmful pesticides. You get to harvest your beans at their peak ripeness, ensuring maximum flavor and nutritional value. Plus, let’s be honest, there’s something incredibly satisfying about eating food you’ve grown yourself. It connects you to nature, reduces your carbon footprint, and adds a touch of magic to your plate.
Beyond the basic method, there’s plenty of room for experimentation. Try different varieties of purple bush beans, such as ‘Royal Burgundy’ or ‘Purple Queen,’ to discover your favorite flavor profile. Consider companion planting with herbs like rosemary or thyme to deter pests and enhance the beans’ flavor. You can also explore different growing methods, such as using raised beds or vertical trellises to maximize space and yield.
And don’t limit yourself to just boiling or steaming your purple bush beans. They’re fantastic in salads, stir-fries, and even pickled for a tangy treat. Imagine adding a handful of these vibrant beans to your next pasta dish or using them as a colorful garnish for a summer barbecue. The possibilities are endless!
Growing purple bush beans is a rewarding experience that will transform your garden and your meals. It’s a simple, sustainable, and delicious way to connect with nature and enjoy the fruits (or rather, vegetables) of your labor.
We wholeheartedly encourage you to give this DIY trick a try. Start small, learn as you go, and don’t be afraid to experiment. And most importantly, share your experience with us! We’d love to hear about your successes, your challenges, and your favorite ways to enjoy your homegrown purple bush beans. Post pictures of your harvest, share your recipes, and let’s create a community of purple bean enthusiasts! Happy gardening!
Frequently Asked Questions (FAQ)
What is the best time to plant purple bush beans?
The ideal time to plant purple bush beans is after the last frost in spring, when the soil has warmed to at least 60°F (15°C). Bush beans are sensitive to cold temperatures, so planting too early can hinder germination and growth. In most regions, this typically falls between late spring and early summer. You can also do succession planting every 2-3 weeks for a continuous harvest throughout the summer.
How much sunlight do purple bush beans need?
Purple bush beans require at least 6-8 hours of direct sunlight per day to thrive. Choose a planting location that receives ample sunlight throughout the day. If you’re growing them in containers, make sure to place them in a sunny spot on your patio or balcony. Insufficient sunlight can lead to leggy growth and reduced bean production.
What type of soil is best for growing purple bush beans?
Purple bush beans prefer well-drained, fertile soil with a slightly acidic to neutral pH (6.0-7.0). Amend your soil with compost or other organic matter to improve drainage and fertility. Avoid heavy clay soils, as they can become waterlogged and inhibit root growth. A well-draining soil is crucial for preventing root rot and ensuring healthy bean development.
How often should I water my purple bush beans?
Water your purple bush beans regularly, especially during dry periods. Aim to keep the soil consistently moist but not waterlogged. Water deeply at the base of the plants, avoiding wetting the foliage, which can increase the risk of fungal diseases. Mulching around the plants can help retain moisture and suppress weeds. Check the soil moisture regularly and adjust your watering schedule accordingly.
Do purple bush beans need fertilizer?
While purple bush beans don’t require heavy fertilization, a balanced fertilizer can help promote healthy growth and bean production. Apply a fertilizer with a ratio of 5-10-10 (nitrogen-phosphorus-potassium) at planting time and again when the plants begin to flower. Avoid over-fertilizing with nitrogen, as this can lead to excessive foliage growth at the expense of bean production. Organic fertilizers, such as compost tea or fish emulsion, are also excellent options.
How long does it take for purple bush beans to mature?
Purple bush beans typically mature in 50-60 days from planting. The exact time will depend on the variety, growing conditions, and climate. You’ll know the beans are ready to harvest when they are firm, plump, and easily snap off the plant. Regular harvesting encourages continued bean production.
What are some common pests and diseases that affect purple bush beans?
Common pests that can affect purple bush beans include aphids, bean beetles, and spider mites. Diseases include bean rust, powdery mildew, and root rot. Regularly inspect your plants for signs of pests or diseases and take appropriate action. Organic pest control methods, such as insecticidal soap or neem oil, can be effective for controlling pests. Ensure good air circulation and avoid overwatering to prevent fungal diseases.
Can I grow purple bush beans in containers?
Yes, purple bush beans can be successfully grown in containers. Choose a container that is at least 12 inches deep and wide to provide adequate space for root growth. Use a well-draining potting mix and ensure the container has drainage holes. Place the container in a sunny location and water regularly. Bush bean varieties are particularly well-suited for container gardening.
How do I harvest purple bush beans?
Harvest purple bush beans when they are firm, plump, and easily snap off the plant. Gently pull or snip the beans from the plant, being careful not to damage the stems. Harvest regularly, every few days, to encourage continued bean production. Overripe beans can become tough and stringy.
Can I save seeds from my purple bush beans?
Yes, you can save seeds from your purple bush beans for planting next year. Allow some of the beans to fully mature on the plant until they are dry and brown. Remove the beans from the pods and store them in a cool, dry place in an airtight container. Be aware that if you grew a hybrid variety, the seeds may not produce plants that are true to type.


Leave a Comment