
Growing Rutabagas at Home might sound like a challenge reserved for seasoned farmers, but trust me, it’s totally achievable – and incredibly rewarding – even for beginner gardeners like you and me! Have you ever dreamt of pulling a plump, earthy rutabaga straight from your own backyard, ready to be roasted, mashed, or added to a hearty stew? This DIY guide will unlock the secrets to cultivating these often-overlooked root vegetables right in your own garden.
Rutabagas, a cross between a cabbage and a turnip, have a fascinating history. Originating in Bohemia sometime in the 17th century, they quickly spread across Europe and eventually made their way to North America. They’ve long been a staple in colder climates, providing essential nutrients throughout the winter months. Think of them as the unsung heroes of the root vegetable world!
But why should you bother with growing rutabagas at home? Well, for starters, they’re packed with vitamins and fiber, making them a healthy addition to your diet. Plus, store-bought rutabagas can sometimes be bland and uninspiring. When you grow your own, you get to experience the true, sweet, and slightly peppery flavor that makes them so special. And let’s be honest, there’s nothing quite like the satisfaction of harvesting something you’ve nurtured from seed to table. This DIY guide will provide you with all the tips and tricks you need to successfully start growing rutabagas at home, even if you’ve never grown a root vegetable before. So, grab your gardening gloves, and let’s get started!
Growing Rutabagas: A Comprehensive DIY Guide
Rutabagas, those often-overlooked root vegetables, are surprisingly easy and rewarding to grow at home! They’re packed with nutrients, delicious roasted, mashed, or even raw, and can be stored for months. I’m going to walk you through everything you need to know to successfully cultivate these hardy vegetables in your own garden.
Choosing the Right Rutabaga Variety
First things first, let’s talk about varieties. While most rutabagas are pretty similar, there are a few subtle differences that might influence your choice:
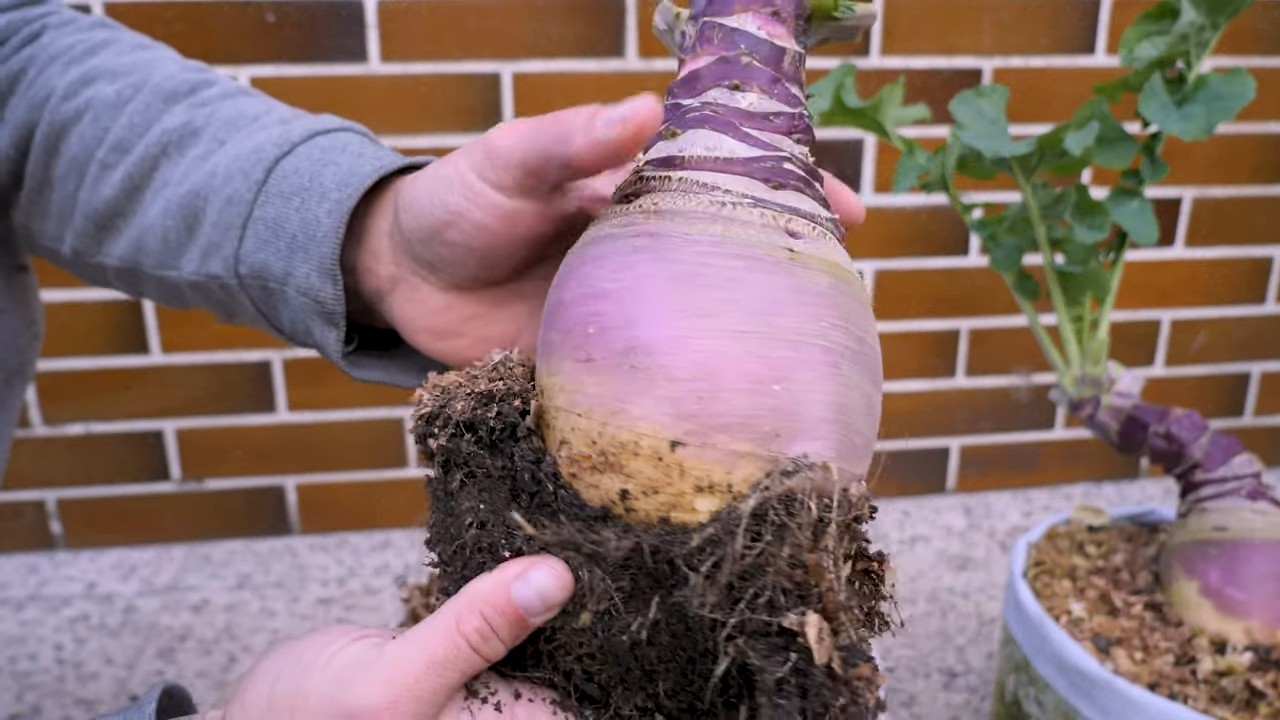
* ‘Laurentian’: This is a popular, widely available variety known for its smooth, purple-topped roots and yellow flesh. It’s a reliable producer and stores well.
* ‘American Purple Top’: As the name suggests, this variety has a distinctive purple top. It’s known for its sweet flavor and good storage capabilities.
* ‘Joan’: A newer variety that matures earlier than some others, making it a good choice for shorter growing seasons. It has a smooth, yellow skin and flesh.
I personally prefer ‘Laurentian’ because it’s readily available and consistently performs well in my garden. But feel free to experiment and find the variety that suits your taste and climate best!
Preparing Your Garden Bed
Rutabagas need a sunny spot with well-drained soil. Here’s how I prepare my garden bed for them:
* Sunlight: Aim for at least 6 hours of direct sunlight per day.
* Soil: Rutabagas thrive in loose, fertile soil with a pH between 6.0 and 7.0.
* Drainage: Good drainage is crucial to prevent root rot. If your soil is heavy clay, amend it with compost, well-rotted manure, or other organic matter to improve drainage.
* Nutrients: Rutabagas are heavy feeders, so enrich the soil with compost or a balanced fertilizer before planting.
Step-by-Step Planting Guide
Now for the fun part – planting!
1. Timing is Key: Rutabagas are cool-season crops, so the best time to plant them is in late spring or early summer for a fall harvest. I usually aim to plant about 90-100 days before the first expected frost in my area. You can also plant them in late summer for a winter harvest in milder climates.
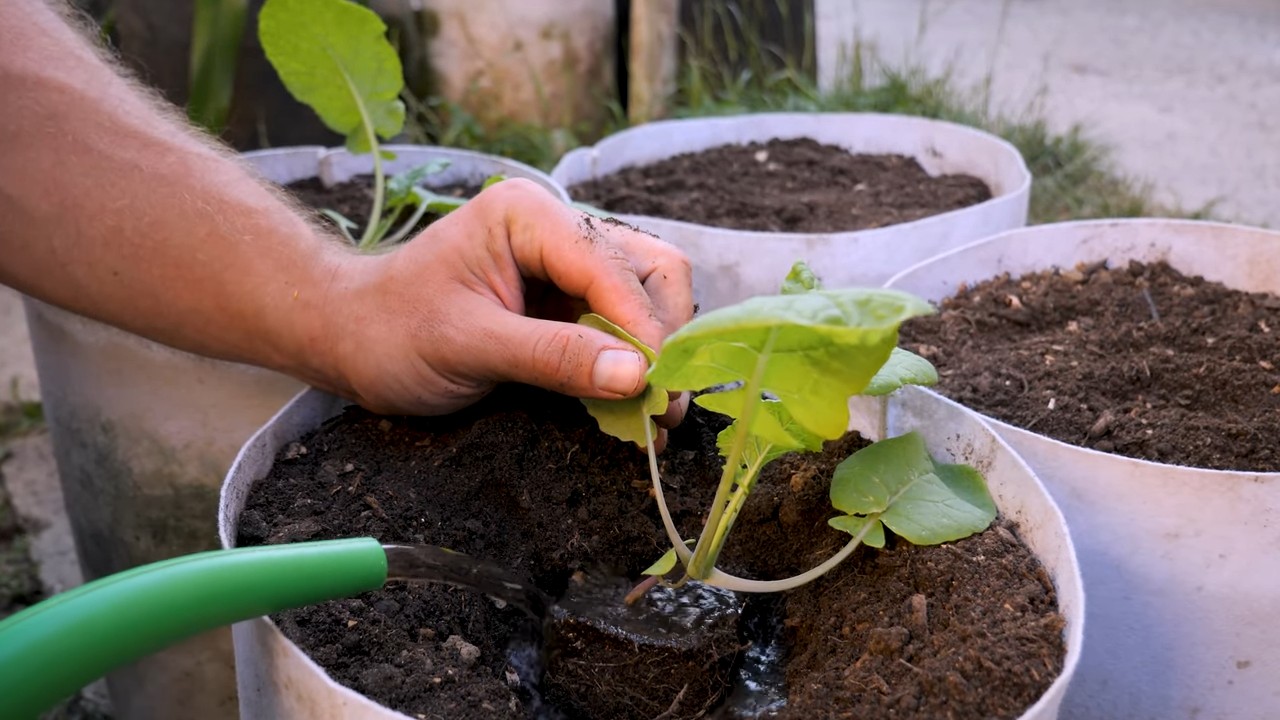
2. Direct Sowing: Rutabagas are best direct-sown into the garden. They don’t transplant well because disturbing their roots can hinder their growth.
3. Prepare the Seedbed: Rake the soil smooth and remove any rocks or debris.
4. Sowing the Seeds: Sow the seeds about ½ inch deep and 1-2 inches apart in rows that are 18-24 inches apart.
5. Water Gently: Water the seedbed gently to avoid washing away the seeds.
6. Thinning Seedlings: Once the seedlings emerge (usually in 5-10 days), thin them to 6-8 inches apart. This gives the rutabagas enough space to develop their roots. Don’t be afraid to thin them aggressively – crowded rutabagas won’t grow to their full potential.
Caring for Your Rutabagas
Once your rutabagas are planted, here’s how to keep them happy and healthy:
* Watering: Rutabagas need consistent moisture, especially during dry periods. Water deeply once or twice a week, or more often if the soil dries out quickly.
* Weeding: Keep the garden bed free of weeds, which can compete with the rutabagas for nutrients and water. Hand-pull weeds carefully to avoid disturbing the rutabaga roots.
* Fertilizing: Side-dress the rutabagas with compost or a balanced fertilizer a few weeks after thinning. This will provide them with the extra nutrients they need to grow large and healthy.
* Pest Control: Rutabagas can be susceptible to pests like flea beetles, aphids, and root maggots. I prefer to use organic pest control methods whenever possible.
* Flea Beetles: These tiny beetles can chew small holes in the leaves of your rutabagas. Cover the plants with row covers to prevent flea beetles from reaching them. You can also spray the plants with insecticidal soap.
* Aphids: These small, sap-sucking insects can weaken your rutabagas. Spray them off with a strong stream of water or use insecticidal soap.
* Root Maggots: These pests can tunnel into the roots of your rutabagas, causing them to rot. Prevent root maggots by covering the plants with row covers or using diatomaceous earth around the base of the plants.
* Disease Prevention: Rutabagas are generally disease-resistant, but they can be susceptible to diseases like clubroot and powdery mildew.
* Clubroot: This soilborne disease can cause the roots of your rutabagas to become swollen and distorted. Prevent clubroot by practicing crop rotation and maintaining a soil pH of 7.0 or higher.
* Powdery Mildew: This fungal disease can cause a white, powdery coating on the leaves of your rutabagas. Improve air circulation around the plants and avoid overhead watering to prevent powdery mildew. You can also spray the plants with a fungicide if necessary.
Harvesting Your Rutabagas
Harvest time is the most rewarding part!
1. When to Harvest: Rutabagas are typically ready to harvest in the fall, about 90-100 days after planting. The roots should be 3-5 inches in diameter. You can also harvest them earlier if you prefer smaller, more tender roots.
2. How to Harvest: Loosen the soil around the rutabagas with a garden fork. Gently pull the rutabagas out of the ground, being careful not to damage the roots.
3. Cleaning and Curing: Brush off any excess soil from the rutabagas. Cure them in a cool, dry place for a few days to allow the skins to harden. This will help them store longer.
Storing Your Rutabagas
Proper storage is key to enjoying your rutabagas throughout the winter.
* Ideal Conditions: Store rutabagas in a cool, humid place, such as a root cellar or refrigerator. The ideal temperature is between 32°F and 40°F, and the humidity should be around 90%.
* Storage Methods:
* Root Cellar: If you have a root cellar, you can store rutabagas in bins or crates filled with sand or sawdust. This will help keep them moist and prevent them from drying out.
* Refrigerator: If you don’t have a root cellar, you can store rutabagas in the refrigerator. Wrap them individually in plastic wrap or place them in a plastic bag with a few holes for ventilation.
* Storage Duration: Properly stored rutabagas can last for several months. Check them periodically and remove any that show signs of spoilage.
Troubleshooting Common Problems
Even with the best care, you might encounter a few challenges along the way. Here are some common problems and how to address them:
* Slow Growth: If your rutabagas are growing slowly, it could be due to a lack of nutrients, water, or sunlight. Make sure they are getting enough of all three. You can also side-dress them with compost or a balanced fertilizer.
* Small Roots: Small roots can be caused by overcrowding, poor soil, or insufficient watering. Thin the seedlings to 6-8 inches apart, amend the soil with compost, and water regularly.
* Cracked Roots: Cracked roots can be caused by inconsistent watering. Water deeply and regularly, especially during dry periods.
* Bitter Taste: A bitter taste can be caused by hot weather or stress. Harvest the rutabagas before they get too large, and provide them with consistent moisture.
Enjoying Your Homegrown Rutabagas
Now that you’ve successfully grown and harvested your rutabagas, it’s time to enjoy them! Here are a few of my favorite ways to prepare them:
* Roasted Rutabagas: Toss rutabaga cubes with olive oil, salt, pepper, and your favorite herbs, and roast them in the oven until tender and slightly caramelized.
* Mashed Rutabagas: Boil or steam rutabaga cubes until tender, then mash them with butter, milk, and seasonings.
* Rutabaga Fries: Cut rutabagas into fry shapes, toss them with olive oil and spices, and bake or air fry them until crispy.
* Raw Rutabagas: Grate raw rutabagas into salads or slaws for a crunchy and slightly sweet flavor.
Growing rutabagas is a rewarding experience that allows you to enjoy fresh, healthy vegetables from your own garden. With a little planning and care, you can easily grow these versatile root vegetables and add them to
Conclusion
So, there you have it! Growing rutabagas at home is not only achievable, but it’s also a deeply rewarding experience that connects you directly to the food you eat. From the initial seed sowing to the final harvest, each step offers a chance to learn, experiment, and appreciate the magic of nature. Forget those bland, store-bought rutabagas; imagine the vibrant flavor and satisfying crunch of a freshly harvested rutabaga, grown with your own two hands.
This isn’t just about saving a few dollars at the grocery store; it’s about embracing a more sustainable lifestyle, reducing your carbon footprint, and enjoying the unparalleled taste of homegrown produce. Plus, let’s be honest, there’s a certain pride that comes with serving a dish featuring an ingredient you nurtured from a tiny seed.
But the journey doesn’t end here. Feel free to experiment with different varieties of rutabagas. Try the ‘Laurentian’ for its smooth texture and sweet flavor, or the ‘American Purple Top’ for its classic appearance and robust taste. You can also explore different planting times to extend your harvest season. Consider succession planting, sowing seeds every few weeks, to ensure a continuous supply of fresh rutabagas throughout the fall and winter.
Don’t be afraid to get creative with your rutabaga recipes, too! While mashed rutabaga with butter and herbs is a classic for a reason, there’s so much more you can do. Roast them with other root vegetables for a hearty side dish, add them to soups and stews for extra depth of flavor, or even grate them raw into salads for a surprising crunch. You can even try fermenting them for a probiotic-rich treat.
The key to successful rutabaga cultivation is consistent care and attention. Keep an eye out for pests and diseases, water regularly, and provide your plants with the nutrients they need to thrive. Remember, even experienced gardeners encounter challenges, so don’t be discouraged if things don’t go perfectly the first time. Learn from your mistakes, adapt your approach, and keep on growing!
We are confident that with a little effort and patience, you’ll be enjoying delicious, homegrown rutabagas in no time. So, grab your gardening gloves, order some seeds, and embark on this exciting adventure. We encourage you to try growing rutabagas at home and share your experiences with us! Tell us about your successes, your challenges, and your favorite rutabaga recipes. Let’s build a community of passionate home gardeners who are dedicated to growing their own food and sharing their knowledge with others. Share your photos and stories on social media using #HomegrownRutabagas – we can’t wait to see what you create!
Frequently Asked Questions (FAQ)
What are the biggest challenges when growing rutabagas, and how can I overcome them?
One of the most common challenges is dealing with pests like root maggots and aphids. To combat root maggots, consider using row covers to prevent the flies from laying eggs near your plants. You can also introduce beneficial nematodes to the soil, which will prey on the maggots. For aphids, a strong blast of water from a hose can often dislodge them. You can also use insecticidal soap or neem oil, following the instructions carefully. Another challenge can be clubroot, a soilborne disease. To prevent clubroot, ensure your soil is well-drained and has a pH of at least 7.0. Crop rotation is also crucial; avoid planting brassicas (like cabbage, broccoli, and cauliflower) in the same spot for several years. Finally, ensure you are providing adequate water and nutrients, as stressed plants are more susceptible to pests and diseases.
How much space do rutabagas need to grow properly?
Rutabagas need adequate space to develop their large roots. A good rule of thumb is to space plants about 6-8 inches apart in rows that are 18-24 inches apart. This allows the roots to expand without being crowded. If you’re growing in raised beds or containers, ensure the container is at least 12 inches deep and wide enough to accommodate the root’s growth. Overcrowding can lead to smaller roots and reduced yields. Thinning seedlings early is important to ensure each plant has enough room to thrive.
When is the best time to harvest rutabagas, and how do I know when they are ready?
Rutabagas are typically ready for harvest in the fall, about 90-100 days after planting. The ideal size for harvesting is around 4-6 inches in diameter. You can check the size by gently digging around the base of the plant. The tops of the rutabagas should be visible above the soil surface. Another way to tell if they’re ready is to check the foliage; if the leaves start to yellow and die back, it’s a good indication that the roots are mature. Don’t wait too long to harvest, as overly mature rutabagas can become tough and woody.
Can I grow rutabagas in containers, and if so, what are the best practices?
Yes, you can definitely grow rutabagas in containers! Choose a large container, at least 12 inches deep and wide, to accommodate the root’s growth. Use a high-quality potting mix that is well-draining. Ensure the container has drainage holes to prevent waterlogging. Water regularly, especially during hot weather, and fertilize every few weeks with a balanced fertilizer. Place the container in a sunny location that receives at least 6 hours of sunlight per day. Be mindful of the container drying out faster than a garden bed, so check the soil moisture frequently.
What are some creative ways to use rutabagas in cooking besides just mashing them?
Rutabagas are incredibly versatile in the kitchen! Try roasting them with other root vegetables like carrots, parsnips, and potatoes for a hearty side dish. You can also add them to soups and stews for extra depth of flavor and nutrition. Grate them raw into salads for a surprising crunch and slightly peppery taste. Rutabaga fries are a delicious and healthy alternative to potato fries. You can also pickle or ferment them for a probiotic-rich treat. Don’t forget the leaves! Young rutabaga leaves can be cooked like spinach or added to salads.
How do I store rutabagas after harvesting them?
Proper storage is key to keeping your rutabagas fresh for months. After harvesting, remove any excess soil and trim the leaves, leaving about an inch of stem. Store the rutabagas in a cool, dark, and humid place, such as a root cellar or unheated garage. The ideal temperature is between 32-40°F (0-4°C) with high humidity. You can store them in perforated plastic bags or in bins filled with damp sand or sawdust. Check them periodically and remove any that show signs of spoilage. With proper storage, rutabagas can last for several months.
Are there any companion plants that benefit rutabagas?
Yes, certain companion plants can help rutabagas thrive. Planting them alongside legumes like beans and peas can help fix nitrogen in the soil, benefiting the rutabagas. Aromatic herbs like rosemary, thyme, and sage can help deter pests. Marigolds are also known to repel nematodes and other harmful insects. Avoid planting rutabagas near other brassicas, as they can attract the same pests and diseases.
What type of soil is best for growing rutabagas?
Rutabagas thrive in well-drained, fertile soil with a pH between 6.0 and 7.0. Amend the soil with compost or other organic matter to improve drainage and fertility. Avoid heavy clay soils, as they can become waterlogged and hinder root development. If your soil is acidic, add lime to raise the pH. A soil test can help you determine the pH and nutrient levels of your soil.
Leave a Comment