
Growing Summer Squash in Containers: Imagine stepping onto your patio, not to a barren concrete slab, but to a vibrant mini-garden overflowing with lush greenery and, best of all, plump, sun-kissed summer squash ready for your dinner table! Sounds dreamy, right? Well, it doesn’t have to be just a dream. For centuries, container gardening has allowed people, even those without sprawling yards, to connect with nature and cultivate their own food. From ancient rooftop gardens in Babylon to modern-day apartment balconies, the desire to nurture life in limited spaces is deeply ingrained in us.
But let’s be honest, sometimes gardening feels more like a chore than a joy, especially when space is tight. That’s where clever DIY tricks and hacks come in! I’m here to share my favorite secrets for successfully growing summer squash in containers, even if you’re a complete beginner. We’ll tackle everything from choosing the right container size to mastering the art of watering and fertilizing.
Why is this so important? Because fresh, homegrown produce tastes infinitely better than anything you can buy at the store. Plus, knowing exactly where your food comes from and how it was grown gives you peace of mind. And let’s not forget the sheer satisfaction of nurturing a plant from seed to harvest! So, ditch the grocery store squash and get ready to embark on a rewarding journey of container gardening. I promise, with these simple DIY tricks, you’ll be harvesting delicious summer squash in no time!
Growing Summer Squash in Containers: A Comprehensive Guide
Hey there, fellow gardening enthusiasts! I’m so excited to share my experience with growing summer squash in containers. It’s a fantastic way to enjoy fresh, homegrown squash even if you don’t have a sprawling garden. Trust me, with a little know-how, you can have a bountiful harvest right on your patio or balcony!
Choosing the Right Squash Variety
First things first, not all squash varieties are created equal when it comes to container gardening. You’ll want to opt for bush varieties, as they tend to be more compact and manageable than their vining counterparts. Here are a few of my favorites:
* ‘Spacemaster’: This zucchini variety is specifically bred for containers and produces delicious, dark green fruits.
* ‘Bush Delicata’: A smaller delicata squash that’s perfect for roasting or stuffing.
* ‘Early Crookneck’: A classic yellow squash with a slightly curved neck and a mild flavor.
* ‘Patty Pan’: These adorable, saucer-shaped squash come in various colors and are great for grilling or sauteing.
* ‘Gold Rush’: A yellow zucchini variety that is known for its disease resistance.
Preparing Your Container
The right container is crucial for successful squash growing. Here’s what you need to consider:
* Size Matters: Choose a container that’s at least 24 inches in diameter and 12 inches deep. Squash plants need plenty of room for their roots to grow. A 5-gallon bucket is the absolute minimum, but bigger is always better.
* Drainage is Key: Make sure your container has adequate drainage holes. Squash plants don’t like sitting in soggy soil. If your container doesn’t have enough holes, you can drill a few more.
* Material Considerations: Plastic, terracotta, or even fabric grow bags can work well. I personally prefer fabric grow bags because they allow for better airflow and drainage.
* Location, Location, Location: Place your container in a spot that receives at least 6-8 hours of direct sunlight per day. Squash plants are sun-worshippers!
The Perfect Potting Mix
Forget garden soil! You’ll need a high-quality potting mix that’s lightweight, well-draining, and rich in organic matter.
* Avoid Garden Soil: Garden soil is too heavy and compacts easily in containers, which can suffocate the roots.
* Choose a Soilless Mix: Look for a potting mix that contains ingredients like peat moss, perlite, vermiculite, and compost.
* Amend with Compost: I like to add extra compost to my potting mix to provide a boost of nutrients.
* Consider Adding Slow-Release Fertilizer: This will provide a steady supply of nutrients to your plants throughout the growing season.
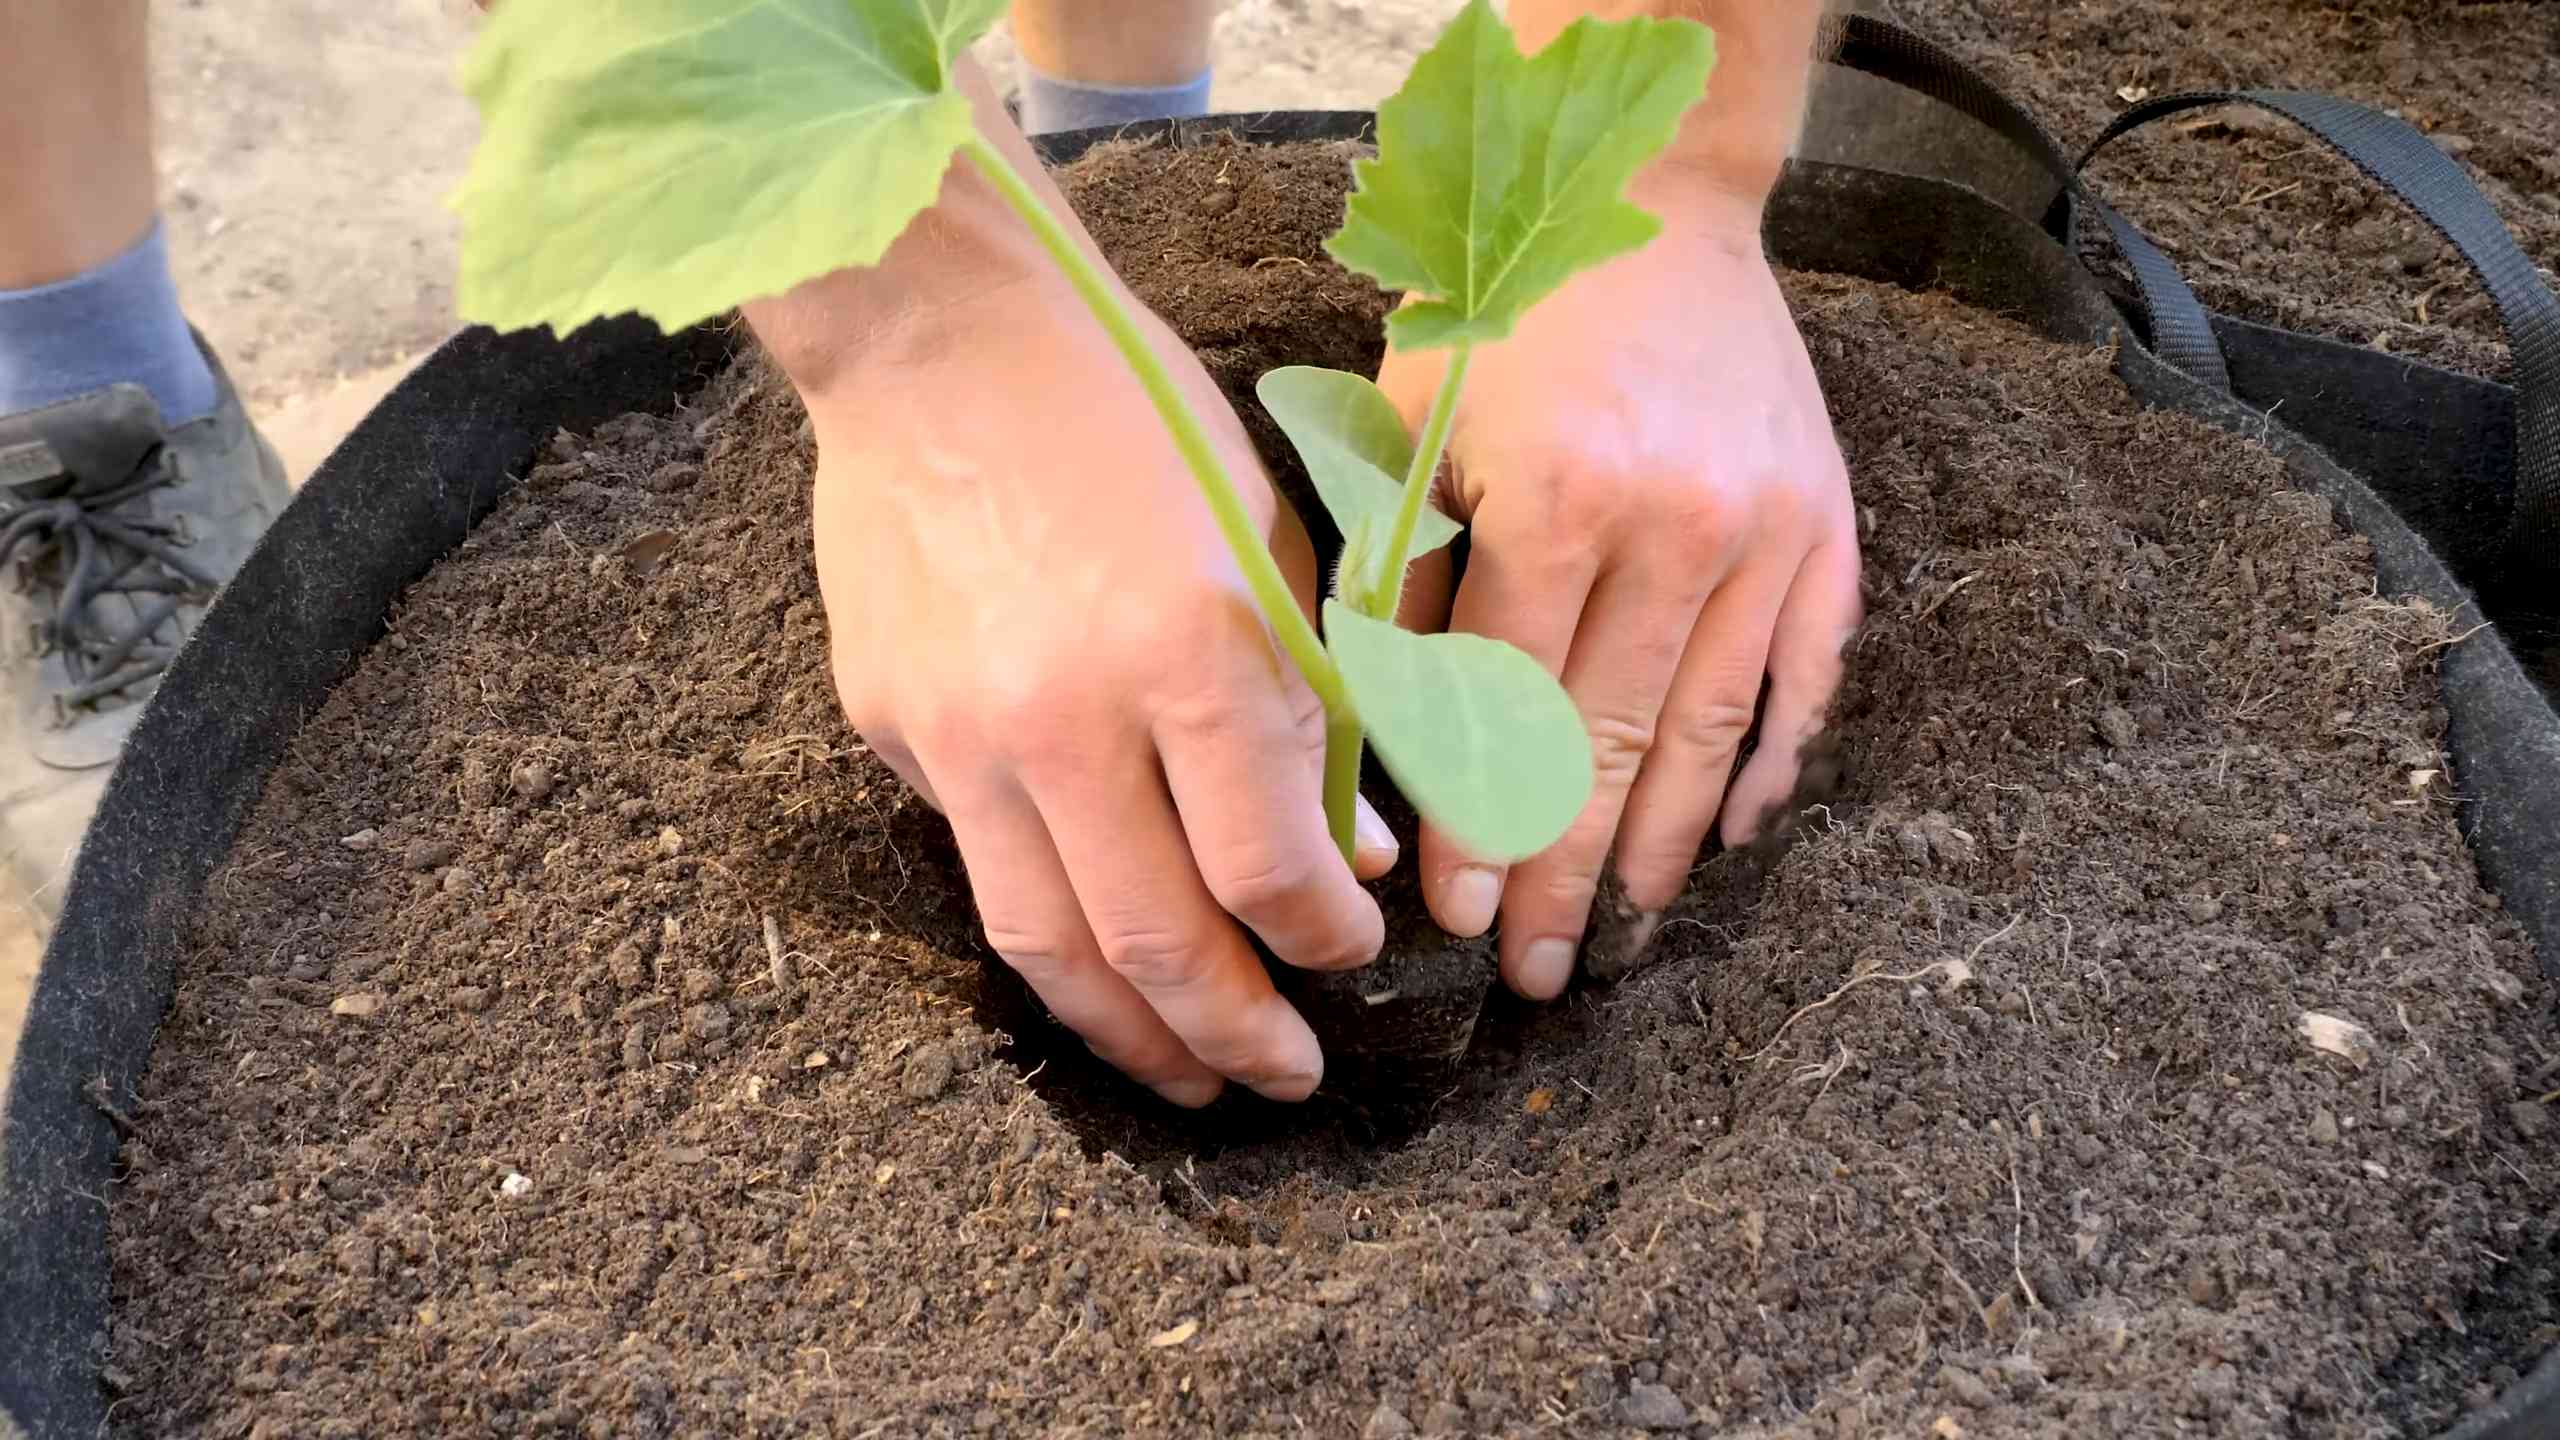
Planting Your Squash Seedlings
Now for the fun part – planting!
1. Fill the Container: Fill your container with the prepared potting mix, leaving a few inches of space at the top.
2. Create Planting Holes: Dig two or three small holes, about an inch deep, in the center of the container.
3. Sow the Seeds: Place one or two seeds in each hole. I usually plant two seeds per hole to increase the chances of germination.
4. Cover the Seeds: Gently cover the seeds with potting mix and water thoroughly.
5. Keep it Moist: Keep the soil consistently moist, but not waterlogged, until the seeds germinate. This usually takes about 7-10 days.
6. Thin the Seedlings: Once the seedlings have emerged and have a few sets of true leaves, thin them to one plant per hole. Choose the strongest, healthiest-looking seedling and snip off the others at the soil line.
Caring for Your Squash Plants
Consistent care is essential for a successful squash harvest.
* Watering: Water deeply and regularly, especially during hot, dry weather. Check the soil moisture regularly and water when the top inch feels dry to the touch. Avoid overhead watering, as this can lead to fungal diseases. I prefer to water at the base of the plant.
* Fertilizing: Squash plants are heavy feeders, so you’ll need to fertilize them regularly. Use a balanced fertilizer (like 10-10-10) every two to three weeks. You can also use a liquid fertilizer, such as fish emulsion or seaweed extract, for a more gentle feeding.
* Mulching: Apply a layer of mulch around the base of the plant to help retain moisture, suppress weeds, and regulate soil temperature. Straw, wood chips, or shredded leaves work well.
* Pollination: Squash plants have separate male and female flowers. The female flowers need to be pollinated in order to produce fruit. If you’re not seeing any fruit developing, you may need to hand-pollinate the flowers.
* Hand-Pollination: Use a small paintbrush to transfer pollen from the male flower (which has a long, thin stem) to the female flower (which has a small, immature fruit at the base). Do this in the morning, when the pollen is most viable.
* Pest Control: Keep an eye out for common squash pests, such as squash bugs, squash vine borers, and aphids.
* Squash Bugs: Handpick them off the plants or use insecticidal soap.
* Squash Vine Borers: These pests can be tricky to control. You can try wrapping the base of the stem with aluminum foil to prevent them from laying their eggs.
* Aphids: Spray them with a strong stream of water or use insecticidal soap.
* Disease Prevention: Squash plants are susceptible to fungal diseases, such as powdery mildew.
* Powdery Mildew: Ensure good air circulation around the plants and avoid overhead watering. You can also spray the plants with a fungicide if necessary.
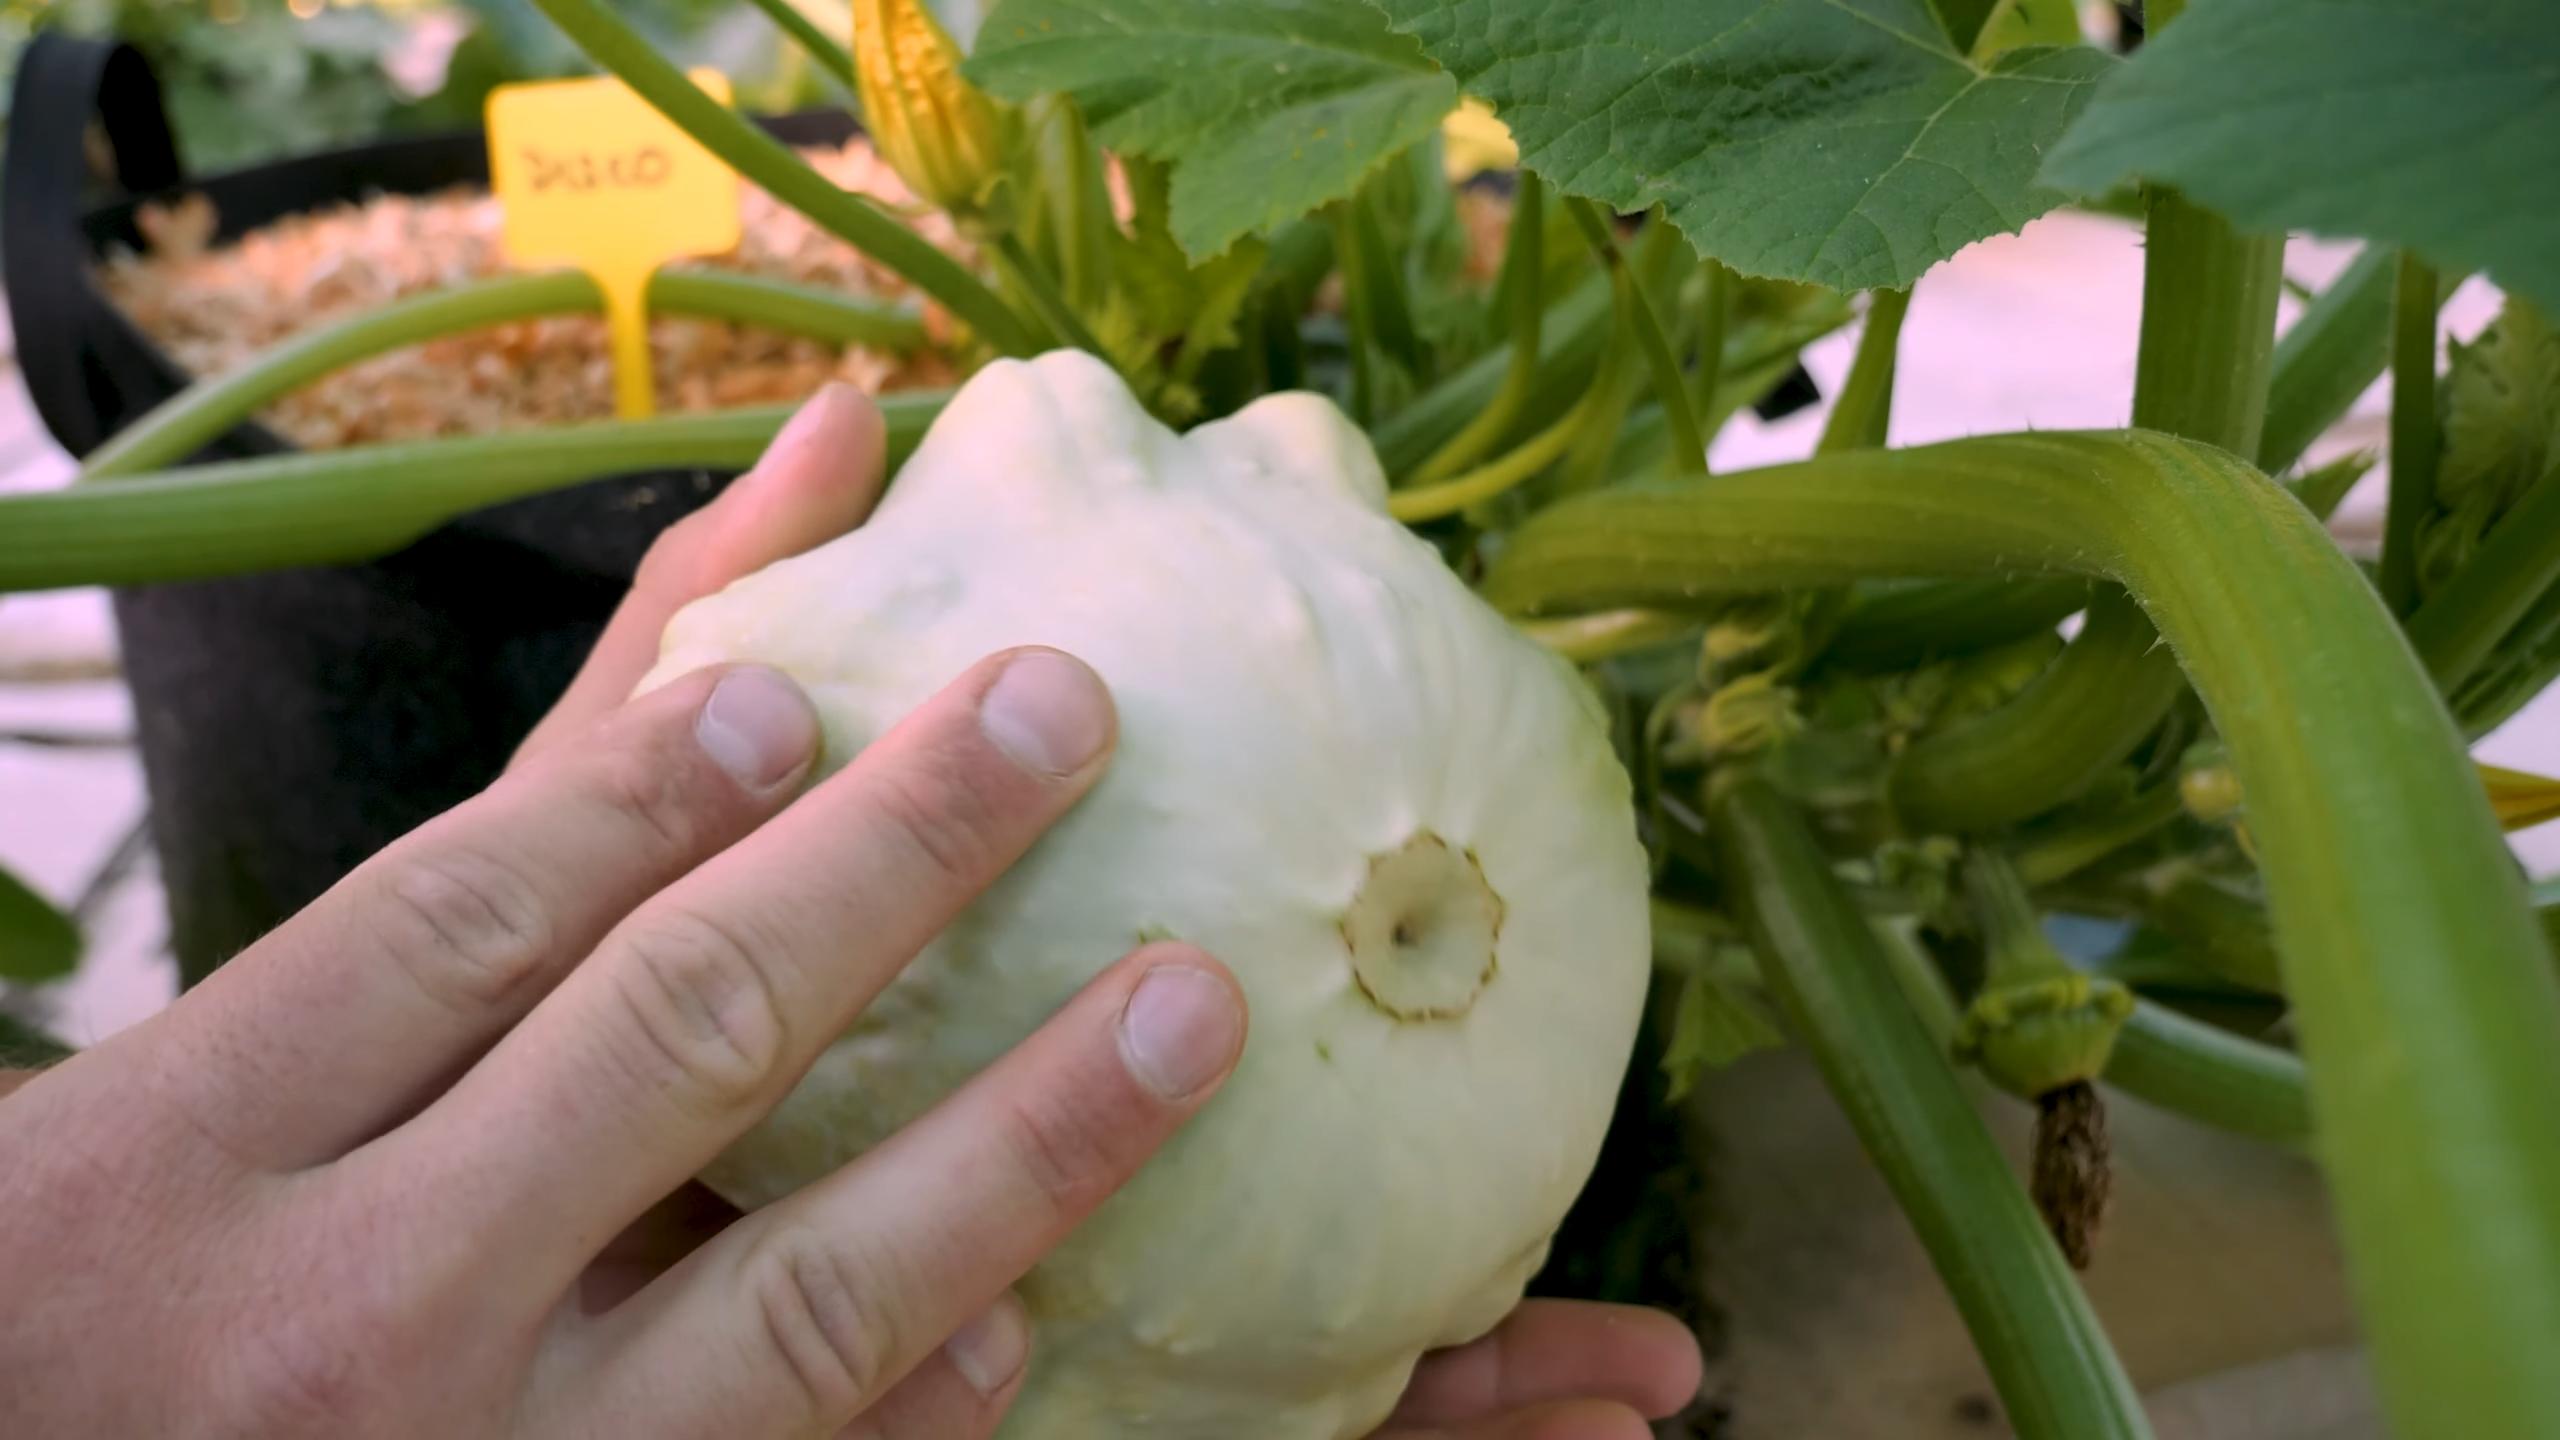
Harvesting Your Squash
The moment you’ve been waiting for!
* Timing is Everything: Harvest your squash when it’s young and tender. The exact timing will depend on the variety, but generally, you should harvest zucchini when it’s about 6-8 inches long and yellow squash when it’s about 4-6 inches long. Patty pan squash can be harvested when they’re about 3-4 inches in diam
Hey there, fellow gardening enthusiasts! I’m so excited to share my experience with growing summer squash in containers. It’s a fantastic way to enjoy fresh, homegrown squash even if you don’t have a sprawling garden. Trust me, with a little know-how, you can have a bountiful harvest right on your patio or balcony!
Choosing the Right Squash Variety
First things first, not all squash varieties are created equal when it comes to container gardening. You’ll want to opt for bush varieties, as they tend to be more compact and manageable than their vining counterparts. Here are a few of my favorites:
* ‘Spacemaster’: This zucchini variety is specifically bred for containers and produces delicious, dark green fruits.
* ‘Bush Delicata’: A smaller delicata squash that’s perfect for roasting or stuffing.
* ‘Early Crookneck’: A classic yellow squash with a slightly curved neck and a mild flavor.
* ‘Patty Pan’: These adorable, saucer-shaped squash come in various colors and are great for grilling or sauteing.
* ‘Gold Rush’: A yellow zucchini variety that is known for its disease resistance.
Preparing Your Container
The right container is crucial for successful squash growing. Here’s what you need to consider:
* Size Matters: Choose a container that’s at least 24 inches in diameter and 12 inches deep. Squash plants need plenty of room for their roots to grow. A 5-gallon bucket is the absolute minimum, but bigger is always better.
* Drainage is Key: Make sure your container has adequate drainage holes. Squash plants don’t like sitting in soggy soil. If your container doesn’t have enough holes, you can drill a few more.
* Material Considerations: Plastic, terracotta, or even fabric grow bags can work well. I personally prefer fabric grow bags because they allow for better airflow and drainage.
* Location, Location, Location: Place your container in a spot that receives at least 6-8 hours of direct sunlight per day. Squash plants are sun-worshippers!
The Perfect Potting Mix
Forget garden soil! You’ll need a high-quality potting mix that’s lightweight, well-draining, and rich in organic matter.
* Avoid Garden Soil: Garden soil is too heavy and compacts easily in containers, which can suffocate the roots.
* Choose a Soilless Mix: Look for a potting mix that contains ingredients like peat moss, perlite, vermiculite, and compost.
* Amend with Compost: I like to add extra compost to my potting mix to provide a boost of nutrients.
* Consider Adding Slow-Release Fertilizer: This will provide a steady supply of nutrients to your plants throughout the growing season.
Planting Your Squash Seedlings
Now for the fun part – planting!
1. Fill the Container: Fill your container with the prepared potting mix, leaving a few inches of space at the top.
2. Create Planting Holes: Dig two or three small holes, about an inch deep, in the center of the container.
3. Sow the Seeds: Place one or two seeds in each hole. I usually plant two seeds per hole to increase the chances of germination.
4. Cover the Seeds: Gently cover the seeds with potting mix and water thoroughly.
5. Keep it Moist: Keep the soil consistently moist, but not waterlogged, until the seeds germinate. This usually takes about 7-10 days.
6. Thin the Seedlings: Once the seedlings have emerged and have a few sets of true leaves, thin them to one plant per hole. Choose the strongest, healthiest-looking seedling and snip off the others at the soil line.
Caring for Your Squash Plants
Consistent care is essential for a successful squash harvest.
* Watering: Water deeply and regularly, especially during hot, dry weather. Check the soil moisture regularly and water when the top inch feels dry to the touch. Avoid overhead watering, as this can lead to fungal diseases. I prefer to water at the base of the plant.
* Fertilizing: Squash plants are heavy feeders, so you’ll need to fertilize them regularly. Use a balanced fertilizer (like 10-10-10) every two to three weeks. You can also use a liquid fertilizer, such as fish emulsion or seaweed extract, for a more gentle feeding.
* Mulching: Apply a layer of mulch around the base of the plant to help retain moisture, suppress weeds, and regulate soil temperature. Straw, wood chips, or shredded leaves work well.
* Pollination: Squash plants have separate male and female flowers. The female flowers need to be pollinated in order to produce fruit. If you’re not seeing any fruit developing, you may need to hand-pollinate the flowers.
* Hand-Pollination: Use a small paintbrush to transfer pollen from the male flower (which has a long, thin stem) to the female flower (which has a small, immature fruit at the base). Do this in the morning, when the pollen is most viable.
* Pest Control: Keep an eye out for common squash pests, such as squash bugs, squash vine borers, and aphids.
* Squash Bugs: Handpick them off the plants or use insecticidal soap.
* Squash Vine Borers: These pests can be tricky to control. You can try wrapping the base of the stem with aluminum foil to prevent them from laying their eggs.
* Aphids: Spray them with a strong stream of water or use insecticidal soap.
* Disease Prevention: Squash plants are susceptible to fungal diseases, such as powdery mildew.
* Powdery Mildew: Ensure good air circulation around the plants and avoid overhead watering. You can also spray the plants with a fungicide if necessary.
Harvesting Your Squash
The moment you’ve been waiting for!
* Timing is Everything: Harvest your squash when it’s young and tender. The exact timing will depend on the variety, but generally, you should harvest zucchini when it’s about 6-8 inches long and yellow squash when it’s about 4-6 inches long. Patty pan squash can be harvested when they’re about 3-4 inches in diameter.
* Gentle Harvesting: Use a sharp knife or pruning shears to cut the squash from the plant, leaving a short stem attached.
* Regular Harvesting: Harvest your squash regularly to encourage the plant to produce more fruit.
Troubleshooting Common Problems
Even with the best care, you may encounter some challenges along the way. Here are a few common problems and how to address them:
* Yellowing Leaves: This could be a sign of overwatering, underwatering, nutrient deficiency, or disease. Check the soil moisture and adjust your watering accordingly. Fertilize the plant with a balanced fertilizer. Inspect the leaves for signs of disease and treat as necessary.
* Blossom End Rot: This is a condition where the blossom end of the fruit turns brown and rotten. It’s usually caused by a calcium deficiency. Add calcium to the soil by amending with bone meal or crushed eggshells. Ensure consistent watering to help the plant absorb calcium.
* Lack of Fruit Production: This could be due to poor pollination, nutrient deficiency, or stress. Hand-pollinate the flowers to ensure fruit set. Fertilize the plant with a balanced fertilizer. Provide adequate water and sunlight.
Extending the Harvest
Want to keep the squash coming? Here are a few tips:
* Succession Planting: Plant new squash seeds every few weeks to extend the harvest season.
* Deadheading: Remove any spent flowers or damaged leaves to encourage the plant to focus its energy on producing new fruit.
* Fall Planting: In warmer climates, you can plant squash again in the fall for a second harvest.
Enjoying Your Homegrown Squash
Now that you’ve harvested your delicious squash, it’s time to enjoy it! There are endless ways to prepare squash, from grilling and sauteing to roasting and baking. You can also use it in soups, stews, and even desserts.
I hope this guide has inspired you to try growing summer squash in containers. It’s a rewarding experience that will provide you with fresh, healthy produce all summer long. Happy gardening!
Conclusion
So, there you have it! Growing summer squash in containers isn’t just possible; it’s a rewarding and surprisingly simple way to bring the bounty of the garden to your patio, balcony, or even your doorstep. We’ve walked through the essential steps, from selecting the right container and variety to nurturing your plants and harvesting those delicious, sun-kissed fruits.
Why is this DIY trick a must-try? Because it democratizes gardening! You don’t need acres of land to enjoy fresh, homegrown summer squash. Container gardening opens up the possibility to anyone, regardless of space constraints. Imagine stepping outside and picking a zucchini for tonight’s dinner, or adding vibrant yellow squash to your favorite summer salad. The taste of homegrown is simply unmatched, and the satisfaction of nurturing a plant from seed to harvest is incredibly fulfilling.
Beyond the basic guidelines, there’s plenty of room for experimentation. Consider trying different varieties of summer squash. Bush varieties like ‘Spacemaster’ zucchini or ‘Early Crookneck’ yellow squash are particularly well-suited for containers. You could also explore companion planting. Marigolds, for example, can help deter pests, while basil can improve the flavor of your squash. Don’t be afraid to get creative with your container design, too. A decorative pot can add a touch of personality to your garden space.
Remember, consistent watering and fertilization are key to success. Keep a close eye on your plants for any signs of pests or diseases, and address them promptly. And most importantly, don’t be discouraged if you encounter a few challenges along the way. Gardening is a learning process, and every season brings new opportunities to improve your skills.
We’re confident that you’ll find growing summer squash in containers to be a delightful and productive experience. The fresh flavor and convenience of having homegrown squash at your fingertips are well worth the effort. So, grab your seeds, your soil, and your containers, and get ready to enjoy a summer filled with delicious, homegrown goodness.
We encourage you to try this DIY trick and share your experiences with us! Let us know what varieties you’re growing, what challenges you’ve overcome, and what delicious recipes you’re creating with your homegrown summer squash. Share your photos and stories in the comments below – we can’t wait to hear from you! Happy gardening!
Frequently Asked Questions (FAQ)
What is the best size container for growing summer squash?
A container that holds at least 5 gallons of soil is recommended for growing summer squash. However, a 10-gallon container or larger is even better, as it provides more room for the roots to grow and helps retain moisture. The larger the container, the less frequently you’ll need to water. Ensure the container has drainage holes to prevent waterlogging.
What type of soil should I use for container-grown summer squash?
Use a high-quality potting mix specifically formulated for containers. Avoid using garden soil, as it can become compacted in containers and doesn’t drain well. A good potting mix will be lightweight, well-draining, and contain essential nutrients to support healthy plant growth. You can also amend the potting mix with compost or other organic matter to further improve its fertility and drainage.
How often should I water my container-grown summer squash?
Summer squash needs consistent moisture, especially when grown in containers. Water deeply whenever the top inch of soil feels dry to the touch. This may mean watering daily, or even twice a day, during hot, dry weather. Avoid overhead watering, as this can promote fungal diseases. Instead, water at the base of the plant.
How much sunlight does summer squash need?
Summer squash needs at least 6-8 hours of direct sunlight per day to thrive. Choose a location for your container that receives plenty of sunlight throughout the day. If you live in a particularly hot climate, providing some afternoon shade can help prevent the plants from overheating.
What kind of fertilizer should I use for summer squash?
Summer squash are heavy feeders and benefit from regular fertilization. Use a balanced fertilizer, such as a 10-10-10 or 5-5-5, according to the package directions. You can also use a fertilizer specifically formulated for vegetables. Fertilize every 2-3 weeks during the growing season. Consider using a slow-release fertilizer at planting time to provide a steady supply of nutrients.
How do I prevent pests and diseases from affecting my summer squash?
Regularly inspect your plants for signs of pests or diseases. Common pests that affect summer squash include squash bugs, squash vine borers, and aphids. Diseases include powdery mildew and squash mosaic virus. Use organic pest control methods, such as insecticidal soap or neem oil, to control pests. Ensure good air circulation around the plants to prevent fungal diseases. Remove any infected leaves or plants promptly. Companion planting with marigolds or nasturtiums can also help deter pests.
When should I harvest my summer squash?
Harvest summer squash when they are young and tender. Zucchini should be harvested when they are about 6-8 inches long, while yellow squash should be harvested when they are about 4-6 inches long. Regular harvesting encourages the plant to produce more fruit. Use a sharp knife or pruners to cut the squash from the plant, leaving a short stem attached.
Can I grow summer squash indoors?
While it’s possible to start summer squash seeds indoors, it’s generally not recommended to grow them indoors for their entire life cycle. Summer squash needs a lot of sunlight and space to thrive, which can be difficult to provide indoors. If you do want to start seeds indoors, do so about 2-3 weeks before the last expected frost. Transplant the seedlings outdoors into containers once the weather has warmed up and the risk of frost has passed.
What are some good companion plants for summer squash?
Good companion plants for summer squash include marigolds, nasturtiums, basil, oregano, and beans. Marigolds and nasturtiums help deter pests, while basil and oregano can improve the flavor of the squash. Beans can help fix nitrogen in the soil, which benefits the squash plants. Avoid planting summer squash near potatoes or fennel, as they can inhibit growth.
My summer squash plant is producing flowers, but no fruit. What could be the problem?
There are several reasons why your summer squash plant might be producing flowers but no fruit. One common reason is a lack of pollination. Summer squash requires pollination to produce fruit. You can hand-pollinate the flowers by transferring pollen from the male flowers to the female flowers using a small brush. Another reason could be nutrient deficiencies. Ensure you are fertilizing your plants regularly with a balanced fertilizer. Stress from heat, drought, or pests can also prevent fruit production. Ensure your plants are receiving adequate water and protection from pests.

Leave a Comment