
Growing Sweet Potatoes Vertically might sound like something out of a science fiction novel, but trust me, it’s a real and incredibly rewarding gardening technique! Are you dreaming of a bountiful sweet potato harvest but short on garden space? Or perhaps you’re just looking for a fun and innovative way to grow your own food? Well, you’ve come to the right place! I’m going to share some amazing DIY tricks that will transform your gardening game.
For centuries, sweet potatoes have been a staple crop in many cultures, particularly in South America and Asia. They’re packed with nutrients and incredibly versatile in the kitchen. Traditionally, they sprawl across the ground, taking up a considerable amount of space. But what if I told you there’s a way to enjoy these delicious tubers even if you only have a small balcony or patio?
That’s where vertical gardening comes in! This DIY guide will walk you through the process of growing sweet potatoes vertically, maximizing your yield while minimizing the space required. Imagine harvesting a basket full of sweet potatoes from a tower of vines – it’s not only practical but also a beautiful and eye-catching addition to your garden. Plus, it’s a fantastic conversation starter! So, let’s ditch the traditional sprawling method and explore the exciting world of vertical sweet potato cultivation. Get ready to unleash your inner gardener and enjoy a homegrown harvest like never before!
Growing Sweet Potatoes Vertically: A DIY Guide to Bountiful Harvests in Small Spaces
Hey there, fellow gardening enthusiasts! Are you dreaming of a sweet potato harvest but short on space? Well, I’ve got a fantastic solution for you: growing sweet potatoes vertically! This method is not only space-saving but also adds a unique and visually appealing element to your garden. I’ve been doing this for a few years now, and trust me, it’s a game-changer. Let’s dive into how you can create your own vertical sweet potato garden.
What You’ll Need
Before we get started, let’s gather all the necessary materials. This will make the process smoother and more enjoyable.
* **Large Container:** A sturdy container is essential. I recommend a container at least 2 feet in diameter and 2-3 feet deep. A large plastic bin, a half-barrel, or even a repurposed trash can (cleaned thoroughly, of course!) will work perfectly. Make sure it has drainage holes.
* **Sweet Potato Slips:** These are sprouts grown from sweet potatoes. You can purchase them from a local nursery or start your own (more on that later!).
* **Potting Mix:** Use a high-quality potting mix that’s well-draining and rich in organic matter. Avoid using garden soil, as it can become compacted in containers.
* **Support Structure:** This is what will allow the vines to climb vertically. Options include:
* **Tomato Cages:** These are readily available and easy to use.
* **Trellises:** A sturdy trellis provides excellent support.
* **DIY Structures:** Get creative! You can use bamboo poles, wooden stakes, or even repurposed materials to build your own support system.
* **Fertilizer:** A balanced fertilizer (e.g., 10-10-10) or a fertilizer specifically formulated for root vegetables will help your sweet potatoes thrive.
* **Watering Can or Hose:** For regular watering.
* **Gloves:** To protect your hands.
* **Optional: Mulch:** To help retain moisture and suppress weeds.
Starting Your Own Sweet Potato Slips (Optional but Recommended!)
Growing your own slips is a rewarding experience and saves you money. Here’s how I do it:
1. **Choose a Healthy Sweet Potato:** Select a firm, disease-free sweet potato from your local grocery store or farmer’s market. Organic ones are best to avoid any growth inhibitors.
2. **Prepare the Potato:** Wash the sweet potato thoroughly. You can cut it in half or leave it whole, depending on its size.
3. **Suspend the Potato:** There are two main methods:
* **Water Method:** Insert toothpicks around the middle of the sweet potato and suspend it over a jar or glass filled with water, ensuring the bottom half is submerged.
* **Soil Method:** Bury the sweet potato halfway in a container filled with moist potting mix.
4. **Provide Warmth and Light:** Place the jar or container in a warm, sunny location.
5. **Wait for Sprouts:** Within a few weeks, you should see sprouts (slips) emerging from the sweet potato. Keep the water level consistent or the soil moist.
6. **Harvest the Slips:** Once the slips are 6-8 inches long, gently twist or cut them off the sweet potato.
7. **Root the Slips:** Place the slips in a glass of water, ensuring the bottom inch or two is submerged. Roots should develop within a few days.
8. **Plant the Slips:** Once the roots are about an inch long, they’re ready to be planted in your vertical garden.
Building Your Vertical Sweet Potato Garden
Now for the fun part! Let’s get our hands dirty and create our vertical sweet potato haven.
1. Preparing the Container
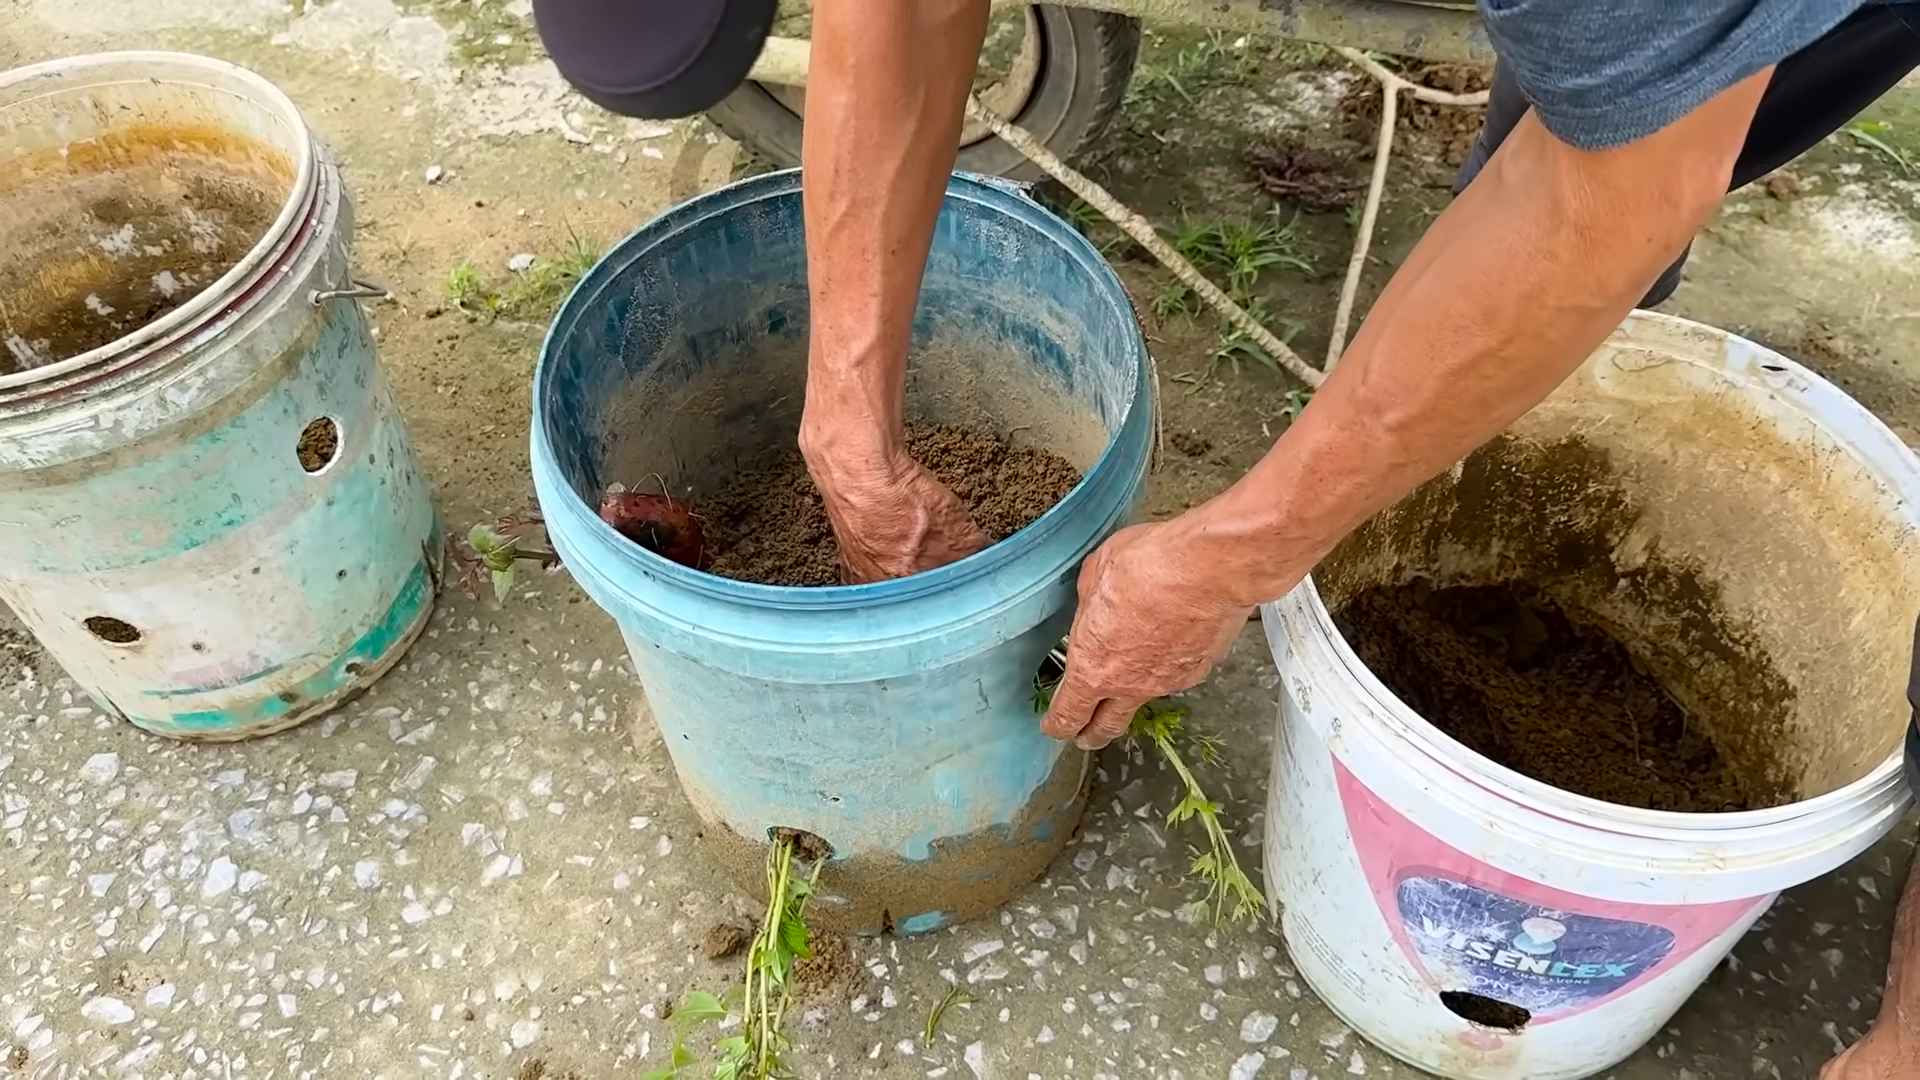
* **Ensure Drainage:** Double-check that your container has adequate drainage holes. If not, drill a few more. Sweet potatoes don’t like soggy feet!
* Add Potting Mix: Fill the container with high-quality potting mix, leaving about 4-6 inches of space at the top. This will prevent soil from spilling out when you water.
2. Installing the Support Structure
* **Tomato Cage:** If using a tomato cage, simply place it in the center of the container, pushing it firmly into the soil.
* **Trellis:** For a trellis, position it against the back of the container and secure it in place. You may need to use stakes or ties to keep it stable.
* **DIY Structure:** Get creative! Arrange your bamboo poles or wooden stakes in a way that provides ample support for the vines.
3. Planting the Sweet Potato Slips
* Spacing: Space the slips about 12-18 inches apart around the base of the support structure. This will give them enough room to grow and spread.
* Planting Depth: Dig small holes and gently plant the slips, burying the roots and the bottom part of the stem.
* Water Thoroughly: After planting, water the slips thoroughly to help them settle in.
4. Caring for Your Vertical Sweet Potato Garden
* Watering: Sweet potatoes need consistent moisture, especially during hot weather. Water deeply whenever the top inch of soil feels dry. Avoid overwatering, as this can lead to root rot.
* Fertilizing: Feed your sweet potatoes with a balanced fertilizer every 2-3 weeks. Follow the instructions on the fertilizer package. You can also use a fertilizer specifically formulated for root vegetables.
* Training the Vines: As the vines grow, gently train them to climb the support structure. You can use plant ties or simply weave them through the trellis or tomato cage.
* Sunlight: Sweet potatoes need at least 6-8 hours of sunlight per day. Place your container in a sunny location.
* Pest Control: Keep an eye out for pests such as aphids, spider mites, and sweet potato weevils. Treat any infestations promptly with organic pest control methods. I personally use neem oil spray.
* Mulching (Optional): Apply a layer of mulch around the base of the plants to help retain moisture, suppress weeds, and regulate soil temperature.
Harvesting Your Sweet Potatoes
The moment we’ve all been waiting for! Harvesting your sweet potatoes is the culmination of all your hard work.
* Timing: Sweet potatoes typically take 90-120 days to mature. The best time to harvest is before the first frost.
* Signs of Maturity: The leaves will start to turn yellow and the vines will begin to die back.
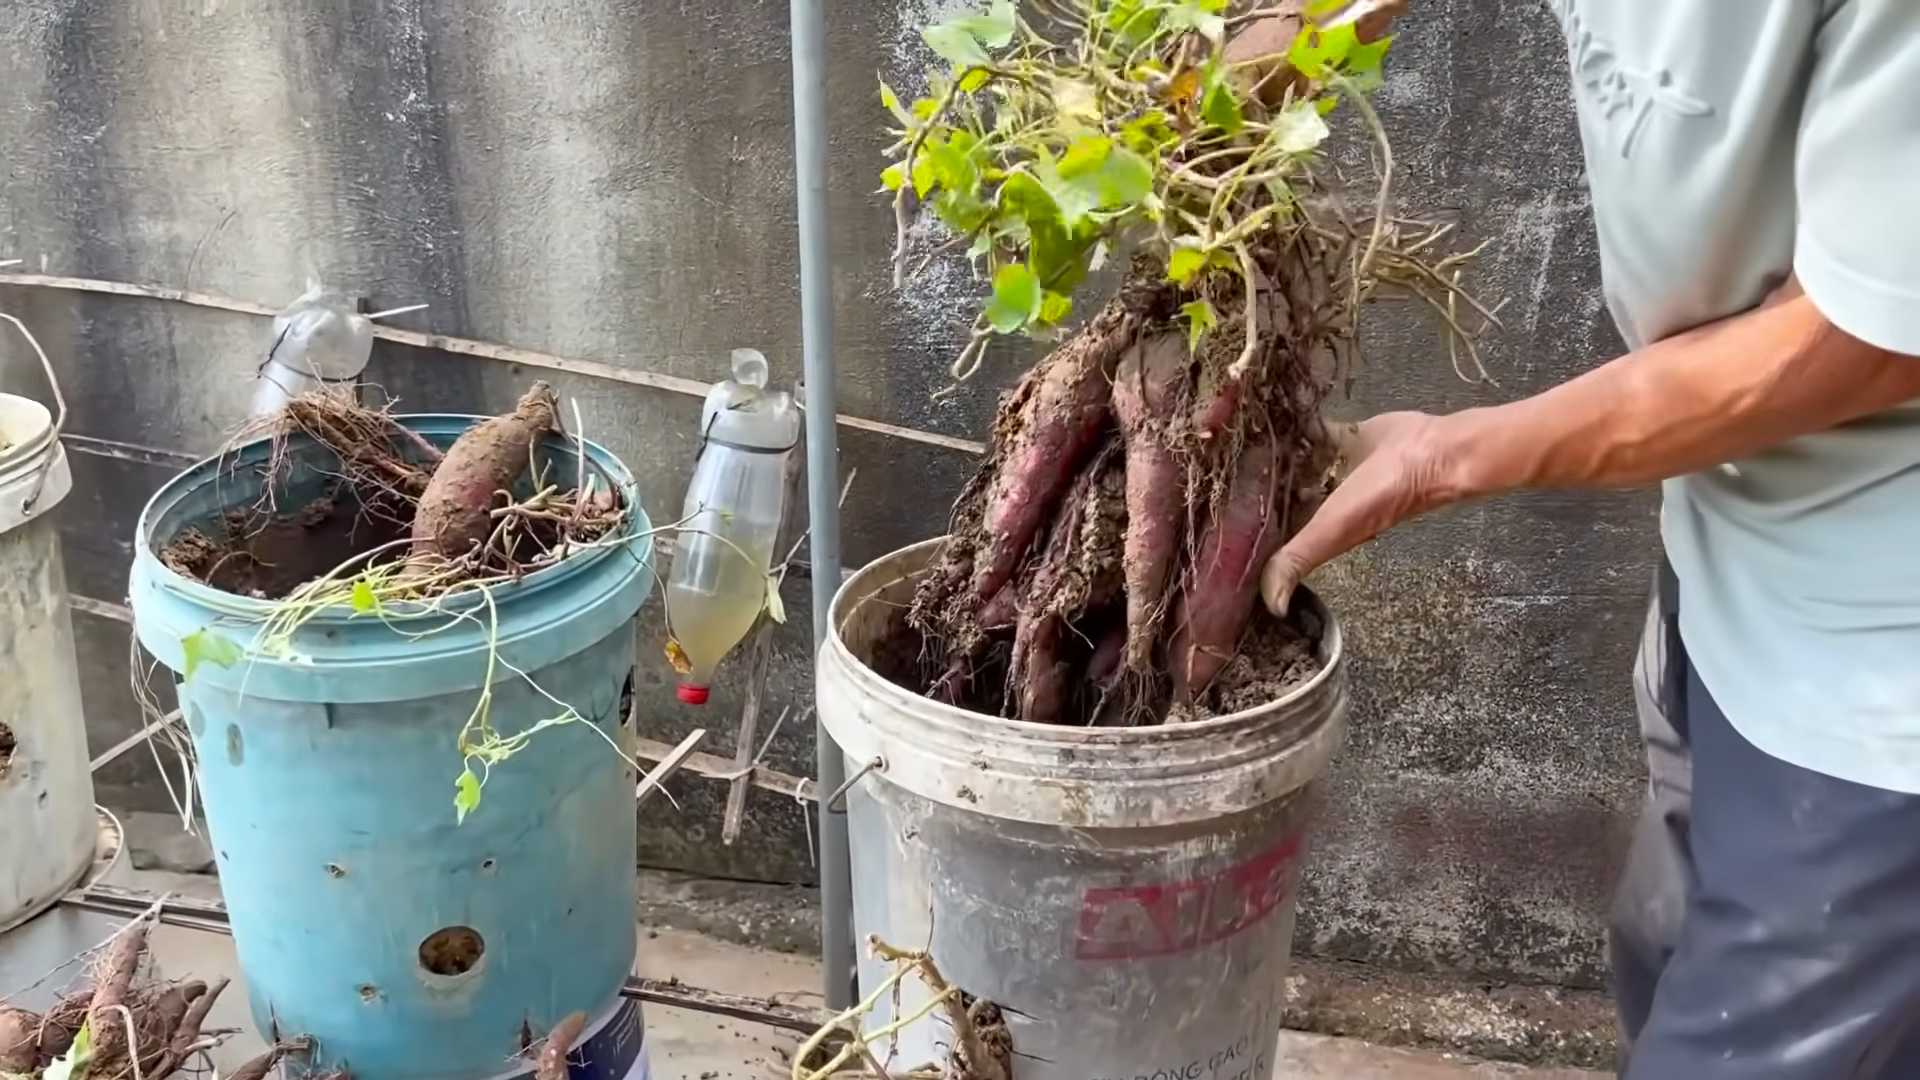
* Harvesting Technique: Gently dig around the base of the plant, being careful not to damage the sweet potatoes. Use a garden fork or trowel to loosen the soil.
* Curing: After harvesting, cure your sweet potatoes for 7-10 days in a warm, humid place (80-85°F and 85-90% humidity). This will help them develop their sweetness and improve their storage life. I usually use my garage for this, making sure to keep the humidity high.
* Storing: Store your cured sweet potatoes in a cool, dry place (55-60°F) with good ventilation. They should last for several months.
Troubleshooting
Even with the best planning, sometimes things don’t go exactly as expected. Here are a few common issues and how to address them:
* Yellowing Leaves: This could be a sign of overwatering, underwatering, nutrient deficiency, or pest infestation. Check the soil moisture, fertilize if necessary, and inspect for pests.
* Slow Growth: This could be due to insufficient sunlight, poor soil, or lack of fertilizer. Ensure your sweet potatoes are getting enough sunlight, amend the soil with compost, and fertilize regularly.
* No Sweet Potatoes: This could be caused by a variety of factors, including poor soil, insufficient sunlight, or late planting. Make sure your sweet potatoes are getting the right conditions and that you planted them early enough in the season.
Tips and Tricks for Success
Here are a few extra tips to help you maximize your sweet potato harvest:
* Choose the Right Variety: Some sweet potato varieties are better suited for container gardening than others. Beauregard, Georgia Jet, and Centennial are all good choices.
* Rotate Your Crops: Avoid planting sweet potatoes in the same container year after year. This can help prevent soilborne diseases and nutrient depletion.
* Companion Planting: Plant companion plants such as basil, thyme, and marigolds around your sweet potatoes to deter pests and attract beneficial insects.
* Don’t Overcrowd: Give your sweet potatoes enough space to grow. Overcrowding can lead to smaller yields and increased disease risk.
* Enjoy the Process! Gardening should be a fun and rewarding experience. Don’t be afraid to experiment and learn from your mistakes.
Growing sweet potatoes vertically is a fantastic way to enjoy a bountiful harvest even
Conclusion
So, there you have it! Growing sweet potatoes vertically isn’t just a gardening fad; it’s a game-changer for maximizing your yield, conserving space, and adding a touch of unique beauty to your garden or patio. We’ve walked through the steps, from choosing the right container and soil mix to nurturing your plants and anticipating that glorious harvest.
But why is this DIY trick a must-try? Let’s recap. First and foremost, it’s about space efficiency. If you’re limited to a balcony, small yard, or even just a sunny windowsill, vertical sweet potato growing allows you to cultivate a substantial crop where you might otherwise only be able to manage a few herbs. Second, it’s a fantastic way to improve soil drainage and aeration, which sweet potatoes absolutely love. The controlled environment of a container allows you to tailor the soil mix to their specific needs, leading to healthier plants and bigger, more delicious tubers. Third, let’s be honest, it’s just plain cool! A tower of lush green vines cascading down, hinting at the treasure hidden beneath, is a conversation starter and a source of immense gardening pride.
Now, let’s talk variations. Feel free to experiment with different container sizes and materials. While we recommended a large grow bag or repurposed container, you could also try building a tiered planter or using a series of smaller pots stacked vertically. Consider companion planting! Marigolds can help deter pests, while basil can improve the overall health of your sweet potato plants. And don’t be afraid to get creative with your trellising system. Bamboo stakes, netting, or even repurposed branches can all provide the support your vines need to thrive.
Another exciting variation is exploring different sweet potato varieties. While Beauregard is a popular and reliable choice, there are countless other options to discover, each with its own unique flavor, color, and texture. From the deep purple Okinawan sweet potato to the creamy white Japanese sweet potato, the possibilities are endless. Imagine a vertical garden showcasing a rainbow of sweet potato varieties!
The key to success with vertical sweet potato growing is observation and adaptation. Pay close attention to your plants’ needs, adjusting your watering and fertilizing schedule as necessary. Don’t be afraid to experiment and learn from your mistakes. Gardening is a journey, not a destination, and every season brings new opportunities for growth and discovery.
We wholeheartedly encourage you to give this DIY trick a try. It’s a rewarding and sustainable way to enjoy fresh, homegrown sweet potatoes, even if you don’t have a traditional garden. And most importantly, we want to hear about your experience! Share your photos, tips, and challenges in the comments below. Let’s build a community of vertical sweet potato growers and learn from each other. Together, we can unlock the full potential of this innovative gardening technique and enjoy the delicious fruits (or rather, tubers) of our labor. So, grab your containers, soil, and sweet potato slips, and get ready to embark on a vertical gardening adventure! Remember, the best way to learn is by doing, and the rewards of growing your own food are immeasurable. Let’s get growing!
Frequently Asked Questions (FAQ)
What is the best type of container to use for growing sweet potatoes vertically?
The ideal container for vertical sweet potato growing should be large enough to accommodate the extensive root system and tuber development. A minimum of 20 gallons is recommended, but larger is generally better. Grow bags are a popular choice due to their excellent drainage and aeration, but repurposed containers like large plastic bins or even old tires can also work well. Just ensure that the container has adequate drainage holes to prevent waterlogging. The material of the container isn’t as crucial as its size and drainage capabilities. Consider the weight of the filled container, especially if you’re placing it on a balcony or deck.
What kind of soil mix should I use for vertical sweet potato growing?
Sweet potatoes thrive in well-draining, nutrient-rich soil. A good soil mix for vertical growing should consist of equal parts of the following:
* **Compost:** Provides essential nutrients and improves water retention.
* **Potting Soil:** Offers a light and airy texture, promoting root growth.
* **Sand or Perlite:** Enhances drainage and prevents soil compaction.
Avoid using heavy garden soil, as it can become waterlogged and hinder tuber development. You can also amend the soil with slow-release fertilizer to provide a steady supply of nutrients throughout the growing season. Consider adding a handful of bone meal to the soil mix to encourage strong root growth.
How often should I water my vertical sweet potato plants?
Watering frequency depends on several factors, including the weather, the size of the container, and the type of soil mix. Generally, you should water your sweet potato plants when the top inch of soil feels dry to the touch. During hot, dry weather, you may need to water daily, while during cooler, wetter periods, you can reduce the frequency. Avoid overwatering, as this can lead to root rot. Ensure that the container has adequate drainage to prevent water from pooling at the bottom. A good rule of thumb is to water deeply until water drains out of the drainage holes.
How much sunlight do sweet potatoes need when grown vertically?
Sweet potatoes are sun-loving plants and require at least 6-8 hours of direct sunlight per day to thrive. Choose a location for your vertical garden that receives ample sunlight throughout the day. If you live in a particularly hot climate, you may need to provide some afternoon shade to prevent the plants from scorching. If you’re growing sweet potatoes indoors, supplement with grow lights to ensure they receive sufficient light. Rotate the container regularly to ensure that all sides of the plant receive equal exposure to sunlight.
When is the best time to harvest my sweet potatoes?
Sweet potatoes are typically ready to harvest about 90-120 days after planting. The leaves will start to turn yellow and the vines will begin to die back, indicating that the tubers are mature. To harvest, carefully dig around the base of the plant and gently lift the entire root ball out of the container. Be careful not to damage the tubers during harvesting. Cure the sweet potatoes by placing them in a warm, humid location for about a week to allow the skins to harden. This will improve their flavor and storage life.
What are some common pests and diseases that affect sweet potatoes?
Sweet potatoes are relatively pest-resistant, but they can be susceptible to certain pests and diseases, including:
* **Sweet Potato Weevils:** These pests can damage the tubers and vines. Use row covers or insecticidal soap to control them.
* **Fungal Diseases:** Root rot and other fungal diseases can occur in poorly drained soil. Ensure that your container has adequate drainage and avoid overwatering.
* **Aphids:** These small insects can suck the sap from the leaves. Spray them with insecticidal soap or neem oil.
Regularly inspect your plants for signs of pests or diseases and take action promptly to prevent them from spreading.
Can I grow sweet potatoes vertically indoors?
Yes, you can grow sweet potatoes vertically indoors, but it requires careful planning and attention to detail. You’ll need to provide adequate light, either through a sunny window or with grow lights. Ensure that the container is large enough and has good drainage. Monitor the soil moisture carefully and avoid overwatering. Indoor sweet potato plants may not produce as many tubers as those grown outdoors, but you can still enjoy the beautiful foliage and the satisfaction of growing your own food.
What kind of fertilizer should I use for vertical sweet potato growing?
Sweet potatoes benefit from a balanced fertilizer with a slightly higher potassium content. A 5-10-10 fertilizer is a good choice. Apply fertilizer every 2-3 weeks during the growing season, following the instructions on the package. You can also use organic fertilizers like compost tea or fish emulsion. Avoid over-fertilizing, as this can lead to excessive vine growth at the expense of tuber development.
How do I start sweet potato slips for vertical growing?
Sweet potato slips are the sprouts that grow from a mature sweet potato. To start slips, suspend a sweet potato in a jar of water, with the bottom half submerged. Place the jar in a warm, sunny location. Within a few weeks, sprouts will begin to emerge from the sweet potato. Once the sprouts are several inches long, gently twist them off and plant them in small pots filled with potting soil. Keep the soil moist and the slips will root within a week or two. Once the slips have developed a strong root system, they are ready to be transplanted into your vertical garden.
Can I reuse the soil from my vertical sweet potato container?
Yes, you can reuse the soil from your vertical sweet potato container, but it’s important to amend it with fresh compost and fertilizer to replenish the nutrients that were depleted during the previous growing season. Remove any remaining plant debris and break up any compacted soil. You may also want to sterilize the soil by baking it in the oven or microwaving it to kill any potential pests or diseases.


Leave a Comment