
Growing Water Spinach, also known as Ong Choy or Kang Kong, might seem like an exotic endeavor reserved for seasoned gardeners, but trust me, it’s surprisingly easy and incredibly rewarding! Have you ever dreamed of snipping fresh, vibrant greens right from your backyard to stir-fry into a delicious, healthy meal? This DIY guide will unlock the secrets to cultivating your own thriving patch of this nutritious and versatile vegetable.
Water spinach has a rich history, deeply rooted in Asian cuisine and culture. For centuries, it has been a staple in dishes across Southeast Asia, China, and beyond, prized for its mild, slightly sweet flavor and impressive nutritional profile. It’s packed with vitamins, minerals, and antioxidants, making it a fantastic addition to any diet.
But why should you bother with growing water spinach at home? Well, for starters, it’s incredibly fast-growing, meaning you’ll be harvesting fresh greens in just a few weeks! Plus, store-bought water spinach can sometimes be hard to find and may not always be the freshest. By growing your own, you’ll have a constant supply of organic, pesticide-free greens right at your fingertips. I’m going to show you how to easily grow this amazing vegetable at home, even if you have limited space or gardening experience. Get ready to embark on a fun and fulfilling gardening adventure!

Growing Water Spinach (Kangkong) at Home: A DIY Guide
Hey there, fellow gardening enthusiasts! I’m so excited to share my experience with growing water spinach, also known as kangkong or ong choy, right in my backyard. It’s surprisingly easy, incredibly rewarding, and you get a constant supply of fresh, delicious greens. Trust me, once you taste homegrown kangkong, you’ll never want to buy it from the store again!
This guide will walk you through everything you need to know, from choosing the right container to harvesting your bountiful crop. Let’s get started!
What You’ll Need
Before we dive into the nitty-gritty, let’s gather our supplies. Here’s a checklist of everything you’ll need to successfully grow water spinach at home:
* Water Spinach Seeds or Cuttings: You can find seeds online or at your local garden center. Cuttings can be obtained from a friend who already grows kangkong or sometimes even from the vegetable section of Asian grocery stores (look for stems with nodes).
* A Large Container or Tub: Water spinach thrives in water, so you’ll need a container that can hold a good amount of it. I recommend something at least 12 inches deep and wide. A plastic storage tub works perfectly!
* Potting Soil or Garden Soil: While water spinach loves water, it still needs soil to anchor its roots and provide nutrients. Use a good quality potting mix or garden soil.
* Compost or Organic Fertilizer: To give your kangkong a boost, mix in some compost or organic fertilizer into the soil.
* Water: Obviously! You’ll need a constant supply of fresh water to keep your water spinach happy.
* Sunlight: Water spinach needs at least 6 hours of sunlight per day to thrive. Choose a sunny spot in your garden or balcony.
* Optional: A small pump or aerator to oxygenate the water (especially if you’re growing a lot of kangkong).
Choosing Your Growing Method: Seeds vs. Cuttings
You have two main options for starting your water spinach: seeds or cuttings. Both methods are relatively easy, but they have their own pros and cons.
* Seeds: Starting from seeds takes a bit longer, but it’s a great way to ensure you’re growing a healthy, disease-free plant.
* Cuttings: Using cuttings is faster and easier, as you’re essentially cloning an existing plant. However, you need to make sure the cuttings are healthy and free from diseases.
I’ve tried both methods, and I personally prefer using cuttings because it’s quicker and I can see results faster. But don’t worry, I’ll walk you through both methods in detail!
Growing Water Spinach from Seeds
If you’re starting from seeds, here’s what you need to do:
1. Soak the Seeds: Before planting, soak the water spinach seeds in warm water for 12-24 hours. This will help soften the seed coat and improve germination.
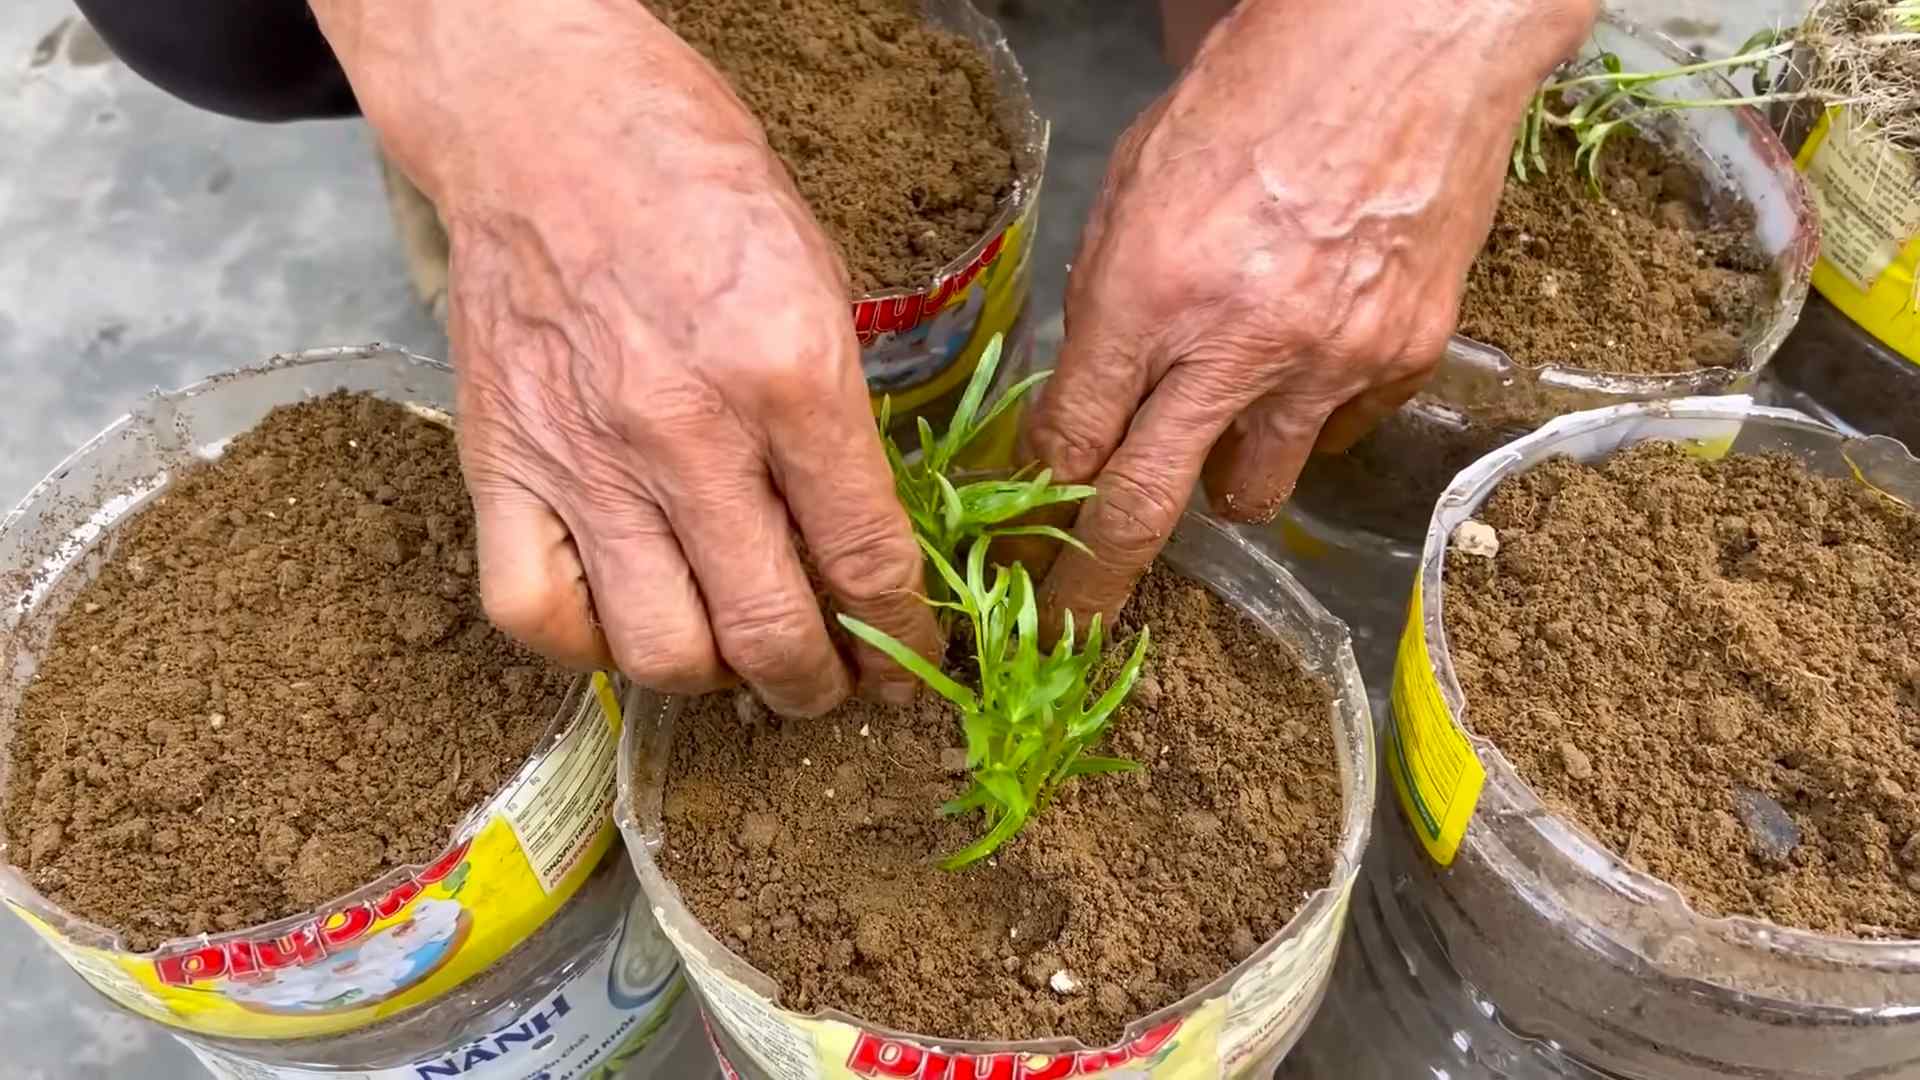
2. Prepare the Container: Fill your container with potting soil or garden soil, leaving about 2-3 inches of space at the top. Mix in some compost or organic fertilizer to enrich the soil.
3. Sow the Seeds: Sprinkle the seeds evenly over the surface of the soil. Then, cover them with a thin layer of soil (about 1/4 inch).
4. Water Gently: Water the soil gently to avoid disturbing the seeds. You want the soil to be moist but not waterlogged.
5. Maintain Moisture: Keep the soil consistently moist by watering regularly. You can also cover the container with a plastic wrap to create a humid environment, but make sure to remove it once the seedlings emerge.
6. Provide Sunlight: Place the container in a sunny location where it will receive at least 6 hours of sunlight per day.
7. Wait for Germination: Water spinach seeds typically germinate within 7-14 days. Be patient and keep the soil moist.
8. Thin the Seedlings: Once the seedlings have developed a few true leaves, thin them out to give them more space to grow. Aim for a spacing of about 4-6 inches between plants.
Growing Water Spinach from Cuttings
If you’re using cuttings, here’s how to do it:
1. Select Healthy Cuttings: Choose healthy, vibrant stems with several nodes (the points where leaves emerge). The cuttings should be about 6-8 inches long.
2. Prepare the Cuttings: Remove the leaves from the bottom 2-3 inches of the cuttings. This will encourage root growth.
3. Rooting the Cuttings (Optional): You can root the cuttings in water before planting them in soil. Simply place the cuttings in a glass of water, making sure the bottom nodes are submerged. Change the water every day or two. Roots should start to appear within a week or two. This step isn’t strictly necessary, but it can increase your success rate.
4. Plant the Cuttings: Fill your container with potting soil or garden soil, leaving about 2-3 inches of space at the top. Mix in some compost or organic fertilizer.
5. Insert the Cuttings: Make small holes in the soil and insert the cuttings, burying the bottom 2-3 inches. Space the cuttings about 4-6 inches apart.
6. Water Thoroughly: Water the soil thoroughly after planting.
7. Maintain Moisture: Keep the soil consistently moist by watering regularly.
8. Provide Sunlight: Place the container in a sunny location where it will receive at least 6 hours of sunlight per day.
Maintaining Your Water Spinach
Once your water spinach is established, here’s how to keep it thriving:
1. Water Regularly: Water spinach loves water, so keep the soil consistently moist. You may need to water it daily, especially during hot weather.
2. Fertilize Regularly: Feed your water spinach with a liquid fertilizer every 2-3 weeks to promote healthy growth. I like to use a balanced organic fertilizer.
3. Control Pests and Diseases: Water spinach is generally pest-resistant, but keep an eye out for aphids, spider mites, and other common garden pests. If you spot any pests, treat them with an organic insecticide.
4. Oxygenate the Water (Optional): If you’re growing a lot of water spinach in a large container, you may want to consider using a small pump or aerator to oxygenate the water. This will help prevent algae growth and keep the water fresh.
5. Top Up the Water Level: As the water spinach grows, it will absorb water from the container. Make sure to top up the water level regularly to keep the roots submerged.
Harvesting Your Water Spinach
The best part of growing water spinach is, of course, harvesting it! You can start harvesting your water spinach about 4-6 weeks after planting.
1. Harvest Regularly: The more you harvest, the more your water spinach will grow. Harvest the stems when they are about 6-8 inches long.
2. Cut the Stems: Use a sharp knife or scissors to cut the stems just above a node (the point where leaves emerge). This will encourage new growth from the node.
3. Harvesting Technique: You can either harvest the entire plant at once, or you can harvest individual stems as needed. I prefer to harvest individual stems so I can enjoy a continuous supply of fresh kangkong.
4. Wash and Store: Wash the harvested water spinach thoroughly and store it in the refrigerator. It will stay fresh for several days.
Troubleshooting
Even with the best care, you might encounter some problems while growing water spinach. Here are some common issues and how to fix them:
* Yellowing Leaves: This could be a sign of nutrient deficiency. Try fertilizing your water spinach with a balanced organic fertilizer.
* Slow Growth: This could be due to lack of sunlight or water. Make sure your water spinach is getting at least 6 hours of sunlight per day and that the soil is consistently moist.
* Algae Growth: Algae can grow in the water, especially if it’s exposed to direct sunlight. To prevent algae growth, try using a dark-colored container or adding a small amount of hydrogen peroxide to the water.
* Pests: Keep an eye out for aphids, spider mites, and other common garden pests. Treat them with an organic insecticide.
Enjoying Your Homegrown Water Spinach
Now that you’ve harvested your homegrown water spinach, it’s time to enjoy it! Water spinach is a versatile vegetable that can be used in a variety of dishes. Here are some of my favorite ways to cook with water spinach:
* Stir-fries: Water spinach is a classic ingredient in stir-fries. Simply stir-fry it with garlic, ginger
Conclusion
So, there you have it! Growing your own water spinach, or *kangkong*, at home is not only achievable but also incredibly rewarding. We’ve walked through the simple steps, highlighting the ease and accessibility of this DIY project. Forget those expensive grocery store trips for wilted greens; imagine stepping into your backyard or onto your balcony and harvesting fresh, crisp water spinach whenever you need it.
This isn’t just about saving money, though that’s certainly a perk. It’s about connecting with your food, understanding its journey from seed (or cutting!) to plate, and enjoying the unparalleled flavor of homegrown produce. The taste difference between store-bought and freshly harvested water spinach is truly remarkable – a vibrant, slightly nutty flavor that elevates any dish.
Why is this DIY trick a must-try? Because it empowers you to control the quality and freshness of your food. You know exactly what goes into growing your water spinach – no harmful pesticides or questionable practices. Plus, it’s a fantastic way to introduce children to gardening and teach them about where their food comes from. It’s a sustainable and enriching experience for the whole family.
But the beauty of this DIY project lies in its adaptability. Feel free to experiment with different growing mediums. While we focused on water culture, you can also grow water spinach in soil, ensuring it remains consistently moist. Consider adding a slow-release fertilizer to the water or soil to boost growth and yield.
Variations to consider:
* Container Size: Experiment with different container sizes to see what works best for your space. Larger containers generally allow for more robust growth.
* Sunlight Exposure: While water spinach thrives in full sun, you can also try growing it in partial shade, especially in hotter climates. Monitor the growth and adjust accordingly.
* Nutrient Solutions: Research different hydroponic nutrient solutions to optimize growth. There are many commercially available options, or you can create your own using readily available ingredients.
* Growing from Seed vs. Cuttings: While we primarily discussed growing from cuttings, try starting some water spinach from seed to compare the growth rates and yields.
* Vertical Gardening: If you’re short on space, consider using a vertical gardening system to grow your water spinach. This can be a great way to maximize your yield in a small area.
We encourage you to embrace this DIY adventure and discover the joy of growing your own water spinach. It’s a simple, satisfying, and delicious way to enhance your culinary experiences.
Don’t be afraid to get your hands dirty (or wet!). The process is forgiving, and even if you encounter a few hiccups along the way, you’ll learn valuable lessons and gain a deeper appreciation for the magic of gardening.
So, go ahead, give it a try! We’re confident that you’ll be amazed by the results. And most importantly, we want to hear about your experience. Share your photos, tips, and stories with us in the comments below. Let’s build a community of water spinach enthusiasts and inspire others to embrace the joys of homegrown goodness. Let us know what your favorite way to prepare your fresh harvest of water spinach is!
Frequently Asked Questions (FAQ)
1. How long does it take to grow water spinach from cuttings?
Typically, you can expect to harvest your first batch of water spinach from cuttings within 2-3 weeks. The exact timeframe depends on factors like sunlight exposure, temperature, and nutrient availability. You’ll notice the cuttings developing roots within a few days, followed by rapid leaf growth. Consistent watering and adequate sunlight are crucial for optimal growth during this period.
2. Can I grow water spinach indoors?
Yes, you can grow water spinach indoors, but you’ll need to provide adequate lighting. A sunny windowsill that receives at least 6 hours of direct sunlight per day is ideal. If you don’t have enough natural light, consider using grow lights. LED grow lights are energy-efficient and provide the necessary spectrum of light for healthy plant growth. Ensure proper ventilation to prevent fungal diseases.
3. What are the best conditions for growing water spinach?
Water spinach thrives in warm, humid conditions with plenty of sunlight. The ideal temperature range is between 75°F and 85°F (24°C and 29°C). It prefers consistently moist soil or water and requires at least 6 hours of direct sunlight per day. Protect the plants from strong winds, which can damage the delicate leaves. Regular fertilization is also essential for optimal growth and yield.
4. How often should I fertilize my water spinach?
If you’re growing water spinach in water, fertilize every 1-2 weeks with a balanced liquid fertilizer diluted to half strength. If you’re growing it in soil, fertilize every 3-4 weeks with a slow-release fertilizer or a diluted liquid fertilizer. Avoid over-fertilizing, as this can lead to nutrient burn and damage the plants. Monitor the plants for signs of nutrient deficiencies, such as yellowing leaves, and adjust the fertilization schedule accordingly.
5. What are some common pests and diseases that affect water spinach?
Water spinach is generally resistant to pests and diseases, but it can be susceptible to aphids, spider mites, and fungal diseases like powdery mildew. Regularly inspect your plants for signs of infestation or disease. If you find pests, try washing them off with a strong stream of water or using insecticidal soap. For fungal diseases, improve ventilation and avoid overwatering. You can also use a fungicide if necessary.
6. How do I harvest water spinach?
Harvest water spinach by cutting the stems about 6-8 inches from the top. This encourages the plant to produce new shoots, allowing for continuous harvesting. You can harvest multiple times from the same plant. It’s best to harvest in the morning when the leaves are crisp and fresh. Wash the harvested water spinach thoroughly before using it in your recipes.
7. Can I eat the entire water spinach plant?
Yes, you can eat the entire water spinach plant, including the leaves and stems. The leaves are more tender and cook quickly, while the stems have a slightly chewier texture and require a bit longer cooking time. Both the leaves and stems are nutritious and delicious.
8. How do I store harvested water spinach?
Store harvested water spinach in the refrigerator in a plastic bag or container. It’s best to use it within a few days for optimal freshness. You can also blanch and freeze water spinach for longer storage. To blanch, submerge the water spinach in boiling water for 2-3 minutes, then transfer it to an ice bath to stop the cooking process. Drain well and freeze in airtight containers or freezer bags.
9. Is water spinach safe to eat?
Water spinach is generally safe to eat, but it’s important to source it from a reputable supplier or grow it yourself in clean water. Avoid consuming water spinach that has been grown in contaminated water, as it can accumulate heavy metals and other pollutants. Thoroughly wash water spinach before consuming it to remove any dirt or debris.
10. What are some popular ways to cook water spinach?
Water spinach is a versatile vegetable that can be used in a variety of dishes. Some popular ways to cook it include stir-frying, steaming, boiling, and adding it to soups and stews. It pairs well with garlic, ginger, chili peppers, and soy sauce. You can also use it in salads, spring rolls, and other Asian-inspired dishes. Try stir-frying it with garlic and oyster sauce for a simple and delicious side dish.


Leave a Comment