
Growing Winged Beans at Home can seem daunting, but trust me, it’s an incredibly rewarding experience! Have you ever dreamt of strolling through your garden, plucking fresh, vibrant beans straight from the vine, knowing exactly where your food comes from? This isn’t just a fantasy; it’s a reality you can create with a little know-how and a touch of DIY spirit.
Winged beans, also known as Goa beans, have a rich history, particularly in Southeast Asia and Papua New Guinea, where they’ve been cultivated for centuries. They’re not just delicious; they’re a nutritional powerhouse! Every part of the plant is edible, from the beans themselves to the leaves, flowers, and even the roots.
But why should *you* bother with this DIY project? Well, in a world increasingly concerned with food security and sustainability, growing winged beans at home offers a fantastic way to connect with nature, reduce your carbon footprint, and enjoy fresh, organic produce. Plus, let’s be honest, there’s something incredibly satisfying about nurturing a plant from seed to harvest. This article is your ultimate guide to unlocking the secrets of successful home cultivation, filled with practical tips and tricks to ensure your winged bean adventure is a resounding success. So, grab your gardening gloves, and let’s get started!
Growing Winged Beans: A DIY Guide to Vertical Gardening and Delicious Harvests
Hey there, fellow gardening enthusiasts! I’m so excited to share my experience with growing winged beans, also known as Goa beans or asparagus peas. These fascinating legumes are not only incredibly nutritious but also add a beautiful vertical element to your garden. Plus, every part of the plant is edible – the pods, leaves, flowers, seeds, and even the tubers! Get ready to embark on this rewarding gardening adventure with me.
Choosing the Right Variety and Location
Before we dive into the nitty-gritty, let’s talk about selecting the right winged bean variety and finding the perfect spot in your garden.
* Variety Selection: While there aren’t a ton of commercially available varieties, look for ones that are well-suited to your climate. Some varieties are more heat-tolerant than others. Check with your local nursery or online seed suppliers for recommendations specific to your region. I personally prefer varieties that produce long, tender pods.
* Sunlight: Winged beans are sun-worshippers! They need at least 6-8 hours of direct sunlight each day to thrive. A south-facing location is ideal.
* Soil: Well-draining soil is crucial. Winged beans don’t like to sit in soggy soil, which can lead to root rot. Amend your soil with compost or other organic matter to improve drainage and fertility. A slightly acidic to neutral pH (around 6.0-7.0) is best.
* Support System: These are climbing plants, so you’ll need a sturdy trellis, fence, or other support structure for them to climb on. I’ve used everything from bamboo poles to repurposed metal fencing with great success. The support should be at least 6-8 feet tall, as the vines can grow quite long.
Starting Your Winged Bean Journey: From Seed to Seedling
You can start winged beans directly in the ground, but I prefer to start them indoors to get a head start, especially if you have a shorter growing season.
Materials You’ll Need:
* Winged bean seeds
* Seed starting trays or small pots
* Seed starting mix
* Watering can or spray bottle
* Grow lights (optional, but recommended for indoor starting)
* Heat mat (optional, but helpful for germination)
Step-by-Step Instructions:
1. Soaking the Seeds: Winged bean seeds have a hard outer shell, so soaking them in warm water for 12-24 hours before planting will significantly improve germination rates. I usually put them in a small bowl of water and let them sit overnight.
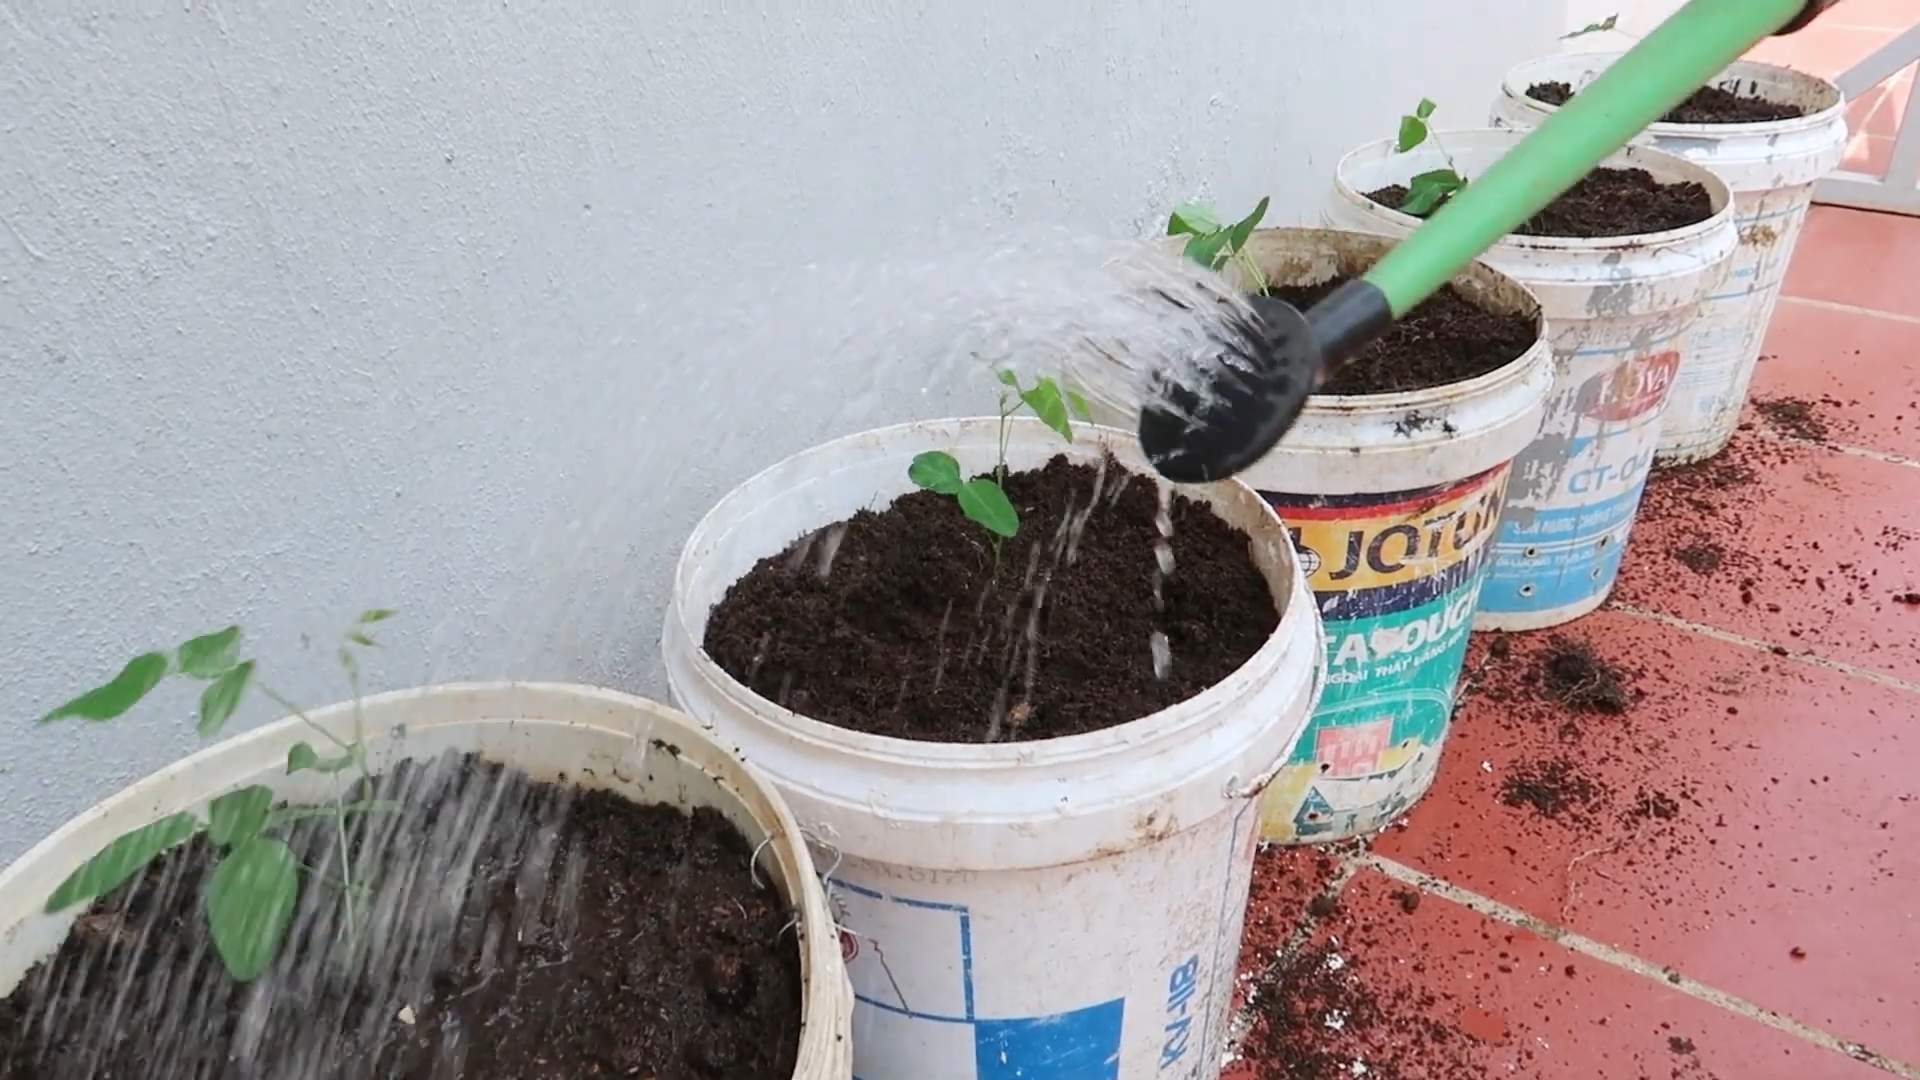
2. Planting the Seeds: Fill your seed starting trays or pots with seed starting mix. Make a small hole (about 1 inch deep) in the center of each cell or pot. Place one or two seeds in each hole and cover them gently with soil.
3. Watering: Water the soil thoroughly but gently, making sure not to dislodge the seeds. I prefer to use a spray bottle to avoid overwatering.
4. Providing Warmth and Light: Winged beans germinate best in warm conditions (around 70-80°F). If you have a heat mat, place the seed starting trays on it. If not, find a warm spot in your house. Place the trays under grow lights or in a sunny window.
5. Maintaining Moisture: Keep the soil consistently moist but not waterlogged. Check the soil daily and water as needed.
6. Transplanting: Once the seedlings have developed a few sets of true leaves (usually after 4-6 weeks), they’re ready to be transplanted outdoors. Harden them off by gradually exposing them to outdoor conditions for a week before transplanting. This helps them adjust to the sun and wind.
Transplanting and Setting Up Your Vertical Garden
Now comes the exciting part – moving your seedlings into their permanent home and setting up their climbing structure!
Materials You’ll Need:
* Winged bean seedlings
* Trowel or shovel
* Compost or other organic matter
* Trellis, fence, or other support structure
* Gardening gloves
* Watering can or hose
Step-by-Step Instructions:
1. Preparing the Planting Site: Choose a sunny location with well-draining soil. Dig a hole that is slightly larger than the root ball of the seedling. Amend the soil with compost or other organic matter to improve fertility and drainage.
2. Transplanting the Seedlings: Gently remove the seedlings from their pots, being careful not to damage the roots. Place the seedling in the hole and backfill with soil. Gently firm the soil around the base of the plant. Space the plants about 12-18 inches apart.
3. Setting Up the Support Structure: Install your trellis, fence, or other support structure near the plants. Make sure it’s sturdy enough to support the weight of the mature vines.
4. Watering: Water the newly transplanted seedlings thoroughly.
5. Guiding the Vines: As the vines grow, gently guide them onto the support structure. You may need to tie them loosely to the trellis with twine or plant ties.
Caring for Your Winged Bean Plants
Once your winged beans are established, they’re relatively easy to care for. Here’s what you need to know:
* Watering: Water regularly, especially during dry periods. Winged beans need consistent moisture to produce abundant pods. Aim for about 1 inch of water per week.
* Fertilizing: Winged beans are legumes, which means they can fix nitrogen from the air. However, they still benefit from occasional fertilization. Use a balanced fertilizer or side-dress with compost every few weeks. Avoid over-fertilizing with nitrogen, as this can promote leafy growth at the expense of pod production.
* Weeding: Keep the area around the plants free of weeds. Weeds compete with the winged beans for nutrients and water.
* Pest and Disease Control: Winged beans are generally resistant to pests and diseases. However, keep an eye out for common garden pests like aphids, spider mites, and bean beetles. Treat infestations promptly with insecticidal soap or neem oil. Good air circulation can help prevent fungal diseases.
* Pruning: Pruning is not usually necessary, but you can trim the vines to control their size or to encourage branching. Remove any dead or diseased leaves.
Harvesting Your Bountiful Crop
The best part of growing winged beans is, of course, the harvest!
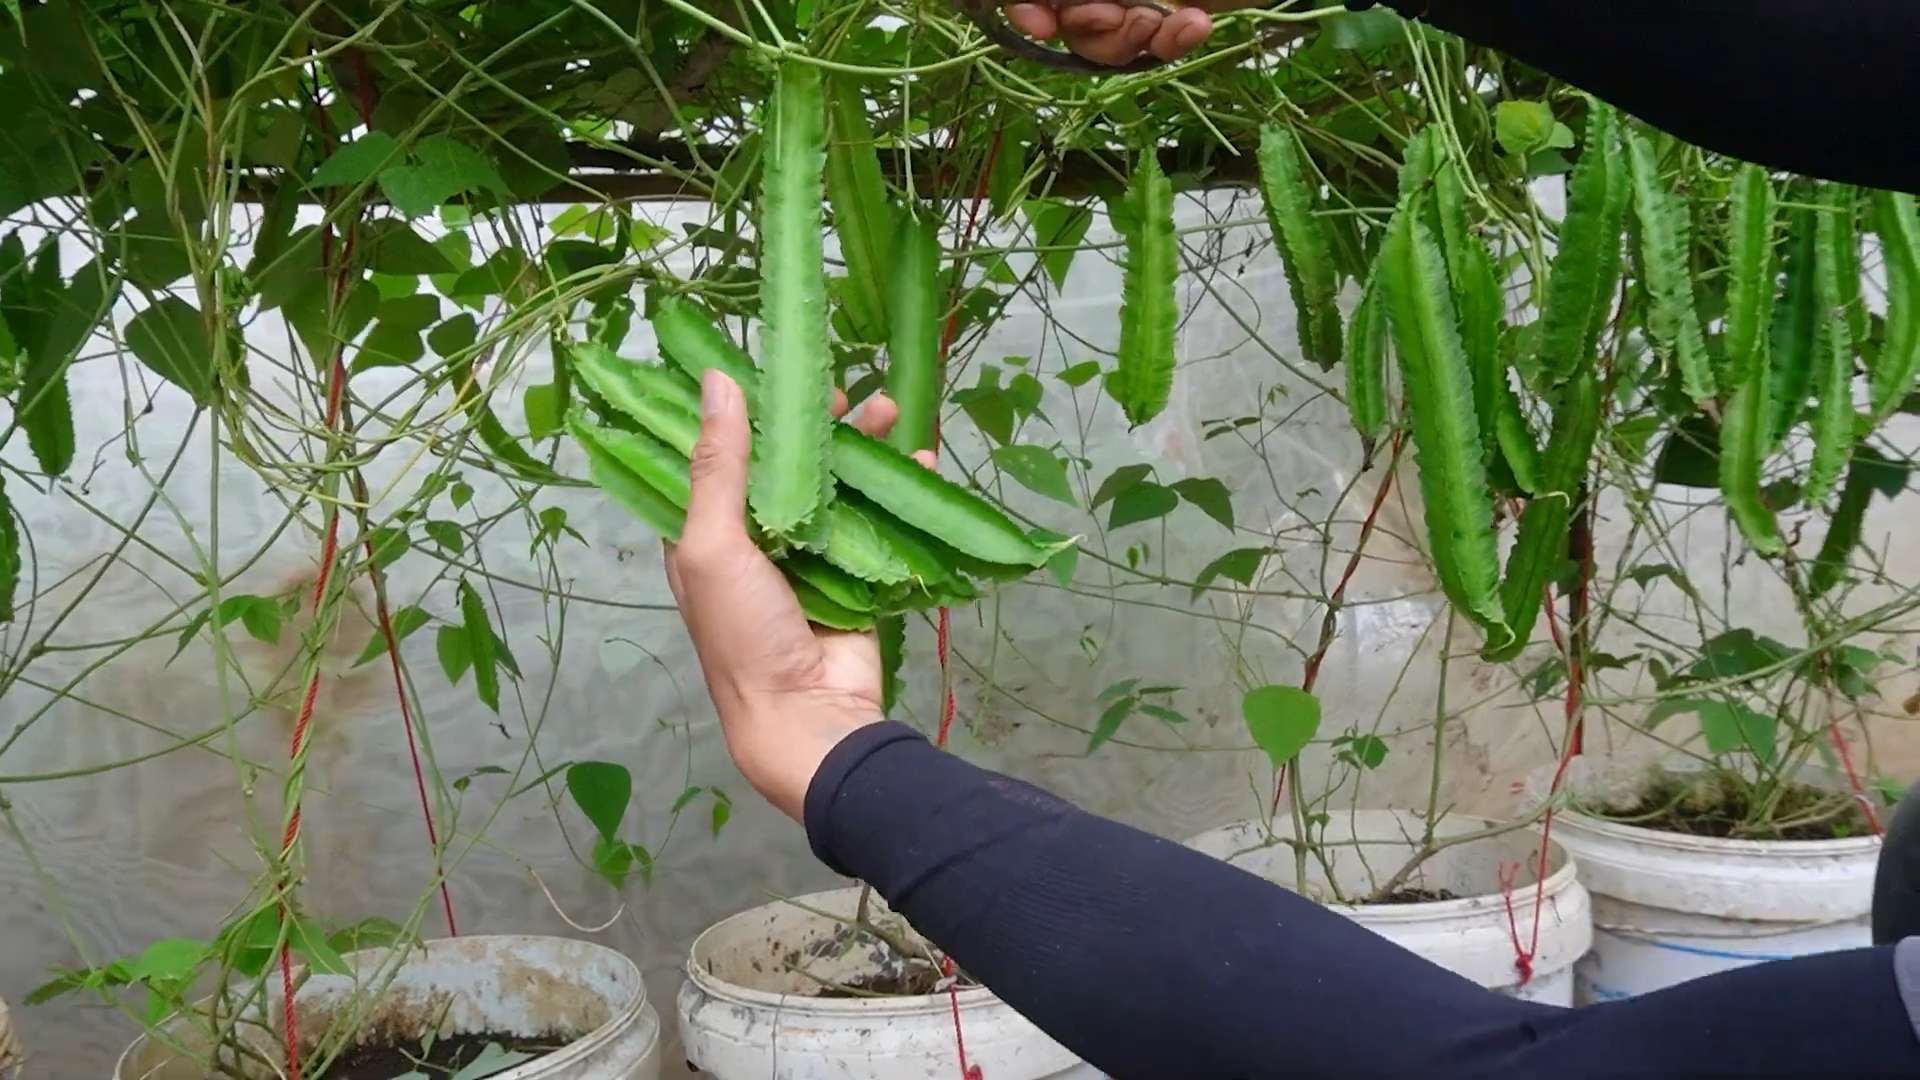
* When to Harvest: The pods are usually ready to harvest about 2-3 weeks after flowering. Harvest them when they are young and tender, about 4-6 inches long. The longer you wait, the tougher the pods will become. You can also harvest the leaves, flowers, and seeds. The tubers can be harvested in the fall after the plant has died back.
* How to Harvest: Use scissors or pruning shears to cut the pods from the vine. Be careful not to damage the plant.
* Storing: Freshly harvested winged bean pods can be stored in the refrigerator for up to a week. You can also freeze them for longer storage. Blanch the pods in boiling water for a few minutes before freezing to preserve their color and flavor.
Enjoying Your Winged Bean Harvest
Winged beans are incredibly versatile in the kitchen. You can eat them raw in salads, stir-fry them, steam them, or add them to soups and stews. The leaves can be used like spinach, and the flowers can be added to salads or used as a garnish. The seeds can be roasted and eaten like nuts, or ground into flour. The tubers can be cooked like potatoes.
Here are a few of my favorite ways to enjoy winged beans:
* Winged Bean Stir-Fry: Sauté the pods with garlic, ginger, and your favorite vegetables. Add a splash of soy sauce and sesame oil for a delicious and healthy meal.
* Winged Bean Salad: Slice the pods thinly and toss them with a vinaigrette dressing. Add some chopped tomatoes, cucumbers, and onions for a refreshing salad.
* Winged Bean Curry: Add the pods to your favorite curry recipe. They add a unique flavor and texture to the dish.
Troubleshooting Common Issues
Even with the best care, you might encounter a few challenges along the way. Here are some common issues and how to address them:
* Poor Germination: If your seeds aren’t germinating, make sure they are getting enough warmth and moisture. Try soaking the seeds for a longer period of time.
* Yellowing Leaves: Yellowing leaves can be a sign of nutrient deficiency. Fertilize the plants with a balanced fertilizer.
* Lack of Pod Production: Lack of pod production can be caused by insufficient sunlight, over-fertilization with nitrogen, or poor pollination. Make sure the plants are getting enough sunlight and avoid over-fertilizing. You can also try hand-pollinating the flowers.
* Pest Inf
Conclusion
So, there you have it! Growing winged beans at home is not only achievable, but it’s also a deeply rewarding experience that connects you directly to your food source. We’ve walked through the essential steps, from selecting the right seeds and preparing the soil to providing adequate support and managing potential pests. But why is this DIY project a must-try?
First and foremost, the taste of freshly harvested winged beans is simply unparalleled. Forget the bland, often fibrous beans you might find at the grocery store. Homegrown winged beans offer a crisp, slightly nutty flavor that elevates any dish. Imagine adding them to stir-fries, salads, or even enjoying them raw as a crunchy snack. The possibilities are endless!
Beyond the superior taste, growing your own winged beans allows you to control the entire process, ensuring that your produce is free from harmful pesticides and herbicides. You know exactly what goes into your food, giving you peace of mind and promoting a healthier lifestyle. Plus, the vibrant purple flowers and unique pod shapes of the winged bean plant add a touch of beauty to your garden, making it a visually appealing and productive space.
But the benefits don’t stop there. Winged beans are incredibly nutritious, packed with protein, vitamins, and minerals. They are a fantastic addition to any diet, especially for vegetarians and vegans looking for plant-based protein sources. By growing your own, you have a readily available supply of this nutritional powerhouse right at your fingertips.
Now, let’s talk about variations. While we’ve focused on the basic method, there are plenty of ways to customize your winged bean growing experience. Consider experimenting with different varieties of winged beans. Some varieties are more heat-tolerant, while others are better suited for cooler climates. You can also try growing them in containers if you have limited garden space. Just make sure to provide a large enough pot and a sturdy trellis for support.
Another exciting variation is to explore different culinary uses for winged beans. Don’t just limit yourself to the pods. The leaves, flowers, and even the roots of the winged bean plant are edible and offer unique flavors and textures. Research different recipes and experiment with incorporating these lesser-known parts of the plant into your cooking.
Growing winged beans at home is more than just a gardening project; it’s an investment in your health, your taste buds, and your connection to nature. It’s a chance to learn new skills, enjoy the satisfaction of harvesting your own food, and contribute to a more sustainable lifestyle.
So, what are you waiting for? Grab some seeds, prepare your garden, and embark on this exciting adventure. We encourage you to try this DIY trick and share your experiences with us. Let us know what varieties you’re growing, what challenges you’ve faced, and what delicious dishes you’ve created. Share your photos and tips in the comments below. Together, we can create a community of winged bean enthusiasts and inspire others to discover the joys of homegrown food. We are confident that you will find the process of growing winged beans at home to be a rewarding and delicious experience.
Frequently Asked Questions (FAQ)
What are the ideal growing conditions for winged beans?
Winged beans thrive in warm, humid climates with plenty of sunshine. They need at least 6-8 hours of direct sunlight per day. The ideal soil is well-drained, fertile, and slightly acidic to neutral (pH 6.0-7.0). They are sensitive to frost, so it’s best to plant them after the last frost date in your area. Consistent watering is crucial, especially during flowering and pod development.
How long does it take for winged beans to mature?
Winged beans typically take 120-180 days to mature from seed to harvest. However, this can vary depending on the variety, climate, and growing conditions. You can start harvesting the pods when they are about 6-8 inches long and still tender. Regular harvesting encourages continued pod production.
What kind of support system do winged beans need?
Winged beans are climbing plants and require a strong support system to grow properly. A trellis, fence, or even a sturdy pole can be used. The support should be at least 6-8 feet tall to accommodate the plant’s vigorous growth. Make sure the support is strong enough to handle the weight of the mature plant and its pods.
Are winged beans susceptible to any pests or diseases?
While relatively pest-resistant, winged beans can sometimes be affected by aphids, spider mites, and bean beetles. Regularly inspect your plants for signs of infestation and take appropriate action, such as using insecticidal soap or neem oil. Good air circulation and proper watering can help prevent fungal diseases.
Can I grow winged beans in containers?
Yes, you can grow winged beans in containers, but you’ll need a large pot (at least 15-20 gallons) to accommodate their root system. Use a well-draining potting mix and provide a sturdy trellis for support. Container-grown winged beans may require more frequent watering and fertilization than those grown in the ground.
How do I harvest winged beans?
Harvest winged beans when the pods are young and tender, typically 6-8 inches long. Use scissors or pruning shears to cut the pods from the vine, being careful not to damage the plant. Regular harvesting encourages continued pod production. The leaves, flowers, and roots can also be harvested when the plant is mature.
Are all parts of the winged bean plant edible?
Yes, all parts of the winged bean plant are edible, including the pods, leaves, flowers, and roots. The pods are the most commonly consumed part, but the leaves can be used in salads or cooked like spinach. The flowers can be added to salads or used as a garnish. The roots can be boiled or roasted like potatoes.
How do I store winged beans?
Freshly harvested winged beans can be stored in the refrigerator for up to a week. For longer storage, you can blanch and freeze them. To blanch, boil the pods for 2-3 minutes, then immediately transfer them to an ice bath to stop the cooking process. Drain well and store in freezer bags or containers.
Can I save seeds from my winged bean plants?
Yes, you can save seeds from your winged bean plants. Allow some of the pods to mature fully on the vine until they are dry and brown. Harvest the pods and extract the seeds. Dry the seeds thoroughly before storing them in an airtight container in a cool, dark place.
What are some ways to cook with winged beans?
Winged beans are incredibly versatile and can be used in a variety of dishes. They can be stir-fried, steamed, boiled, grilled, or even eaten raw. They are a great addition to salads, soups, stews, and curries. Their slightly nutty flavor pairs well with a variety of spices and sauces. Experiment with different recipes and find your favorite way to enjoy this delicious and nutritious vegetable.

Leave a Comment