
Expert Cleaning Hacks: are you tired of spending your weekends scrubbing away grime and battling stubborn stains? I know I used to be! It felt like I was constantly fighting a losing battle against dust bunnies and sticky messes. But what if I told you there’s a better way? A way to reclaim your precious free time and still have a sparkling clean home?
For centuries, people have been developing clever cleaning techniques, passing down tips and tricks from generation to generation. Think about it – our grandmothers knew a thing or two about keeping a house spotless without relying on a cupboard full of harsh chemicals! These time-tested methods, combined with some modern innovations, form the foundation of the expert cleaning hacks we’re about to explore.
In today’s busy world, who has time to spend hours cleaning? We’re all juggling work, family, and social lives. That’s why these DIY cleaning hacks are so essential. They’re designed to be quick, easy, and effective, using common household items you probably already have on hand. Imagine the satisfaction of tackling tough cleaning challenges with minimal effort and maximum results. Get ready to discover simple solutions that will transform your cleaning routine and leave your home looking and feeling its best!
DIY Drain Cleaner: Unleash the Power of Harpic (Safely!)
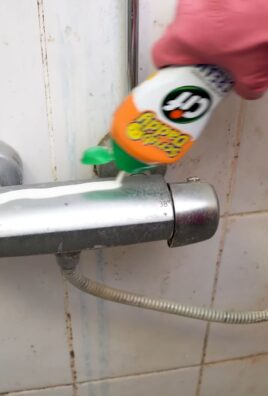
Okay, so your drain is clogged. We’ve all been there. Before you call a plumber and watch your bank account weep, let’s try a little DIY magic. I’m going to show you how to use Harpic toilet cleaner (yes, you read that right!) to tackle that stubborn clog. But listen up, safety is KEY here. We’re dealing with chemicals, so let’s be smart about it.
Important Safety Precautions:
* Ventilation is your friend: Open windows and doors. We don’t want to be breathing in fumes.
* Gloves are a must: Protect your hands from the chemicals. Rubber gloves are perfect.
* Eye protection is non-negotiable: Wear safety glasses or goggles. Splashes happen!
* No mixing! Never, ever mix Harpic with other cleaning products, especially bleach. This can create dangerous and potentially deadly gases. Seriously, don’t do it.
* Keep kids and pets away: This should be obvious, but make sure little ones and furry friends are nowhere near the drain while you’re working.
* Work quickly and efficiently: Minimize the amount of time you’re exposed to the fumes.
* If you feel unwell, stop immediately: If you experience dizziness, nausea, or any other adverse reaction, stop what you’re doing and get some fresh air. Consult a doctor if necessary.
* Know your pipes: This method is generally safe for PVC pipes, but if you have older or fragile pipes, proceed with extreme caution or consider alternative methods. If you are unsure, consult a professional.
* Rinse thoroughly: After the process, flush the drain with plenty of water to remove any remaining chemicals.
What You’ll Need
* Harpic toilet cleaner (the original blue kind works best, but check the label to ensure it contains hydrochloric acid)
* Rubber gloves
* Safety glasses or goggles
* A measuring cup or container (that you don’t use for food!)
* A bucket
* Hot water (not boiling!)
* Baking soda (optional, but helpful)
* Vinegar (optional, but helpful)
* Plunger (just in case)
Step-by-Step Instructions
1. Prepare the Area: Clear the area around the drain. Remove any items that might get splashed or damaged. Put on your gloves and safety glasses. Open windows and doors for ventilation.
2. Remove Standing Water: If there’s standing water in the sink or tub, bail it out with a bucket or cup. We want the Harpic to directly target the clog, not be diluted by excess water.
3. Measure the Harpic: Carefully pour about 1/2 cup (approximately 120ml) of Harpic into your measuring cup. Don’t overdo it! More isn’t always better, and we want to minimize the risk of damage to your pipes.
4. Pour the Harpic into the Drain: Slowly and carefully pour the Harpic directly into the clogged drain. Try to aim for the center of the drain opening.
5. Wait (Patiently!): This is the crucial part. Let the Harpic sit in the drain for at least 30 minutes, but no more than an hour. This gives the hydrochloric acid time to break down the clog. I usually set a timer so I don’t forget.
6. Flush with Hot Water: After the waiting period, carefully pour a bucket of hot (but not boiling!) water down the drain. The hot water helps to flush away the dissolved clog and any remaining Harpic.
7. Assess the Situation: Check if the drain is flowing freely. If it is, congratulations! You’ve successfully unclogged your drain. If not, proceed to the next step.
8. Repeat (If Necessary): If the drain is still partially clogged, you can repeat steps 3-6 one more time. However, I wouldn’t recommend doing this more than twice. If the clog persists after two attempts, it’s time to consider other methods or call a professional.
Boosting the Power: Baking Soda and Vinegar (Optional)
If the Harpic alone isn’t quite doing the trick, you can try adding a baking soda and vinegar chaser. This creates a fizzy reaction that can help to dislodge stubborn clogs.
1. Pour Baking Soda: After the initial Harpic treatment and hot water flush, pour about 1/2 cup of baking soda down the drain.
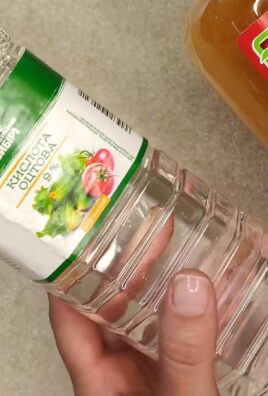
2. Add Vinegar: Immediately follow the baking soda with 1 cup of white vinegar.
3. Let it Fizz: You’ll notice a fizzing reaction. This is normal and what we want! Let the mixture sit for about 30 minutes.
4. Flush with Hot Water (Again!): After the fizzing subsides, flush the drain with another bucket of hot water.
When to Call a Plumber
Sometimes, despite our best efforts, a clog is just too stubborn for DIY methods. Here are some signs that it’s time to call a plumber:
* The clog persists after multiple attempts: If you’ve tried the Harpic method (with or without baking soda and vinegar) a couple of times and the drain is still clogged, it’s likely a more serious issue.
* You suspect a deeper problem: If you notice slow drainage in multiple drains, or if you hear gurgling sounds coming from your pipes, it could indicate a problem with your main sewer line.
* You’re uncomfortable working with chemicals: If you’re not confident in your ability to handle chemicals safely, it’s always best to leave it to the professionals.
* You have old or fragile pipes: As mentioned earlier, if you have older pipes, harsh chemicals can potentially damage them. A plumber can assess the situation and recommend a safer solution.
Important Considerations
* Grease is the enemy: Avoid pouring grease down your drains. It solidifies and creates stubborn clogs.
* Hair is a common culprit: Hair can easily get caught in drains and cause blockages. Use a drain strainer to catch hair before it goes down the drain.
* Regular maintenance is key: Periodically flush your drains with hot water and a small amount of dish soap to help prevent clogs from forming.
Troubleshooting
* Fumes are too strong: If the fumes are overwhelming, immediately open more windows and doors. You can also try wearing a respirator mask.
* Harpic isn’t working: Make sure you’re using the correct type of Harpic (one that contains hydrochloric acid). Also, ensure that you’re allowing enough time for the Harpic to work.
* Drain is still slow: Even if the drain is no longer completely clogged, it might still be draining slowly. Try using a plunger to help dislodge any remaining debris.
Alternative Drain Cleaning Methods
If you’re hesitant to use Harpic, here are some alternative drain cleaning methods you can try:
* Boiling water: Sometimes, a simple flush with boiling water can be enough to dislodge a minor clog.
* Plunger: A plunger can be effective for clearing many types of clogs. Make sure there’s enough water in the sink or tub to create a good seal.
* Drain snake: A drain snake is a flexible tool that can be used to reach down into the drain and break up or remove clogs.
* Baking soda and vinegar: As mentioned earlier, baking soda and vinegar can be a powerful combination for unclogging drains.
* Enzyme drain cleaner: Enzyme drain cleaners use natural enzymes to break down organic matter that can cause clogs. These are generally considered to be safer for your pipes than chemical drain cleaners.
Remember, safety first! Always wear gloves and eye protection when working with any type of drain cleaner. And if you’re ever unsure about something, it’s always best to consult a professional plumber. Good luck, and happy unclogging!
Conclusion
So, there you have it! This simple yet incredibly effective DIY cleaning trick is a game-changer for anyone looking to maintain a sparkling clean home without breaking the bank or relying on harsh chemicals. We’ve shown you how to leverage readily available ingredients to create a powerful cleaning solution that tackles grime, eliminates odors, and leaves your surfaces gleaming.
Why is this a must-try? Because it’s economical, eco-friendly, and surprisingly potent. Store-bought cleaners often contain a cocktail of chemicals that can be harmful to your health and the environment. This DIY alternative allows you to control exactly what goes into your cleaning products, ensuring a safer and healthier home for you and your family. Plus, you’ll be amazed at how much money you can save by ditching those expensive commercial cleaners.
But the benefits don’t stop there. This DIY cleaning trick is also incredibly versatile. Feel free to experiment with different essential oils to create your own signature scent. Lavender, lemon, tea tree, and eucalyptus are all excellent choices, each offering unique aromatherapy benefits in addition to their cleaning properties. You can also adjust the proportions of the ingredients to suit your specific cleaning needs. For tougher stains, try adding a bit more vinegar or baking soda. For a gentler solution, reduce the amount of vinegar.
Consider these variations to tailor the recipe to your specific needs:
* **For a stronger disinfectant:** Add a few drops of tea tree oil, known for its antibacterial and antifungal properties.
* **For a refreshing scent:** Infuse your vinegar with citrus peels for a week before using it in the recipe. This will add a natural, uplifting fragrance to your cleaning solution.
* **For cleaning greasy surfaces:** Increase the amount of dish soap slightly.
* **For polishing furniture:** Add a tablespoon of olive oil to the mixture for a natural shine.
We are confident that once you try this DIY cleaning trick, you’ll be hooked. It’s a simple, effective, and sustainable way to keep your home clean and healthy.
We encourage you to give it a try and see the amazing results for yourself. Don’t just take our word for it – experience the difference firsthand! And most importantly, we want to hear about your experience. Share your tips, variations, and before-and-after photos in the comments below. Let’s build a community of DIY cleaning enthusiasts and help each other create cleaner, healthier homes. Let us know how this **expert cleaning hacks** worked for you.
Frequently Asked Questions (FAQ)
Q: What types of surfaces can I use this DIY cleaner on?
A: This DIY cleaner is generally safe for most non-porous surfaces, including countertops (granite, quartz, laminate), sinks, tiles, glass, and stainless steel. However, it’s always a good idea to test it on a small, inconspicuous area first, especially on delicate surfaces like marble or wood. Avoid using it on unsealed stone, as the vinegar can etch the surface. For wood, ensure the surface is properly sealed and use a very diluted solution. Always wipe dry after cleaning to prevent water damage.
Q: Can I use this cleaner on my hardwood floors?
A: While some people use diluted vinegar solutions on hardwood floors, it’s generally not recommended. Vinegar is acidic and can damage the finish over time, leading to dullness and discoloration. If you choose to use it, dilute it heavily with water (1/4 cup vinegar to 1 gallon of water) and test it in an inconspicuous area first. Always wipe the floor dry immediately after cleaning. A better option for hardwood floors is a cleaner specifically designed for wood, or a solution of mild dish soap and water.
Q: How long will the DIY cleaner last?
A: This DIY cleaner is best used within a few weeks. While the ingredients themselves don’t necessarily “expire,” the essential oils can lose their potency over time. To maximize its shelf life, store it in a cool, dark place in an airtight container. You’ll know it’s time to make a fresh batch when the scent fades or the solution becomes cloudy.
Q: Can I use different types of vinegar?
A: White vinegar is the most commonly recommended type of vinegar for cleaning due to its acidity and lack of color, which minimizes the risk of staining. However, you can experiment with other types of vinegar, such as apple cider vinegar, but be aware that they may have a slight color that could potentially stain light-colored surfaces. Avoid using balsamic vinegar, as it is very dark and can definitely stain.
Q: Is baking soda really necessary?
A: Baking soda is not strictly necessary, but it adds a mild abrasive quality to the cleaner, which helps to scrub away stubborn grime and stains. It also helps to neutralize odors. If you prefer a gentler cleaner, you can omit the baking soda. However, for tougher cleaning jobs, the baking soda is a valuable addition.
Q: Can I add bleach to this DIY cleaner?
A: Absolutely not! Never mix vinegar with bleach. This combination creates toxic chlorine gas, which can be extremely harmful and even fatal. Always use bleach separately and follow the manufacturer’s instructions carefully.
Q: What essential oils are best for cleaning?
A: Many essential oils have antibacterial, antifungal, and antiviral properties, making them excellent additions to DIY cleaners. Some popular choices include:
* **Lemon:** Has a fresh, citrusy scent and is a natural degreaser.
* **Tea Tree:** Known for its powerful antibacterial and antifungal properties.
* **Lavender:** Has a calming scent and is effective against bacteria and fungi.
* **Eucalyptus:** Has a refreshing scent and is a natural disinfectant.
* **Peppermint:** Has a invigorating scent and is a natural insect repellent.
Experiment with different essential oils to find your favorite scent and cleaning properties.
Q: Can I use this cleaner to clean my toilet?
A: Yes, this DIY cleaner can be used to clean your toilet. Pour some of the solution into the toilet bowl and let it sit for a few minutes before scrubbing with a toilet brush. The vinegar will help to dissolve mineral deposits and the baking soda will help to scrub away stains. You can also add a few drops of tea tree oil for extra disinfecting power.
Q: My cleaner is leaving streaks on my windows. What am I doing wrong?
A: Streaking on windows can be caused by a few factors. First, make sure you’re using a clean microfiber cloth. Second, avoid cleaning windows in direct sunlight, as the cleaner can dry too quickly and leave streaks. Third, try diluting the cleaner further with water. Finally, after cleaning, wipe the windows dry with a clean, dry microfiber cloth or squeegee.
Q: Can I use this cleaner on my car’s interior?
A: While this cleaner is generally safe for most surfaces, it’s best to avoid using it on your car’s interior, especially on leather or vinyl. The vinegar can dry out these materials and cause them to crack or fade. Instead, use a cleaner specifically designed for car interiors.
Q: What if I don’t have essential oils? Can I still make this cleaner?
A: Yes, you can definitely make this cleaner without essential oils. The vinegar, water, and baking soda will still provide effective cleaning power. The essential oils are primarily for fragrance and added antibacterial properties, but they are not essential for the cleaner to work.
Q: How do I dispose of the cleaner when I’m done with it?
A: This DIY cleaner is environmentally friendly and can be safely poured down the drain. The ingredients are biodegradable and will not harm the environment.
Q: Can this cleaner be used to remove mold?
A: While this cleaner can help to inhibit mold growth, it’s not a substitute for a dedicated mold remover. For serious mold infestations, it’s best to use a product specifically designed to kill mold and prevent its return. However, this cleaner can be used as a preventative measure to keep mold at bay.

Leave a Comment