
Planting Blueberries Home Garden can seem daunting, but trust me, it’s incredibly rewarding! Imagine stepping outside your back door and picking plump, juicy blueberries fresh from your own bushes. That’s the dream, right? For centuries, blueberries have been cherished, not just for their delicious taste, but also for their incredible health benefits. Native American cultures revered them, using them in traditional medicines and foods.
But let’s be honest, store-bought blueberries can be expensive and sometimes lack that vibrant flavor. That’s where the magic of DIY comes in! This article is packed with simple, yet effective tricks and hacks to help you successfully start planting blueberries home garden, even if you’re a complete beginner. I’ll guide you through everything from choosing the right variety for your climate to preparing the perfect acidic soil they crave.
Why do you need these DIY tricks? Because blueberries are a bit particular! They need specific conditions to thrive, and without the right knowledge, you might end up with a disappointing harvest. But don’t worry, I’m here to demystify the process and empower you to grow your own bountiful supply of these little blue gems. Get ready to roll up your sleeves and transform your garden into a blueberry paradise!

Growing Onions at Home: A Beginner’s Guide
Okay, so you want to grow onions at home? Awesome! It’s easier than you might think, and there’s nothing quite like the satisfaction of pulling your own fresh onions from the ground. I’m going to walk you through everything you need to know, from choosing the right type of onion to harvesting your bounty. Let’s get started!
Choosing Your Onions: Sets, Seeds, or Transplants?
First things first, you need to decide how you want to start your onions. You have three main options:
* Onion Sets: These are small, immature onion bulbs that are already partially grown. They’re the easiest and fastest way to get a harvest, making them perfect for beginners. I highly recommend starting with sets if you’re new to onion growing.
* Onion Seeds: Starting from seed gives you the widest variety of onion types to choose from and is generally the most economical option. However, it requires more time and effort, as you’ll need to start the seeds indoors several weeks before the last frost.
* Onion Transplants: These are young onion plants that have already been started from seed. They offer a good balance between convenience and variety. You can often find them at local nurseries or garden centers.
For this guide, I’m going to focus primarily on growing from onion sets, as it’s the most beginner-friendly method.
Preparing Your Garden Bed
Onions need a sunny spot with well-drained soil. They’re heavy feeders, so you’ll also want to amend the soil with plenty of organic matter.
* Sunlight: Onions need at least 6-8 hours of direct sunlight per day. Choose a location in your garden that gets plenty of sun.
* Soil: Onions prefer loose, well-drained soil with a pH between 6.0 and 7.0. If your soil is heavy clay, amend it with compost, aged manure, or other organic matter to improve drainage. Sandy soil should also be amended with organic matter to help retain moisture.
* Fertilizing: Before planting, work in a generous amount of compost or aged manure into the soil. You can also add a balanced fertilizer, such as 10-10-10, according to the package directions. I like to use a slow-release organic fertilizer for a steady supply of nutrients.
Planting Your Onion Sets
Now for the fun part – planting!
1. Prepare the Soil: Rake the soil smooth and remove any rocks or debris. Make sure the soil is loose and easy to work with.
2. Create Furrows: Use a hoe or trowel to create shallow furrows in the soil, about 1 inch deep and 4-6 inches apart.
3. Plant the Sets: Place the onion sets in the furrows, spacing them about 4-6 inches apart. Make sure the pointed end of the set is facing up.
4. Cover the Sets: Gently cover the sets with soil, leaving the very tip of the bulb exposed. Don’t bury them too deep, as this can hinder their growth.
5. Water Thoroughly: Water the newly planted sets thoroughly to settle the soil and provide moisture.
Caring for Your Onions
Once your onions are planted, it’s important to provide them with proper care to ensure a healthy and abundant harvest.
* Watering: Onions need consistent moisture, especially during bulb formation. Water deeply whenever the top inch of soil feels dry to the touch. Avoid overwatering, as this can lead to rot.
* Weeding: Keep the area around your onions free of weeds. Weeds compete with onions for nutrients and water, so it’s important to remove them regularly. Hand-weeding is the best option, as it avoids damaging the onion plants.
* Fertilizing: Side-dress your onions with a nitrogen-rich fertilizer every 2-3 weeks during the growing season. This will help promote healthy foliage growth and bulb development. I like to use fish emulsion or compost tea.
* Mulching: Apply a layer of mulch around your onions to help retain moisture, suppress weeds, and regulate soil temperature. Straw, hay, or shredded leaves are all good options.
* Pest and Disease Control: Onions are generally resistant to pests and diseases, but they can be susceptible to onion maggots, thrips, and fungal diseases. Inspect your plants regularly for any signs of problems and take action promptly. You can use insecticidal soap or neem oil to control pests, and copper fungicide to prevent fungal diseases.
Harvesting Your Onions
The moment you’ve been waiting for! Knowing when to harvest your onions is key to getting the best flavor and storage life.
1. When to Harvest: Onions are typically ready to harvest when the tops start to fall over and turn yellow or brown. This usually happens in late summer or early fall, depending on the variety and your climate.
2. The Falling Over Test: Don’t wait for all the tops to fall over. Once about half of the tops have fallen, you can gently push over the remaining ones to encourage the bulbs to mature.
3. Digging Them Up: Use a garden fork or trowel to carefully lift the onions from the soil. Be gentle, as you don’t want to damage the bulbs.
4. Curing Your Onions: After harvesting, you need to cure your onions to help them dry out and develop a protective outer layer. This will improve their storage life.
* Lay Them Out: Spread the onions out in a single layer in a warm, dry, well-ventilated place. You can cure them outdoors in the sun, but protect them from rain and excessive heat.
* How Long to Cure: Cure the onions for 2-3 weeks, or until the necks are completely dry and the outer skins are papery.
5. Storing Your Onions: Once the onions are cured, you can store them in a cool, dry, dark place.
* Braiding: Braiding the tops together and hanging them is a traditional and attractive way to store onions.
* Mesh Bags: You can also store them in mesh bags or crates, making sure they have good air circulation.
* Avoid Bruising: Handle the onions carefully to avoid bruising, as this can lead to spoilage.
* Storage Life: Properly cured and stored onions can last for several months.
Growing Onions from Seed: A More Advanced Approach
While I recommended starting with sets, growing from seed offers more variety. Here’s a quick overview:
1. Starting Seeds Indoors: Start your onion seeds indoors 8-10 weeks before the last expected frost.
* Seed Starting Mix: Use a seed starting mix and sow the seeds thinly in trays or pots.
* Light and Water: Keep the soil moist and provide plenty of light. A grow light is helpful.
2. Transplanting Seedlings: Harden off the seedlings by gradually exposing them to outdoor conditions before transplanting them into the garden.
* Timing: Transplant them when the soil has warmed up and the risk of frost has passed.
* Spacing: Space the seedlings about 4-6 inches apart in rows that are 12-18 inches apart.
3. Ongoing Care: Continue to care for the seedlings as you would onion sets, providing regular watering, weeding, and fertilizing.
Troubleshooting Common Onion Problems
Even with the best care, you might encounter some problems. Here are a few common issues and how to address them:
* Onion Maggots: These pests can damage the roots of onion plants, causing them to wilt and die. Use row covers to prevent adult flies from laying eggs near the plants. You can also use beneficial nematodes to control the larvae in the soil.
* Thrips: These tiny insects suck the sap from onion leaves, causing them to turn silvery and distorted. Spray with insecticidal soap or neem oil to control thrips.
* Downy Mildew: This fungal disease can cause yellow spots on onion leaves, which eventually turn brown. Improve air circulation around the plants and apply a copper fungicide to prevent the spread of the disease.
* Bolting: Sometimes, onions will bolt (send up a flower stalk) prematurely. This can be caused by stress, such as cold weather or inconsistent watering. Once an onion bolts, the bulb will stop growing and become tough and bitter. Remove the flower stalk as soon as you see it to try to salvage the bulb.
Onion Varieties to Consider
There are so many onion varieties to choose from! Here are a few popular options:
* Yellow Onions: These are the most common type of onion and are great for cooking. ‘Yellow Spanish’ and ‘Walla Walla Sweet’ are popular varieties.
* White Onions: White onions have a milder
Conclusion
So, there you have it! Mastering the art of planting blueberries in your home garden is not only achievable but also incredibly rewarding. We’ve walked you through the essential steps, from selecting the right blueberry varieties to preparing the perfect acidic soil, ensuring proper planting techniques, and providing ongoing care. But why is this DIY trick a must-try?
Simply put, growing your own blueberries offers a multitude of benefits that far outweigh the initial effort. Imagine stepping into your backyard and harvesting plump, juicy blueberries bursting with flavor, knowing exactly where they came from and how they were grown. No more relying on store-bought berries that may have traveled long distances and lost their freshness. You’ll have access to a constant supply of organic, delicious fruit, perfect for snacking, baking, or adding to your morning smoothie.
Beyond the taste and convenience, planting blueberries is an investment in your health and well-being. Blueberries are packed with antioxidants, vitamins, and minerals, making them a nutritional powerhouse. By growing your own, you can ensure that you’re consuming the freshest, most nutrient-rich berries possible.
But the benefits don’t stop there. Gardening is a therapeutic activity that can reduce stress, improve your mood, and connect you with nature. Tending to your blueberry bushes can be a relaxing and fulfilling hobby, providing a sense of accomplishment as you watch your plants thrive and produce abundant fruit.
Now, let’s talk about variations and suggestions to personalize your blueberry-growing experience. Consider experimenting with different blueberry varieties to find your favorites. Some popular options include ‘Bluecrop,’ ‘Elliott,’ ‘Duke,’ and ‘Chandler,’ each offering unique flavors and ripening times. You can also explore different planting methods, such as container gardening, which is ideal for those with limited space. If you live in an area with alkaline soil, container gardening allows you to create the perfect acidic environment for your blueberries.
Another suggestion is to incorporate companion plants into your blueberry patch. Plants like azaleas, rhododendrons, and ferns thrive in acidic soil and can create a beautiful and harmonious garden ecosystem. Additionally, consider adding a layer of mulch around your blueberry bushes to help retain moisture, suppress weeds, and regulate soil temperature. Pine needles, wood chips, or shredded bark are excellent choices for mulch.
Don’t be afraid to experiment with different fertilizers and soil amendments to optimize your blueberry growth. Conduct soil tests regularly to monitor the pH level and nutrient content, and adjust your fertilization accordingly. Remember, blueberries prefer acidic soil with a pH between 4.5 and 5.5.
Finally, we encourage you to embrace the journey of planting blueberries and share your experiences with others. Gardening is a collaborative activity, and we can all learn from each other’s successes and failures. Share your tips, tricks, and photos on social media, join online gardening communities, or even start your own blog to document your blueberry-growing adventure.
So, what are you waiting for? Grab your gardening gloves, gather your supplies, and embark on the rewarding journey of planting blueberries in your home garden. We’re confident that you’ll be delighted with the results. Remember, the key to success is patience, persistence, and a willingness to learn. Happy gardening!
Frequently Asked Questions (FAQ)
What is the best time of year to plant blueberries?
The ideal time to plant blueberries is in the early spring or late fall, when the plants are dormant. This allows them to establish their root systems before the onset of extreme temperatures. In warmer climates, fall planting is often preferred, while in colder regions, spring planting is recommended to avoid winter damage. However, container-grown blueberries can be planted at any time of year, provided that you take extra care to protect them from extreme weather conditions.
How much sunlight do blueberries need?
Blueberries require at least six hours of direct sunlight per day to thrive and produce abundant fruit. Choose a planting location that receives full sun exposure, especially during the morning hours. If you live in a hot climate, some afternoon shade may be beneficial to prevent the plants from overheating. Insufficient sunlight can result in reduced fruit production and weaker plant growth.
What type of soil is best for blueberries?
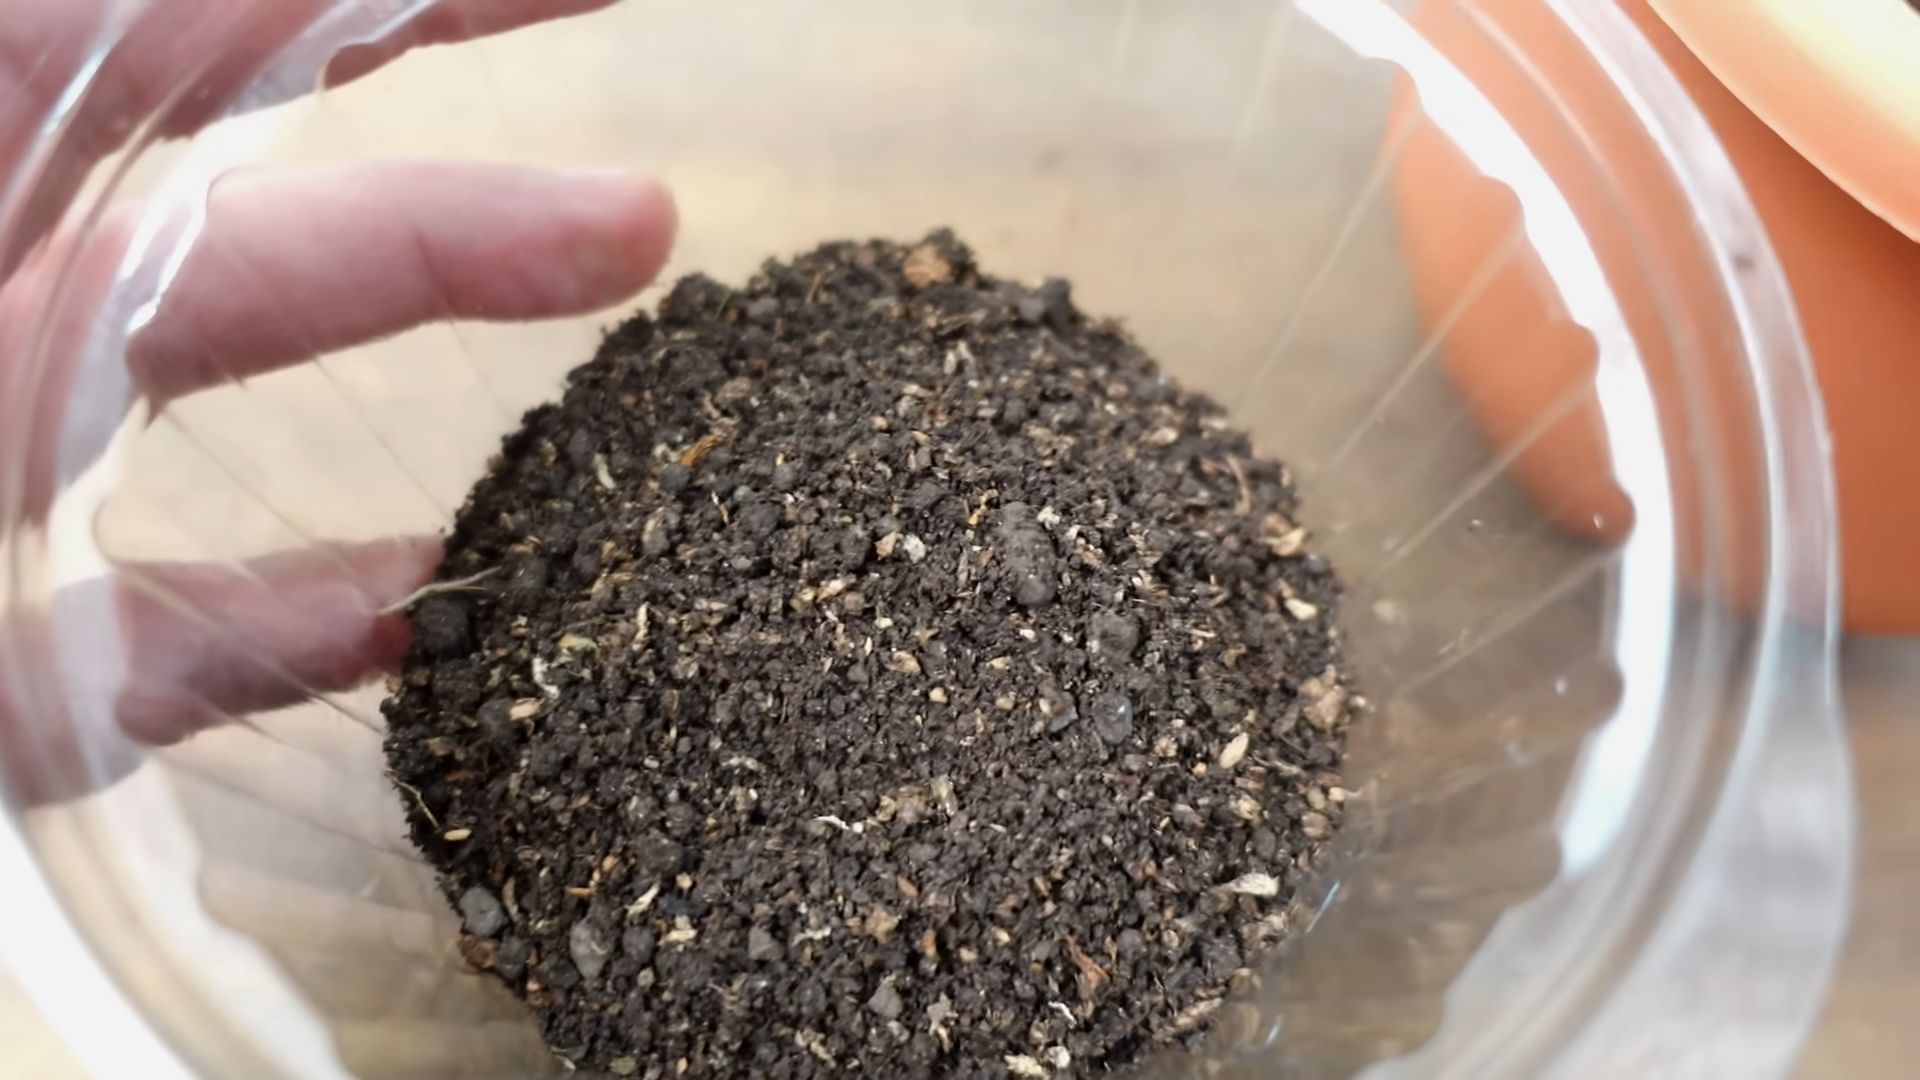
Blueberries require acidic soil with a pH between 4.5 and 5.5. Conduct a soil test to determine the pH level of your soil. If your soil is not acidic enough, you can amend it with sulfur, peat moss, or other acidifying agents. Blueberries also prefer well-drained soil that is rich in organic matter. Amend heavy clay soils with compost or other organic materials to improve drainage and aeration.
How often should I water my blueberry plants?
Blueberries need consistent moisture, especially during the growing season. Water deeply and regularly, ensuring that the soil remains moist but not waterlogged. Avoid overhead watering, as this can promote fungal diseases. Use a soaker hose or drip irrigation system to deliver water directly to the roots. Mulching around the plants can help retain moisture and reduce the need for frequent watering.
What kind of fertilizer should I use for blueberries?
Use a fertilizer specifically formulated for acid-loving plants, such as azaleas or rhododendrons. Apply the fertilizer in the spring, following the instructions on the package. Avoid over-fertilizing, as this can damage the plants. Organic fertilizers, such as compost or aged manure, can also be used to provide nutrients and improve soil health.
How do I prune my blueberry bushes?
Pruning is essential for maintaining the health and productivity of your blueberry bushes. Prune annually in late winter or early spring, before the plants begin to grow. Remove any dead, damaged, or diseased branches. Thin out the center of the bush to improve air circulation and sunlight penetration. Remove any low-growing branches that touch the ground. For young plants, focus on shaping the bush and removing any weak or spindly growth. For mature plants, remove older, less productive branches to encourage new growth.
How do I protect my blueberries from birds?
Birds are notorious for stealing blueberries, so it’s important to take steps to protect your crop. The most effective method is to cover your blueberry bushes with netting. Choose a netting with small holes to prevent birds from getting through. Secure the netting tightly around the bushes, ensuring that there are no gaps or openings. You can also use bird repellents, such as reflective tape or scarecrows, to deter birds.
How long does it take for blueberry plants to produce fruit?
Blueberry plants typically start producing fruit within one to two years of planting, but it may take three to five years for them to reach their full production potential. The amount of fruit produced will depend on the variety, age, and health of the plant, as well as the growing conditions. Be patient and provide your blueberry plants with the care they need, and you’ll be rewarded with a bountiful harvest.
Can I grow blueberries in containers?
Yes, blueberries can be successfully grown in containers, making them a great option for those with limited space or alkaline soil. Choose a large container with drainage holes and fill it with an acidic potting mix specifically formulated for blueberries. Select a compact or dwarf blueberry variety that is well-suited for container growing. Water regularly and fertilize as needed. Place the container in a sunny location and protect it from extreme weather conditions.
What are some common blueberry pests and diseases?
Blueberries are susceptible to a variety of pests and diseases, including aphids, spider mites, blueberry maggot, and fungal diseases like powdery mildew and botrytis blight. Monitor your plants regularly for signs of pests or diseases. Treat infestations or infections promptly with appropriate insecticides or fungicides. Proper pruning, good air circulation, and well-drained soil can help prevent many common blueberry problems.

Leave a Comment