
Plastic Bottle Mushroom Growing: Unlock a world of fresh, homegrown flavor right in your kitchen! Have you ever dreamed of harvesting your own delicious mushrooms but thought you needed acres of land or a fancy setup? Think again! This DIY guide will show you how to transform humble plastic bottles into thriving mushroom farms, bringing the magic of mycology to your fingertips.
Mushroom cultivation has a rich history, dating back centuries in various cultures. From ancient Chinese medicinal practices to the gourmet tables of Europe, mushrooms have always been prized for their unique taste and nutritional benefits. Now, you can participate in this fascinating tradition, regardless of your space or experience level.
Why should you try plastic bottle mushroom growing? Well, for starters, it’s incredibly sustainable! You’re repurposing waste, reducing your carbon footprint, and enjoying fresh produce all at once. Plus, store-bought mushrooms can be expensive and often lack the vibrant flavor of homegrown varieties. Imagine adding freshly harvested oyster mushrooms to your pasta, or shiitakes to your stir-fry, all grown with your own two hands. This DIY project is not only rewarding but also a fantastic way to learn about the fascinating world of fungi and impress your friends and family with your newfound green thumb (or should I say, brown thumb?). Let’s dive in and discover how easy and fun it is to grow your own mushrooms using recycled plastic bottles!

DIY Mushroom Growing with Plastic Bottles: A Fun and Sustainable Project
Hey there, fellow mushroom enthusiasts! Ever thought about growing your own delicious mushrooms right at home? And what if I told you you could do it using something you probably already have lying around: plastic bottles! This project is not only a great way to enjoy fresh, homegrown mushrooms, but it’s also a fantastic way to recycle and reduce waste. Let’s dive into this exciting and sustainable DIY project!
What You’ll Need
Before we get started, let’s gather all the necessary materials. Don’t worry, most of these are easily accessible and budget-friendly.
* Plastic Bottles: You’ll need several clean, clear plastic bottles (2-liter soda bottles or similar work great). The number depends on how many mushroom “farms” you want to create.
* Mushroom Spawn: This is the most important ingredient! You can purchase mushroom spawn online or from a local gardening supply store. Oyster mushrooms are a great choice for beginners as they are relatively easy to grow.
* Substrate: This is the material the mushrooms will grow on. Suitable substrates include:
* Straw: Chopped straw is a readily available and affordable option.
* Coffee Grounds: Used coffee grounds are a fantastic, sustainable choice. Make sure they are pasteurized (more on that later!).
* Sawdust: Hardwood sawdust is another good option, but avoid using sawdust from treated wood.
* Drill or Knife: For creating ventilation holes in the bottles.
* Spray Bottle: For misting the mushrooms to maintain humidity.
* Rubbing Alcohol: For sterilizing your tools and work area.
* Gloves: To maintain a sterile environment and protect your hands.
* Optional: Micropore Tape: To cover the ventilation holes and prevent contamination while still allowing air exchange.
* Large Pot or Container: For pasteurizing the substrate.
* Thermometer: To monitor the temperature during pasteurization.
Preparing the Substrate
The substrate is the food source for your mushrooms, so preparing it properly is crucial for success. We need to pasteurize it to kill off any competing organisms that could hinder mushroom growth.
Pasteurizing Straw
1. Chop the Straw: Cut the straw into smaller pieces, about 1-3 inches long. This will make it easier to pack into the bottles and allow the mushroom mycelium to colonize it more effectively.
2. Soak the Straw: Place the chopped straw in a large pot or container and cover it with water. Let it soak for at least 24 hours. This will hydrate the straw and prepare it for pasteurization.
3. Heat the Straw: Drain the soaked straw and place it back in the pot. Add fresh water until the straw is submerged. Heat the water to a temperature of 140-160°F (60-71°C).
4. Maintain the Temperature: Maintain this temperature for about 60-90 minutes. Use a thermometer to ensure the water doesn’t get too hot or too cold. Stir the straw occasionally to ensure even heating.
5. Cool and Drain: After pasteurization, carefully drain the hot water and allow the straw to cool completely. You can spread it out on a clean surface to speed up the cooling process. The straw should be moist but not dripping wet.
Pasteurizing Coffee Grounds
1. Collect Coffee Grounds: Gather used coffee grounds from your coffee maker.
2. Bake the Coffee Grounds: Spread the coffee grounds on a baking sheet and bake them in the oven at 170°F (77°C) for about 2 hours. This will pasteurize them and kill off any unwanted bacteria or mold. Alternatively, you can microwave them in short bursts, stirring in between, until they are heated through.
3. Cool and Drain: Allow the coffee grounds to cool completely before using them. They should be moist but not soggy.
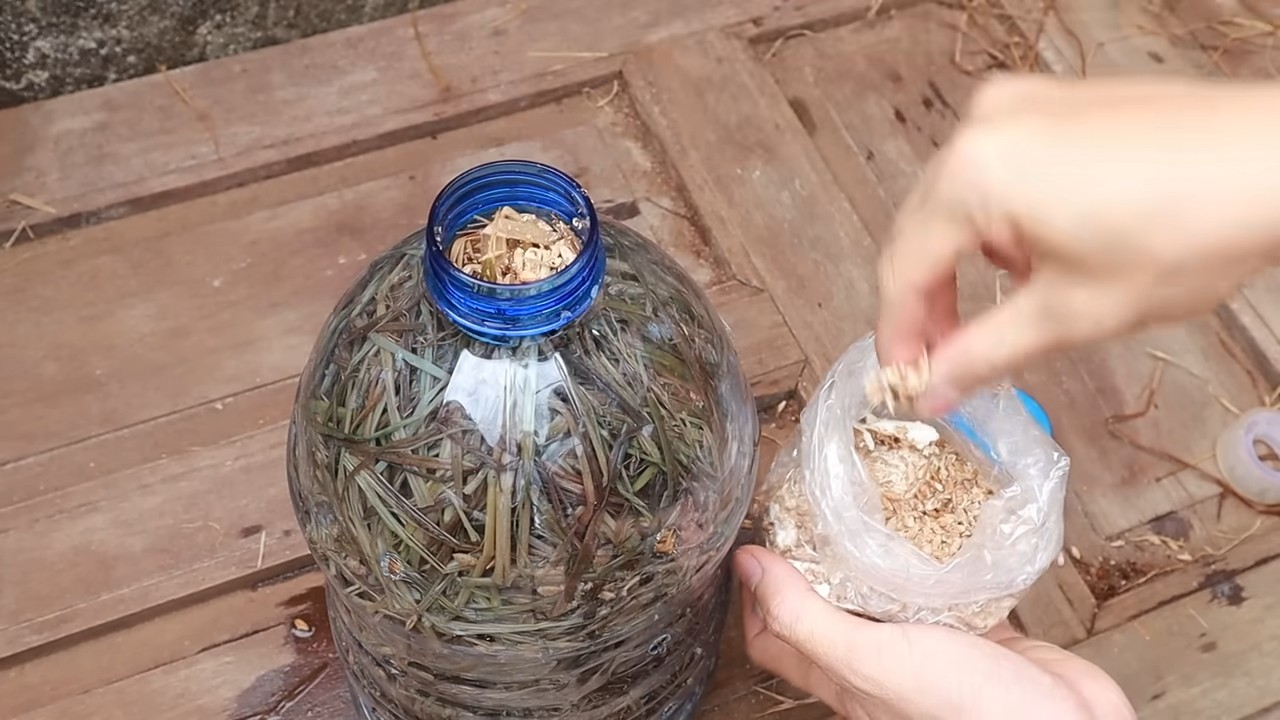
Preparing the Plastic Bottles
Now, let’s get the plastic bottles ready to become mushroom-growing containers.
1. Clean the Bottles: Thoroughly wash the plastic bottles with soap and water to remove any dirt or residue. Rinse them well and allow them to dry completely.
2. Drill Ventilation Holes: Using a drill or knife, create several small ventilation holes around the bottle. These holes will allow for air exchange, which is essential for mushroom growth. Space the holes about 2-3 inches apart and make them about ¼ inch in diameter. You can also create a few larger holes near the bottom for drainage.
3. Sterilize the Bottles: Wipe the inside of the bottles with rubbing alcohol to sterilize them and reduce the risk of contamination.
Inoculating the Substrate and Filling the Bottles
This is where the magic happens! We’ll be introducing the mushroom spawn to the substrate and creating the perfect environment for them to grow.
1. Prepare Your Work Area: Clean and sterilize your work area with rubbing alcohol. Wear gloves to maintain a sterile environment.
2. Mix Spawn and Substrate: In a clean container, mix the pasteurized substrate with the mushroom spawn. A good ratio is about 1 part spawn to 10 parts substrate. Mix thoroughly to ensure the spawn is evenly distributed throughout the substrate.
3. Fill the Bottles: Carefully pack the inoculated substrate into the plastic bottles. Don’t pack it too tightly, as this can restrict air flow. Leave about an inch of space at the top of the bottle.
4. Cover the Holes (Optional): If desired, cover the ventilation holes with micropore tape. This will help prevent contamination while still allowing air exchange.
Incubation
Now that our bottles are filled, we need to provide the right conditions for the mushroom mycelium to colonize the substrate.
1. Find a Suitable Location: Place the filled bottles in a dark, humid, and well-ventilated location. A basement, closet, or spare room works well. The ideal temperature for incubation is around 65-75°F (18-24°C).
2. Maintain Humidity: Mist the inside of the bottles with water every day or two to maintain humidity. You can also place a tray of water near the bottles to increase humidity in the surrounding area.
3. Monitor Colonization: Over the next few weeks, you should see the mushroom mycelium (a white, thread-like substance) spreading throughout the substrate. This process is called colonization. It can take anywhere from 2-4 weeks, depending on the type of mushroom and the environmental conditions.
4. Check for Contamination: Keep an eye out for any signs of contamination, such as green, black, or other colored molds. If you see any contamination, remove the affected bottle immediately to prevent it from spreading to the other bottles.
Fruiting
Once the substrate is fully colonized, it’s time to trigger fruiting, which is when the mushrooms start to grow.
1. Increase Light: Move the bottles to a location with indirect light. Mushrooms don’t need a lot of light, but some light is necessary for fruiting.
2. Increase Humidity: Increase the humidity even further by misting the bottles more frequently. You can also create a humidity tent by placing a plastic bag over the bottles, making sure to leave some space for air circulation.
3. Maintain Ventilation: Ensure there is adequate ventilation to prevent the buildup of carbon dioxide.
4. Monitor for Pinning: After a few days, you should start to see small mushroom “pins” forming on the surface of the substrate. These are the baby mushrooms!
5. Harvesting: Once the mushrooms have reached a desirable size, harvest them by gently twisting them off the substrate. Harvest them before they release their spores (you’ll see a powdery substance on the caps).
Second Flush and Beyond
After harvesting your first flush of mushrooms, you can often get a second (and sometimes even a third) flush.
1. Soak the Substrate: After harvesting, soak the substrate in water for 24 hours. This will rehydrate the substrate and encourage another flush of mushrooms.
2. Repeat Fruiting Steps: Drain the water and repeat the fruiting steps outlined above.
3. Dispose of Spent Substrate: After a few flushes, the substrate will become depleted of nutrients. You can then dispose of it in your compost bin or use it as a soil amendment in your garden.
Troubleshooting
Even with the best preparation, things can sometimes go wrong. Here are some common problems and how to fix them:
* No Mushroom Growth: This could be due to several factors, such as low humidity, incorrect temperature, contamination, or poor-quality spawn. Make sure you are providing the right conditions and that your spawn is viable.
* Contamination: Contamination is a common problem in mushroom growing. To prevent contamination,
Conclusion
So, there you have it! Transforming a simple plastic bottle into a thriving mushroom farm is not just a fun project; it’s a sustainable, cost-effective, and incredibly rewarding way to enjoy fresh, homegrown mushrooms. We’ve walked you through the process, highlighting the simplicity and accessibility of this DIY method. The beauty of this project lies in its adaptability. You’re not limited to just one type of mushroom. While oyster mushrooms are often recommended for beginners due to their resilience and rapid growth, feel free to experiment with other varieties like shiitake or even lion’s mane, keeping in mind that their growing conditions might differ slightly.
This method isn’t just about saving money on store-bought mushrooms; it’s about connecting with the natural world, understanding the fascinating life cycle of fungi, and reducing your environmental footprint. Think about the sheer volume of plastic waste we generate daily. By repurposing these bottles, we’re actively participating in a circular economy, giving discarded materials a new lease on life. Plus, you’ll be amazed at the satisfaction of harvesting your own delicious mushrooms, knowing you nurtured them from start to finish.
Consider these variations to personalize your plastic bottle mushroom growing experience:
* Vertical Garden Expansion: Create a vertical mushroom farm by stacking multiple bottle setups. This maximizes space, especially if you’re working with limited areas like balconies or small apartments.
* Nutrient Boost: Experiment with different substrates. While coffee grounds are a fantastic base, try adding other nitrogen-rich materials like straw, shredded cardboard (unprinted), or even spent grain from home brewing. Just ensure everything is properly pasteurized to prevent contamination.
* Humidity Control: If you live in a particularly dry climate, consider placing your bottle farm inside a larger container with a lid to create a more humid microclimate. Regularly misting the inside of the container will also help.
* Lighting Adjustments: While mushrooms don’t need direct sunlight, they do benefit from some ambient light. Experiment with different locations to find the sweet spot for optimal growth.
The possibilities are truly endless. The key is to be patient, observant, and willing to learn from your experiences. Don’t be discouraged if your first attempt isn’t perfect. Mushroom growing is a journey, and every mistake is a valuable lesson.
We wholeheartedly encourage you to give this DIY plastic bottle mushroom growing trick a try. It’s an engaging project for individuals, families, and even classrooms. Imagine the educational opportunities! And once you’ve harvested your first batch of homegrown goodness, we’d love to hear about your experience. Share your photos, tips, and any variations you’ve tried in the comments below. Let’s build a community of mushroom enthusiasts, all learning and growing together! This is more than just a recipe; it’s a gateway to a more sustainable and delicious lifestyle.
Frequently Asked Questions (FAQ)
What type of plastic bottle is best for growing mushrooms?
Ideally, you should use PET (polyethylene terephthalate) plastic bottles, which are commonly used for water and soda. These are generally considered food-safe and are readily available. Make sure the bottle is clean and free of any residue before starting. Avoid using bottles that have contained harsh chemicals or cleaning products.
How do I pasteurize the substrate?
Pasteurization is crucial to kill off any competing organisms that could hinder mushroom growth. There are a couple of methods you can use:
* Hot Water Pasteurization: Place your substrate (e.g., coffee grounds, straw) in a heat-resistant container. Pour boiling water over the substrate until it’s completely submerged. Let it sit for at least an hour, then drain off the excess water. The substrate should be moist but not dripping wet.
* Oven Pasteurization: Spread the substrate on a baking sheet and bake it in a preheated oven at 160-170°F (71-77°C) for about an hour. Monitor the temperature closely to avoid burning the substrate.
Always allow the substrate to cool down completely before inoculating it with mushroom spawn.
Where should I place my plastic bottle mushroom farm?
Mushrooms thrive in cool, dark, and humid environments. A basement, garage, or even a closet can be ideal locations. Avoid direct sunlight, as it can dry out the substrate and inhibit growth. Aim for a temperature range of 60-75°F (15-24°C). If your chosen location is too dry, you can increase humidity by misting the inside of the bottle regularly or placing it inside a larger container with a lid.
How often should I water my mushrooms?
The substrate should be kept consistently moist but not waterlogged. Check the moisture level daily by feeling the substrate. If it feels dry to the touch, mist it lightly with water using a spray bottle. Avoid overwatering, as this can lead to mold growth.
How long does it take for mushrooms to grow?
The time it takes for mushrooms to grow varies depending on the mushroom species, the substrate used, and the environmental conditions. Oyster mushrooms typically fruit within 2-3 weeks after inoculation. Shiitake mushrooms can take several months. Be patient and monitor your bottle farm regularly.
What if I see mold growing in my bottle?
Mold is a common problem in mushroom cultivation. If you see mold, it’s important to address it quickly to prevent it from spreading. Small patches of mold can sometimes be removed with a clean spoon or knife. However, if the mold is widespread, it’s best to discard the entire setup and start over. To prevent mold, ensure your substrate is properly pasteurized, maintain good hygiene, and avoid overwatering.
Can I reuse the substrate after harvesting mushrooms?
Yes, you can often get multiple flushes (harvests) from a single batch of substrate. After harvesting, soak the substrate in water for a few hours to rehydrate it. Then, drain off the excess water and return the bottle to its growing location. You may need to add some fresh spawn to encourage further growth. Eventually, the substrate will become depleted of nutrients and will no longer produce mushrooms. At that point, you can compost it and use it to enrich your garden soil.
What are the benefits of growing my own mushrooms?
Growing your own mushrooms offers numerous benefits:
* Fresh, Delicious Mushrooms: Enjoy the taste of homegrown mushrooms, which are often fresher and more flavorful than store-bought varieties.
* Cost Savings: Reduce your grocery bill by growing your own mushrooms.
* Sustainability: Reduce your environmental footprint by repurposing plastic bottles and using sustainable growing practices.
* Educational Experience: Learn about the fascinating world of fungi and the process of mushroom cultivation.
* Healthy Food Source: Mushrooms are a nutritious food source, rich in vitamins, minerals, and antioxidants.
* Reduce Waste: Using coffee grounds and other waste products as a substrate helps to reduce waste and promote a circular economy.
What kind of mushrooms are best for beginners?
Oyster mushrooms are generally considered the best choice for beginners due to their ease of cultivation, rapid growth, and tolerance of a wide range of conditions. They are also readily available in spawn form. Other good options include shiitake and wine cap mushrooms, but these may require more patience and attention to detail.
How do I harvest the mushrooms?
Harvest mushrooms when the caps are fully formed but before they start to release spores. To harvest, gently twist and pull the mushroom from the substrate. Avoid cutting the mushroom, as this can leave behind a stump that can rot and attract pests.

Leave a Comment