
Strawberry harvest plan: the secret to baskets overflowing with juicy, red berries all season long! Imagine biting into a sun-warmed strawberry, bursting with flavor, knowing you nurtured it from tiny blossom to delectable treat. That’s the magic of home gardening, and with a smart strawberry harvest plan, you can maximize your yield and minimize waste.
For centuries, strawberries have been cherished, not just for their taste, but also for their vibrant color and symbolism. From ancient Roman gardens to medieval tapestries, the strawberry has represented love, purity, and abundance. Today, growing your own strawberries connects you to that rich history, offering a tangible link to the past while providing fresh, healthy food for your table.
But let’s be honest, sometimes our strawberry dreams don’t quite match reality. We’ve all been there – a few scattered berries here and there, or worse, a glut of ripe fruit all at once that we can’t possibly eat before they spoil. That’s where a well-thought-out harvest plan comes in. I’m here to guide you through simple, effective DIY tricks and hacks that will transform your strawberry patch into a berry-producing powerhouse. No more wasted berries, no more missed opportunities – just a continuous supply of deliciousness. So, grab your gardening gloves, and let’s get started on creating the ultimate strawberry harvest plan!
DIY Strawberry Tower: A Vertical Garden for Bountiful Berries!
Hey there, fellow gardening enthusiasts! Are you dreaming of juicy, homegrown strawberries but short on space? Well, I’ve got the perfect solution for you: a DIY strawberry tower! This vertical garden is not only a space-saver but also a beautiful addition to any patio, balcony, or garden. Plus, it’s a super fun project to tackle. Let’s get started!
What You’ll Need: The Supply List
Before we dive in, let’s gather all the necessary materials. Trust me, having everything on hand will make the process much smoother.
* PVC Pipe (Main Structure): A 6-inch diameter PVC pipe, approximately 5-6 feet long. The length depends on how tall you want your tower. I went with 5 feet for easy access.
* PVC Pipe (Irrigation): A 1-inch diameter PVC pipe, slightly longer than your main pipe. This will be our internal watering system.
* Drill and Hole Saw: You’ll need a drill and a hole saw attachment (usually around 2-3 inches in diameter) to create the planting holes.
* Measuring Tape and Marker: For accurate hole placement.
* Safety Glasses and Gloves: Safety first!
* Landscape Fabric or Burlap: To line the inside of the tower and prevent soil from washing out.
* Zip Ties or Twine: To secure the landscape fabric.
* Potting Soil: A good quality potting mix is crucial for healthy strawberry plants.
* Strawberry Plants: Choose everbearing varieties for a continuous harvest throughout the season. I recommend starting with at least 15-20 plants.
* Gravel or Small Rocks: For drainage at the bottom of the tower.
* PVC Pipe Cement (Optional): If you want to permanently seal the bottom of the large PVC pipe.
* End Cap for 1-inch PVC Pipe: To close the bottom of the irrigation pipe.
* Drill Bit (Small): For drilling small holes in the irrigation pipe.
* Sandpaper: To smooth any rough edges after drilling.
Phase 1: Preparing the PVC Pipes
This is where we lay the foundation for our strawberry tower. Accuracy is key here, so take your time and double-check your measurements.
1. Marking the Planting Holes: Using your measuring tape and marker, evenly space out the planting holes on the 6-inch PVC pipe. I recommend staggering the holes in a spiral pattern for maximum planting space and visual appeal. Aim for about 6-8 inches between each hole, both vertically and horizontally. Remember to leave about 6 inches at the bottom of the pipe without any holes. This will be buried in the ground or placed in a container.
2. Drilling the Holes: Put on your safety glasses and gloves! Using the hole saw attachment on your drill, carefully drill out the marked holes. Apply steady pressure and let the saw do the work. Avoid forcing it, as this can crack the PVC.
3. Smoothing the Edges: After drilling, use sandpaper to smooth any rough edges around the holes. This will prevent damage to your strawberry plants when you insert them.
4. Preparing the Irrigation Pipe: Now, let’s work on the 1-inch PVC pipe. This will be our internal watering system. Using a small drill bit, drill small holes (about 1/8 inch) along the length of the pipe. Space these holes about 2-3 inches apart. These holes will allow water to seep out and evenly distribute moisture throughout the tower.
5. Capping the Irrigation Pipe: Attach the end cap to the bottom of the 1-inch PVC pipe. This will prevent water from draining out the bottom.
Phase 2: Assembling the Strawberry Tower
Now comes the fun part – putting everything together! This is where your tower starts to take shape.
1. Lining the Main Pipe: Cut the landscape fabric or burlap to fit the inside of the 6-inch PVC pipe. You’ll need enough fabric to line the entire length of the pipe, with some overlap at the top. Secure the fabric to the inside of the pipe using zip ties or twine. Make sure the fabric is snug against the pipe to prevent soil from escaping.
2. Adding Drainage: Pour a layer of gravel or small rocks into the bottom of the lined PVC pipe. This will provide drainage and prevent the soil from becoming waterlogged. Aim for a layer about 4-6 inches deep.
3. Inserting the Irrigation Pipe: Carefully insert the 1-inch PVC irrigation pipe into the center of the 6-inch PVC pipe. Make sure the capped end is at the bottom.
4. Adding Soil: Now, slowly add potting soil around the irrigation pipe, filling the space between the fabric lining and the pipe. As you add soil, gently pack it down to eliminate air pockets. Fill the tower up to the first row of holes.
Phase 3: Planting Your Strawberries
This is where your tower comes to life! Get ready to get your hands dirty and plant those delicious strawberry plants.
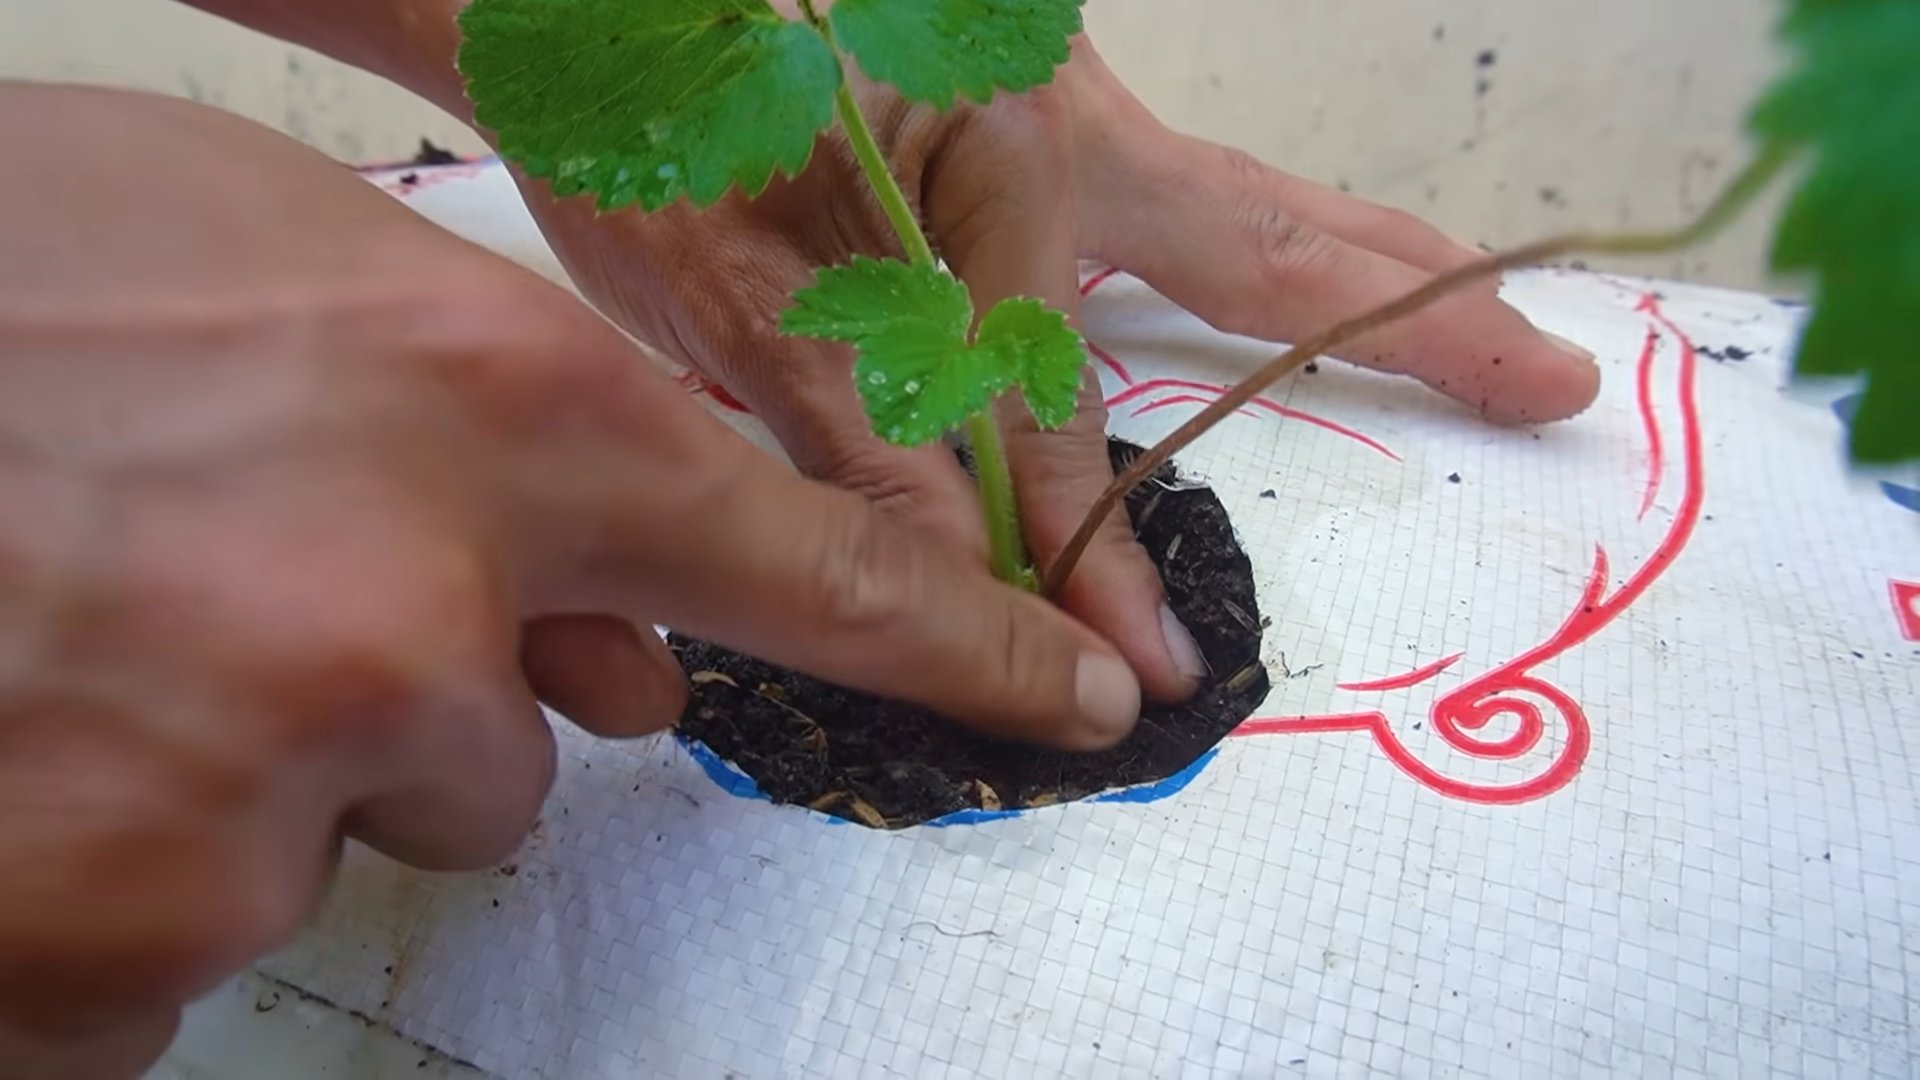
1. Planting the First Row: Gently remove a strawberry plant from its container and loosen the roots. Carefully insert the plant into one of the holes in the first row, making sure the roots are well covered with soil. Repeat this process for all the holes in the first row.
2. Adding More Soil: Add more potting soil to the tower, filling it up to the next row of holes. Again, gently pack the soil down.
3. Planting the Remaining Rows: Repeat the planting process for each row of holes, adding soil and planting strawberry plants until you reach the top of the tower.
4. Planting the Top: For the top of the tower, you can plant a few more strawberry plants directly into the soil. This will create a beautiful, cascading effect.
5. Watering Thoroughly: Once all the plants are in place, water the tower thoroughly. Pour water into the top of the 1-inch PVC irrigation pipe until it starts to drain out of the bottom. This will ensure that the soil is evenly moistened.
Phase 4: Caring for Your Strawberry Tower
Now that your strawberry tower is complete, it’s important to provide proper care to ensure a bountiful harvest.
1. Sunlight: Place your strawberry tower in a location that receives at least 6-8 hours of sunlight per day. Strawberries need plenty of sunlight to thrive.
2. Watering: Water your strawberry tower regularly, especially during hot, dry weather. Check the soil moisture by sticking your finger into the soil. If it feels dry, it’s time to water. Water through the irrigation pipe to ensure even distribution.
3. Fertilizing: Feed your strawberry plants with a balanced fertilizer every 2-3 weeks. Follow the instructions on the fertilizer package.
4. Pruning: Remove any dead or yellowing leaves to keep your plants healthy and productive.
5. Pest Control: Keep an eye out for pests such as aphids, slugs, and snails. Treat any infestations promptly with organic pest control methods.
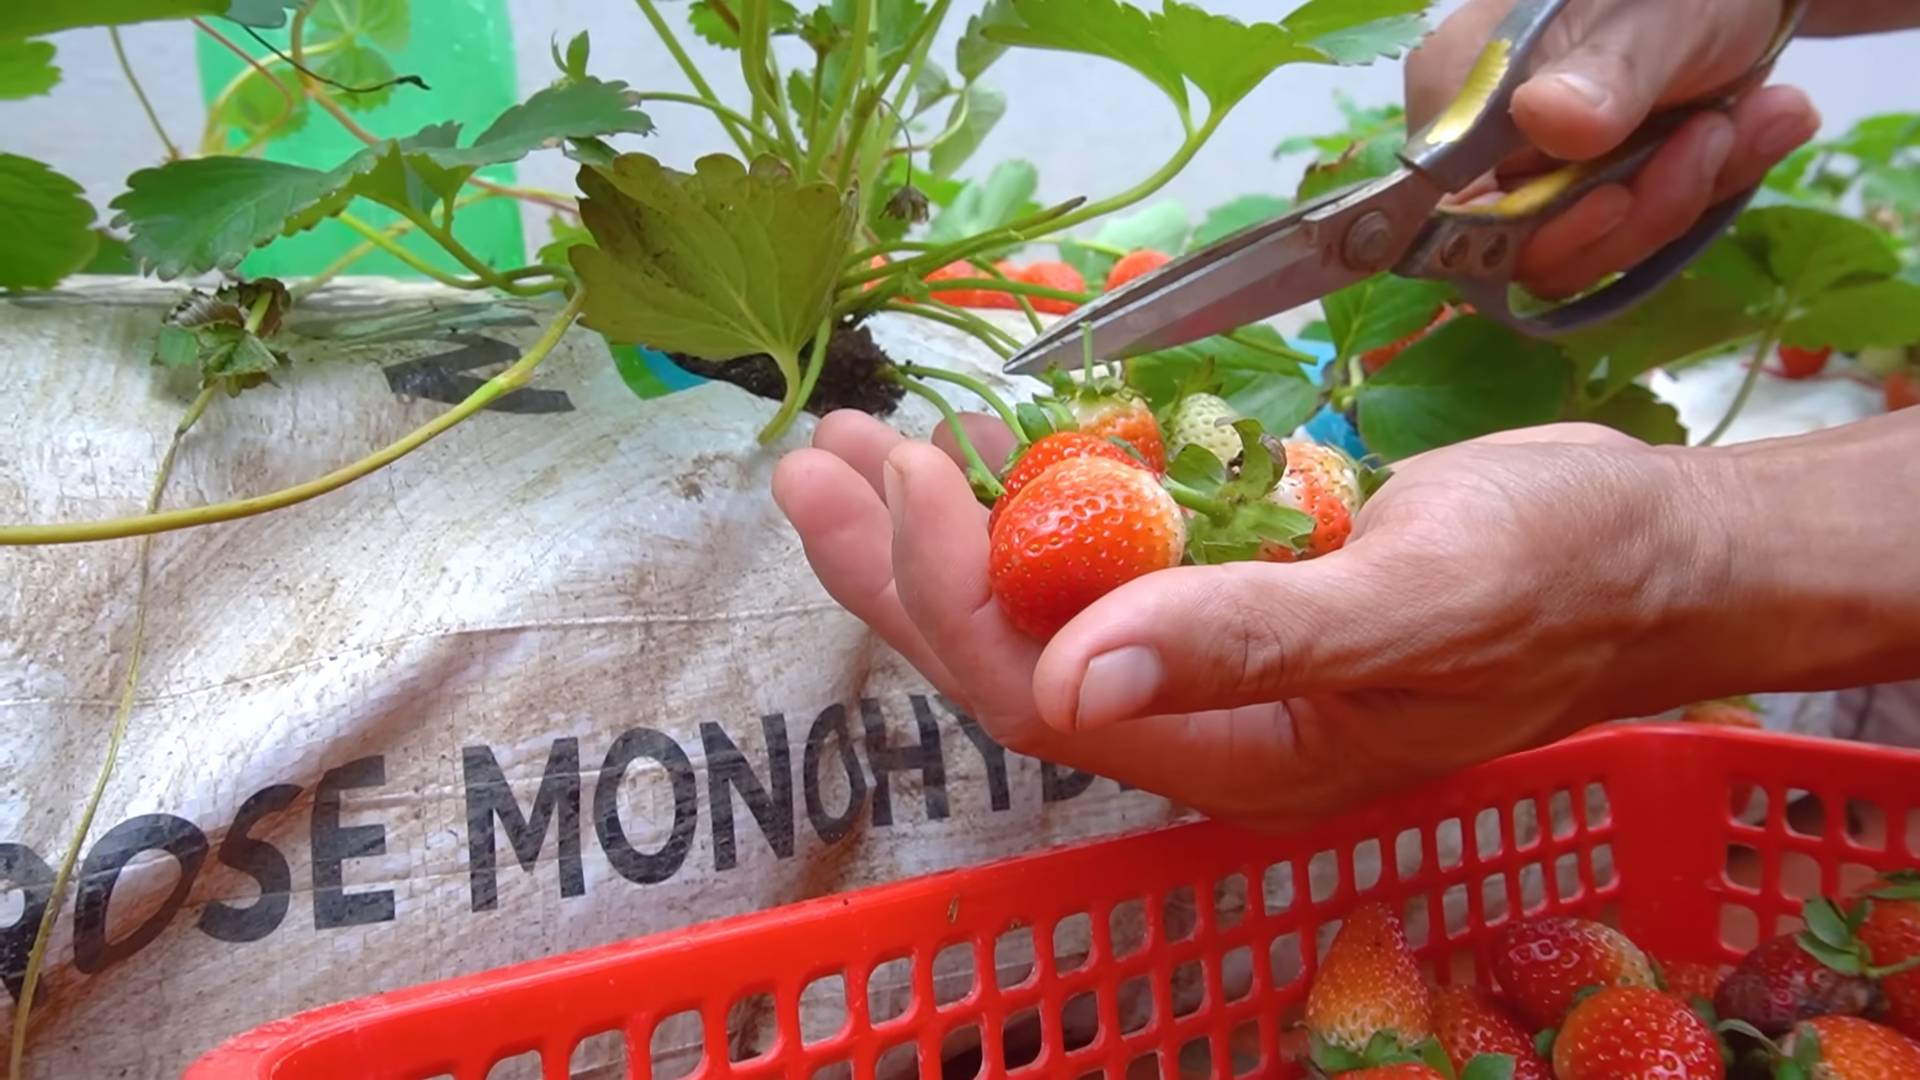
6. Harvesting: Harvest your strawberries when they are fully ripe and red. Gently pluck them from the plant, being careful not to damage the surrounding berries.
Tips and Tricks for a Successful Strawberry Tower
Here are a few extra tips to help you get the most out of your strawberry tower:
* Choose the Right Location: Consider the amount of sunlight your location receives and choose a spot that is easily accessible for watering and harvesting.
* Use Quality Potting Soil: Don’t skimp on the potting soil! A good quality mix will provide the nutrients your plants need to thrive.
* Rotate Your Plants: After a few seasons, consider rotating your strawberry plants to prevent soil depletion.
* Protect from Frost: If you live in an area with cold winters, protect your strawberry tower from frost by covering it with a blanket or moving it to a sheltered location.
* Consider Companion Planting: Plant herbs like basil or thyme around your strawberry plants to deter pests and attract beneficial insects.
Troubleshooting Common Issues
Even with the best care, you might encounter a few challenges along the way. Here are some common issues and how to address them:
* Yellowing Leaves: This could be a sign of overwatering, underwatering, or nutrient deficiency. Adjust your watering schedule and fertilize your plants as needed.
* Lack of Fruit: This could be due to insufficient sunlight, poor pollination, or nutrient deficiency. Make sure your plants are getting enough sunlight, consider hand-pollinating the flowers, and fertilize your plants regularly.
* Pest Infestations: Treat any pest infestations promptly with organic pest control methods.
* Soil Erosion: If you notice soil washing out of the holes, reinforce the landscape fabric lining or add more soil to the tower.
And
Conclusion
So, there you have it! This simple yet effective DIY strawberry preservation trick is a game-changer for anyone looking to extend the life of their precious harvest. Forget about mushy, moldy berries languishing in your fridge. This method, focusing on proper washing and storage, will keep your strawberries fresh, vibrant, and ready to enjoy for days longer than you ever thought possible.
Why is this a must-try? Because it saves you money, reduces food waste, and ensures you always have delicious strawberries on hand for snacking, baking, or adding to your favorite recipes. Imagine being able to pull out perfectly preserved strawberries in the middle of winter to brighten up a dreary day! That’s the power of this simple technique.
But don’t stop there! Feel free to experiment with variations. For an extra layer of protection, consider lining your storage container with a paper towel to absorb any excess moisture. You could also try adding a tablespoon of white vinegar to your water bath – the acidity helps to further inhibit mold growth. Another variation is to dry the strawberries in a salad spinner after washing to remove excess water. This can help prevent them from becoming soggy during storage.
This DIY strawberry preservation method isn’t just about extending shelf life; it’s about maximizing flavor and enjoyment. It’s about respecting the effort you put into growing or purchasing these delicious fruits. It’s about making the most of every single berry.
We wholeheartedly encourage you to give this DIY strawberry preservation trick a try. It’s quick, easy, and requires minimal effort. You’ll be amazed at the difference it makes. And most importantly, we want to hear about your experience! Share your results, tips, and variations in the comments below. Let’s build a community of strawberry-loving enthusiasts who are committed to preserving the goodness of this amazing fruit. Did you find a particular container worked better? Did you try a different drying method? Your insights could help others achieve even better results.
Don’t let another precious strawberry go to waste! Embrace this simple DIY technique and unlock the secret to long-lasting freshness. Happy preserving!
Frequently Asked Questions (FAQ)
Why is washing strawberries before storing them usually a bad idea?
Typically, washing strawberries before storing them introduces excess moisture, which creates the perfect environment for mold and bacteria to thrive. This leads to faster spoilage and a shorter shelf life. However, our DIY strawberry preservation method addresses this issue by emphasizing thorough drying after washing, effectively mitigating the risk of premature spoilage.
What kind of container is best for storing washed strawberries?
The best type of container for storing washed strawberries is one that is airtight and allows for some ventilation. A container with a lid that seals well will help prevent moisture from escaping, which can lead to mold growth. However, some ventilation is also important to allow for air circulation and prevent the strawberries from becoming too humid. Glass containers or plastic containers with ventilation holes are both good options. Make sure the container is clean and dry before storing the strawberries.
How long will strawberries last using this DIY preservation method?
Using this DIY strawberry preservation method, you can typically expect your strawberries to last for 7-10 days in the refrigerator. This is significantly longer than the 2-3 days they usually last when stored unwashed. However, the exact shelf life will depend on the initial freshness of the strawberries and the effectiveness of your washing and drying techniques.
Can I use this method for other berries besides strawberries?
While this method is specifically tailored for strawberries, it can also be adapted for other delicate berries like raspberries, blueberries, and blackberries. However, keep in mind that these berries are often more fragile than strawberries, so handle them with extra care during the washing and drying process. You may also want to reduce the soaking time in the water bath to prevent them from becoming too soft.
What if I don’t have time to dry the strawberries thoroughly?
Thorough drying is a crucial step in this DIY strawberry preservation method. If you don’t have time to dry the strawberries properly, they are more likely to spoil quickly. However, you can speed up the drying process by using a salad spinner or gently patting the strawberries dry with a clean paper towel. If you’re short on time, it’s better to skip the washing step altogether and store the unwashed strawberries in the refrigerator until you have more time to wash and dry them properly.
Is it necessary to use distilled water for washing the strawberries?
While distilled water is ideal for washing strawberries, it’s not strictly necessary. Tap water is generally fine, as long as it’s clean and free from any contaminants. However, if your tap water has a strong chlorine odor or taste, you may want to consider using filtered water instead. Distilled water is preferred because it is free of minerals and other impurities that can potentially affect the flavor and shelf life of the strawberries.
Can I freeze strawberries after washing them using this method?
Yes, you can freeze strawberries after washing and drying them using this method. In fact, this is a great way to preserve them for even longer. To freeze the strawberries, spread them out in a single layer on a baking sheet lined with parchment paper and freeze them for a few hours until they are solid. This will prevent them from clumping together in the freezer. Once the strawberries are frozen, transfer them to a freezer-safe bag or container and store them in the freezer for up to 6 months.
What are some signs that my strawberries have gone bad, even after using this preservation method?
Even with proper washing and storage, strawberries will eventually spoil. Some signs that your strawberries have gone bad include:
* Mold growth: This is the most obvious sign of spoilage.
* Soft or mushy texture: Strawberries that are no longer firm and plump are likely past their prime.
* Sour or fermented smell: A foul odor indicates that the strawberries have started to decompose.
* Dull or discolored appearance: Strawberries that have lost their vibrant red color and appear dull or discolored are likely no longer fresh.
If you notice any of these signs, it’s best to discard the strawberries to avoid any potential health risks.
Can I add a vinegar solution to the water when washing the strawberries?
Yes, adding a vinegar solution to the water when washing the strawberries is a great way to further inhibit mold growth. A ratio of 1 tablespoon of white vinegar per cup of water is generally recommended. The acidity of the vinegar helps to kill any bacteria or mold spores that may be present on the surface of the strawberries. Just be sure to rinse the strawberries thoroughly with clean water after soaking them in the vinegar solution to remove any residual vinegar taste.
What if my strawberries are already a little soft when I buy them? Will this method still work?
This method works best with strawberries that are relatively fresh and firm. If your strawberries are already a little soft when you buy them, this preservation method may not be as effective. However, you can still try washing and drying them as described, but be sure to handle them very gently to avoid bruising them further. You may also want to use them sooner rather than later, as they are likely to spoil more quickly than fresher strawberries.
Leave a Comment