
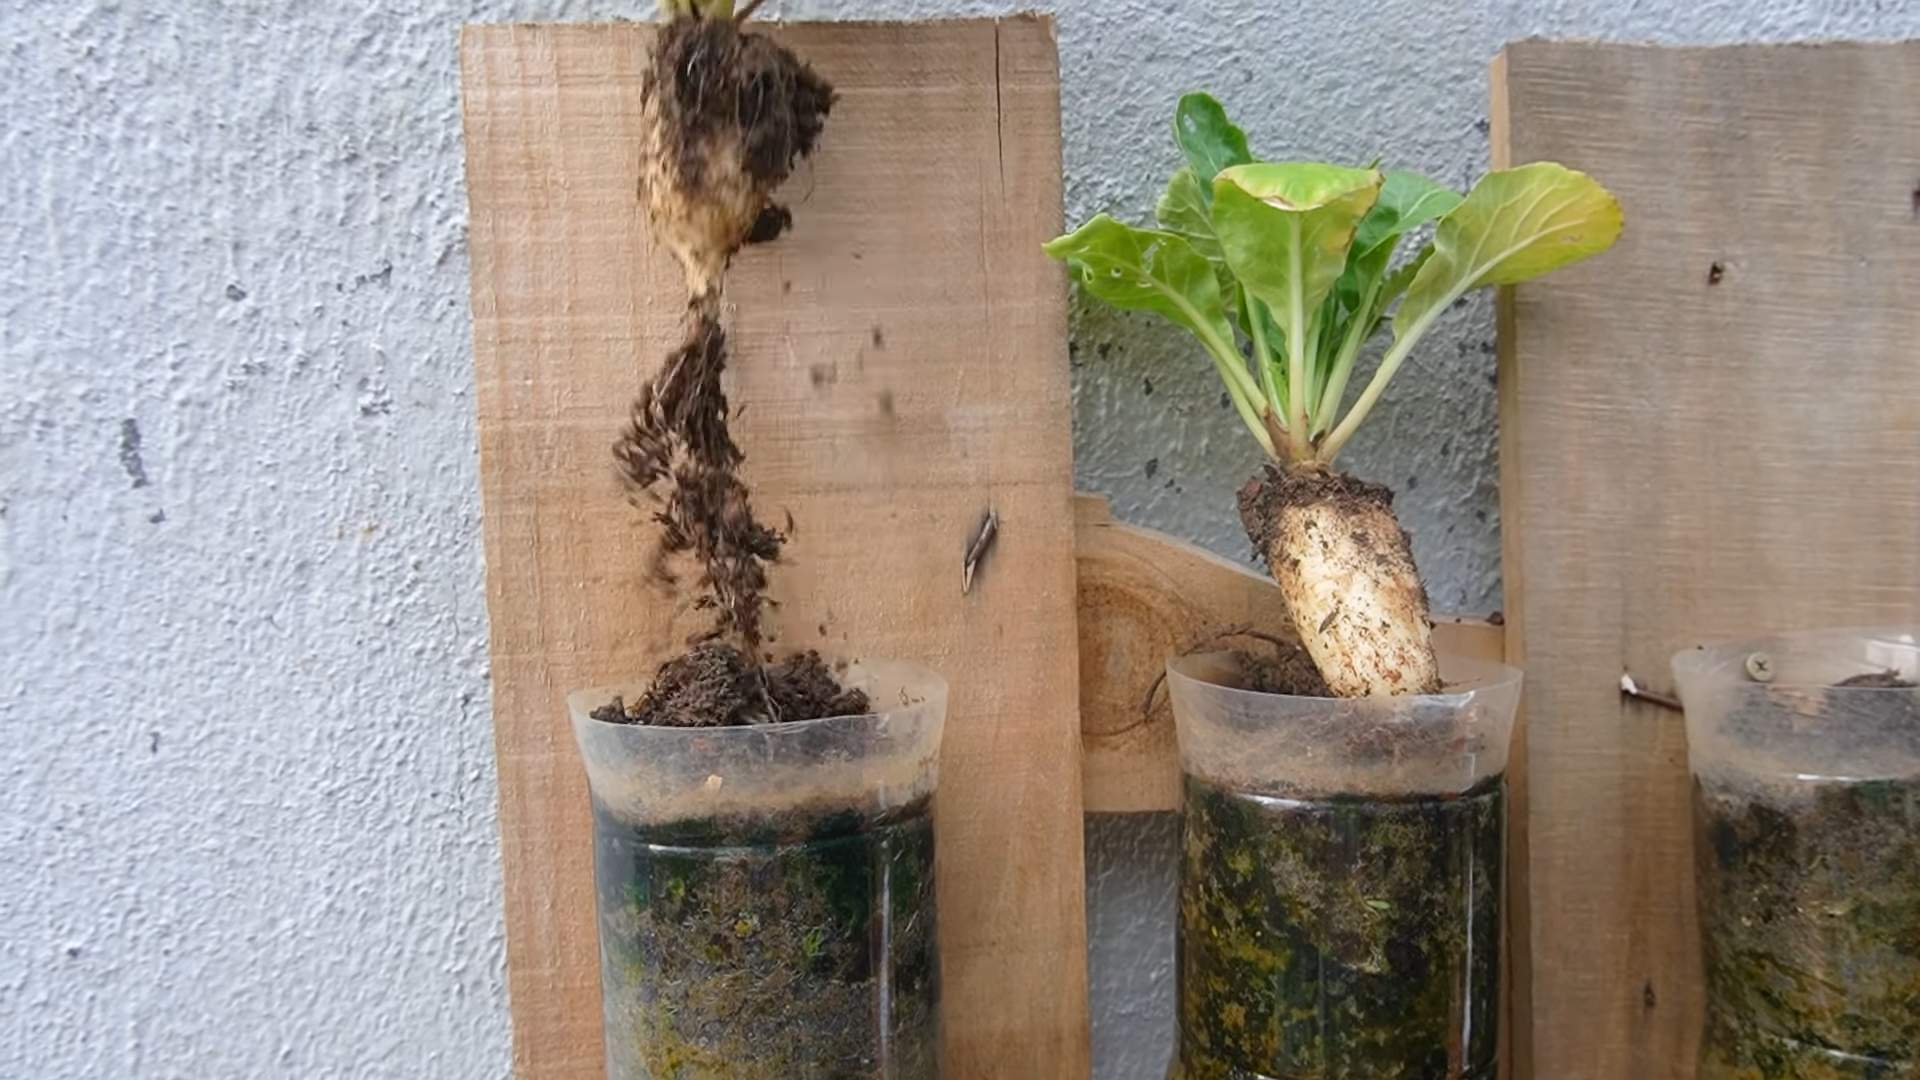
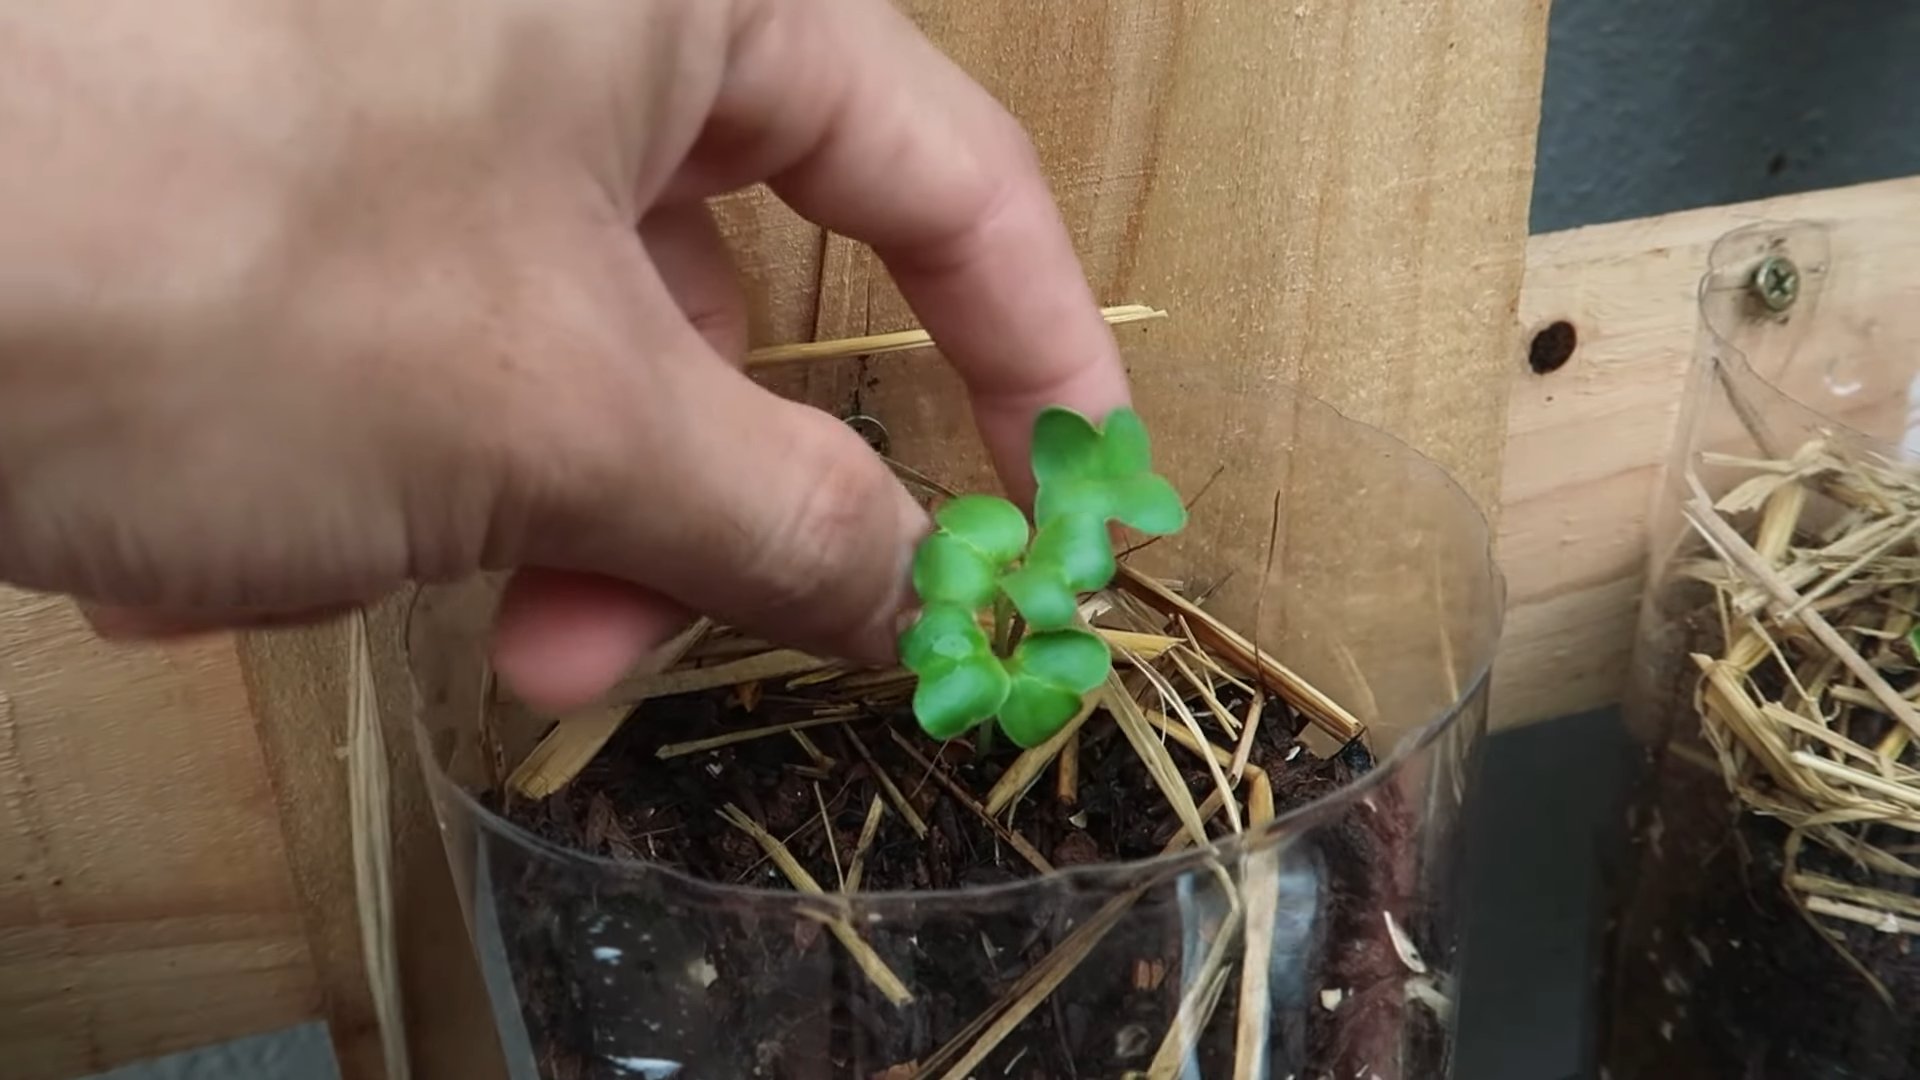
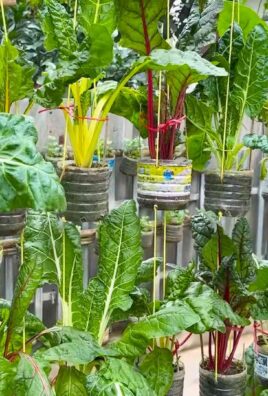
Grow Radishes Year Round? Absolutely! Imagine fresh, crisp radishes gracing your salads and snacks, no matter the season. Forget relying solely on fleeting spring and fall harvests. This isn’t just a gardener’s dream; it’s an achievable reality with a few clever tricks and DIY techniques.
Radishes, humble as they may seem, have a rich history, dating back to ancient Egypt and Greece. They were valued not only for their peppery bite but also for their medicinal properties. Today, while we might not be prescribing them for ailments, their vibrant color and zesty flavor make them a welcome addition to any meal. But why limit ourselves to seasonal availability?
Let’s face it, store-bought radishes often lack the zing and freshness of homegrown ones. Plus, who wants to pay premium prices when you can cultivate your own supply? That’s where these DIY tricks come in. I’m going to share simple, effective methods to extend your radish-growing season, allowing you to grow radishes year round, even in challenging climates. From selecting the right varieties to mastering protective growing techniques, I’ll guide you through each step. Get ready to enjoy a continuous supply of these delightful root vegetables, adding a burst of flavor to your table all year long!
Grow Your Own Sweet Potatoes Indoors: A Beginner’s Guide
Hey there, fellow gardening enthusiasts! Ever thought about growing your own sweet potatoes right in your home? It’s easier than you might think, and incredibly rewarding. I’m going to walk you through the whole process, from sprouting slips to harvesting your very own homegrown sweet potatoes. Get ready to get your hands dirty (in a good way!).
What You’ll Need
Before we dive in, let’s gather our supplies. This is what I’ve found works best:
* Sweet Potatoes: Choose organic sweet potatoes from the grocery store. Organic is important because non-organic ones might be treated to prevent sprouting. Look for firm, healthy-looking potatoes without any soft spots or blemishes.
* Glass Jars or Containers: Wide-mouthed jars or containers are ideal. Mason jars, old pickle jars – anything that can hold water and support the sweet potato.
* Toothpicks: These will be your trusty supports for suspending the sweet potato in water.
* Potting Soil: A good quality potting mix is essential for planting the slips.
* Large Pots or Containers: Choose pots that are at least 12 inches in diameter and 12 inches deep. Sweet potatoes need room to grow!
* Water: Tap water is fine, but let it sit out for a day or two to allow any chlorine to dissipate.
* Sunny Location: Sweet potatoes thrive in sunlight, so find a spot that gets at least 6-8 hours of direct sunlight per day. A south-facing window is usually perfect.
* Spray Bottle: For misting the slips and young plants.
* Optional: Rooting Hormone: While not strictly necessary, rooting hormone can help speed up the rooting process for the slips.
Sprouting Sweet Potato Slips: The Magic Begins
This is where the fun really starts! We’re going to coax those sweet potatoes into producing slips – the little sprouts that will eventually become our plants.
1. Prepare the Sweet Potato: Gently wash the sweet potato to remove any dirt or debris.
2. Insert Toothpicks: Insert 3-4 toothpicks evenly spaced around the middle of the sweet potato. These will act as supports to suspend the potato in the jar.
3. Suspend in Water: Fill your jar or container with water, leaving about an inch of space at the top. Carefully place the sweet potato on top of the jar, using the toothpicks to hold it in place. The bottom half of the sweet potato should be submerged in water.
4. Find a Sunny Spot: Place the jar in a warm, sunny location. A windowsill is perfect.
5. Maintain Water Level: Check the water level daily and add more water as needed to keep the bottom half of the sweet potato submerged.
6. Wait Patiently: This is the hardest part! It can take anywhere from 2-6 weeks for slips to start sprouting. Be patient and keep the water fresh. You’ll start to see little roots emerging from the bottom and sprouts (slips) appearing on the top.
7. Encourage Slip Growth: Once the slips are a few inches long, you can gently mist them with water to encourage further growth.
Separating and Rooting the Slips
Now that we have slips, it’s time to separate them from the mother potato and give them a chance to develop their own root systems.
1. Wait for Sufficient Growth: Let the slips grow to be about 6-8 inches long before removing them. They should have several leaves.
2. Carefully Remove the Slips: Gently twist or cut the slips off the sweet potato. Try to get as much of the base of the slip as possible, as this is where the roots will emerge.
3. Rooting in Water (Option 1): Place the slips in a glass of water, making sure the bottom inch or two of the stem is submerged. Change the water every day or two to keep it fresh. Within a week or two, you should see roots starting to grow.
4. Rooting Directly in Soil (Option 2): You can also root the slips directly in soil. Dip the cut end of the slip in rooting hormone (optional) and then plant it in a small pot filled with moist potting soil. Keep the soil consistently moist and place the pot in a warm, sunny location.
5. Monitor Root Growth: Whether you’re rooting in water or soil, keep an eye on the slips. Once they have a good root system (about 1-2 inches long), they’re ready to be transplanted into larger pots.
Planting Your Sweet Potato Slips
Alright, the moment we’ve been waiting for! It’s time to plant our rooted slips and watch them grow into sweet potato plants.
1. Prepare Your Pots: Fill your large pots with good quality potting soil. Leave about an inch of space at the top of the pot.
2. Create Planting Holes: Make a small hole in the center of each pot, large enough to accommodate the root ball of the slip.
3. Carefully Transplant the Slips: Gently remove the rooted slips from the water or small pots. Be careful not to damage the roots.
4. Plant the Slips: Place the slips in the planting holes and gently cover the roots with soil. Firm the soil around the base of the plant.
5. Water Thoroughly: Water the newly planted slips thoroughly until the water drains out of the bottom of the pot.
6. Provide Support (Optional): If your slips are tall and leggy, you can provide them with some support by staking them or using a small trellis.
Caring for Your Sweet Potato Plants
Now that your sweet potato plants are in their new homes, it’s important to provide them with the care they need to thrive.
1. Sunlight: Sweet potatoes need plenty of sunlight, so make sure they’re in a location that gets at least 6-8 hours of direct sunlight per day.
2. Watering: Water your sweet potato plants regularly, especially during hot weather. The soil should be consistently moist, but not waterlogged. Check the soil moisture by sticking your finger into the soil. If the top inch feels dry, it’s time to water.
3. <
Hey there, fellow gardening enthusiasts! Ever thought about growing your own sweet potatoes right in your home? It's easier than you might think, and incredibly rewarding. I'm going to walk you through the whole process, from sprouting slips to harvesting your very own homegrown sweet potatoes. Get ready to get your hands dirty (in a good way!).
What You’ll Need
Before we dive in, let’s gather our supplies. This is what I’ve found works best:
* Sweet Potatoes: Choose organic sweet potatoes from the grocery store. Organic is important because non-organic ones might be treated to prevent sprouting. Look for firm, healthy-looking potatoes without any soft spots or blemishes.
* Glass Jars or Containers: Wide-mouthed jars or containers are ideal. Mason jars, old pickle jars – anything that can hold water and support the sweet potato.
* Toothpicks: These will be your trusty supports for suspending the sweet potato in water.
* Potting Soil: A good quality potting mix is essential for planting the slips.
* Large Pots or Containers: Choose pots that are at least 12 inches in diameter and 12 inches deep. Sweet potatoes need room to grow!
* Water: Tap water is fine, but let it sit out for a day or two to allow any chlorine to dissipate.
* Sunny Location: Sweet potatoes thrive in sunlight, so find a spot that gets at least 6-8 hours of direct sunlight per day. A south-facing window is usually perfect.
* Spray Bottle: For misting the slips and young plants.
* Optional: Rooting Hormone: While not strictly necessary, rooting hormone can help speed up the rooting process for the slips.
Sprouting Sweet Potato Slips: The Magic Begins
This is where the fun really starts! We’re going to coax those sweet potatoes into producing slips – the little sprouts that will eventually become our plants.
1. Prepare the Sweet Potato: Gently wash the sweet potato to remove any dirt or debris.
2. Insert Toothpicks: Insert 3-4 toothpicks evenly spaced around the middle of the sweet potato. These will act as supports to suspend the potato in the jar.
3. Suspend in Water: Fill your jar or container with water, leaving about an inch of space at the top. Carefully place the sweet potato on top of the jar, using the toothpicks to hold it in place. The bottom half of the sweet potato should be submerged in water.
4. Find a Sunny Spot: Place the jar in a warm, sunny location. A windowsill is perfect.
5. Maintain Water Level: Check the water level daily and add more water as needed to keep the bottom half of the sweet potato submerged.
6. Wait Patiently: This is the hardest part! It can take anywhere from 2-6 weeks for slips to start sprouting. Be patient and keep the water fresh. You’ll start to see little roots emerging from the bottom and sprouts (slips) appearing on the top.
7. Encourage Slip Growth: Once the slips are a few inches long, you can gently mist them with water to encourage further growth.
Separating and Rooting the Slips
Now that we have slips, it’s time to separate them from the mother potato and give them a chance to develop their own root systems.
1. Wait for Sufficient Growth: Let the slips grow to be about 6-8 inches long before removing them. They should have several leaves.
2. Carefully Remove the Slips: Gently twist or cut the slips off the sweet potato. Try to get as much of the base of the slip as possible, as this is where the roots will emerge.
3. Rooting in Water (Option 1): Place the slips in a glass of water, making sure the bottom inch or two of the stem is submerged. Change the water every day or two to keep it fresh. Within a week or two, you should see roots starting to grow.
4. Rooting Directly in Soil (Option 2): You can also root the slips directly in soil. Dip the cut end of the slip in rooting hormone (optional) and then plant it in a small pot filled with moist potting soil. Keep the soil consistently moist and place the pot in a warm, sunny location.
5. Monitor Root Growth: Whether you’re rooting in water or soil, keep an eye on the slips. Once they have a good root system (about 1-2 inches long), they’re ready to be transplanted into larger pots.
Planting Your Sweet Potato Slips
Alright, the moment we’ve been waiting for! It’s time to plant our rooted slips and watch them grow into sweet potato plants.
1. Prepare Your Pots: Fill your large pots with good quality potting soil. Leave about an inch of space at the top of the pot.
2. Create Planting Holes: Make a small hole in the center of each pot, large enough to accommodate the root ball of the slip.
3. Carefully Transplant the Slips: Gently remove the rooted slips from the water or small pots. Be careful not to damage the roots.
4. Plant the Slips: Place the slips in the planting holes and gently cover the roots with soil. Firm the soil around the base of the plant.
5. Water Thoroughly: Water the newly planted slips thoroughly until the water drains out of the bottom of the pot.
6. Provide Support (Optional): If your slips are tall and leggy, you can provide them with some support by staking them or using a small trellis.
Caring for Your Sweet Potato Plants
Now that your sweet potato plants are in their new homes, it’s important to provide them with the care they need to thrive.
1. Sunlight: Sweet potatoes need plenty of sunlight, so make sure they’re in a location that gets at least 6-8 hours of direct sunlight per day.
2. Watering: Water your sweet potato plants regularly, especially during hot weather. The soil should be consistently moist, but not waterlogged. Check the soil moisture by sticking your finger into the soil. If the top inch feels dry, it’s time to water.
3. Fertilizing: Sweet potatoes are heavy feeders, so fertilize them regularly with a balanced fertilizer. Follow the instructions on the fertilizer package. I like to use a liquid fertilizer diluted to half strength every two weeks.
4. Pruning: Pruning isn’t strictly necessary, but you can trim back any long, trailing vines to keep the plants manageable.
5. Pest Control: Keep an eye out for pests like aphids, spider mites, and whiteflies. If you notice any pests, treat them with an appropriate insecticide or insecticidal soap. I prefer to use organic pest control methods whenever possible.
6. Rotating the Pots: Rotate the pots every few days to ensure that all sides of the plant receive equal sunlight. This will help prevent the plants from becoming leggy and lopsided.
Harvesting Your Sweet Potatoes
This is the most exciting part! After months of care and patience, it’s time to harvest your homegrown sweet potatoes.
1. Timing is Key: Sweet potatoes typically take about 90-120 days to mature. You’ll know they’re ready to harvest when the leaves start to turn yellow and die back.
2. Gently Dig Up the Potatoes: Carefully tip the pot over and gently loosen the soil around the base of the plant. Use your hands to dig around and find the sweet potatoes. Be careful not to damage them.
3. Cure the Sweet Potatoes: Curing is an important step that helps to improve the flavor and storage life of your sweet potatoes. To cure them, place them in a warm, humid location (around 80-85°F and 85-90% humidity) for about a week. A sunny windowsill or a greenhouse is ideal.
4. Store Properly: After curing, store your sweet potatoes in a cool, dry, and well-ventilated place. They should last for several months if stored properly.
Troubleshooting Tips
Sometimes, things don’t go exactly as planned. Here are a few common problems you might encounter and how to fix them:
* Slips Not Sprouting: If your sweet potato isn’t sprouting slips, make sure it’s getting enough sunlight and that the water is fresh. You can also try using a different sweet potato.
* Slips Turning Yellow: Yellowing slips can be a sign of overwatering or nutrient deficiency. Make sure the soil is well-draining and fertilize regularly.
* Pests: If you notice pests on your sweet potato plants, treat them with an appropriate insecticide or insecticidal soap.
* Slow Growth: Slow growth can be caused by a lack of sunlight, water, or nutrients
Conclusion
So, there you have it! Growing radishes year-round isn’t just a gardener’s dream; it’s an achievable reality with a little planning and this simple DIY trick. We’ve walked you through the steps, highlighted the benefits, and hopefully, inspired you to take the plunge.
Why is this a must-try? Because fresh, peppery radishes, bursting with flavor and nutrients, shouldn’t be limited to a fleeting spring harvest. Imagine adding a vibrant crunch to your winter salads, a spicy kick to your autumn soups, or a refreshing bite to your summer tacos – all thanks to your own year-round radish patch. This method empowers you to control your food source, reduce your reliance on store-bought produce (often shipped from afar), and connect with the natural rhythms of the seasons, even when the weather outside is frightful.
But the beauty of this DIY approach lies in its adaptability. Feel free to experiment with different radish varieties. French Breakfast radishes offer a milder flavor, while Black Spanish radishes pack a serious punch. Consider companion planting to further enhance your radish growth. Carrots, lettuce, and spinach are excellent companions, helping to deter pests and improve soil health. You can also adjust the container size and location based on your available space and climate. If you live in a particularly cold region, consider using a cold frame or greenhouse for added protection during the harshest winter months. For warmer climates, providing shade during the hottest part of the day can prevent bolting (premature flowering).
Don’t be afraid to get creative with your growing medium, either. While we recommended a well-draining potting mix, you can also incorporate compost, perlite, or vermiculite to improve drainage and nutrient retention. Remember to monitor the moisture levels regularly and adjust your watering schedule accordingly. Overwatering can lead to root rot, while underwatering can stunt growth.
The key to successful year-round radish cultivation is consistent monitoring and adaptation. Pay attention to your plants’ needs, adjust your techniques as necessary, and don’t be discouraged by occasional setbacks. Gardening is a learning process, and every season brings new challenges and opportunities.
We are confident that with a little effort and this DIY trick, you’ll be enjoying fresh, homegrown radishes all year long. So, grab your seeds, gather your supplies, and get ready to embark on a rewarding gardening adventure.
We’re eager to hear about your experiences! Share your successes, your challenges, and your creative variations in the comments below. Let’s build a community of year-round radish growers and inspire others to embrace the joy of homegrown food. What varieties did you try? What challenges did you face? What tips and tricks did you discover along the way? Your insights can help others succeed and contribute to a wealth of knowledge for all. Let’s make **growing radishes year round** a shared success!
Frequently Asked Questions (FAQ)
Q: What are the best radish varieties to grow year-round?
A: While many radish varieties can be grown year-round with proper care, some are better suited for specific seasons. For cooler months, consider varieties like ‘Cherry Belle,’ ‘French Breakfast,’ or ‘Sparkler.’ These tend to be more cold-tolerant and mature quickly. For warmer months, look for heat-resistant varieties like ‘White Icicle’ or ‘Black Spanish.’ These are less likely to bolt (go to seed prematurely) in hot weather. Experimenting with different varieties is always a good idea to see what thrives best in your specific microclimate.
Q: How do I prevent my radishes from becoming too spicy?
A: The spiciness of radishes is influenced by several factors, including temperature, moisture levels, and soil fertility. Hot weather and dry soil can contribute to a more pungent flavor. To reduce spiciness, ensure consistent watering, especially during hot periods. Also, harvest your radishes promptly once they reach maturity. Overmature radishes tend to become spicier and woodier. Adding organic matter to your soil can also help retain moisture and moderate soil temperature.
Q: My radish greens are growing, but the roots are not developing. What am I doing wrong?
A: This is a common issue, and several factors could be at play. First, ensure your radishes are getting enough sunlight. They need at least 6 hours of direct sunlight per day to develop properly. Second, check your soil fertility. Radishes need adequate phosphorus and potassium to form healthy roots. Consider adding a fertilizer specifically formulated for root vegetables. Third, avoid overcrowding. Thin your seedlings to ensure they have enough space to grow. Finally, make sure your soil is loose and well-draining. Compacted soil can restrict root growth.
Q: How often should I water my radishes?
A: Radishes need consistent moisture to thrive, but over
So, there you have it! Growing radishes year-round isn’t just a gardener’s dream; it’s an achievable reality with a little planning and this simple DIY trick. We’ve walked you through the steps, highlighted the benefits, and hopefully, inspired you to take the plunge.
Why is this a must-try? Because fresh, peppery radishes, bursting with flavor and nutrients, shouldn’t be limited to a fleeting spring harvest. Imagine adding a vibrant crunch to your winter salads, a spicy kick to your autumn soups, or a refreshing bite to your summer tacos – all thanks to your own year-round radish patch. This method empowers you to control your food source, reduce your reliance on store-bought produce (often shipped from afar), and connect with the natural rhythms of the seasons, even when the weather outside is frightful.
But the beauty of this DIY approach lies in its adaptability. Feel free to experiment with different radish varieties. French Breakfast radishes offer a milder flavor, while Black Spanish radishes pack a serious punch. Consider companion planting to further enhance your radish growth. Carrots, lettuce, and spinach are excellent companions, helping to deter pests and improve soil health. You can also adjust the container size and location based on your available space and climate. If you live in a particularly cold region, consider using a cold frame or greenhouse for added protection during the harshest winter months. For warmer climates, providing shade during the hottest part of the day can prevent bolting (premature flowering).
Don’t be afraid to get creative with your growing medium, either. While we recommended a well-draining potting mix, you can also incorporate compost, perlite, or vermiculite to improve drainage and nutrient retention. Remember to monitor the moisture levels regularly and adjust your watering schedule accordingly. Overwatering can lead to root rot, while underwatering can stunt growth.
The key to successful year-round radish cultivation is consistent monitoring and adaptation. Pay attention to your plants’ needs, adjust your techniques as necessary, and don’t be discouraged by occasional setbacks. Gardening is a learning process, and every season brings new challenges and opportunities.
We are confident that with a little effort and this DIY trick, you’ll be enjoying fresh, homegrown radishes all year long. So, grab your seeds, gather your supplies, and get ready to embark on a rewarding gardening adventure.
We’re eager to hear about your experiences! Share your successes, your challenges, and your creative variations in the comments below. Let’s build a community of year-round radish growers and inspire others to embrace the joy of homegrown food. What varieties did you try? What challenges did you face? What tips and tricks did you discover along the way? Your insights can help others succeed and contribute to a wealth of knowledge for all. Let’s make **growing radishes year round** a shared success!
Frequently Asked Questions (FAQ)
Q: What are the best radish varieties to grow year-round?
A: While many radish varieties can be grown year-round with proper care, some are better suited for specific seasons. For cooler months, consider varieties like ‘Cherry Belle,’ ‘French Breakfast,’ or ‘Sparkler.’ These tend to be more cold-tolerant and mature quickly. For warmer months, look for heat-resistant varieties like ‘White Icicle’ or ‘Black Spanish.’ These are less likely to bolt (go to seed prematurely) in hot weather. Experimenting with different varieties is always a good idea to see what thrives best in your specific microclimate.
Q: How do I prevent my radishes from becoming too spicy?
A: The spiciness of radishes is influenced by several factors, including temperature, moisture levels, and soil fertility. Hot weather and dry soil can contribute to a more pungent flavor. To reduce spiciness, ensure consistent watering, especially during hot periods. Also, harvest your radishes promptly once they reach maturity. Overmature radishes tend to become spicier and woodier. Adding organic matter to your soil can also help retain moisture and moderate soil temperature.
Q: My radish greens are growing, but the roots are not developing. What am I doing wrong?
A: This is a common issue, and several factors could be at play. First, ensure your radishes are getting enough sunlight. They need at least 6 hours of direct sunlight per day to develop properly. Second, check your soil fertility. Radishes need adequate phosphorus and potassium to form healthy roots. Consider adding a fertilizer specifically formulated for root vegetables. Third, avoid overcrowding. Thin your seedlings to ensure they have enough space to grow. Finally, make sure your soil is loose and well-draining. Compacted soil can restrict root growth.
Q: How often should I water my radishes?
A: Radishes need consistent moisture to thrive, but overwatering can lead to root rot. Water deeply whenever the top inch of soil feels dry to the touch. The frequency of watering will depend on your climate, soil type, and the size of your container. In general, you may need to water more frequently during hot, dry weather and less frequently during cool, wet weather. Check the soil moisture regularly and adjust your watering schedule accordingly.
Q: What kind of fertilizer should I use for radishes?
A: Radishes benefit from a balanced fertilizer with a slightly higher phosphorus and potassium content than nitrogen. A 5-10-10 or 10-20-20 fertilizer is a good option. You can also use organic fertilizers like bone meal (for phosphorus) and wood ash (for potassium). Avoid using fertilizers that are too high in nitrogen, as this can promote excessive foliage growth at the expense of root development. Apply fertilizer according to the package directions, and be careful not to over-fertilize, as this can burn the roots.
Q: How do I protect my radishes from pests?
A: Several pests can attack radishes, including flea beetles, root maggots, and aphids. To prevent pest problems, practice good garden hygiene. Remove weeds and debris that can harbor pests. Cover your plants with row covers to prevent pests from accessing them. You can also use organic pest control methods like insecticidal soap or neem oil to control infestations. Companion planting with herbs like rosemary or thyme can also help deter pests.
Q: How long does it take for radishes to mature?
A: Radishes are one of the fastest-growing vegetables, typically maturing in just 20-30 days. However, the exact time will depend on the variety and growing conditions. Check the seed packet for specific maturity dates. Harvest your radishes promptly once they reach maturity, as they can become woody and spicy if left in the ground too long.
Q: Can I grow radishes in containers?
A: Absolutely! Radishes are well-suited for container gardening. Choose a container that is at least 6 inches deep and has good drainage. Use a well-draining potting mix and provide adequate sunlight and water. Container-grown radishes may need to be fertilized more frequently than those grown in the ground, as nutrients can leach out of the soil more quickly.
Q: What do I do if my radishes bolt (go to seed)?
A: Bolting is a common problem, especially in hot weather. Once radishes bolt, the roots become tough and bitter. To prevent bolting, choose heat-resistant varieties, provide shade during the hottest part of the day, and ensure consistent watering. If your radishes do bolt, you can still harvest the seed pods, which are edible and have a peppery flavor.
Q: Can I eat the radish greens?
A: Yes, radish greens are edible and nutritious! They have a peppery flavor similar to the roots. You can add them to salads, soups, or stir-fries. Choose young, tender greens for the best flavor. Avoid eating greens from radishes that have been treated with pesticides.
Leave a Comment