
Vinegar and cloves reaction – sounds like a science experiment, right? Well, it kind of is, but it’s also your secret weapon for a pest-free and fragrant home! For centuries, cloves have been prized not only for their warm, spicy flavor in cooking but also for their potent insect-repelling properties. Think back to old-fashioned pomanders, oranges studded with cloves, used to ward off illness and freshen the air. That’s the power we’re tapping into today!
Let’s face it, nobody enjoys sharing their living space with unwanted creepy crawlies. Whether it’s pesky fruit flies buzzing around your kitchen or ants marching across your countertops, dealing with pests can be a real headache. Store-bought insecticides are often harsh and filled with chemicals I’d rather not have lingering in my home, especially around my family and pets. That’s where this simple, yet incredibly effective, vinegar and cloves reaction comes in.
This DIY trick is a game-changer because it’s natural, affordable, and surprisingly easy to make. I’m going to show you how to harness the power of these two humble ingredients to create a potent pest repellent that will keep your home smelling amazing while keeping those unwanted guests at bay. Get ready to say goodbye to harsh chemicals and hello to a naturally fresh and pest-free home!

Growing Chili Peppers: From Seed to Spicy Harvest!
Okay, chili pepper enthusiasts, gather ’round! I’m going to walk you through everything you need to know to grow your own fiery friends, right from seed. Get ready for a rewarding journey from tiny sprouts to a bountiful harvest of delicious, spicy peppers!
Choosing Your Chili Pepper Varieties
Before we even think about soil, let’s talk peppers! The world of chili peppers is vast and exciting. Consider these factors when choosing your varieties:
* Heat Level: This is the big one! Do you want a mild poblano, a medium jalapeño, or a scorching habanero? The Scoville Heat Unit (SHU) scale measures the heat. Research different varieties and their SHU ratings to find your perfect spice level.
* Flavor Profile: Beyond the heat, peppers have distinct flavors. Some are fruity, some are smoky, and some are earthy. Think about what flavors you enjoy in your cooking.
* Plant Size: Some chili pepper plants grow tall and bushy, while others are more compact. Consider the space you have available in your garden or on your patio.
* Growing Season: Different varieties mature at different rates. If you live in a region with a short growing season, choose varieties that mature quickly.
* Disease Resistance: Some varieties are more resistant to common pepper diseases. This can be a big help, especially if you’re new to gardening.
Some popular choices include:
* Jalapeño: A classic, versatile pepper with a moderate heat.
* Serrano: A bit hotter than a jalapeño, with a bright, fresh flavor.
* Cayenne: A long, thin pepper with a good kick, often dried and ground into powder.
* Habanero: One of the hottest peppers, with a fruity, floral flavor (handle with care!).
* Poblano: A mild, flavorful pepper, often used in Mexican cuisine.
* Bell Pepper: While technically not a chili pepper (it has no capsaicin), it’s a great option if you want a sweet, mild pepper.
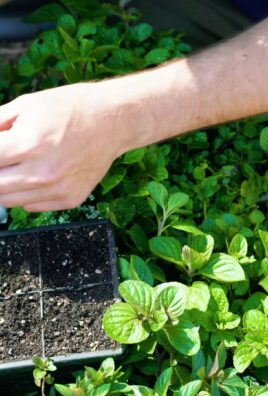
Starting Your Chili Pepper Seeds Indoors
Chili peppers need a long growing season, so starting them indoors is crucial, especially if you live in a cooler climate. I usually start my seeds about 6-8 weeks before the last expected frost.
1. Gather Your Supplies:
* Chili pepper seeds (of course!)
* Seed starting trays or small pots
* Seed starting mix (a light, sterile mix specifically designed for seedlings)
* Spray bottle
* Heat mat (optional, but helpful)
* Grow light (optional, but highly recommended)
* Clear plastic dome or plastic wrap
2. Prepare Your Seed Starting Trays:
* Fill your seed starting trays or pots with seed starting mix. Gently tap the trays to settle the mix.
* Moisten the mix thoroughly with a spray bottle. You want it to be damp, but not soggy.
3. Sow Your Seeds:
* Make a small indentation (about 1/4 inch deep) in the center of each cell or pot.
* Place 2-3 seeds in each indentation. This increases your chances of at least one seed germinating.
* Gently cover the seeds with seed starting mix.
* Lightly mist the surface with water.
4. Create a Humid Environment:
* Cover the seed starting trays with a clear plastic dome or plastic wrap. This helps to retain moisture and create a humid environment, which is essential for germination.
5. Provide Warmth:
* Place the seed starting trays on a heat mat, if using. Chili pepper seeds germinate best at temperatures between 75-85°F (24-29°C).
* If you don’t have a heat mat, place the trays in a warm location, such as on top of your refrigerator.
6. Provide Light:
* Place the seed starting trays under a grow light, if using. Grow lights provide the seedlings with the light they need to grow strong and healthy.
* If you don’t have a grow light, place the trays in a sunny window. However, be aware that seedlings grown in a window may become leggy (tall and spindly) due to insufficient light.
7. Monitor and Water:
* Check the seed starting trays daily. Keep the seed starting mix moist, but not soggy. Mist with water as needed.
* Once the seeds germinate (usually within 7-14 days), remove the plastic dome or plastic wrap.
8. Thin the Seedlings:
* Once the seedlings have their first true leaves (the second set of leaves that appear after the initial seed leaves), thin them to one seedling per cell or pot.
* Choose the strongest, healthiest seedling and snip off the others at the soil line with scissors. Don’t pull them out, as this can disturb the roots of the remaining seedling.
Transplanting Your Chili Pepper Seedlings
Once the danger of frost has passed and the soil has warmed up, it’s time to transplant your chili pepper seedlings outdoors.
1. Harden Off Your Seedlings:
* Before transplanting, you need to “harden off” your seedlings. This means gradually exposing them to outdoor conditions to help them adjust to the sun, wind, and temperature changes.
* Start by placing the seedlings outdoors in a sheltered location for a few hours each day. Gradually increase the amount of time they spend outdoors over the course of a week or two.
* Protect the seedlings from strong winds and direct sunlight during the hardening off process.
2. Prepare Your Garden Bed or Pots:
* Choose a sunny location for your chili pepper plants. They need at least 6-8 hours of sunlight per day.
* Prepare the soil by amending it with compost or other organic matter. Chili peppers prefer well-drained soil that is rich in nutrients.
* If you’re growing your chili peppers in pots, choose pots that are at least 12 inches in diameter.
3. Transplant Your Seedlings:
* Dig a hole that is slightly larger than the root ball of the seedling.
* Gently remove the seedling from its cell or pot.
* Place the seedling in the hole and backfill with soil.
* Water the seedling thoroughly.
4. Space Your Plants:
* Space your chili pepper plants according to the variety. Generally, space them 18-24 inches apart.
5. Mulch Your Plants:
* Mulch around your chili pepper plants with straw, wood chips, or other organic mulch. This helps to retain moisture, suppress weeds, and regulate soil temperature.
Caring for Your Chili Pepper Plants
Now that your chili pepper plants are in the ground, it’s time to provide them with the care they need to thrive.
1. Watering:
* Water your chili pepper plants regularly, especially during hot, dry weather. Water deeply and thoroughly, allowing the soil to dry out slightly between waterings.
* Avoid overwatering, as this can lead to root rot.
2. Fertilizing:
* Fertilize your chili pepper plants every 2-3 weeks with a balanced fertilizer.
* You can also use a fertilizer that is specifically formulated for peppers and tomatoes.
3. Pruning:
* Pruning is not essential for chili pepper plants, but it can help to improve air circulation and promote bushier growth.
* If you choose to prune, remove any suckers (small shoots that grow from the base of the plant) and any dead or diseased leaves.
4. Pest and Disease Control:
* Keep an eye out for pests and diseases. Common pests of chili pepper plants include aphids, spider mites, and whiteflies. Common diseases include blossom end rot and fungal infections.
* If you notice any pests or diseases, take action immediately. You can use organic pest control methods, such as insecticidal soap or neem oil, to control pests. You can also use fungicides to control fungal diseases.
5. Support:
* Some chili pepper varieties, especially those with heavy fruit, may need support. You can use stakes or cages to support the plants.
Harvesting Your Chili Peppers
The moment you’ve been waiting for! Harvesting your own homegrown chili peppers is incredibly satisfying.
1. When to Harvest:
* The time to harvest your chili peppers depends on the variety and your personal preference.
* Generally, chili peppers are ready to harvest when they have reached their mature color and size.
* You can also harvest them when they are green, but they will be less flavorful and less spicy.
2. How to Harvest:

Conclusion
So, there you have it! This simple yet surprisingly effective DIY trick using vinegar and cloves is more than just a home remedy; it’s a natural, cost-effective, and aromatic way to tackle common household annoyances. We’ve explored how the potent combination of vinegar’s acidity and cloves’ powerful essential oils creates a solution that can freshen the air, deter pests, and even act as a mild disinfectant.
Why is this a must-try? Because it’s a win-win! You’re ditching harsh chemicals and embracing a natural alternative that’s gentle on your family and the environment. Plus, the warm, spicy scent of cloves is far more appealing than the artificial fragrances found in many commercial products. It’s a simple swap that can make a significant difference in your home.
But the beauty of this DIY trick lies in its versatility. Feel free to experiment with variations to suit your specific needs and preferences. For a stronger scent, increase the number of cloves. If you prefer a sweeter aroma, consider adding a few drops of your favorite essential oil, such as orange or cinnamon. You can also infuse the vinegar with other herbs like rosemary or lavender for added benefits and fragrance.
Consider using different types of vinegar as well. While white vinegar is the most common and readily available, apple cider vinegar offers a slightly milder scent and additional health benefits. Just be mindful that apple cider vinegar may have a slight color that could stain light-colored surfaces, so test it in an inconspicuous area first.
Another variation involves the application method. While we’ve focused on using a spray bottle, you can also soak cotton balls in the vinegar and clove solution and place them in strategic locations, such as drawers, closets, or under sinks. This is a great way to provide continuous, localized protection against pests and odors. You can even simmer the solution on the stovetop for a natural air freshener that fills your entire home with a delightful aroma. Just be sure to keep a close eye on it and add water as needed to prevent it from burning.
The possibilities are endless! The key is to experiment and find what works best for you and your home. This **vinegar and cloves reaction** is a powerful tool in your natural cleaning arsenal, and we encourage you to embrace its potential.
We’re confident that you’ll be amazed by the results. So, go ahead, give this DIY trick a try! We’re eager to hear about your experiences. Share your tips, variations, and success stories in the comments below. Let’s build a community of natural cleaning enthusiasts and discover even more ways to harness the power of vinegar and cloves! Don’t forget to share this article with your friends and family who are looking for natural and effective solutions for their homes. Let’s spread the word about this amazing DIY trick!
Frequently Asked Questions (FAQ)
What type of vinegar works best for this DIY trick?
White vinegar is generally recommended due to its high acidity and neutral scent, which allows the clove aroma to shine through. However, apple cider vinegar can also be used, offering a slightly milder scent and potential additional benefits. Be cautious when using apple cider vinegar on light-colored surfaces, as it may cause staining. Distilled white vinegar is the most potent and cost-effective option for cleaning and pest control.
How long does the vinegar and clove solution last?
The solution can last for several weeks, even months, when stored in a cool, dark place. However, the potency of the clove scent may diminish over time. To ensure optimal effectiveness, it’s recommended to replace the solution every 2-3 months. You can also refresh the scent by adding a few more cloves to the mixture. Observe the solution for any signs of spoilage, such as mold growth, and discard it if necessary.
Can I use ground cloves instead of whole cloves?
While you can use ground cloves, whole cloves are generally preferred. Whole cloves release their essential oils more slowly and consistently, resulting in a longer-lasting and more potent solution. Ground cloves may also leave a residue in the solution, which could clog spray bottles. If you do use ground cloves, be sure to strain the solution before using it in a spray bottle.
Is this solution safe to use around pets and children?
Vinegar and cloves are generally considered safe for pets and children when used in diluted form. However, it’s always best to exercise caution. Avoid spraying the solution directly on pets or children, and keep it out of their reach. Some pets may be sensitive to the scent of cloves, so monitor their behavior and discontinue use if they show any signs of discomfort. If you have any concerns, consult with your veterinarian or pediatrician.
What pests does this solution repel?
The vinegar and clove solution is effective at repelling a variety of pests, including ants, flies, mosquitoes, and spiders. The strong scent of cloves acts as a natural deterrent, discouraging these pests from entering your home. While it may not eliminate existing infestations, it can help prevent new ones from forming. For severe infestations, you may need to combine this DIY trick with other pest control methods.
Can I use this solution on all surfaces?
While vinegar is generally safe for most surfaces, it’s best to test it in an inconspicuous area first, especially on delicate materials like marble, granite, or wood. The acidity of vinegar can damage certain surfaces, so it’s important to proceed with caution. Avoid using the solution on electronic devices or screens. For surfaces that are sensitive to vinegar, consider diluting the solution with water or using a milder alternative.
How can I make the scent stronger?
To make the scent stronger, increase the number of cloves in the solution. You can also crush the cloves slightly before adding them to the vinegar to release more of their essential oils. Another option is to simmer the solution on the stovetop for a short period of time to intensify the aroma. Be sure to monitor the solution closely and add water as needed to prevent it from burning. You can also add a few drops of clove essential oil to the solution for an extra boost of fragrance.
Can I add other essential oils to the solution?
Yes, you can add other essential oils to the solution to customize the scent and enhance its benefits. Some popular options include lavender, lemon, eucalyptus, and tea tree oil. Lavender is known for its calming properties, lemon for its refreshing scent, eucalyptus for its decongestant benefits, and tea tree oil for its antibacterial properties. Experiment with different combinations to find your favorite blend. Be sure to use high-quality essential oils for the best results.
How often should I spray the solution?
The frequency of spraying depends on your specific needs and the severity of the problem you’re trying to address. For general air freshening, you can spray the solution once or twice a day. For pest control, you may need to spray more frequently, especially in areas where pests are common. Monitor the effectiveness of the solution and adjust the frequency accordingly. You can also use the solution as a preventative measure by spraying it regularly in areas where pests are likely to enter your home.
What are the benefits of using this DIY trick over commercial products?
This DIY trick offers several benefits over commercial products. It’s a natural and non-toxic alternative, free from harsh chemicals and artificial fragrances. It’s also cost-effective, as vinegar and cloves are readily available and inexpensive. Additionally, it’s environmentally friendly, reducing your reliance on plastic packaging and potentially harmful ingredients. By making your own cleaning and pest control solutions, you have greater control over the ingredients and can customize them to suit your specific needs and preferences.
Leave a Comment