
Water propagated rosemary: Sounds intimidating, right? Trust me, it’s not! I’m here to let you in on a little secret – growing your own rosemary from cuttings in water is surprisingly easy and incredibly rewarding. Forget those expensive trips to the garden center; with a few simple steps, you can multiply your rosemary supply for free!
For centuries, rosemary has been cherished not only for its culinary uses but also for its medicinal and symbolic significance. In ancient Greece, students wore rosemary garlands to improve memory, and in many cultures, it’s been a symbol of remembrance and fidelity. Now, you can easily bring this fragrant and historically rich herb into your home.
Why should you learn this DIY trick? Well, imagine always having fresh rosemary on hand to elevate your cooking. Think of the satisfaction of nurturing new plants from simple cuttings. Plus, water propagated rosemary is a fantastic way to propagate rosemary, especially if you’re new to gardening or don’t have a lot of space. It’s a budget-friendly, space-saving, and incredibly satisfying project that anyone can tackle. Let’s dive in and get those rosemary cuttings rooting!
Propagating Rosemary from Cuttings in Water: A Simple DIY Guide
Hey there, fellow plant enthusiasts! Ever wanted to multiply your rosemary plant without spending a dime? Well, you’re in the right place! I’m going to walk you through the super easy process of propagating rosemary from cuttings in water. It’s a fantastic way to expand your herb garden, share rosemary with friends, or simply enjoy the satisfaction of creating new life. Let’s get started!
What You’ll Need
Before we dive in, let’s gather our supplies. This is a pretty low-key project, so you probably have most of this stuff already:
* A healthy rosemary plant: This is the source of our cuttings, so make sure it’s looking vibrant and disease-free.
* Sharp, clean scissors or pruning shears: Sharpness is key to making clean cuts that will root easily. Cleanliness prevents the spread of disease.
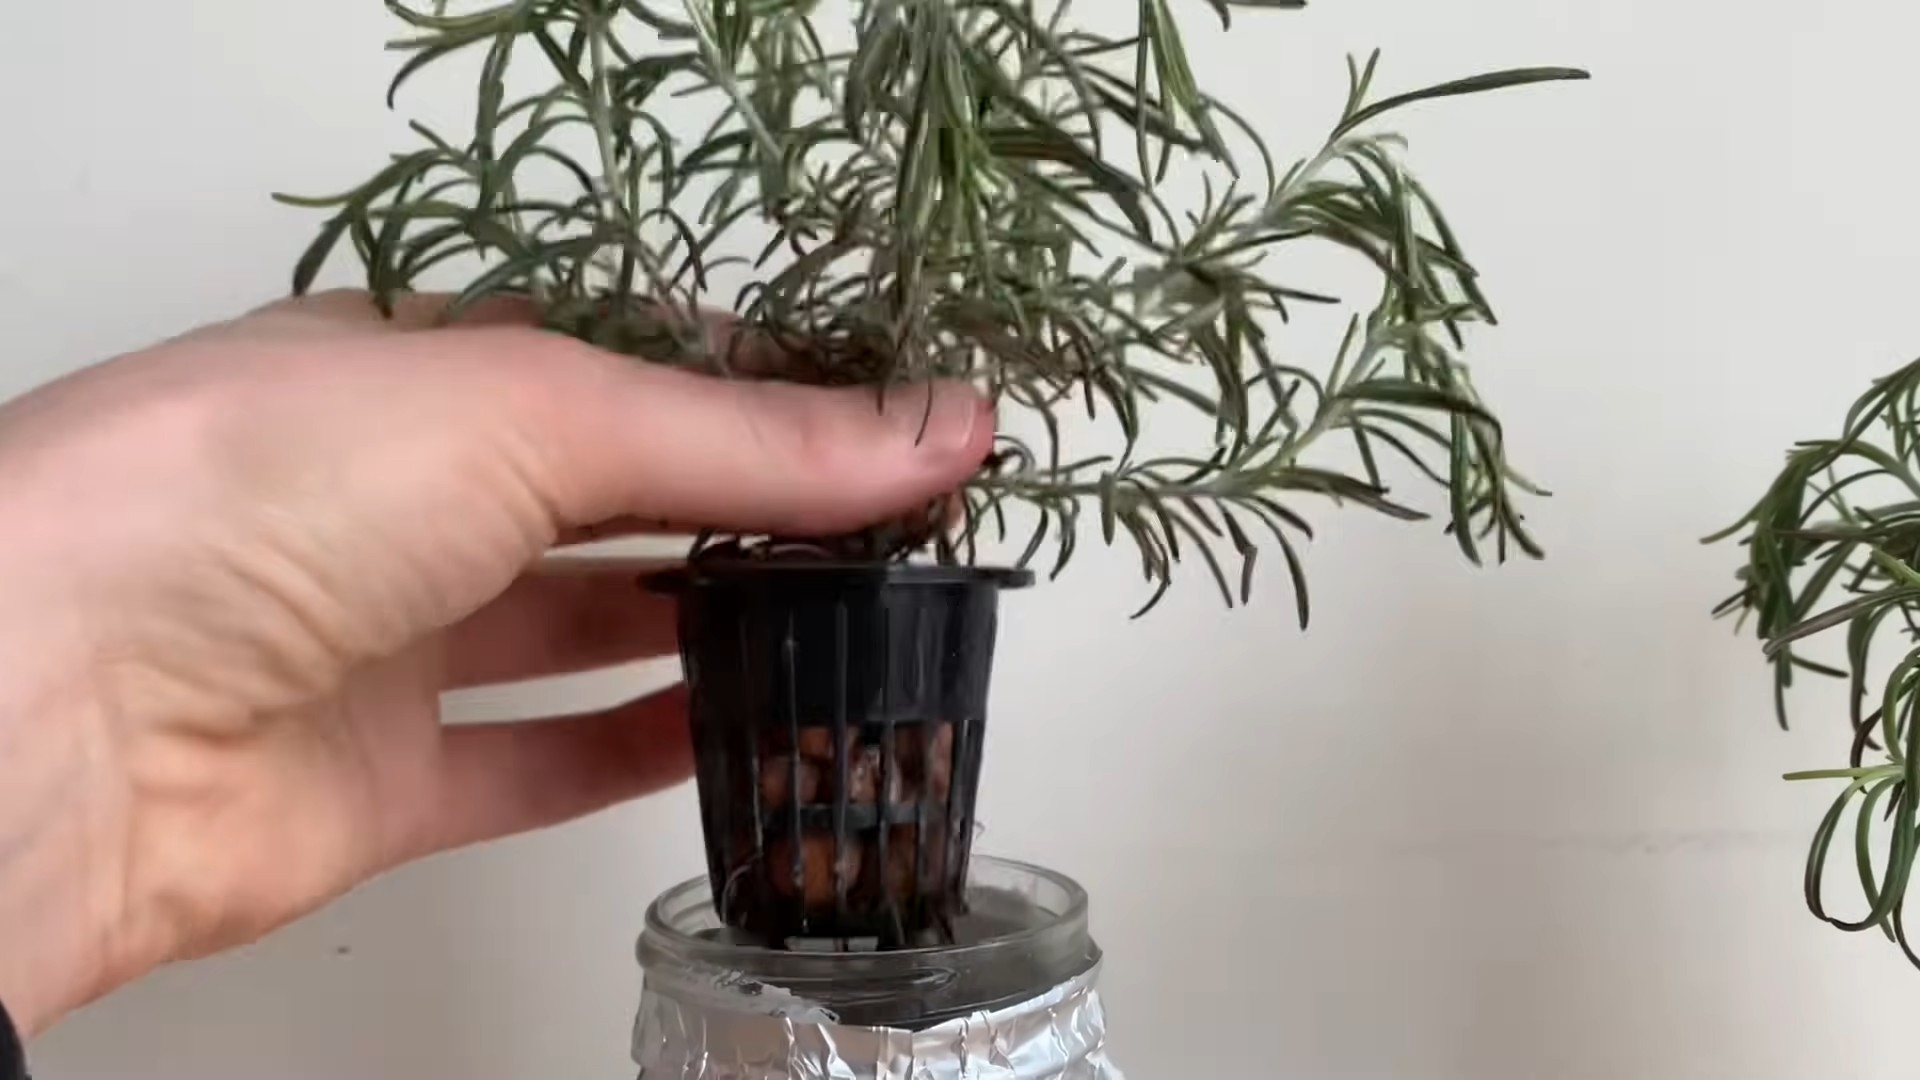
* A clear glass or jar: This will be our propagation vessel. I prefer clear glass so I can monitor root growth.
* Water: Tap water is fine, but filtered water is even better.
* Optional: Rooting hormone: This isn’t strictly necessary, but it can speed up the rooting process.
* Optional: Small pots and potting mix: For when your cuttings are ready to be planted.
Taking the Cuttings
This is the most crucial step, so pay close attention! We want to take cuttings that have the best chance of rooting.
1. Choose healthy stems: Look for stems that are green and flexible, not woody or brittle. Avoid stems with flowers or buds, as the plant will put its energy into flowering instead of rooting.
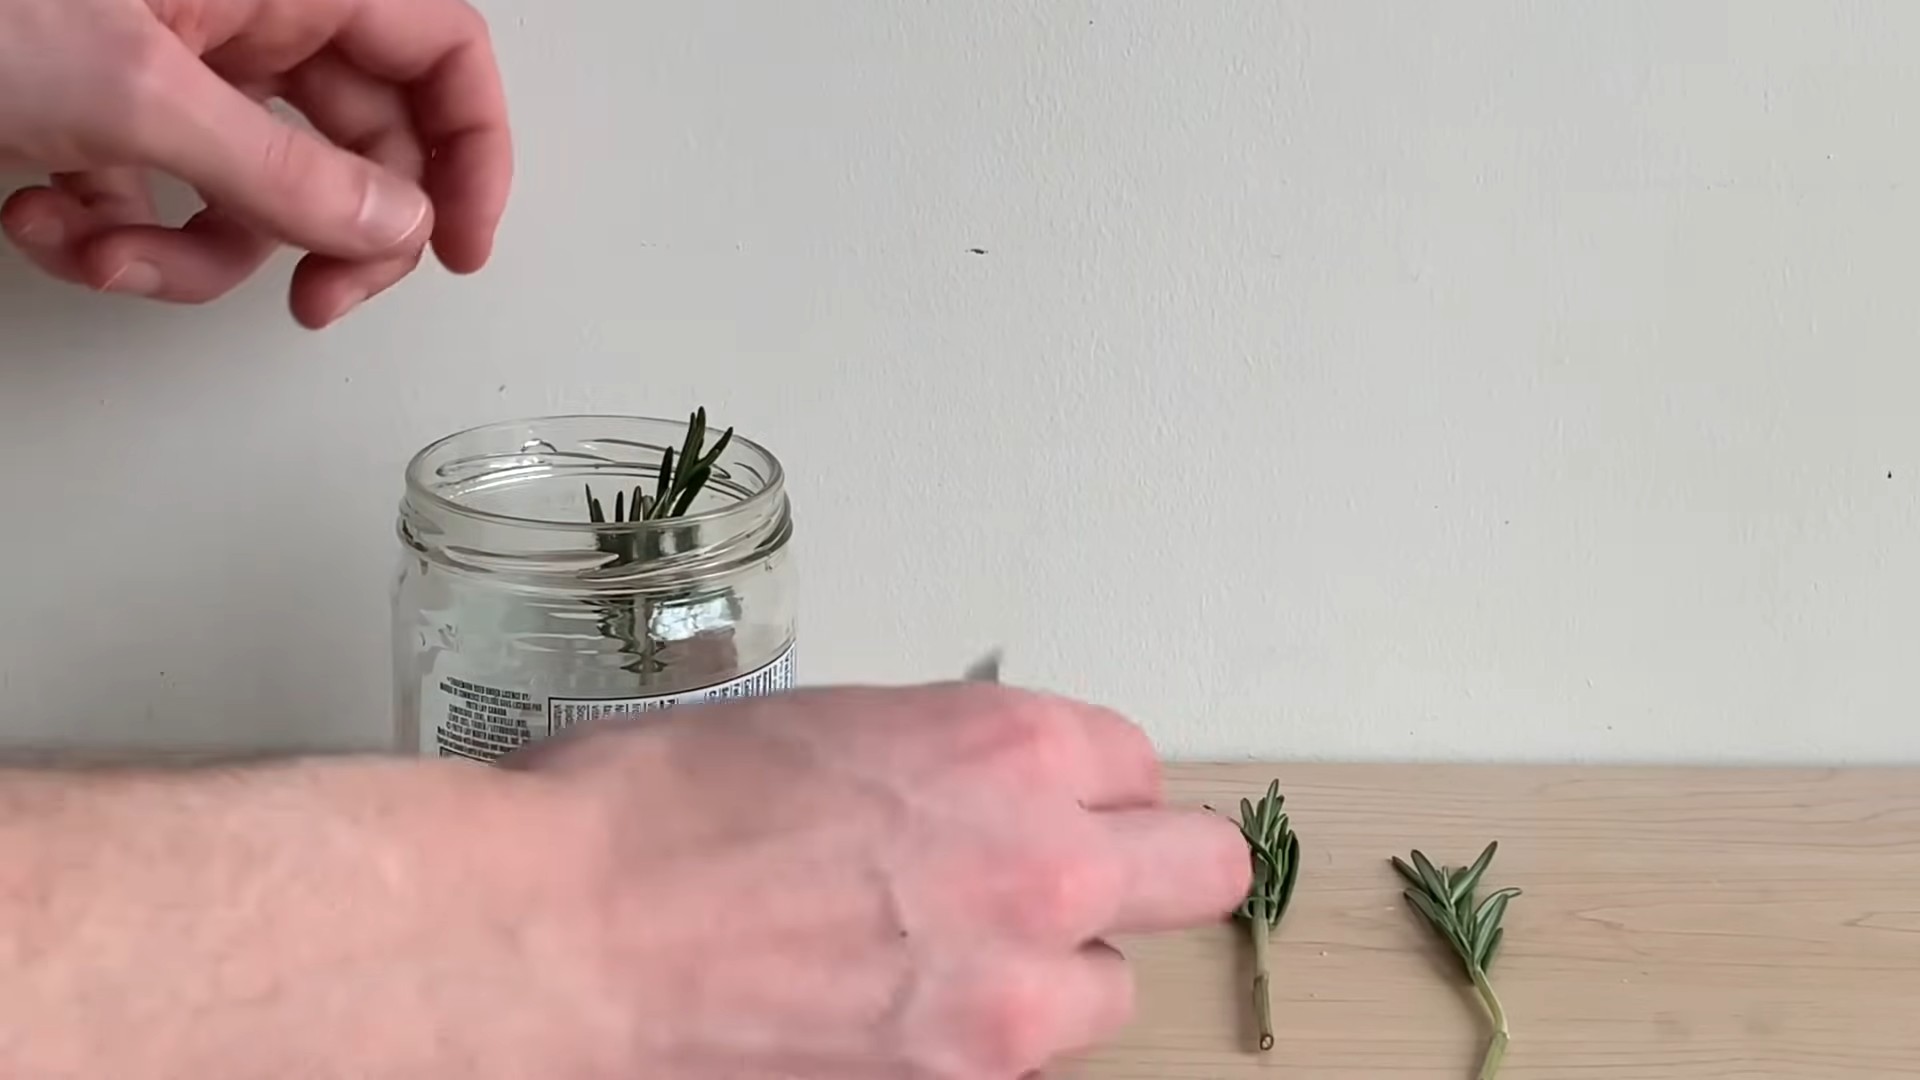
2. Cut the stems: Using your sharp, clean scissors or pruning shears, cut stems that are about 4-6 inches long. Make the cut just below a leaf node (the point where leaves grow from the stem).
3. Remove the lower leaves: Strip off the leaves from the bottom 1-2 inches of the stem. This is important because these submerged leaves will rot and contaminate the water.
4. Optional: Dip in rooting hormone: If you’re using rooting hormone, dip the cut end of the stem into the powder or liquid. Follow the instructions on the rooting hormone package.
Propagating in Water
Now for the fun part – watching those roots grow!
1. Fill the glass or jar with water: Make sure the water is clean and fresh.
2. Place the cuttings in the water: Arrange the cuttings so that the bottom 1-2 inches of the stems are submerged, but the leaves are above the water line. Don’t overcrowd the jar; give the cuttings some space.
3. Find a bright spot: Place the jar in a location that receives bright, indirect sunlight. Avoid direct sunlight, which can scorch the leaves. A windowsill is often a good choice.
4. Change the water regularly: Change the water every 2-3 days to keep it fresh and prevent the growth of algae or bacteria. This is super important!
5. Be patient: Rooting can take anywhere from 2-6 weeks, so don’t get discouraged if you don’t see roots right away. Just keep changing the water and providing bright, indirect light.
Planting Your Rooted Cuttings
Once your cuttings have developed roots that are at least an inch long, they’re ready to be planted!
1. Prepare the pots: Fill small pots (2-3 inches in diameter) with well-draining potting mix. I like to use a mix of potting soil, perlite, and vermiculite for good drainage.
2. Gently remove the cuttings from the water: Be careful not to damage the delicate roots.
3. Plant the cuttings: Make a small hole in the potting mix and carefully insert the rooted cutting. Gently firm the soil around the stem.
4. Water thoroughly: Water the newly planted cuttings until the water drains out of the bottom of the pot.
5. Provide humidity: Rosemary likes humidity, especially when it’s first transplanted. You can increase humidity by covering the pots with a clear plastic bag or placing them in a humidity dome. Remove the bag or dome for a few hours each day to allow for air circulation.
6. Acclimate to outdoor conditions: If you plan to grow your rosemary outdoors, gradually acclimate the plants to outdoor conditions over a period of 1-2 weeks. Start by placing them in a sheltered location for a few hours each day, gradually increasing the amount of time they spend outdoors.
7. Care for your new rosemary plants: Water regularly, allowing the soil to dry out slightly between waterings. Fertilize occasionally with a balanced fertilizer. Prune regularly to encourage bushier growth.
Troubleshooting
Sometimes, things don’t go exactly as planned. Here are some common problems you might encounter and how to fix them:
* Cuttings are rotting: This is usually caused by bacteria or fungus in the water. Make sure you’re using clean water and changing it regularly. Also, make sure you’ve removed the lower leaves from the stem.
* Cuttings are not rooting: This could be due to a number of factors, including poor lighting, low humidity, or unhealthy cuttings. Make sure you’re providing bright, indirect light, increasing humidity if necessary, and using healthy cuttings from a vigorous plant.
* Cuttings are wilting: This is usually caused by lack of humidity. Increase humidity by covering the pots with a clear plastic bag or placing them in a humidity dome.
* Cuttings are turning yellow: This could be a sign of overwatering or nutrient deficiency. Allow the soil to dry out slightly between waterings and fertilize occasionally with a balanced fertilizer.
Tips for Success
Here are a few extra tips to help you succeed with propagating rosemary from cuttings in water:
* Take cuttings in the spring or early summer: This is when rosemary is actively growing and will root more easily.
* Use filtered water: Tap water can contain chlorine and other chemicals that can inhibit rooting. Filtered water is a better choice.
* Don’t overcrowd the jar: Give the cuttings some space to breathe. Overcrowding can lead to rot and disease.
* Be patient: Rooting can take time, so don’t get discouraged if you don’t see results right away. Just keep providing the right conditions and eventually, you’ll see those roots emerge!
* Experiment with different methods: Some people prefer to propagate rosemary in soil or other mediums. Don’t be afraid to experiment and find what works best for you.
Why Water Propagation Works
You might be wondering why water propagation is so effective. Well, it’s all about providing the right environment for root development. Water provides a readily available source of moisture, which is essential for root growth. The clear glass allows you to monitor root development and ensures that the cuttings receive adequate light. Plus, it’s just plain fun to watch those roots grow!
Beyond Rosemary: Other Herbs to Propagate in Water
Rosemary isn’t the only herb that can be propagated in water. Many other herbs, such as mint, basil, oregano, and sage, can also be easily propagated using this method. So, once you’ve mastered rosemary, why not try your hand at propagating some other herbs?
A Few Extra Thoughts
Propagating rosemary from cuttings in water is a rewarding and cost-effective way to expand your herb garden. It’s also a great way to learn more about plant propagation and connect with nature. So, grab your scissors, gather your supplies, and get ready to create some new rosemary plants! I hope this guide has been helpful. Happy growing!
Conclusion
So, there you have it! Transforming rosemary cuttings into thriving plants through water propagation is not just a fun experiment; it’s a game-changer for any herb enthusiast. Forget constantly buying rosemary from the store – with this simple DIY trick, you can have a continuous supply of fresh, fragrant rosemary right at your fingertips.
Why is this a must-try? Because it’s incredibly cost-effective, environmentally friendly, and surprisingly easy. You’re essentially cloning your existing rosemary plant, creating new life from something that would otherwise be discarded. Plus, watching the roots develop in the water is a fascinating process, offering a tangible connection to the natural world.
But the beauty of this method lies in its adaptability. Feel free to experiment with different types of rosemary. Some varieties, like creeping rosemary, might take root faster than others. You can also play around with the rooting environment. While tap water works perfectly well, some gardeners swear by adding a tiny amount of liquid fertilizer to the water to give the cuttings an extra boost. Just be careful not to overdo it, as too much fertilizer can actually inhibit root growth.
Consider using different containers for your water propagation. While a simple glass jar works perfectly, you could also use repurposed bottles or even specialized propagation stations. The key is to ensure the cuttings are partially submerged and receive adequate light.
Once your rosemary cuttings have developed a healthy root system, don’t rush the transplanting process. Gradually acclimate them to the outdoor environment by placing them in a sheltered spot for a few hours each day before planting them in their permanent location. This will help them adjust to the change in temperature and humidity, increasing their chances of survival.
And don’t limit yourself to just rosemary! This water propagation technique can be applied to a wide range of other herbs and plants, allowing you to expand your garden and create a lush, thriving ecosystem.
We wholeheartedly encourage you to give this DIY trick a try. It’s a rewarding experience that will not only save you money but also deepen your appreciation for the wonders of plant propagation. Once you’ve successfully propagated your rosemary, we’d love to hear about your experience! Share your tips, tricks, and photos in the comments below. Let’s build a community of rosemary enthusiasts and learn from each other’s successes (and occasional failures!). Happy propagating! Let us know how your water propagated rosemary journey goes!
Frequently Asked Questions (FAQ)
Q: How long does it take for rosemary cuttings to root in water?
A: The time it takes for rosemary cuttings to root in water can vary depending on several factors, including the variety of rosemary, the temperature, and the amount of light they receive. Generally, you can expect to see roots starting to emerge within 2-4 weeks. However, some cuttings may take longer, so be patient and continue to monitor them. It’s important to change the water regularly (every 2-3 days) to prevent the growth of bacteria and ensure the cuttings have access to fresh oxygen. Once the roots are about an inch or two long, they are ready to be transplanted into soil.
Q: What is the best time of year to propagate rosemary?
A: While you can propagate rosemary at any time of year, the best time is generally during the spring or early summer. This is when rosemary is actively growing, and the cuttings are more likely to root successfully. The warmer temperatures and longer days provide optimal conditions for root development. However, if you live in a climate with mild winters, you can also propagate rosemary during the fall. Just be sure to provide adequate light and warmth to the cuttings during the cooler months. Avoid propagating during the hottest part of the summer, as the cuttings may be more susceptible to stress and dehydration.
Q: What kind of water should I use for propagating rosemary?
A: Tap water is generally fine for propagating rosemary. However, it’s best to let the tap water sit out for 24 hours before using it to allow any chlorine or other chemicals to dissipate. Alternatively, you can use filtered water or rainwater. Avoid using distilled water, as it lacks the minerals that plants need to thrive. Changing the water regularly is more important than the type of water you use. Fresh water provides oxygen and prevents the buildup of harmful bacteria.
Q: How much light do rosemary cuttings need during propagation?
A: Rosemary cuttings need bright, indirect light during propagation. Avoid placing them in direct sunlight, as this can scorch the leaves and prevent them from rooting. A north-facing window or a spot near an east-facing window is ideal. If you don’t have access to natural light, you can use a grow light. Position the grow light about 6-12 inches above the cuttings and provide 12-16 hours of light per day.
Q: What kind of soil should I use when transplanting the rooted rosemary cuttings?
A: Rosemary prefers well-draining soil. A mixture of potting soil, perlite, and sand is ideal. This will provide good drainage and aeration, preventing the roots from becoming waterlogged. Avoid using heavy clay soil, as this can retain too much moisture and lead to root rot. You can also add some compost to the soil to provide extra nutrients. When transplanting the cuttings, be gentle with the roots and avoid damaging them. Water the soil thoroughly after planting and keep it moist but not soggy until the plants are established.
Q: My rosemary cuttings are turning yellow or brown. What am I doing wrong?
A: Yellowing or browning leaves on rosemary cuttings can be a sign of several problems. One common cause is overwatering. Make sure the cuttings are not sitting in stagnant water and that the water is changed regularly. Another possible cause is lack of light. Ensure the cuttings are receiving adequate bright, indirect light. Over-fertilization can also cause leaf discoloration. Avoid adding too much fertilizer to the water, as this can burn the roots. Finally, check the cuttings for signs of pests or diseases. If you notice any insects or fungal growth, treat the cuttings with an appropriate insecticide or fungicide.
Q: Can I propagate rosemary from woody stems?
A: While it’s possible to propagate rosemary from woody stems, it’s generally more difficult than propagating from softwood cuttings. Softwood cuttings are the new growth that emerges in the spring or early summer. They are more flexible and have a higher rooting potential. If you are using woody stems, choose stems that are about 4-6 inches long and have several leaf nodes. Remove the leaves from the bottom half of the stem and place the cutting in water. Be patient, as woody stems may take longer to root than softwood cuttings.
Q: How do I care for my water propagated rosemary after transplanting it to soil?
A: After transplanting your water propagated rosemary to soil, it’s important to provide proper care to ensure its survival and growth. Water the plant regularly, especially during the first few weeks after transplanting. Allow the soil to dry out slightly between waterings. Rosemary prefers full sun, so place the plant in a sunny location. Fertilize the plant every few weeks with a balanced fertilizer. Prune the plant regularly to encourage bushier growth. Rosemary is relatively drought-tolerant once established, but it’s important to provide adequate water during dry periods. With proper care, your water propagated rosemary will thrive and provide you with fresh herbs for years to come.
Q: Can I use rooting hormone to help rosemary cuttings root faster?
A: Yes, you can use rooting hormone to help rosemary cuttings root faster. Rooting hormone contains auxins, which are plant hormones that promote root development. To use rooting hormone, dip the cut end of the rosemary cutting into the hormone powder or liquid before placing it in water. Be sure to follow the instructions on the rooting hormone package. While rooting hormone can speed up the rooting process, it’s not essential. Rosemary cuttings can root successfully in water without the use of rooting hormone.

Leave a Comment