
Water Spinach Self Watering DIY: Your Guide to Effortless Greens!
Have you ever dreamed of fresh, vibrant water spinach gracing your dinner table, but felt intimidated by the thought of constant watering and care? I get it! Life gets busy, and sometimes our green thumbs need a little help. That’s where this amazing DIY project comes in. For centuries, water spinach, also known as Ong Choy, has been a staple in Asian cuisine, prized for its delicious flavor and nutritional benefits. Imagine being able to harvest your own supply, knowing exactly where it came from and how it was grown, without the daily hassle of watering.
This isn’t just about convenience; it’s about reclaiming control over your food source and connecting with nature, even in a small space. Many people struggle with inconsistent watering schedules, leading to wilted, unhappy plants. This water spinach self watering DIY project solves that problem by creating a simple, effective system that provides your plants with a consistent supply of moisture.
I’m going to show you how to build a simple, affordable self-watering system that will keep your water spinach thriving, even when you’re away. Say goodbye to dried-out soil and hello to a bountiful harvest! This water spinach self watering DIY is perfect for beginners and experienced gardeners alike. Let’s get started!
DIY Self-Watering Water Spinach Container: Never Forget to Water Again!
Hey there, fellow plant enthusiasts! Are you like me, sometimes a little forgetful when it comes to watering your plants? Or maybe you’re planning a vacation and worried about your leafy greens drying out? Well, fret no more! I’m going to show you how to build a super easy and effective self-watering container specifically designed for growing water spinach (also known as kangkong or ong choy). This method is a game-changer, ensuring your water spinach thrives even when you’re not around to give it daily attention.
What Makes This DIY Special for Water Spinach?
Water spinach is a semi-aquatic plant, meaning it loves moisture! While it can grow in regular soil, it absolutely *thrives* in consistently damp conditions. This self-watering container provides that perfect environment, mimicking its natural habitat and leading to faster growth and more abundant harvests. Plus, it’s a great way to recycle materials and reduce your environmental footprint.
Materials You’ll Need
Before we dive in, let’s gather our supplies. Don’t worry, most of these are easily accessible and relatively inexpensive.
* **Two Plastic Containers:**
* One large container (approximately 10-20 gallons) – This will be the main reservoir. A storage tote works perfectly.
* One smaller container (approximately 5-10 gallons) that can fit *inside* the larger container with some space around it. A sturdy bucket or another smaller tote will do.
* **Drill with Various Drill Bits:** You’ll need bits suitable for drilling plastic.
* **PVC Pipe (Approximately 1-2 feet):** This will act as our watering tube. Choose a diameter that’s easy to work with (1-2 inches is ideal).
* **PVC Pipe Cap:** To close off the top of the PVC pipe and prevent debris from falling in.
* **Landscape Fabric or Burlap:** To line the smaller container and prevent soil from washing into the reservoir.
* **Potting Mix:** A good quality potting mix that retains moisture well. I recommend a mix specifically formulated for vegetables.
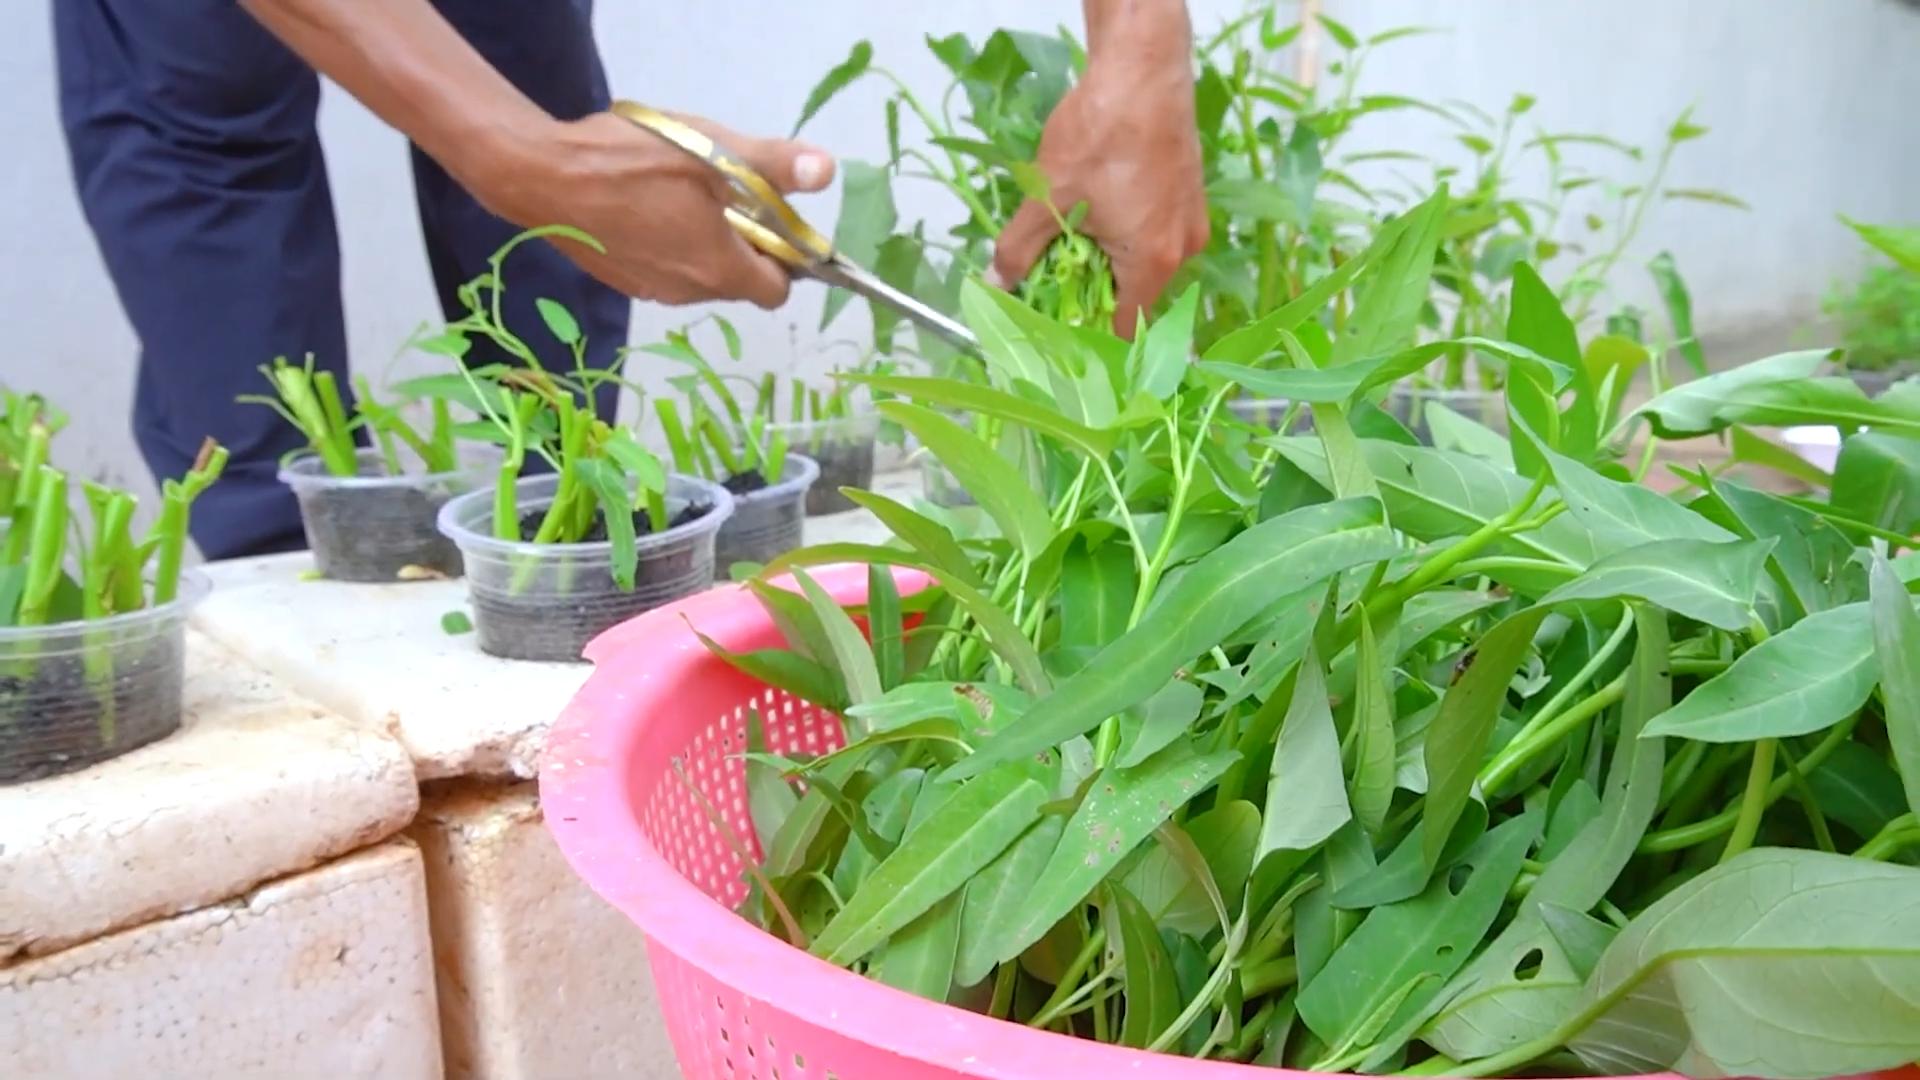
* **Water Spinach Seeds or Cuttings:** Of course, we need something to plant! You can start from seeds or use cuttings from an existing plant.
* **Water:** The lifeblood of our project!
* **Measuring Tape or Ruler:** For accurate measurements.
* **Marker or Pen:** To mark drilling locations.
* **Optional: Decorative Elements:** Paint, stickers, or anything else to personalize your container.
Step-by-Step Instructions: Building Your Self-Watering Container
Alright, let’s get our hands dirty! Follow these steps carefully, and you’ll have your self-watering water spinach container ready in no time.
1. **Prepare the Inner Container (Planting Container):**
* First, we need to create drainage holes in the *bottom* of the smaller container. This is crucial for allowing water to wick up into the soil.
* Using your drill and a medium-sized drill bit (around 1/4 inch), drill several holes (about 10-15) evenly spaced across the bottom of the container. Don’t make them too big, or the soil will fall through.
* Next, we need to drill holes around the *sides* of the smaller container, near the bottom. These holes will allow water to flow from the reservoir into the planting container.
* Measure about 2-3 inches from the bottom of the container and mark several points around the circumference.
* Using a slightly smaller drill bit than the drainage holes (around 1/8 inch), drill holes at each marked point. Again, space them evenly. Aim for about 8-10 holes.
* Now, line the inside of the smaller container with landscape fabric or burlap. This will prevent the potting mix from washing out through the drainage holes and clogging the reservoir. Make sure the fabric covers the bottom and sides completely. You can secure it with a few dabs of hot glue if needed, but it’s usually not necessary.
2. **Prepare the Outer Container (Reservoir):**
* The outer container will act as our water reservoir. We don’t need to drill any holes in the bottom of this container.
* However, we *do* need to create a hole for the PVC pipe. This pipe will allow us to easily refill the reservoir without disturbing the plants.
* Choose a location on the side of the outer container, near the top. Make sure it’s easily accessible.
* Using a drill bit that’s slightly larger than the diameter of your PVC pipe, drill a hole at the chosen location.
* Insert the PVC pipe into the hole. It should fit snugly. You can use a waterproof sealant around the pipe if you want to ensure a completely watertight seal, but it’s usually not necessary.
3. **Assemble the Container:**
* Place the smaller container (the planting container) *inside* the larger container (the reservoir). Make sure it sits securely and there’s enough space around it for water to fill the reservoir.
* The bottom of the smaller container should be elevated slightly above the bottom of the larger container. This creates the reservoir space. If the smaller container sits directly on the bottom, you can place bricks, rocks, or pieces of wood underneath it to raise it up.
4. **Add the Potting Mix:**
* Now it’s time to fill the smaller container with potting mix. Use a good quality potting mix that retains moisture well.
* Fill the container almost to the top, leaving about an inch or two of space.
* Gently press down on the potting mix to compact it slightly.
5. **Plant Your Water Spinach:**
* If you’re starting from seeds, sow them according to the instructions on the seed packet. Usually, you’ll need to make small holes in the potting mix and sprinkle the seeds in, then cover them lightly with soil.
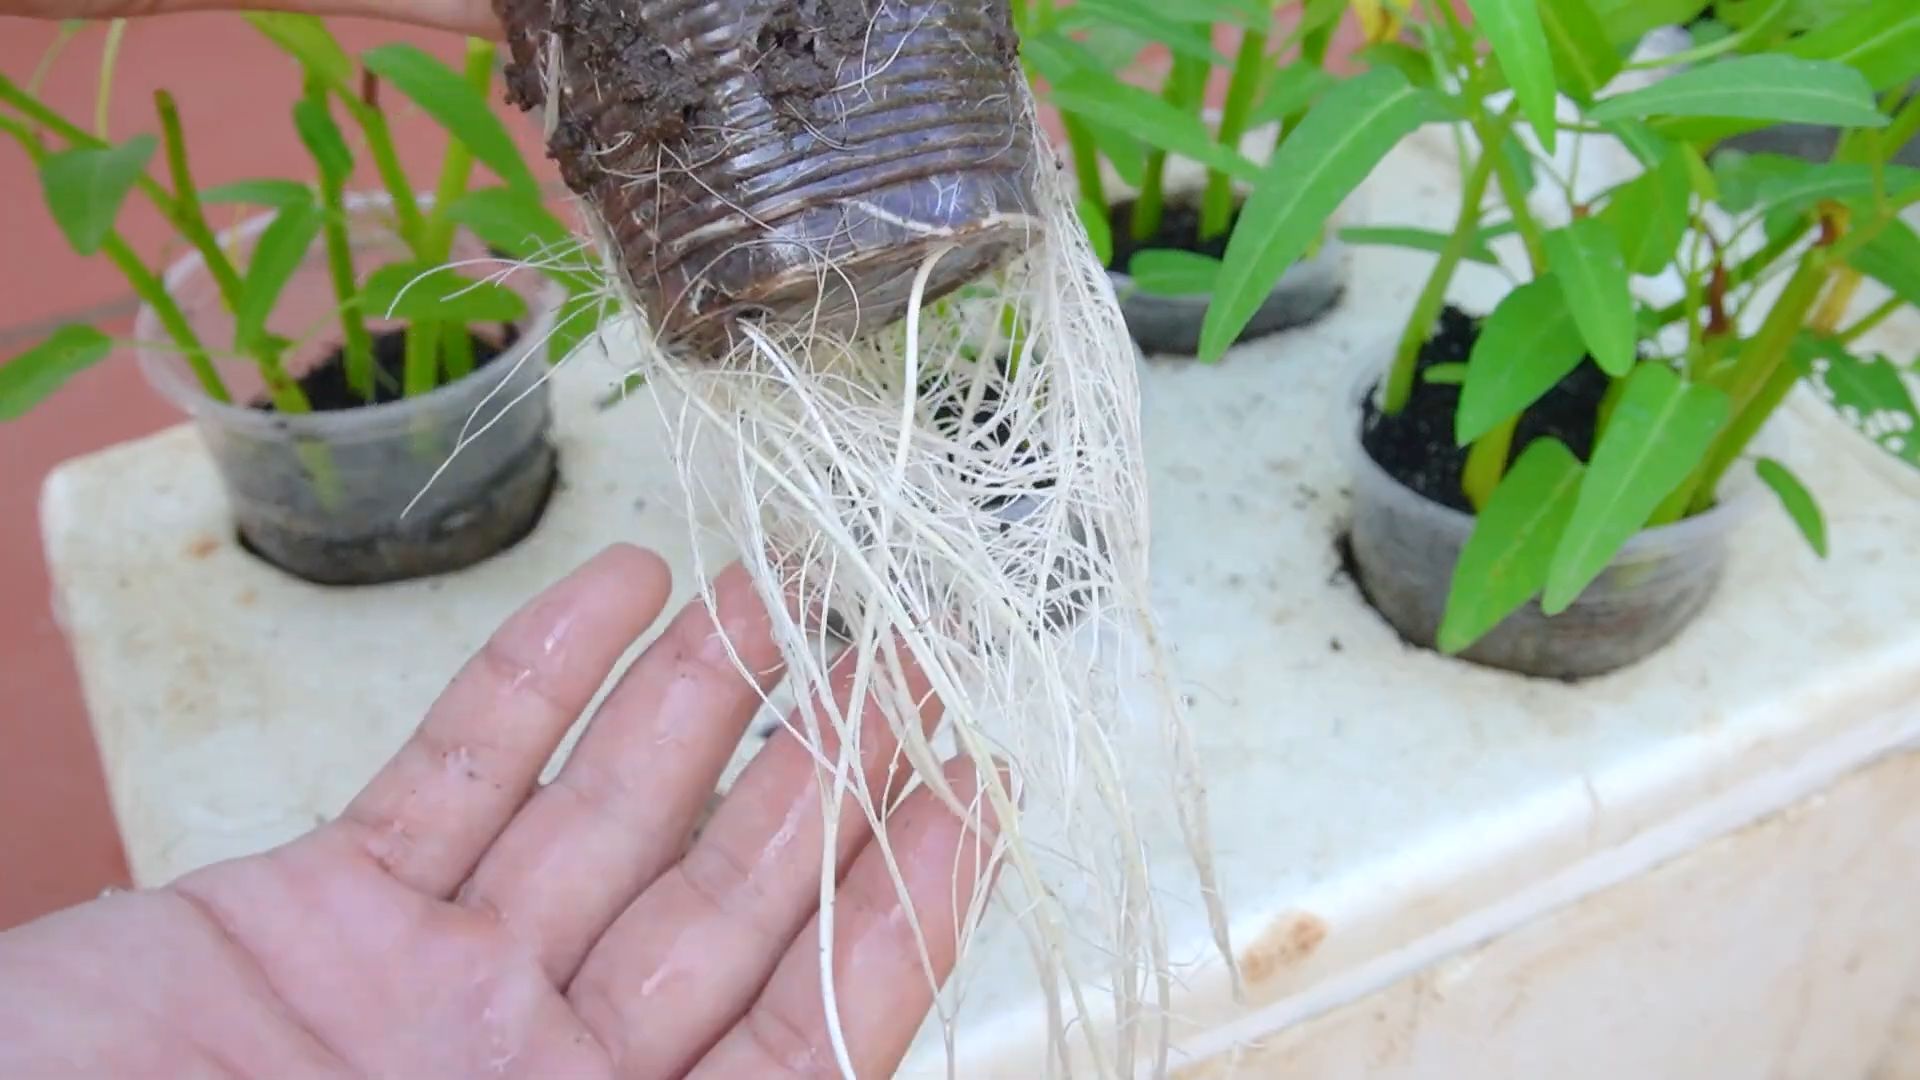
* If you’re using cuttings, make sure they have a few nodes (the points where leaves grow). Plant the cuttings in the potting mix, burying the nodes.
* Water the potting mix gently after planting.
6. **Fill the Reservoir:**
* Now, pour water into the PVC pipe until the reservoir is full. You’ll see the water level rising in the space between the two containers.
* Cap the PVC pipe to prevent debris from falling in.
7. **Placement and Care:**
* Place your self-watering water spinach container in a sunny location. Water spinach needs at least 6 hours of sunlight per day.
* Check the water level in the reservoir regularly, especially during hot weather. Refill as needed.
* Fertilize your water spinach every few weeks with a balanced liquid fertilizer.
* Harvest your water spinach regularly by cutting off the stems and leaves. This will encourage new growth.
Troubleshooting Tips
* **Soil Too Wet:** If the soil seems consistently waterlogged, you may have too many drainage holes in the smaller container. Try adding another layer of landscape fabric to slow down the wicking process.
* **Soil Too Dry:** If the soil is drying out too quickly, make sure the drainage holes in the sides of the smaller container are not clogged. Also, ensure that the reservoir is full of water. You might also need to use a more moisture-retentive potting mix.
* **Algae Growth:** Algae can sometimes grow in the reservoir, especially if it’s exposed to sunlight. This is usually not a problem, but if you’re concerned, you can add a small amount of hydrogen peroxide to the water to kill the algae. You can also paint the outside of the outer container to block sunlight.
* **Pest Problems:** Keep an eye out for common garden pests like aphids and spider mites. Treat them with an appropriate insecticide or organic pest control method.
Harvesting Your Water Spinach
One of the best things about growing your own water spinach is the fresh, delicious harvests! You can start harvesting your water spinach about 4-6 weeks after planting. Simply cut off the stems and leaves, leaving a few inches of the stem intact. The plant will continue to grow and produce new shoots. Harvest regularly to encourage bushier growth and prevent the plant from going to seed.
Enjoy Your Homegrown Water Spinach!
And there you have it! A simple, effective, and eco-friendly way to grow your own water spinach. With this self-watering container, you can enjoy fresh, delicious greens all season long, without the worry of forgetting to water. Happy gardening!
Conclusion
So, there you have it! This simple, yet incredibly effective, water spinach self-watering DIY trick is a game-changer for anyone looking to grow this delicious and nutritious vegetable at home, regardless of their gardening experience. We’ve walked you through the steps, highlighting how easy it is to create a self-watering system that will keep your water spinach thriving, even when you’re short on time or prone to forgetting watering schedules.
Why is this a must-try? Because it addresses the most common challenges faced by home gardeners: inconsistent watering. Water spinach, like many leafy greens, needs consistent moisture to flourish. Too little water, and you’ll end up with wilted, bitter leaves. Too much, and you risk root rot. This DIY system provides the perfect balance, ensuring your plants receive the water they need, when they need it, without any guesswork on your part.
Beyond the convenience, this method also promotes healthier, more robust growth. By delivering water directly to the roots, it minimizes water loss through evaporation and reduces the risk of fungal diseases that can spread through wet foliage. You’ll be amazed at how quickly your water spinach grows and how vibrant the leaves become.
But don’t stop there! Feel free to experiment with variations to suit your specific needs and preferences. For example, if you’re growing water spinach in a larger container, you might consider using multiple water bottles or a larger reservoir to ensure adequate water supply. You could also add a slow-release fertilizer to the water reservoir to provide your plants with a continuous source of nutrients. Another variation is to use different types of containers for the water reservoir. Recycled plastic jugs, buckets, or even glass jars can all work well, as long as they are clean and food-safe.
Consider using a soilless growing medium like coco coir or perlite in your container. These mediums retain moisture well and provide excellent drainage, further enhancing the effectiveness of the self-watering system. You can also experiment with different types of wicking materials. While cotton rope is a reliable option, you could also try using strips of felt, nylon rope, or even old t-shirts. The key is to choose a material that is absorbent and durable.
We encourage you to give this water spinach self-watering DIY a try. It’s a cost-effective, eco-friendly, and incredibly rewarding way to grow your own fresh, delicious water spinach at home. Once you’ve set up your system and started harvesting your own homegrown water spinach, we’d love to hear about your experience! Share your photos, tips, and variations in the comments below. Let’s build a community of thriving water spinach growers! We are confident that this simple method will transform your gardening experience and bring you closer to enjoying the freshest, most flavorful water spinach possible. Happy gardening!
Frequently Asked Questions (FAQ)
What type of container is best for growing water spinach with this DIY self-watering system?
The ideal container should be large enough to accommodate the mature size of the water spinach plants and have drainage holes. A container that is at least 12 inches deep and 12 inches in diameter is generally recommended. You can use plastic pots, terracotta pots, or even repurposed containers like buckets or tubs. Just make sure the container is clean and has adequate drainage to prevent waterlogging. Dark-colored containers can absorb more heat, which can be beneficial in cooler climates, but may overheat the soil in hotter regions. Consider using a lighter-colored container or providing shade to the container in hot weather.
How often do I need to refill the water reservoir?
The frequency of refilling the water reservoir depends on several factors, including the size of the container, the size of the water spinach plants, the weather conditions, and the type of growing medium you are using. In general, you should check the water level in the reservoir every few days and refill it when it is about half empty. During hot, dry weather, you may need to refill the reservoir more frequently. Conversely, during cooler, wetter weather, you may need to refill it less often. Observe your plants closely and adjust the watering schedule accordingly. If the leaves start to wilt, it’s a sign that the plants need more water.
What type of water is best for the self-watering system?
Tap water is generally suitable for growing water spinach, but it’s best to let it sit for 24 hours before using it to allow chlorine to evaporate. Rainwater is an excellent alternative, as it is naturally soft and free of chemicals. If you are using well water, have it tested to ensure it is free of contaminants. Avoid using softened water, as it contains high levels of sodium, which can be harmful to plants. You can also add a small amount of diluted liquid fertilizer to the water reservoir to provide your plants with a continuous source of nutrients.
Can I use this self-watering system for other plants besides water spinach?
Yes, this self-watering system can be adapted for use with other plants that require consistent moisture, such as herbs, vegetables, and flowers. However, it’s important to consider the specific needs of each plant. Some plants prefer drier conditions, while others require more frequent watering. Adjust the size of the water reservoir and the type of wicking material accordingly. For plants that are more sensitive to overwatering, use a well-draining growing medium and monitor the moisture levels closely.
What if the wicking material isn’t drawing enough water?
If you notice that the wicking material isn’t drawing enough water to keep the soil moist, there are a few things you can try. First, make sure the wicking material is in direct contact with both the soil and the water reservoir. You may need to adjust the position of the wicking material to ensure good contact. Second, try using a thicker or more absorbent wicking material. Cotton rope, strips of felt, or even old t-shirts can all work well. Third, make sure the water reservoir is positioned below the level of the soil. This will help to create a siphon effect that draws water up through the wicking material. Finally, if the soil is compacted, it may be preventing the water from wicking properly. Loosen the soil around the base of the plants to improve water absorption.
How do I prevent algae growth in the water reservoir?
Algae growth in the water reservoir is a common problem, especially in sunny locations. To prevent algae growth, use an opaque container for the water reservoir to block out sunlight. You can also add a small amount of hydrogen peroxide to the water reservoir to kill algae. A concentration of 3% hydrogen peroxide is generally safe for plants. Add about 1 teaspoon of hydrogen peroxide per gallon of water. Alternatively, you can use a commercial algae control product that is safe for use in gardens. Regularly clean the water reservoir to remove any algae buildup.
Is this self-watering system suitable for indoor or outdoor growing?
This self-watering system is suitable for both indoor and outdoor growing. When growing water spinach indoors, make sure to provide adequate light. Water spinach requires at least 6 hours of direct sunlight per day. If you don’t have enough natural light, you can supplement with grow lights. When growing water spinach outdoors, choose a location that receives full sun and is protected from strong winds. In hot climates, provide some afternoon shade to prevent the plants from overheating.
How do I harvest water spinach grown with this system?
You can start harvesting water spinach about 4-6 weeks after planting. To harvest, simply cut the stems about 6 inches above the soil line. The plants will continue to produce new shoots and leaves, allowing you to harvest multiple times. Regular harvesting encourages bushier growth and prevents the plants from becoming leggy. Water spinach is best eaten fresh, but it can also be stored in the refrigerator for a few days.


Leave a Comment