
Winter Kale Container Gardening: sounds intimidating, right? But trust me, it’s not! Imagine stepping outside on a crisp winter morning and harvesting fresh, vibrant kale right from your patio. No more sad, wilted greens from the grocery store! This DIY guide will unlock the secrets to successfully growing kale in containers, even when the snow is falling.
Kale, a nutritional powerhouse, has been cultivated for over 2,000 years, with roots tracing back to the eastern Mediterranean. It was a staple food in ancient Rome and throughout Europe. Today, its popularity is soaring, and for good reason! It’s packed with vitamins, minerals, and antioxidants, making it a fantastic addition to any diet. But who wants to brave the cold to tend a sprawling garden in the winter? That’s where container gardening comes in!
I know what you’re thinking: “I don’t have a green thumb!” But that’s okay! This article is designed for beginners. We’ll break down everything you need to know, from choosing the right container and soil to protecting your kale from frost. With a few simple tricks and hacks, you can enjoy fresh, homegrown kale all winter long. Winter Kale Container Gardening is not only possible, but it’s also incredibly rewarding. Let’s get started and transform your balcony or patio into a winter garden oasis!
DIY Winter Kale Container Garden: A Step-by-Step Guide
Hey there, fellow gardening enthusiasts! Winter doesn’t have to mean the end of fresh greens. I’m going to walk you through creating your very own thriving winter kale container garden. It’s easier than you think, and the reward of fresh, homegrown kale during the colder months is totally worth it. Let’s get started!
Choosing Your Kale Varieties
First things first, let’s talk kale! Not all kale is created equal, especially when it comes to winter hardiness. Here are a few of my favorite varieties that hold up well in the cold:
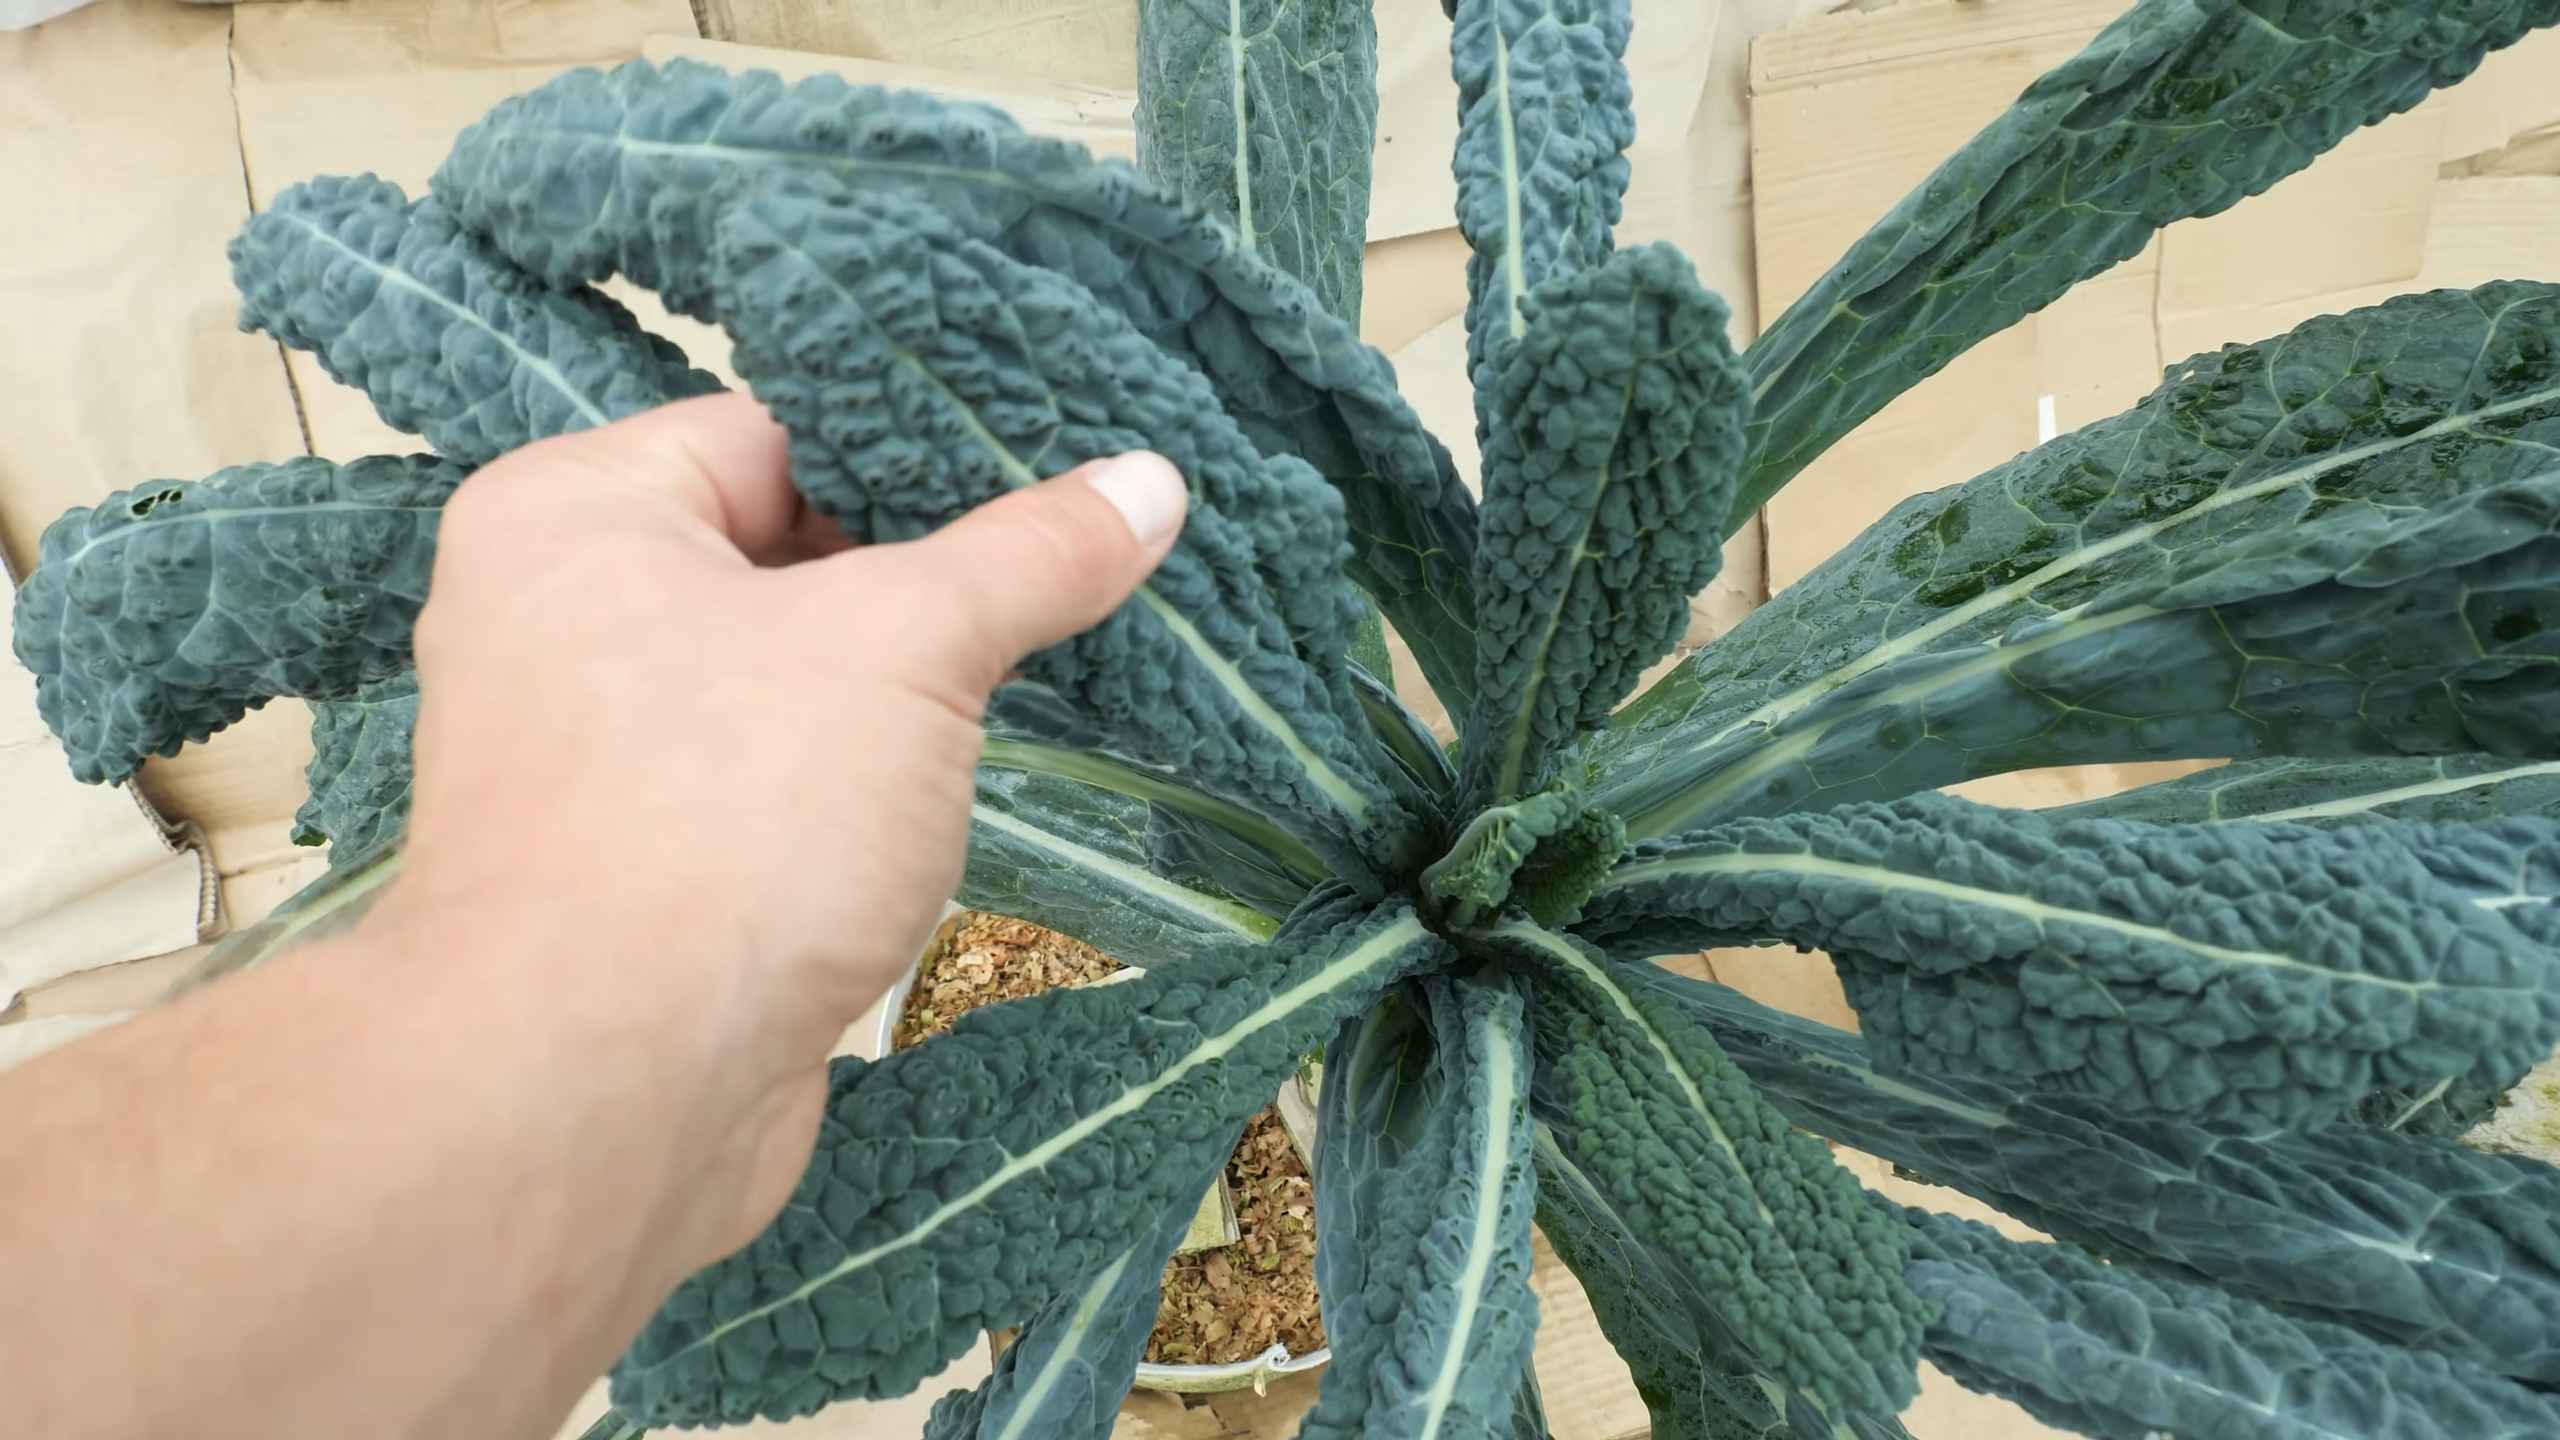
* Lacinato (Dinosaur) Kale: This one’s a classic. It has a slightly nutty flavor and those distinctive, bumpy leaves. It’s super cold-hardy and actually tastes sweeter after a frost!
* Red Russian Kale: This variety is known for its beautiful red stems and slightly milder flavor. It’s also quite cold-tolerant and adds a pop of color to your winter garden.
* Curly Kale: The most common type, curly kale is easy to find and relatively cold-hardy. It has a slightly more bitter flavor than the other two, but it’s still delicious.
* Redbor Kale: If you want a kale that is as beautiful as it is tasty, Redbor is the way to go. Its deep purple leaves get even more vibrant in the cold.
I recommend choosing at least two different varieties for a bit of variety in your salads and cooking.
Gathering Your Supplies
Okay, now that we’ve picked our kale, let’s gather everything we need. Here’s a checklist:
* Containers: You’ll need containers that are at least 12 inches deep and wide. The bigger, the better, as this gives the kale roots plenty of room to grow. Make sure they have drainage holes! I prefer using plastic or resin containers because they retain moisture better than terracotta, which is especially important in the winter.
* Potting Mix: Don’t use garden soil! It’s too heavy and doesn’t drain well in containers. Opt for a high-quality potting mix specifically designed for containers. I like to use a mix that contains peat moss, perlite, and vermiculite for good drainage and aeration.
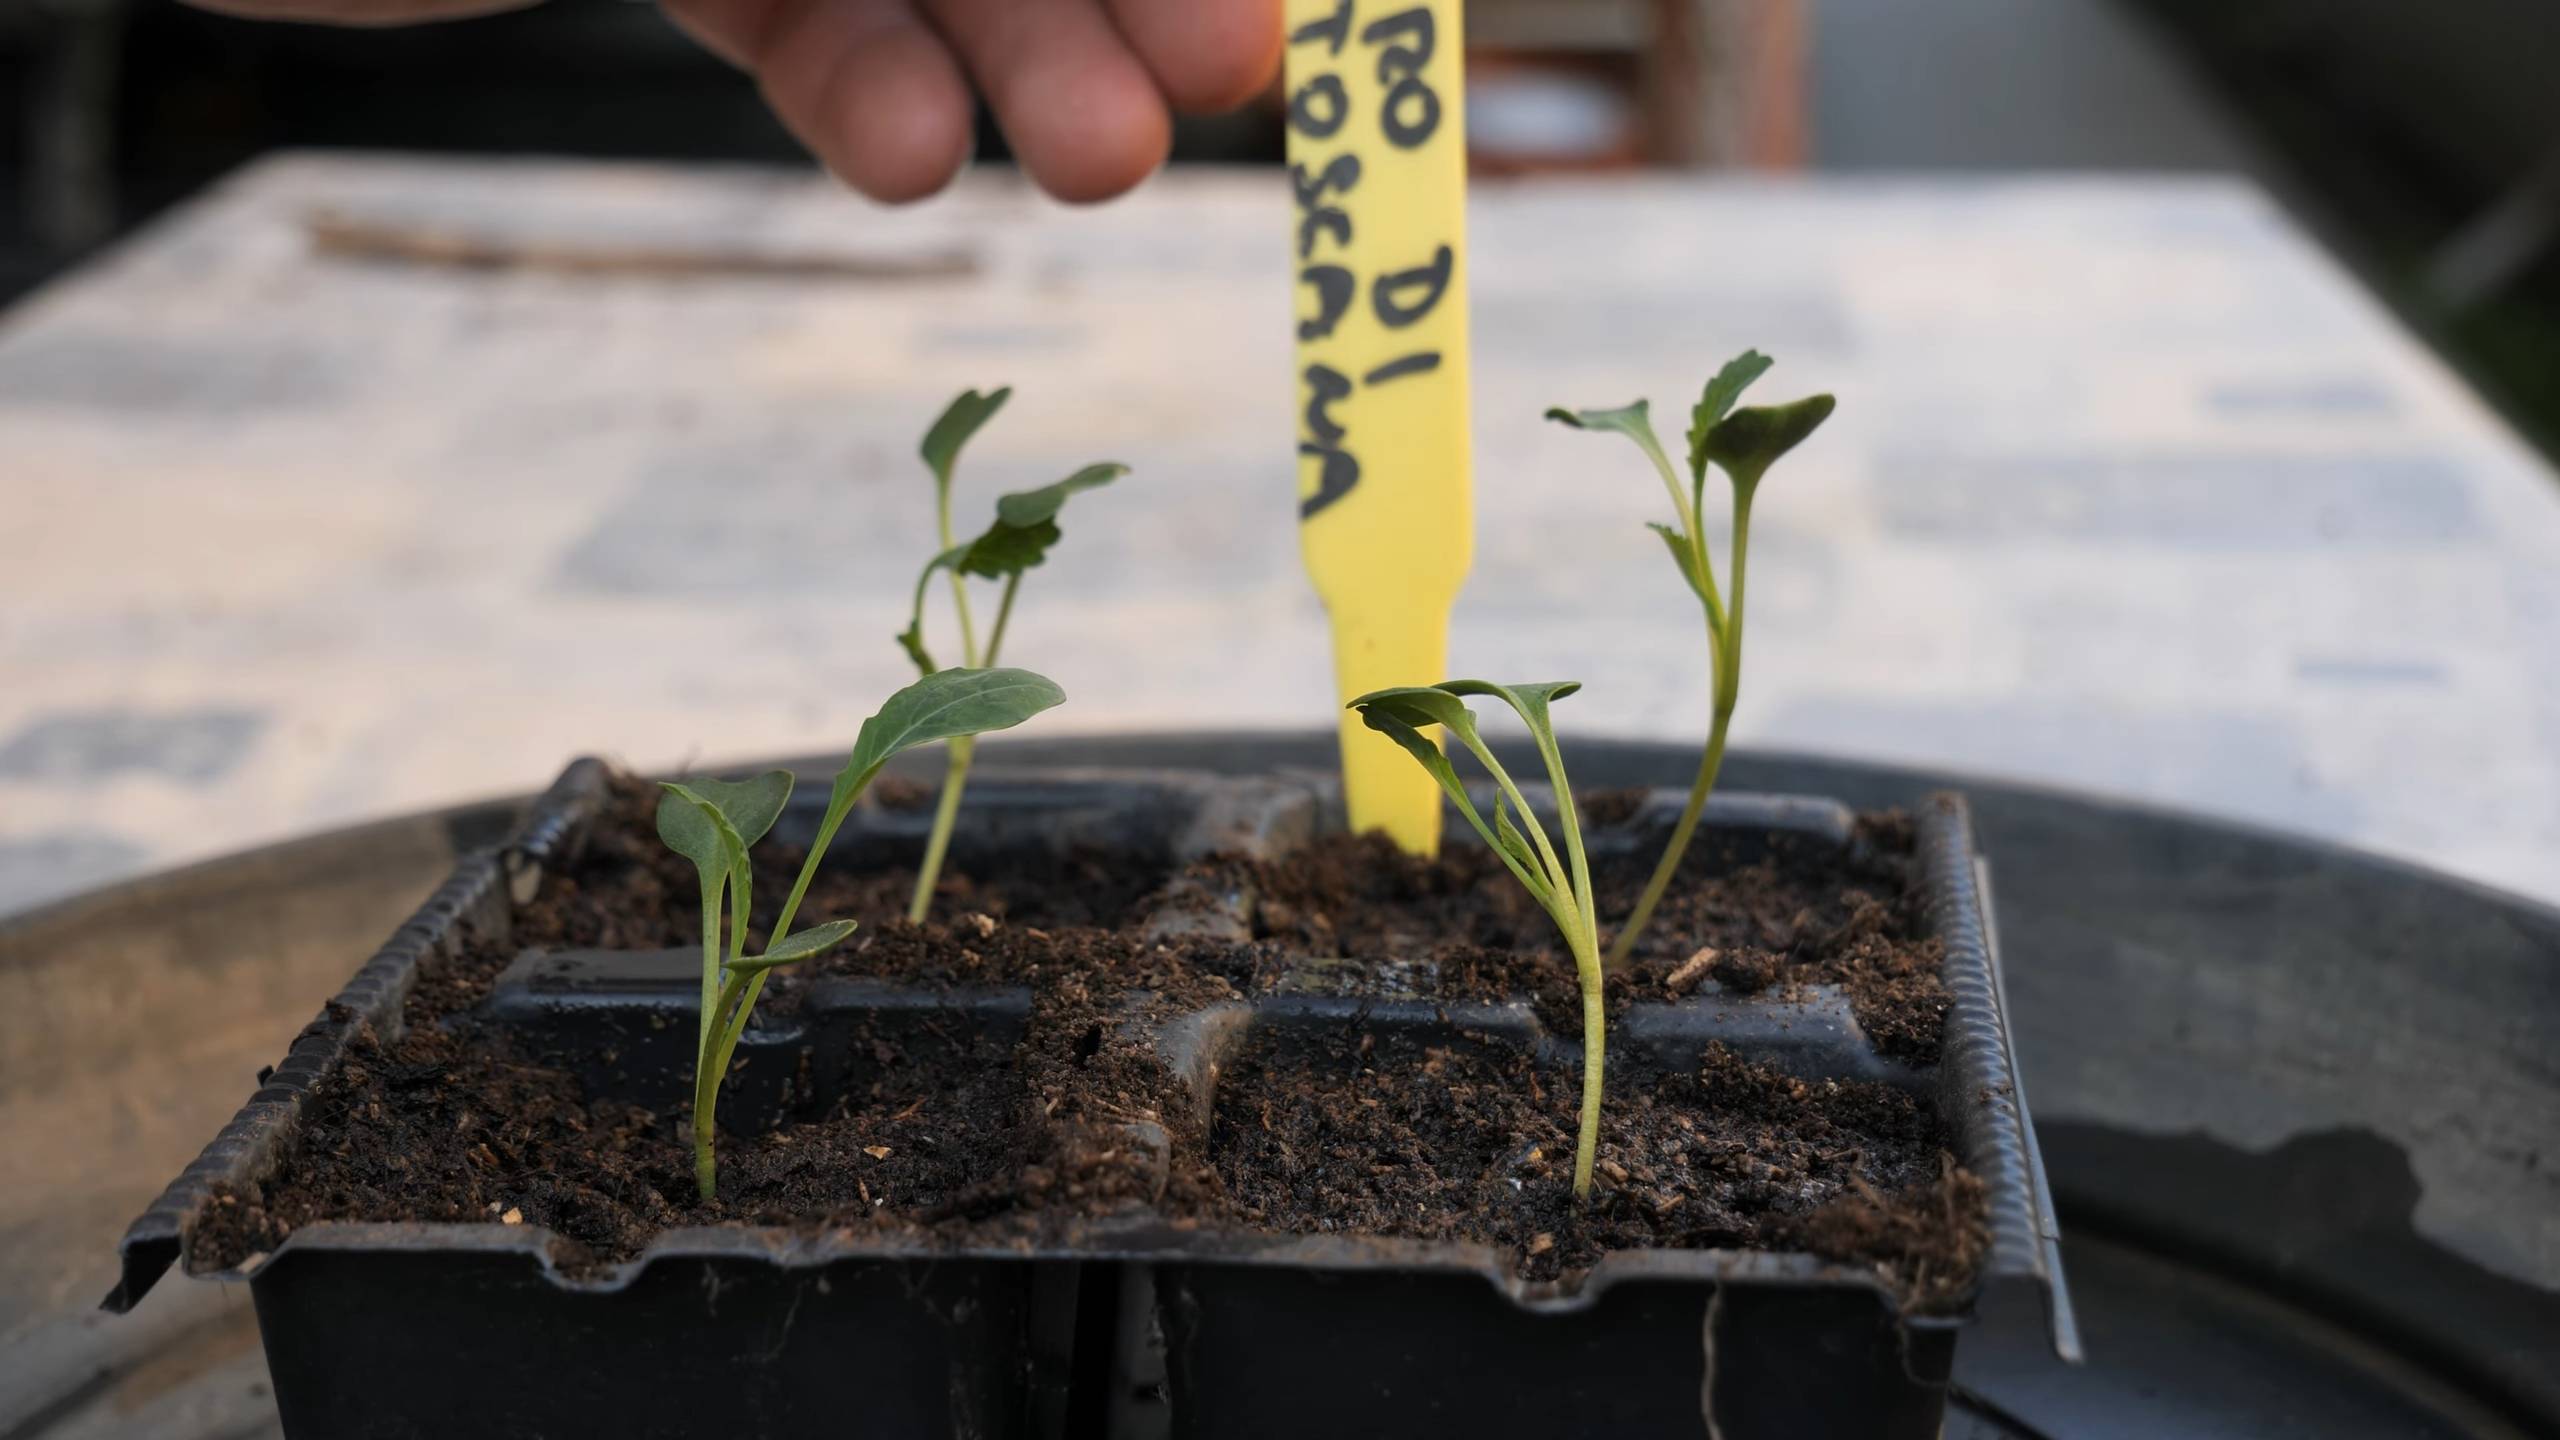
* Kale Seedlings or Seeds: You can either start your kale from seed or buy seedlings from a local nursery. If you’re starting from seed, you’ll need to start them indoors about 6-8 weeks before your first expected frost.
* Slow-Release Fertilizer: Kale is a heavy feeder, so a slow-release fertilizer will provide it with the nutrients it needs throughout the winter. Look for a fertilizer that’s high in nitrogen, which promotes leafy growth.
* Watering Can or Hose: You’ll need something to water your kale. A watering can is great for smaller containers, while a hose is more convenient for larger ones.
* Gardening Gloves: Protect your hands!
* Optional:
* Row Covers or Cold Frames: These can provide extra protection from extreme cold and wind.
* Mulch: A layer of mulch around the base of the plants will help retain moisture and insulate the soil.
* Plant Labels: To keep track of your different kale varieties.
Planting Your Kale
Alright, let’s get our hands dirty! Here’s how to plant your kale:
1. Prepare Your Containers: Fill your containers with potting mix, leaving about an inch or two of space at the top.
2. Add Fertilizer: Sprinkle a slow-release fertilizer evenly over the surface of the potting mix, following the instructions on the package.
3. Plant Your Seedlings: If you’re using seedlings, gently remove them from their pots and loosen the roots a bit. Dig a hole in the potting mix that’s large enough to accommodate the root ball. Place the seedling in the hole and backfill with potting mix, gently firming the soil around the base of the plant. Space the seedlings about 12-18 inches apart.
4. Sow Your Seeds (If Starting from Seed): If you’re starting from seed, sow the seeds about 1/4 inch deep and 1 inch apart. Once the seedlings emerge, thin them out to about 12-18 inches apart, keeping the strongest seedlings.
5. Water Thoroughly: Water your kale thoroughly after planting, until the water drains out of the drainage holes.
6. Label Your Plants: If you’re growing multiple varieties, label each container so you know which is which.
Caring for Your Winter Kale Garden
Now that your kale is planted, it’s time to take care of it! Here’s what you need to do:
1. Watering: Water your kale regularly, especially during dry spells. The soil should be consistently moist, but not soggy. Check the soil moisture by sticking your finger into the soil. If the top inch feels dry, it’s time to water. In winter, you may need to water less frequently than in the summer, as the soil will dry out more slowly. I usually water every 1-2 weeks, depending on the weather.
2. Sunlight: Kale needs at least 6 hours of sunlight per day to thrive. Place your containers in a sunny location. If you live in an area with very short days in the winter, you may need to supplement with grow lights.
3. Fertilizing: Kale is a heavy feeder, so you’ll need to fertilize it regularly. If you used a slow-release fertilizer at planting time, you may not need to fertilize again until mid-winter. Otherwise, fertilize every 2-3 weeks with a liquid fertilizer that’s high in nitrogen.
4. Pest Control: Kale is relatively pest-resistant, but it can be susceptible to aphids, cabbage worms, and slugs. Check your plants regularly for pests and take action if you see any. You can usually control aphids with a strong spray of water. Cabbage worms can be handpicked off the plants. Slugs can be controlled with slug bait or by handpicking them at night.
5. Protecting from Cold: Kale is cold-hardy, but it can still be damaged by extreme cold. If you live in an area with very cold winters, you may need to protect your kale with row covers or cold frames. Row covers are lightweight fabric covers that you can place over your plants. Cold frames are small, enclosed structures that provide extra protection from the cold. You can also mulch around the base of the plants to help insulate the soil.
6. Harvesting: You can start harvesting kale leaves as soon as they’re big enough to eat. Simply cut off the outer leaves, leaving the inner leaves to continue growing. This will encourage the plant to produce more leaves. I like to harvest a few leaves from each plant at a time, rather than harvesting all the leaves from one plant. This ensures that I always have a supply of fresh kale.
Troubleshooting
Even with the best care, you might encounter a few problems with your winter kale garden. Here are some common issues and how to fix them:
* Yellowing Leaves: This can be caused by a number of factors, including overwatering, underwatering, nutrient deficiencies, or pests. Check the soil moisture and adjust your watering accordingly. Fertilize your kale with a balanced fertilizer. Inspect your plants for pests and take action if you see any.
* Stunted Growth: This can be caused by a lack of sunlight, nutrient deficiencies, or rootbound plants. Make sure your kale is getting enough sunlight. Fertilize your kale with a balanced fertilizer. If your plants
Hey there, fellow gardening enthusiasts! Winter doesn’t have to mean the end of fresh greens. I’m going to walk you through creating your very own thriving winter kale container garden. It’s easier than you think, and the reward of fresh, homegrown kale during the colder months is totally worth it. Let’s get started!
Choosing Your Kale Varieties
First things first, let’s talk kale! Not all kale is created equal, especially when it comes to winter hardiness. Here are a few of my favorite varieties that hold up well in the cold:
* Lacinato (Dinosaur) Kale: This one’s a classic. It has a slightly nutty flavor and those distinctive, bumpy leaves. It’s super cold-hardy and actually tastes sweeter after a frost!
* Red Russian Kale: This variety is known for its beautiful red stems and slightly milder flavor. It’s also quite cold-tolerant and adds a pop of color to your winter garden.
* Curly Kale: The most common type, curly kale is easy to find and relatively cold-hardy. It has a slightly more bitter flavor than the other two, but it’s still delicious.
* Redbor Kale: If you want a kale that is as beautiful as it is tasty, Redbor is the way to go. Its deep purple leaves get even more vibrant in the cold.
I recommend choosing at least two different varieties for a bit of variety in your salads and cooking.
Gathering Your Supplies
Okay, now that we’ve picked our kale, let’s gather everything we need. Here’s a checklist:
* Containers: You’ll need containers that are at least 12 inches deep and wide. The bigger, the better, as this gives the kale roots plenty of room to grow. Make sure they have drainage holes! I prefer using plastic or resin containers because they retain moisture better than terracotta, which is especially important in the winter.
* Potting Mix: Don’t use garden soil! It’s too heavy and doesn’t drain well in containers. Opt for a high-quality potting mix specifically designed for containers. I like to use a mix that contains peat moss, perlite, and vermiculite for good drainage and aeration.
* Kale Seedlings or Seeds: You can either start your kale from seed or buy seedlings from a local nursery. If you’re starting from seed, you’ll need to start them indoors about 6-8 weeks before your first expected frost.
* Slow-Release Fertilizer: Kale is a heavy feeder, so a slow-release fertilizer will provide it with the nutrients it needs throughout the winter. Look for a fertilizer that’s high in nitrogen, which promotes leafy growth.
* Watering Can or Hose: You’ll need something to water your kale. A watering can is great for smaller containers, while a hose is more convenient for larger ones.
* Gardening Gloves: Protect your hands!
* Optional:
* Row Covers or Cold Frames: These can provide extra protection from extreme cold and wind.
* Mulch: A layer of mulch around the base of the plants will help retain moisture and insulate the soil.
* Plant Labels: To keep track of your different kale varieties.
Planting Your Kale
Alright, let’s get our hands dirty! Here’s how to plant your kale:
1. Prepare Your Containers: Fill your containers with potting mix, leaving about an inch or two of space at the top.
2. Add Fertilizer: Sprinkle a slow-release fertilizer evenly over the surface of the potting mix, following the instructions on the package.
3. Plant Your Seedlings: If you’re using seedlings, gently remove them from their pots and loosen the roots a bit. Dig a hole in the potting mix that’s large enough to accommodate the root ball. Place the seedling in the hole and backfill with potting mix, gently firming the soil around the base of the plant. Space the seedlings about 12-18 inches apart.
4. Sow Your Seeds (If Starting from Seed): If you’re starting from seed, sow the seeds about 1/4 inch deep and 1 inch apart. Once the seedlings emerge, thin them out to about 12-18 inches apart, keeping the strongest seedlings.
5. Water Thoroughly: Water your kale thoroughly after planting, until the water drains out of the drainage holes.
6. Label Your Plants: If you’re growing multiple varieties, label each container so you know which is which.
Caring for Your Winter Kale Garden
Now that your kale is planted, it’s time to take care of it! Here’s what you need to do:
1. Watering: Water your kale regularly, especially during dry spells. The soil should be consistently moist, but not soggy. Check the soil moisture by sticking your finger into the soil. If the top inch feels dry, it’s time to water. In winter, you may need to water less frequently than in the summer, as the soil will dry out more slowly. I usually water every 1-2 weeks, depending on the weather.
2. Sunlight: Kale needs at least 6 hours of sunlight per day to thrive. Place your containers in a sunny location. If you live in an area with very short days in the winter, you may need to supplement with grow lights.
3. Fertilizing: Kale is a heavy feeder, so you’ll need to fertilize it regularly. If you used a slow-release fertilizer at planting time, you may not need to fertilize again until mid-winter. Otherwise, fertilize every 2-3 weeks with a liquid fertilizer that’s high in nitrogen.
4. Pest Control: Kale is relatively pest-resistant, but it can be susceptible to aphids, cabbage worms, and slugs. Check your plants regularly for pests and take action if you see any. You can usually control aphids with a strong spray of water. Cabbage worms can be handpicked off the plants. Slugs can be controlled with slug bait or by handpicking them at night.
5. Protecting from Cold: Kale is cold-hardy, but it can still be damaged by extreme cold. If you live in an area with very cold winters, you may need to protect your kale with row covers or cold frames. Row covers are lightweight fabric covers that you can place over your plants. Cold frames are small, enclosed structures that provide extra protection from the cold. You can also mulch around the base of the plants to help insulate the soil.
6. Harvesting: You can start harvesting kale leaves as soon as they’re big enough to eat. Simply cut off the outer leaves, leaving the inner leaves to continue growing. This will encourage the plant to produce more leaves. I like to harvest a few leaves from each plant at a time, rather than harvesting all the leaves from one plant. This ensures that I always have a supply of fresh kale.
Troubleshooting
Even with the best care, you might encounter a few problems with your winter kale garden. Here are some common issues and how to fix them:
* Yellowing Leaves: This can be caused by a number of factors, including overwatering, underwatering, nutrient deficiencies, or pests. Check the soil moisture and adjust your watering accordingly. Fertilize your kale with a balanced fertilizer. Inspect your plants for pests and take action if you see any.
* Stunted Growth: This can be caused by a lack of sunlight, nutrient deficiencies, or rootbound plants. Make sure your kale is getting enough sunlight. Fertilize your kale with a balanced fertilizer. If your plants are rootbound, transplant them into larger containers.
* Holes in Leaves: This is usually caused by cabbage worms or slugs. Handpick the pests off the plants or use an appropriate pest control method.
* Bolting (Flowering): Kale can bolt (flower) if it’s exposed to prolonged periods of cold weather or if it’s stressed. Once kale bolts, the leaves become bitter. To prevent bolting, protect your kale from extreme cold and make sure it’s getting enough water and nutrients. If your kale does bolt, you can still eat the flowers, but the leaves will be less palatable.
Enjoying Your Winter Kale Harvest
The best part of growing your own winter kale is, of course, enjoying the harvest! Fresh kale is incredibly versatile and can be used in a variety of dishes. Here are a few of my favorite ways to use winter kale:
* Salads: Massage kale leaves with olive oil and lemon juice to tenderize them, then add your favorite toppings.
* Smoothies: Add a handful of kale to your favorite smoothie for a boost of nutrients.
* Soups and Stews: Kale adds a hearty and nutritious element to soups and stews.
* Sautéed: Sauté kale with garlic and olive oil for a simple and delicious side dish.
*
Conclusion
So, there you have it! Mastering winter kale container gardening is not only achievable, but it’s also incredibly rewarding. Imagine stepping outside on a crisp winter morning and harvesting fresh, vibrant kale right from your own patio. No more relying on wilted, overpriced greens from the grocery store. This DIY trick empowers you to enjoy nutrient-rich, homegrown kale throughout the colder months, adding a burst of flavor and health to your winter meals.
But why is this a must-try? Beyond the obvious benefits of fresh, organic produce, winter kale container gardening offers a unique connection to nature during a time when many gardens are dormant. It’s a therapeutic activity, a visual delight, and a fantastic way to extend your growing season. Plus, it’s surprisingly easy and adaptable to various space constraints.
Consider these variations to personalize your winter kale container gardening experience:
* Variety is the Spice of Life: Experiment with different kale varieties! Red Russian kale offers a milder flavor and beautiful purple stems, while Lacinato (dinosaur) kale provides a more robust, earthy taste. Curly kale is a classic choice, known for its frilly leaves and versatility.
* Companion Planting: Maximize your container space by planting companion herbs like thyme, rosemary, or sage alongside your kale. These herbs not only add flavor to your cooking but also help deter pests.
* Container Customization: While we’ve focused on basic container gardening, feel free to get creative with your container choices. Upcycled buckets, repurposed planters, or even fabric grow bags can all work beautifully. Just ensure proper drainage.
* Extend the Season Further: For even colder climates, consider using a cold frame or mini greenhouse to provide extra protection for your kale plants. This can significantly extend your harvest window.
* Fertilizer Options: While slow-release fertilizer is a great option, you can also use liquid fertilizers every few weeks to give your kale a boost. Look for organic options like fish emulsion or seaweed extract.
Don’t be intimidated by the thought of gardening in winter. With a little planning and effort, you can successfully grow your own delicious kale and enjoy the satisfaction of harvesting fresh produce even when the weather outside is frightful.
We wholeheartedly encourage you to give this DIY trick a try. Start small, experiment with different techniques, and most importantly, have fun! We’re confident that you’ll be amazed by the results.
And now, we want to hear from you! Share your experiences with winter kale container gardening in the comments below. What varieties did you grow? What challenges did you face? What tips and tricks did you discover? Your insights will help other gardeners succeed and inspire even more people to embrace the joys of winter gardening. Let’s build a community of winter kale enthusiasts!
Frequently Asked Questions (FAQ)
What is the best time to start winter kale container gardening?
The ideal time to start your winter kale container gardening depends on your climate. In general, you should aim to plant your kale seedlings or seeds about 6-8 weeks before the first expected frost. This allows the plants to establish themselves before the cold weather sets in. For milder climates, you can plant later in the fall or even early winter. Check your local frost dates to determine the best planting time for your region.
What type of container is best for growing winter kale?
The best type of container for growing winter kale is one that is at least 12 inches deep and wide. This provides enough space for the roots to grow and develop. Choose a container made of durable material that can withstand the cold weather, such as plastic, ceramic, or wood. Make sure the container has drainage holes to prevent waterlogging, which can be detrimental to kale plants.
What kind of soil should I use for winter kale container gardening?
Use a well-draining potting mix that is rich in organic matter. Avoid using garden soil, as it can become compacted in containers and hinder drainage. You can amend your potting mix with compost or other organic materials to improve its fertility and water-holding capacity. A slightly acidic to neutral pH (around 6.0 to 7.0) is ideal for kale.
How much sunlight does winter kale need?
Kale needs at least 6 hours of sunlight per day to thrive. In winter, sunlight can be limited, so choose a location for your container that receives the most sunlight possible. If you don’t have a sunny spot, you can supplement with grow lights. Rotate the container regularly to ensure that all sides of the plant receive adequate sunlight.
How often should I water my winter kale?
Water your winter kale regularly, but avoid overwatering. The soil should be consistently moist but not soggy. Check the soil moisture by sticking your finger into the soil. If the top inch feels dry, it’s time to water. Water deeply, allowing the water to drain out of the drainage holes. Reduce watering frequency during periods of heavy rain or snow.
Do I need to fertilize my winter kale?
Yes, kale benefits from regular fertilization, especially during the winter months when growth can be slow. Use a slow-release fertilizer at planting time, and then supplement with liquid fertilizer every few weeks. Choose a fertilizer that is high in nitrogen, which promotes leafy growth. Organic options like fish emulsion or seaweed extract are excellent choices.
How do I protect my winter kale from frost and freezing temperatures?
There are several ways to protect your winter kale from frost and freezing temperatures. You can cover the container with a frost blanket or burlap sack when frost is predicted. Move the container to a sheltered location, such as a garage or shed, during extreme cold snaps. You can also use a cold frame or mini greenhouse to provide extra protection.
When is winter kale ready to harvest?
Winter kale is ready to harvest when the leaves are about 4-6 inches long. You can harvest individual leaves as needed, starting with the outer leaves. Avoid harvesting more than one-third of the plant at a time to allow it to continue growing. Kale leaves tend to become sweeter and more flavorful after a frost.
What are some common pests and diseases that affect winter kale?
Common pests that affect winter kale include aphids, cabbage worms, and flea beetles. You can control these pests by handpicking them off the plants, using insecticidal soap, or applying neem oil. Common diseases include downy mildew and black rot. Prevent these diseases by providing good air circulation, avoiding overwatering, and removing any infected leaves.
Can I grow other vegetables in the same container as winter kale?
Yes, you can grow other vegetables in the same container as winter kale, as long as they have similar growing requirements. Good companion plants for kale include herbs like thyme, rosemary, and sage, as well as radishes and onions. Avoid planting kale with members of the brassica family, such as broccoli and cabbage, as they can compete for nutrients and attract the same pests and diseases.
Leave a Comment